
Content
Page Table of Contents
About the Author
Hot Topics
DBAN (Darik's Boot and Nuke) is reliable for erasing sensitive information from storage devices. However, users may encounter a common hurdle – DBAN not booting from USB on Windows. This challenge can impede the crucial data erasure process and lead to frustration among users seeking a secure wipe of their storage media.
EaseUS will illuminate the situation and equip you with practical solutions to resolve the issue. This post explores potential causes and methods to get your USB drive recognized and DBAN up and running, ultimately leading you to a successful data wipe. Follow along and discover how to overcome this hurdle and restore your peace of mind.
Why & How to Fix DBAN Not Booting From USB?
There are various solutions to fix DBAN not booting from USB, and multiple causes lead to this issue. In this section, you'll learn why DBAN not booting from USB and how to fix it practically.
1. Why DBAN Not Booting From USB
Let's first understand why DBAN not booting from USB:
- Incorrect BIOS Boot Order: If your BIOS prioritizes other devices like your hard drive, DBAN won't get its turn.
- Wrong USB Port: Damaged or incompatible USB ports can hinder communication, leaving DBAN in the dark.
- Multiple Connected Boot Devices: A crowded USB arena can create confusion, leading your system to overlook the DBAN drive.
- Outdated BIOS: An outdated BIOS might need more features to recognize your bootable USB drive.
You May Also Like:
2. How to Fix DBAN Not Booting From USB
Before starting the process to fix the issue, ensure you have the following:
- A computer with the DBAN tool was downloaded.
- A FAT32 USB drive with sufficient storage for creating a bootable device.
- Note:
- Ensure the DBAN bootable USB's file system is FAT32. Format the USB to FAT32 if the builder doesn't do it automatically. Back up crucial files on the USB and the target hard drive before wiping them to prevent data loss.
💡Extended Reading: How to Format the USB to FAT32.
Way 1. Remove Other Bootable USB Devices
Disconnect any other bootable USB devices and leave only the DBAN bootable USB connected. If multiple bootable USB drives are connected to your PC, it can be clear for the system to determine the correct one to boot from. If the system selects the wrong bootable drive, it can prevent DBAN from booting from USB. To resolve this, disconnect all USB drives and leave only the DBAN bootable drive connected to ensure proper booting.
Way 2. Recreate DBAN Bootable Device
When facing the DBAN bootable USB not working issue, it suggests an issue with the current boot device. Resolve by creating a new DBAN bootable USB. Ensure success by using an alternative boot media creator.
Follow the steps:
Step 1. Visit the official DBAN website and click the "Download DBAN" button to download it.
Step 2. Initiate the download of the DBAN ISO file by clicking Download in the following window.
Step 3. After downloading, store the DBAN file in an accessible location, like the Desktop.
Step 4. Connect the designated USB flash drive to your computer. Visit the Rufus official website to download the latest version compatible with your system.
Step 5. After downloading, execute the Rufus program by double-clicking the Rufus.exe file in File Explorer.
Step 6. Choose Disk or ISO image from the drop-down menu in the Boot selection section. Utilize the "Select" button to locate and pick the previously downloaded DBAN ISO file.

Step 7. Click "Start" to initiate the creation of a DBAN bootable USB drive. Confirm the operation if prompted by clicking "OK."
Way 3. Change Boot Order in BIOS
For successful booting from the DBAN USB drive in Windows 10, ensure it's at the top of the BIOS boot order. DBAN won't initiate from USB to wipe the disk without this adjustment. To resolve, access BIOS, navigate to the Boot tab, and set the DBAN USB as the first boot order.
Here are the steps to change the boot order in BIOS:
Step 1. Restart your computer and press one of these keys (F1, F2, F10, Delete or Esc, etc.) to enter the BIOS setup. The key depends on your computer/laptop model. You may find different keys to enter the BIOS settings, so press the key accordingly and instantly after restarting during the startup screen.
Step 2. Navigate to the "Boot" tab using the arrow keys.
Step 3. Use the options to move your DBAN USB flash drive to the top of the boot order list.
Step 4. Save all the changes and quit the BIOS utility.

Step 5. Your computer will restart, and DBAN should now boot successfully.
Way 4. Update BIOS
The outdated BIOS can contribute to the DBAN not booting from USB issue on Windows 10. In such situations, updating BIOS and ensuring you use the latest version is advisable.
Follow the steps to update your BIOS safely:
Step 1. Visit your computer manufacturer's website and locate the support page for your specific model.
Step 2. Download the latest BIOS update file.
Step 3. Follow the provided instructions carefully to update your BIOS.
Step 4. Once the update is complete, restart your computer and try to boot DBAN.
Alternatively, refer to the below article for a more comprehensive and detailed guide to update the BIOS:
Best Alternative For DBAN - EaseUS Partition Master
While DBAN is a powerful data-wiping tool, it can be troublesome for some users due to its complexities and occasional booting issues. Enter EaseUS Partition Master Professional, a comprehensive partition management software with a user-friendly interface and a wider range of functionalities. EaseUS Partition Master delivers unparalleled ease of use and versatility, making it the perfect alternative to DBAN.
Follow the steps:
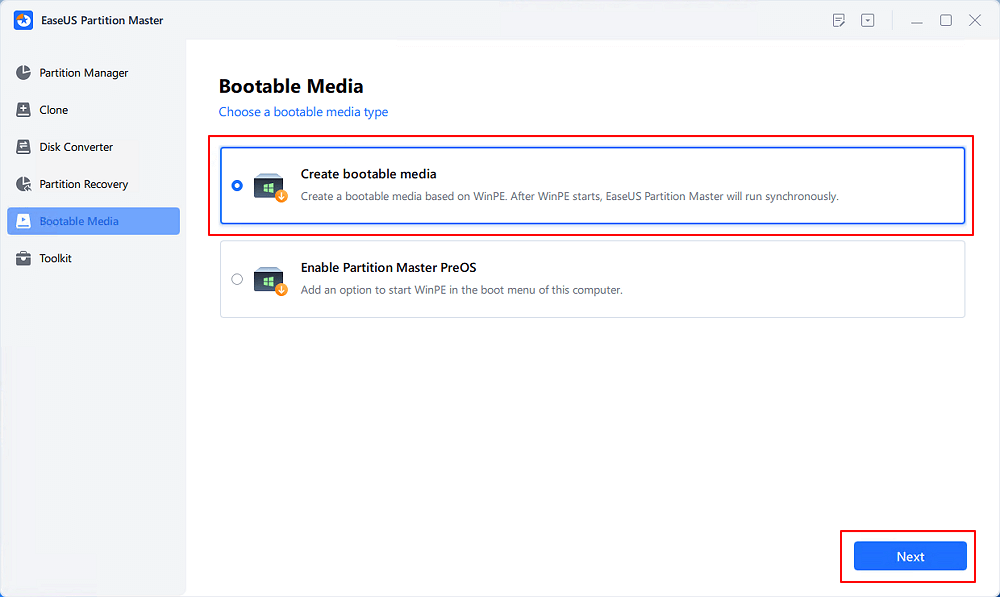
Step 1. Correctly connect a USB drive, flash drive, or a CD/DVD disc to your computer. Then, launch EaseUS Partition Master, go to the "Bootable Media" and click "Create bootable media", click "Next".
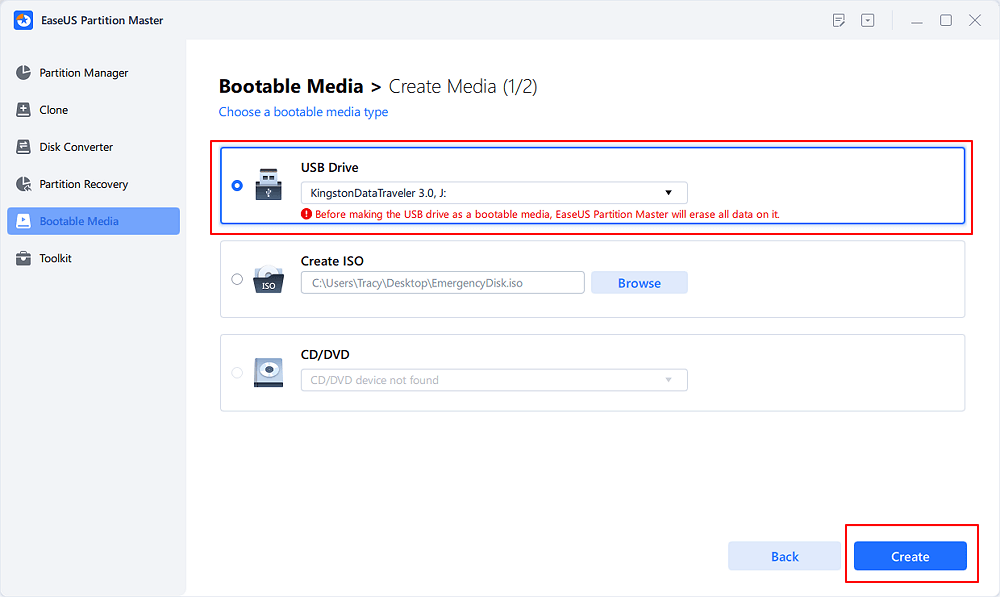
Step 2. You can choose the USB or CD/DVD when the drive is available. Once made the option, click "Proceed".
If you do not have a storage device at hand, you can also save the ISO file to a local drive, and later burn it to a storage media.
Step 3. Connect the WinPE bootable disk to the computer. Restart your computer and press F2/Del at the same time to enter BIOS. Set to boot the PC from "Removable Devices" (bootable USB disk) or "CD-ROM Drive" (bootable CD/DVD) beyond Hard Drive. Press "F10" to save and exit.
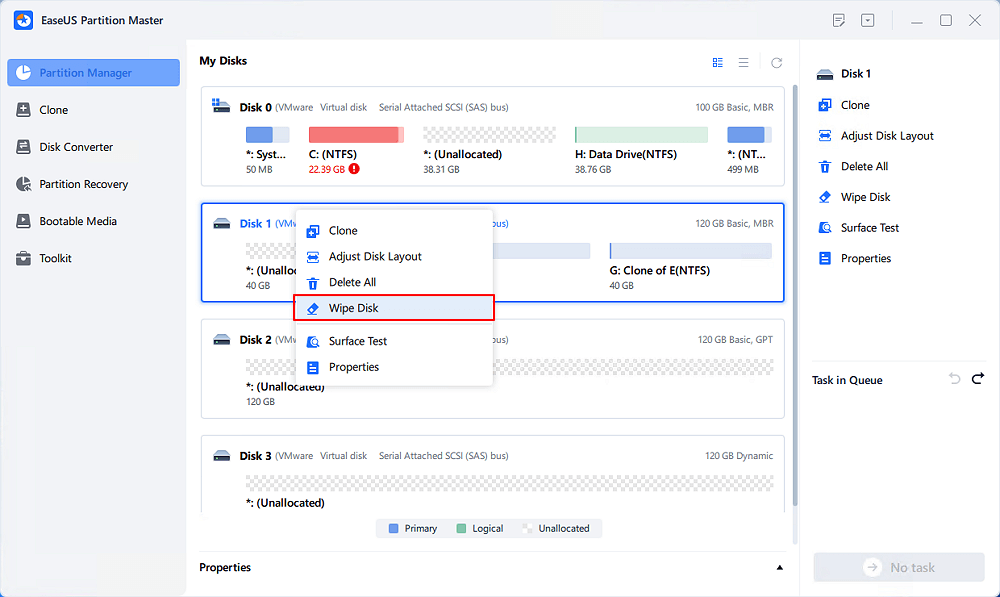
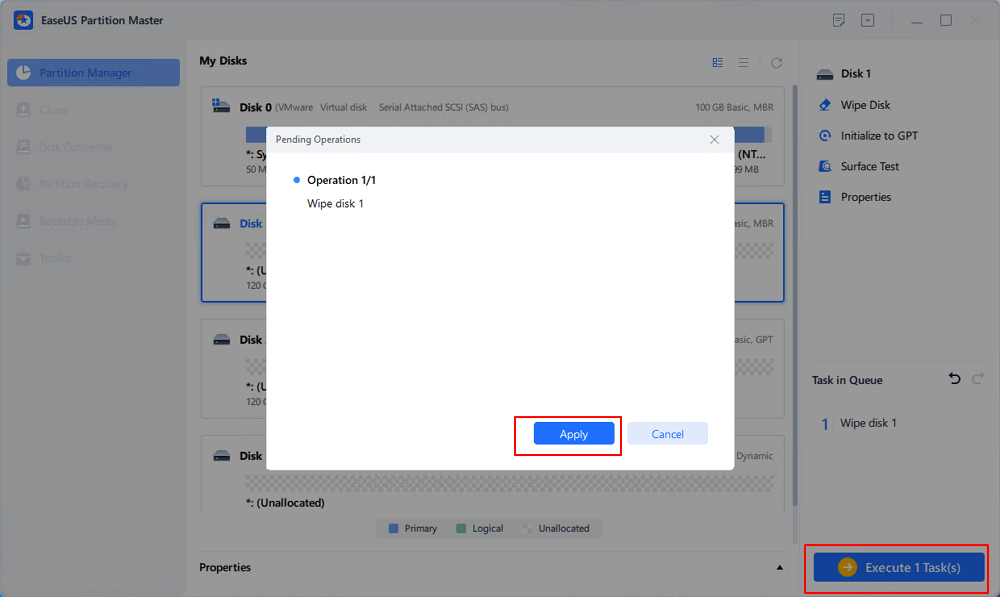
Step 4. Install and launch EaseUS Partition Master. Select the HDD or SSD which you want to wipe. And right-click to choose "Wipe Disk".
Step 5. Set the number of times to wipe data. You can set to 10 at most. Then, click "OK".
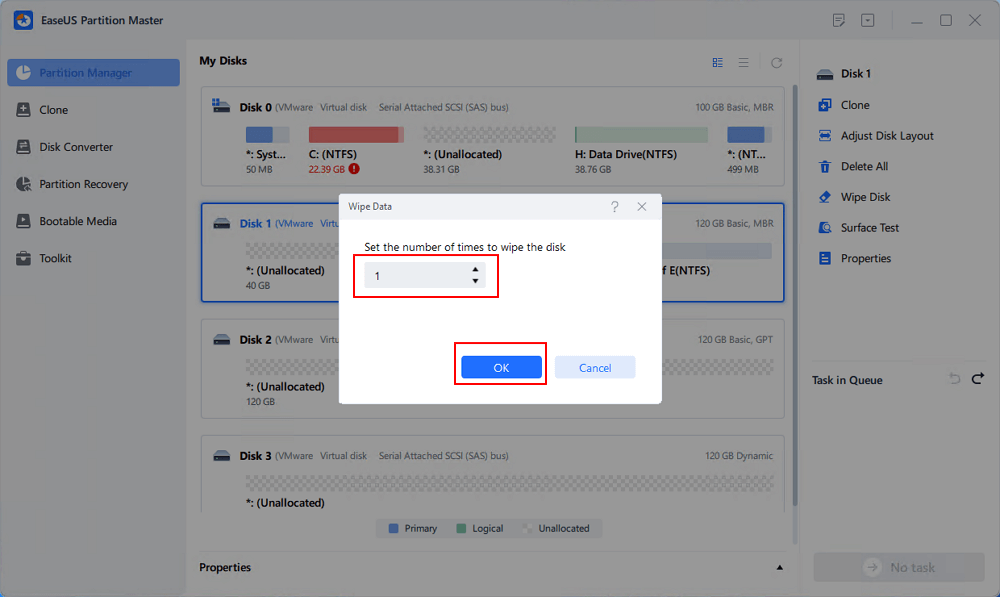
Step 6. Click "Execute 1 Task(s)" and then click "Apply" to start wiping data.
Additional Features:
- Convert MBR to GPT disk and vice versa.
- Check the disk surface for errors and repair them.
- Manage virtual disks created by other virtualization software.
- Supports command-line operation for advanced users.
With its user-friendly interface, comprehensive features, and exceptional data safety, EaseUS Partition Master exceeds the limitations of DBAN, offering a superior solution for all your disk management needs. Give it a try and discover the difference!
Now, you can share this post on social media and continue to learn how to use DBAN to wipe disks using a bootable USB:
Bonus Tip: How do you boot from DBAN and wipe the disk?
To perform boot from DBAN and wipe the disk, you must create a DBAN bootable device and set the boot order for the bootable USB containing ISO file by changing the boot order in BIOS.
Follow the steps from ways 2 and 3 to create a DBAN bootable and change the boot order in BIOS.
After creating a DBAN bootable device and changing the boot order, follow these steps:
Step 1. Restart your PC. Press the "Enter" on the blue screen to initiate DBAN in interactive mode.

Step 2. The erased hard drive will appear on your screen; type "M" to explore the available wiping methods.

Step 3. Select the desired wiping method.

Step 4. Choose the target hard drive for erasure and press "Space."

Step 5. Initiate the wiping process by pressing "F10" and witness the successful erasure of the hard drive.

Beyond wiping the disk, you can learn how to wipe the computer in the article below:
How to Wipe a Computer [Mac & Windows]
This post contains effective solutions that empower users to wipe a computer effortlessly.
Conclusion
Successfully booting from DBAN and wiping your disk can be a rewarding experience, ensuring complete data erasure and protecting your privacy. This guide has equipped you with the knowledge and practical steps to overcome the "DBAN Not Booting from USB" obstacle and achieve your data-wiping goals.
While DBAN offers robust data-wiping capabilities, EaseUS Partition Master is a compelling alternative. Its user-friendly interface, comprehensive functionality, and exceptional data security make it versatile for any disk management task. For those seeking enhanced ease of use and a more comprehensive range of features, EaseUS Partition Master stands as a superior solution.
FAQs About DBAN Not Booting From USB
You may find the answers in these FAQs if you have any questions or require additional assistance.
1. Is it safe to use DBAN?
Yes, DBAN is generally safe to use for data wiping. It overwrites existing data on your storage device multiple times with random patterns, making it virtually impossible to recover the original information. However, it's crucial to remember that DBAN permanently erases data. Once wiped, data cannot be retrieved. Therefore, ensure you have backed up any critical information before using DBAN.
2. How do I force BIOS to boot from DBAN bootable USB?
While specific methods can vary depending on your system, the general process involves entering BIOS Setup and changing the boot order. Here's an essential guide:
- Restart your computer and hit the following keys (usually Del, F2, F10, etc.) to enter BIOS Setup during the initial startup screen.
- Locate the Boot tab or menu within BIOS.
- Navigate the boot options and prioritize your DBAN bootable USB flash drive as the boot drive.
- Save your changes and exit BIOS Setup.
- Your computer should automatically attempt to boot from the DBAN USB drive.
Note: Refer to your computer manufacturer's manual for instructions on accessing and navigating your BIOS Setup.
3. How do I make a bootable USB from DBAN?
Learn the details to create a bootable USB from DBAN:
- Visit the official DBAN website and download the tool.
- Save the downloaded DBAN ISO file to a known location.
- Use a tool like Rufus to create a bootable USB by selecting the DBAN ISO file.
- Follow the on-screen instructions to complete the process.
How Can We Help You
About the Author
Sherly joined EaseUS in 2022 and she has always loved writing articles and enjoys the fun they bring. She receives professional training here, focusing on product performance and other relative knowledge. She has written over 200 articles to help people overcome computing issues.
Roxanne is one of the main contributors to EaseUS and has created over 200 posts that help users solve multiple issues and failures on digital devices like PCs, Mobile phones, tablets, and Macs. She loves to share ideas with people of the same interests.
Product Reviews
-
I love that the changes you make with EaseUS Partition Master Free aren't immediately applied to the disks. It makes it way easier to play out what will happen after you've made all the changes. I also think the overall look and feel of EaseUS Partition Master Free makes whatever you're doing with your computer's partitions easy.
Read More -
Partition Master Free can Resize, Move, Merge, Migrate, and Copy disks or partitions; convert to local, change label, defragment, check and explore partition; and much more. A premium upgrade adds free tech support and the ability to resize dynamic volumes.
Read More -
It won't hot image your drives or align them, but since it's coupled with a partition manager, it allows you do perform many tasks at once, instead of just cloning drives. You can move partitions around, resize them, defragment, and more, along with the other tools you'd expect from a cloning tool.
Read More
Related Articles
-
Fix 'System C Drive Full' Error in Windows Server 2019/2016/2012
![author icon]() Tracy King/2024/04/19
Tracy King/2024/04/19 -
What Is A Typical Symptom That Might Indicate the MBR Record Is Damaged? Fix MBR in Windows 10/11
![author icon]() Tracy King/2024/04/22
Tracy King/2024/04/22 -
Western Digital VS Seagate: A Detailed Comparison Guide
![author icon]() Tracy King/2024/04/19
Tracy King/2024/04/19 -
How to Fix Windows 10 Stuck on Welcome Screen | 2024 🔥
![author icon]() Cici/2024/04/19
Cici/2024/04/19
Hot Topics in 2024


EaseUS Partition Master

Manage partitions and optimize disks efficiently