
Content
Page Table of Contents
About the Author
Hot Topics
When your Dell computer malfunctions or fails to work as expected, one of the options is to boot it from USB. Unlike the normal way of booting from your local hard disk, a Dell boot from USB solves irreparable errors and allows you to access your computer again. Like most people, you may want to learn how to make your Dell computer boot from USB on Windows 11/10.
In this article, EaseUS will help you solve that problem. The steps that we'll outline are detailed and very easy to follow. You also learn how to use a third-party tool to conveniently burn your Windows ISO file on a USB drive before initiating the boot process on your computer.
| ⏱️Duration | 5-7 Minutes (Step-by-step Tutorial) |
| 💻Applies to | Get the Dell laptop/Dell XPS to boot from USB on Windows 11/10/8/7 |
| ⛏️ Tools |
✔️USB ✔️Windows ISO files ✔️Dell laptop or desktop |
| 🖌️ Stages |
1️⃣Stage 1. Preparations Before Dell Boot from USB |
| 🔍Required Software | USB creators and ISO burner - EaseUS Partition Master |
How to Make Dell Boot from USB
Booting your Dell computer from USB allows you to install a new operating system and possibly fix any errors that prevent your device from working correctly. In this section, you'll learn the preparations to make before booting from USB, how to create bootable media, and make your Dell computer boot from USB.
Stage 1. Preparations Before Dell Boot from USB
You must make adequate preparations to ensure the boot process runs smoothly. This entails assembling everything required to boot your computer from USB successfully. The key preparations you need to make include the following:
1. Prepare USB Drives
Ensure you have a flash drive that is detectable by your computer and can allow you to create bootable media on it. The flash drive should be at least 8GB and formatted to FAT32 file format to install the bootable files easily.
2. Download the ISO File
The ISO file contains all the data and information about the operating system you want to install. You'll download it from the Microsoft website, and you can select whether you want an ISO file for Windows 11 or Windows 10.
- Windows 11: www.microsoft.com/software-download/windows11
- Windows 10: www.microsoft.com/en-us/software-download/windows10
This download file is usually large, so you should have a stable internet connection and enough disk space.
3. Download Bootable Media
Once you've downloaded the ISO file, you need a tool to burn it on a flash drive or CD/DVD. Apart from Rufus, another bootable media we recommend you use is EaseUS Partition Master.
This tool simplifies the process of burning Windows ISO files, and even if you are new to a PC, you can master the burning skills.
Stage 2. Create Bootable USB for Dell Laptop
If you've completed assembling all the requirements, creating a bootable USB is the next step. Creating a bootable USB can help users smoothly boot from a USB drive, which is an essential step. There are various ways to help you create a bootable USB and then make your Dell laptop boot from the USB.
Guide 1. Create Bootable USB without ISO
If you want to create Windows 10 installation USB drive without ISO, you can use EaseUS OS2Go - a program dedicated to creating Windows bootable purposes.
Read more: How to Create Bootable USB
Guide 2. Burn ISO with Professional Tool
Booting a computer from USB can help users run their computer system, reinstall Windows, or solve startup problems. If you want to boot your Dell computer because of these problems, we recommend reinstalling your system by burning the Windows ISO to USB using EaseUS Partition Master.
The software lets you select and burn the downloaded ISO file on your flash drive. It allows you to add the bootable partition manager option to the Windows boot menu or create WinPE bootable media. This helps you to troubleshoot common problems like unresponsive OS or other common boot problems.
Below are the steps to create a bootable USB for your Dell computer using EaseUS Partition Master.
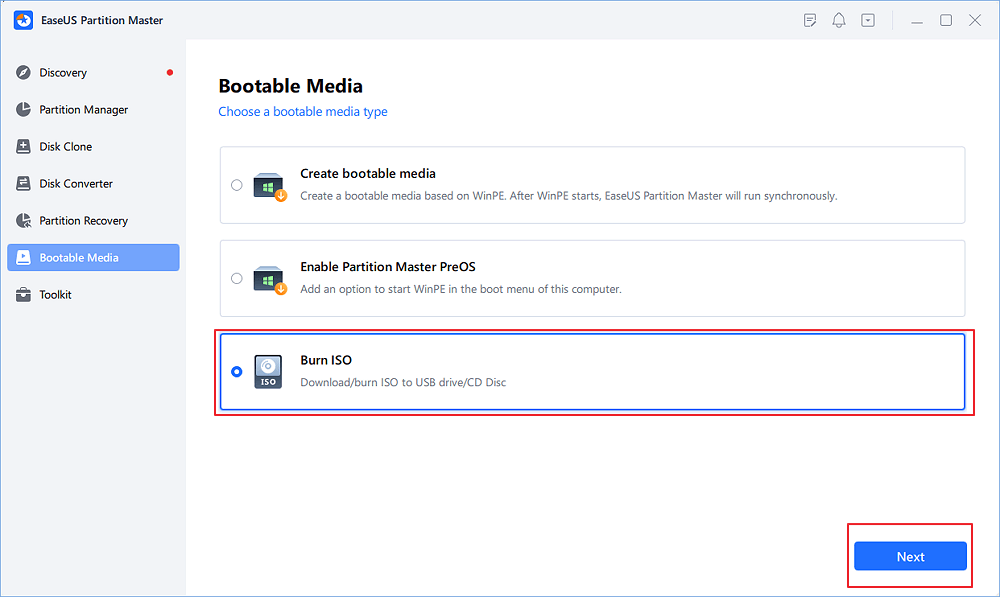
Step 1. Launch EaseUS Partition Master and go to the Bootable Media section. Click "Burn ISO" and click "Next".
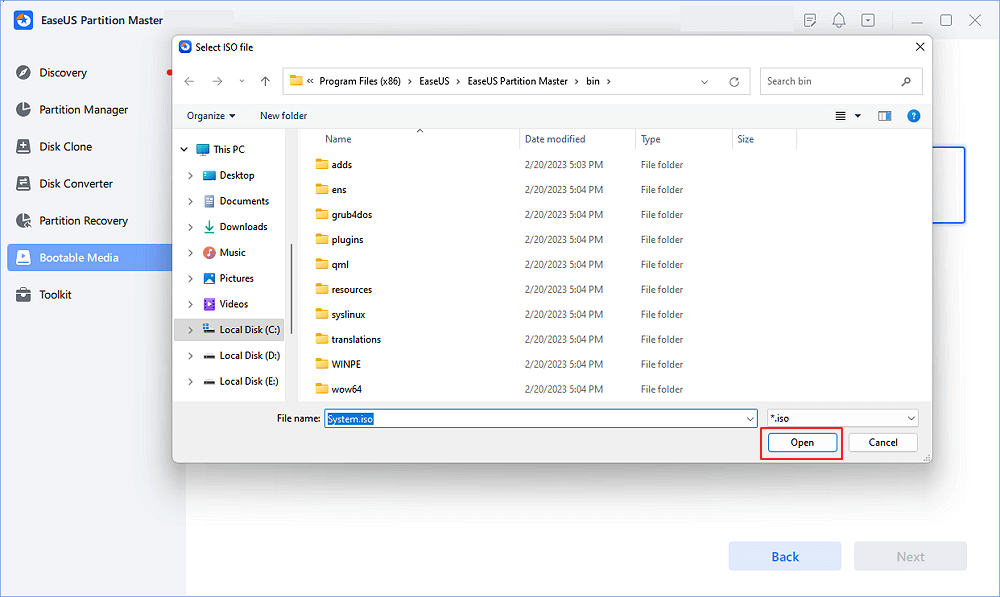
Step 2. Select the ISO image that you have downloaded on your PC, and click "Open".
Step 3. Click "Next" and select the target USB as destination and click "Burn" to execute the operation.
You may also like the following topics related to burning features:
Stage 3. Make Dell Boot from USB
After you've created a bootable USB, the next step is to connect the flash drive to your Dell computer and start booting it. Before starting, you must set the boot order to UEFI. Follow the steps below to achieve that.
Step 1. Shut down your computer and connect the bootable USB drive.
Step 2. Next, turn on your computer and press F2 when the Dell logo appears.
Step 3. Once you've entered the BIOS setup, go to "Advanced" then "CSM Configuration." Navigate to the "Boot option filter" section and select "UEFI only." You've now set UEFI as your boot order.

Step 4. Go to the "Boot" menu tab and select your bootable USB drive from the displayed drives. Next, press ENTER. Press F4 to confirm the selections you've made and exit the screen.

Step 5. If asked to confirm "Save & Exit," select "Yes," then hit the ENTER button. Your Dell computer will start booting from the connected USB drive. You must stay patient and follow the onscreen instructions until the process completes.
You can also watch the video below to learn how to make a Dell computer boot from USB:
With the methods provided in this article, you can also boot other laptops from USB:
How to Boot Raspberry Pi From USB [Step-by-Step]
This article shows how to modify the Raspberry Pi bootloader to boot from a USB storage medium. Continue reading for detailed steps on booting Raspberry Pi from USB.
Bonus Tip: How to Fix It If You Don't See USB Devices Under Boot Options
Sometimes, it may happen that your bootable USB drive isn't listed among the devices available for booting your computer. This could happen if fast boot got enabled on your system. Follow the steps below to fix the problem:
Step 1. Turn on your Dell computer and let it boot normally (you should disconnect the bootable USB drive).
Step 2. Open your Windows settings. Next, go to "System">"Power & Sleep." Click on "Additional power settings."
Step 3. Once the pop-up window is displayed, select "Choose what the power buttons do." Next, select "Change settings that are currently unavailable."
Step 4. Lastly, uncheck the "Turn on fast startup (recommended)" option. You've now turned off the fast boot. You can try rebooting your computer from USB to check if it works. If that were the problem, it would detect the bootable USB drive.
If you meet other errors on Dell laptop, click the following link and fix it:
Why Make Dell Boot from USB
Many people want to know how to boot from USB on Dell. It is a typical case from the forum:
When you encounter any boot errors or see the "no bootable image found, notebook will be shut down" error, it's necessary to try this method. If you are also searching for a tutorial to boot Dell from USB, this article may help you. And you may want to boot your Dell computer from USB for several reasons. Some of the common reasons to make Dell boot from USB include the following:
- For troubleshooting. Sometimes, your computer may run into system errors that prevent it from working as usual. One of the best ways to fix irreparable errors is by booting your computer with a new operating system via USB.
- For Windows upgrading or installing. If you want to install a new OS or upgrade from the old one, it's necessary to perform a USB boot. This allows you to install a new operating system on your Dell computer conveniently and start enjoying new features.
- For system recovery. You may have forgotten your computer password after not using it. To recover your device, you must reset the existing password by booting your device via USB boot.
Did you find the booting tips discussed in this article helpful? Don't forget to share the article with friends.
Conclusion
A Dell boot from USB allows you to fix common problems on your computer, upgrade your OS, install a new OS, or perform a system recovery. This article has taught us that you'll need to create a bootable USB drive before installing Windows 11/10 on your Dell computer. First, you'll need to download the ISO file from the Microsoft website before you burn the setup to a flash drive.
One of the best tools that you can use to burn a Windows setup to a USB flash drive is EaseUS Partition Master. This tool is useful when upgrading to Windows 11 since it allows you to easily create a bootable media and boot your Dell computer without much strain. The tool also allows you to optimize disk performance.
Ensure you download and install EaseUS Partition Master today to use it on your Dell computer.
FAQs About Dell Boot from USB
Below are common questions about how to boot a Dell computer from USB.
1. How Can I Boot from USB on Dell Latitude Laptop?
Once you've made the USB drive bootable, you can follow the steps below to boot your Dell Latitude laptop.
Step 1. Shut down your computer and connect the bootable USB drive.
Step 2. Next, turn on your computer and press F2 when the Dell logo appears.
Step 3. Once you've entered the BIOS setup, go to Advanced, then Configuration. Navigate to the boot option filter section and select UEFI only.
Step 4. Go to the Boot menu tab and select your bootable USB drive from the drive list. Next, press enter. Press F4 to confirm the selections you've made and exit the screen.
Step 5. If asked to confirm save and Exit, select Yes, then hit the enter button. Your Dell computer will start booting from the connected USB drive. You must stay patient and follow the onscreen instructions until the process completes.
2. What Is the Boot Key for Dell Laptop?
The boot key for most Dell laptops is F12. Pressing this key lets you enter the Boot menu on your laptop/computer.
3. How to Boot Windows 10 from USB on Dell?
First, you'll need to download the official Windows 10 ISO file from the Microsoft website. From there, you'll need to burn it on your USB using a bootable media like EaseUS Partition Master. Once you've done that, you can follow the steps outlined in Question 1 above to finish booting your Windows 10 from USB.
How Can We Help You
About the Author
Updated by Tracy King
Tracy became a member of the EaseUS content team in 2013. Being a technical writer for over 10 years, she is enthusiastic about sharing tips to assist readers in resolving complex issues in disk management, file transfer, PC & Mac performance optimization, etc., like an expert.
Cici is the junior editor of the writing team of EaseUS. She accepted the systematic training on computers at EaseUS for over one year. Now, she wrote a lot of professional articles to help people resolve the issues of hard drive corruption, computer boot errors, and disk partition problems.
Product Reviews
-
I love that the changes you make with EaseUS Partition Master Free aren't immediately applied to the disks. It makes it way easier to play out what will happen after you've made all the changes. I also think the overall look and feel of EaseUS Partition Master Free makes whatever you're doing with your computer's partitions easy.
Read More -
Partition Master Free can Resize, Move, Merge, Migrate, and Copy disks or partitions; convert to local, change label, defragment, check and explore partition; and much more. A premium upgrade adds free tech support and the ability to resize dynamic volumes.
Read More -
It won't hot image your drives or align them, but since it's coupled with a partition manager, it allows you do perform many tasks at once, instead of just cloning drives. You can move partitions around, resize them, defragment, and more, along with the other tools you'd expect from a cloning tool.
Read More
Related Articles
-
Top 8 Free SD Card Speed Test Tool 2024 New Checklist
![author icon]() Sherly/2024/04/22
Sherly/2024/04/22 -
How to Boot Lenovo Laptop from USB Windows 11/10 [Full Guide]
![author icon]() Cici/2024/04/22
Cici/2024/04/22 -
Best Solutions on How To Fix Adobe Acrobat Error 0 104
![author icon]() Brithny/2024/04/19
Brithny/2024/04/19 -
HDD Regenerator Free Alternative [Download & Review]
![author icon]() Tracy King/2024/04/22
Tracy King/2024/04/22
Hot Topics in 2024


EaseUS Partition Master

Manage partitions and optimize disks efficiently