
Content
Page Table of Contents
About the Author
Hot Topics
| Workable Solutions | Step-by-step Troubleshooting |
|---|---|
| Do SSDs Slow Down When Full | The drive is slowing down if you are running SSD and the existing data account for 70%...Full steps |
| How to Fix SSD Slowing Down |
1. SSD Optimization...Full steps 2. Make Sure AHCI Mode Is Enabled...Full steps 3. Check the TRIM Is Enabled...Full steps 4. Check That Write Caching is Enabled...Full steps 5. Enter BIOS and Enable AHCI Mode...Full steps |

Do SSDs Slow Down When Full?
Do SSDs get slower when full? Yes, and sure. You'll notice your SSD is slowing down when it gets full. According to Reddit and other forum users, the speed of SSD will rapidly drop when the storage gets used over 75% of the SSD.
This problem does happen when you continue to write files on it or boot applications, you will save more time than ever. Unluckily, the PC could get stuck while you are playing games, clip videos, writing essays, etc.
SSD is faster than HDD. But the exquisite is the disk space not being filled up. The drive is slowing down if you are running SSD, and the existing data accounts for 70%. This is because SSDs can only write to and store data to an empty block, and if the block is not open, solid-state drives need to delete the data marked as deleted and then fill it with new data. This process is one of the reasons the drive slows down.
How much slower when SSDs get full? As we test, the read speed is still fast as ever, but the write will turn 40%-50% slower.
Check more articles:
How to Fix SSD Slowing Down?
1. SSD Optimization - Speed Up SSD
One useful to fix SSD slowing down is to optimize your SSD space. Since storage affects SSD speed, adjusting your drive space is essential. Traditionally, a third-party reliable partition manager software can help you extend space size but requires allocated space adjacent to the targeted drive.
What do we do? Go to download EaseUS Partition Master. You can apply this free disk manager to resize, shrink, delete, format, merge, and create partitions without data loss.
1. Extend SSD Space
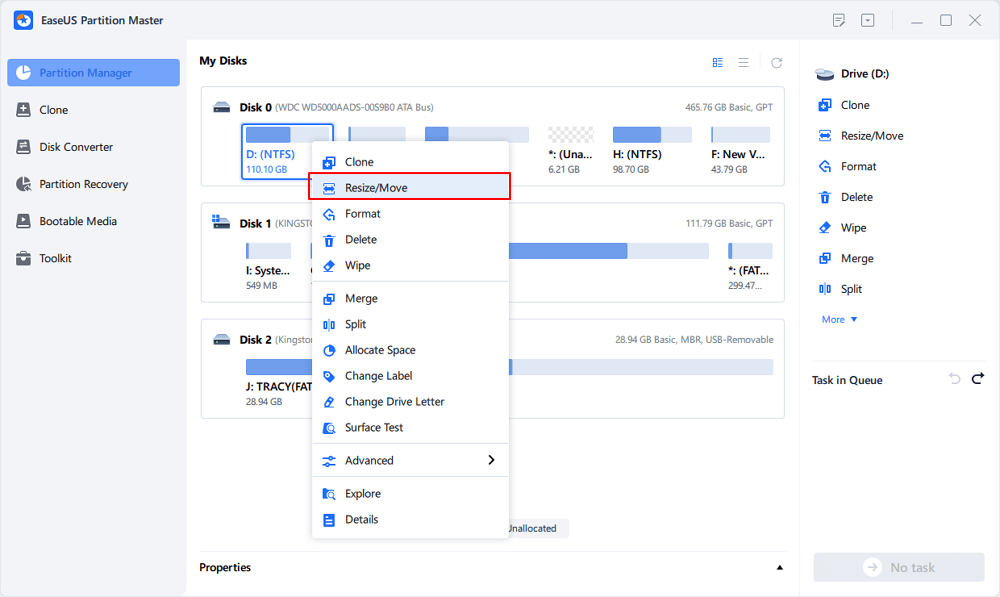
Step 1. Shrink partition to free up space to extend partition.
If the hard drive has enough unallocated space to extend the target partition, jump to Step 2, and continue. If not, free up space first:
- At the Partition Manager section, right-click on a partition next to the target partition and select "Resize/Move".
- Drag the partition ends to free up space, leaving enough unallocated space behind the target partition, click "OK".

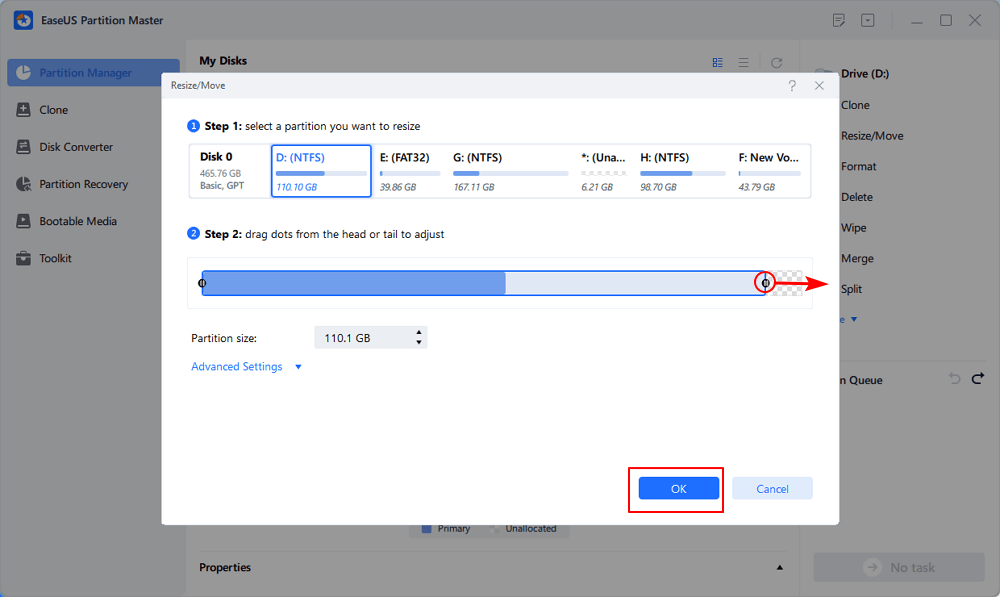
Step 2. Extend the target partition.
Right-click on the target partition you want to extend and select "Resize/Move".
Drag the target partition handle into the unallocated space to extend partition.
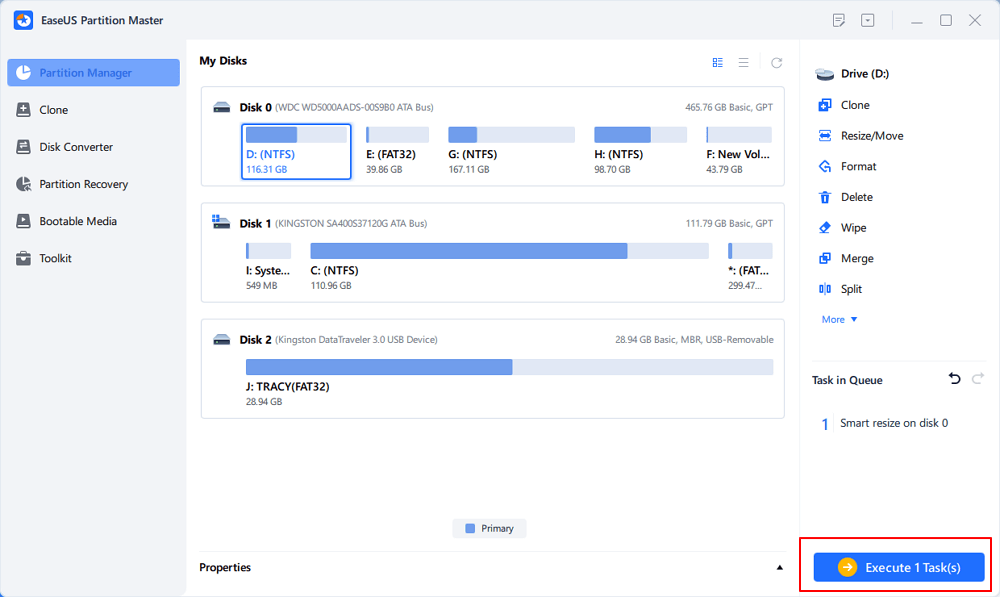
Step 3. Keep all changes.
Click the "Execute Task" button and click "Apply" to keep all changes.
When your SSD runs out of space, you may also apply the Extend Second Disk feature in EaseUS Partition Master to increase SSD across a second disk. If you are with this demand, follow this link: Extend SSD across Disk.
2. Clean Unnecessary Files on SSD
Step 1. DOWNLOAD and install EaseUS Partition Master for free and launch it on your Windows PC.
On the suite, hover your mouse on "PC Cleaner", click the Download icon to install and launch EaseUS CleanGenius.

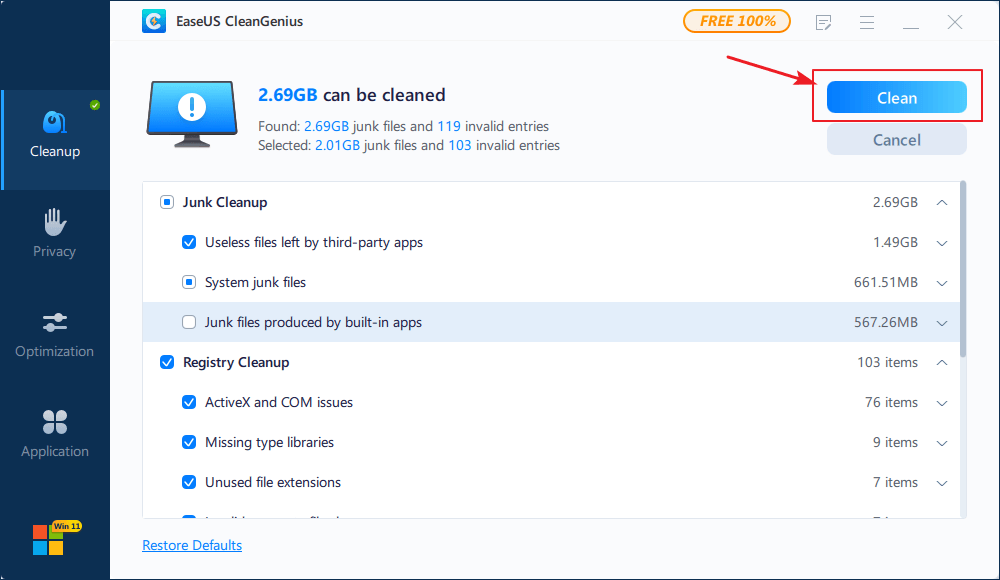
Step 2. On EaseUS CleanGenius, select "Cleanup" on the main screen, and click "Scan" to start scanning.

Step 3. When the scanning process completes, select useless large files and click "Clean" to clean large files.
Step 4. When EaseUS CleanGenius completes cleaning the files you choose, click "Done" to finish the process.

2. Make Sure AHCI Mode Is Enabled
AHCI mode is vital for SSD performance. If it is disabled, your device may face an unexpected boot error. Therefore, please check that AHCI is enabled.
Step 1. Right-click the Start icon and choose Device Manager from the menu.
Step 2. Expand IDE ATA/ATAPI controllers.
If it shows "Enable," click to change it. Disable - Leave it.
If you can not locate that controller, read fix answered by Dell - Dev. manager missing "IDE ATA/ATAPI controller."
3. Check the TRIM Is Enabled
Solid-state drives record data in a different way than HDDs. To write new data into the device, your drive must clean the existing data first. The cleaning process will take a lot of time, which could slow down your SSD speed. Don't worry. The TRIM is come here to zero the deleted data cell before rewriting data automatically.
Follow the in-depth tutorial to make sure the TRIM is enabled:
Step 1. Open Windows search and search for cmd on the box. Choose "Run as administrator."
Step 2. Type command line and press Enter: fsutil behavior query disabledeletenotify.

Step 3. Then check the command line and estimate if the TRIM is enabled on SSD.
NTFS DisableDeleteNotify = 0 - it means “TRIM is enabled.”
NTFS DisableDeleteNotify = 1 - it means “TRIM is disabled.”
If your TRIM technology is not enabling, you can continue to type command line.
Input the command:fsutil behavior set disabledeletenotify 0
Then press Enter to enable it.
4. Check That Write Caching is Enabled
The Write Caching is necessary to increase your SSD performance. But it makes your PC vulnerable to data loss when it comes to equipment power failure. So if you choose to take the advance, follow the steps to enable TRIM:
Step 1. Right-click the Start icon and select "Device Manager."
Step 2. Expand "Disk drives" and click on the "Properties" button.
Step 3. Choose the Policies tab, and then tick "Enable write caching on the device."

Step 4. Click on "OK."
5. Enter BIOS and Enable AHCI Mode
Step 1. Press "Windows + R" to evoke the Run box and type "msconfig." Click on Enter.

Step 2. Go to the Boot tab and tick "Safe boot" under the Boot options.

Step 3. Save changes and reboot the PC.
Step 4. Enter BIOS:
Turn on computer > Press F12 or F2 or DEL to boot into BIOS setting > Change SATA mode from IDE to AHCI > Save changes and exit.
Step 5. Reboot PC > Repeat Step 1 > Untick "Safe Boot" under Boot tab.
How Can We Help You
About the Author
Sherly joined EaseUS in 2022 and she has always loved writing articles and enjoys the fun they bring. She receives professional training here, focusing on product performance and other relative knowledge. She has written over 200 articles to help people overcome computing issues.
Written by Tracy King
Tracy became a member of the EaseUS content team in 2013. Being a technical writer for over 10 years, she is enthusiastic about sharing tips to assist readers in resolving complex issues in disk management, file transfer, PC & Mac performance optimization, etc., like an expert.
Product Reviews
-
I love that the changes you make with EaseUS Partition Master Free aren't immediately applied to the disks. It makes it way easier to play out what will happen after you've made all the changes. I also think the overall look and feel of EaseUS Partition Master Free makes whatever you're doing with your computer's partitions easy.
Read More -
Partition Master Free can Resize, Move, Merge, Migrate, and Copy disks or partitions; convert to local, change label, defragment, check and explore partition; and much more. A premium upgrade adds free tech support and the ability to resize dynamic volumes.
Read More -
It won't hot image your drives or align them, but since it's coupled with a partition manager, it allows you do perform many tasks at once, instead of just cloning drives. You can move partitions around, resize them, defragment, and more, along with the other tools you'd expect from a cloning tool.
Read More
Related Articles
-
Is Your PC Slow to Shut Down? Try These Tips!
![author icon]() Tracy King/2024/04/19
Tracy King/2024/04/19 -
Best PNY USB Flash Drive Format Tool Free Download👍
![author icon]() Roxanne/2024/04/19
Roxanne/2024/04/19 -
Solved: SSD Not Showing Full Capacity After Clone
![author icon]() Sherly/2024/04/19
Sherly/2024/04/19 -
Best FAT32 Converter Free Download [2024 Updated] 🔥
![author icon]() Tracy King/2024/04/19
Tracy King/2024/04/19
Hot Topics in 2024


EaseUS Partition Master

Manage partitions and optimize disks efficiently