Page Table of Contents
About the Author
Hot Topics
Updated on Aug 29, 2024
Hard drive partitioning means creating multiple separate areas on a single hard drive for file management and use. The USB drive is a commonly used storage device and is important for data storage and files.
This article will explore the reasons for partitioning a USB drive and how to partition a USB drive Windows 10.
Why Do I Need to Partition A USB Drive Windows 10
Partitioning a USB drive is a way to better manage a USB by shrinking, expanding, deleting, or creating partitions on the USB drive. Usually, there is no need to partition a new USB. So, why do we need to partition a USB drive? The following reasons may make you want to partition a USB drive:
- Create a bootable USB
- Make the most of the space on the USB
- Modify the file system format of the USB
- Organize the storage volumes of a USB drive
Partitioning a USB drive is not a difficult task. In the next section, I will show you how to partition a USB drive Windows 10.
How to Partition A USB Drive Windows 10 – Three Ways
There are three ways to partition a USB drive Windows 10. There are two built-in tools and professional partitioning software:
Way 1. Partition A USB Drive via EaseUS Partition Master – Easy for all users
Way 2. Partition A USB Drive via Disk Management – Medium for experienced users
Way 3. Partition A USB Drive via Diskpart – Difficult for experts
If you are unfamiliar with computer operations, I highly recommend EaseUS Partition Master - a reliable and all-in-one disk management software. It simplifies the process of partitioning a USB drive.
Let's take a look at how these three methods work.
Way 1. Partition A USB Drive via EaseUS Partition Master
EaseUS Partition Master is a professional disk partition tool. It can improve USB performance by partitioning USB drives, and it can remove the limitations of Windows disk tools, such as creating FAT32 partitions larger than 32GB.
Please refer to the following steps to partition a USB drive.
Step 1. Launch EaseUS Partition Master to check for free space at the Partition Manager section.
- If your hard drive has unallocated space, jump to Step 3 to create partition.
- If the hard drive has no unallocated space, continue with Step 2.
Step 2. Shrink a disk partition to create unallocated space.
Right-click on the target drive partition with a lot free space and select "Resize/Move".
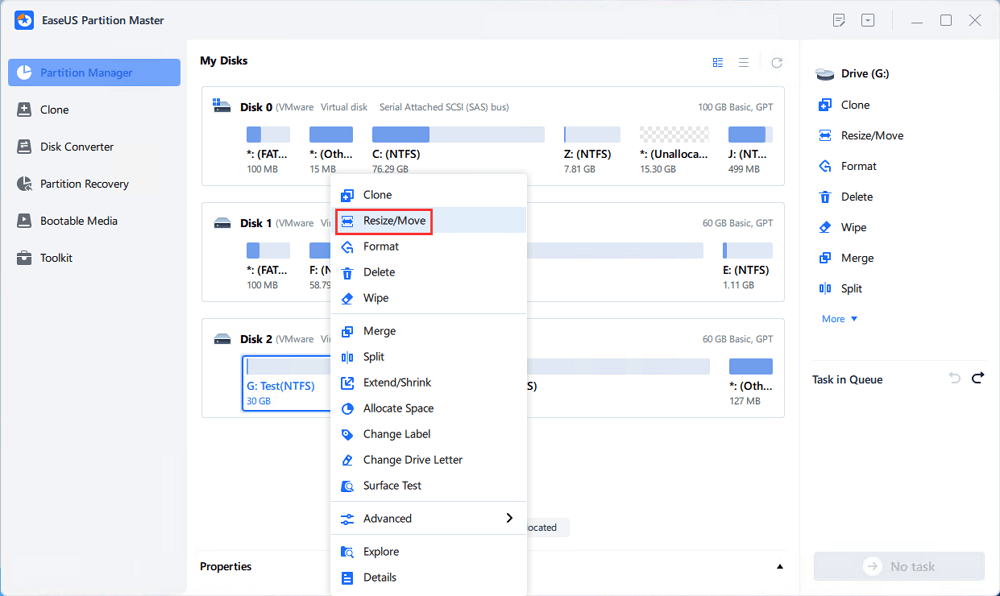
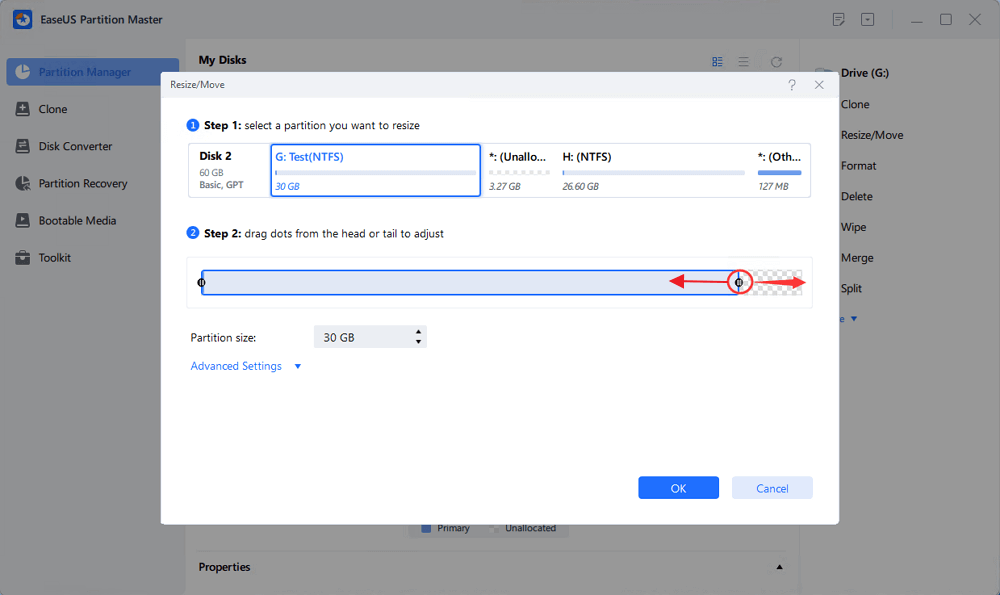
Drag either end of the partition rightwards or leftwards to shrink the partition size so as to get ample unallocated space. You can visually know how much space you've decreased in the "Size of partition" area. Click "OK".
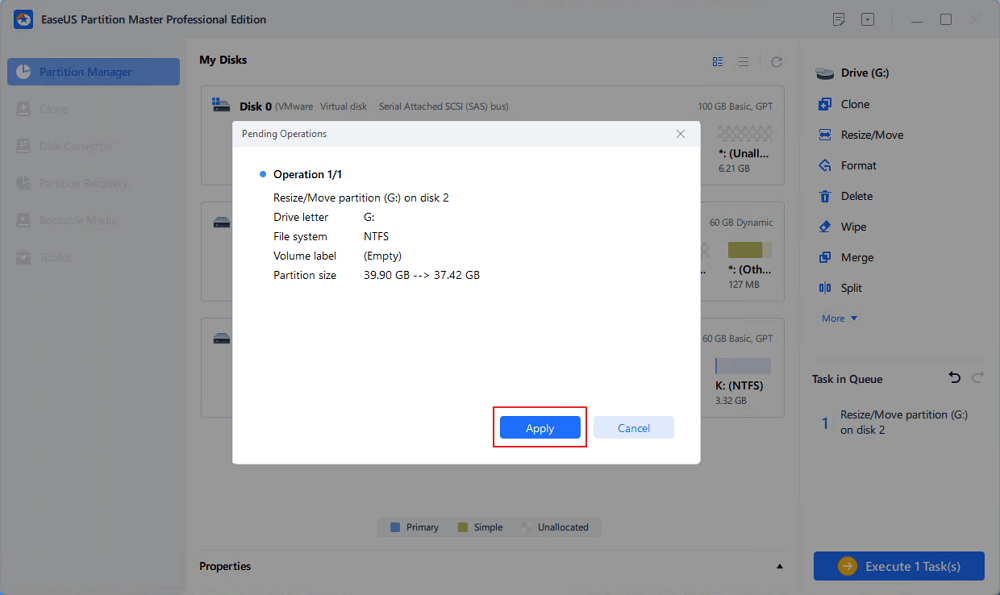
Click "Execute xx Task" and then "Apply" to save all the changes.
Go back to Partition Manager, there should be unallocated space appearing on the same disk and you can continue with the next step to create new partition on your hard drive.
Step 3. Create a new partition with unallocated space on the target hard drive.
Right-click on the unallocated space and choose "Create".
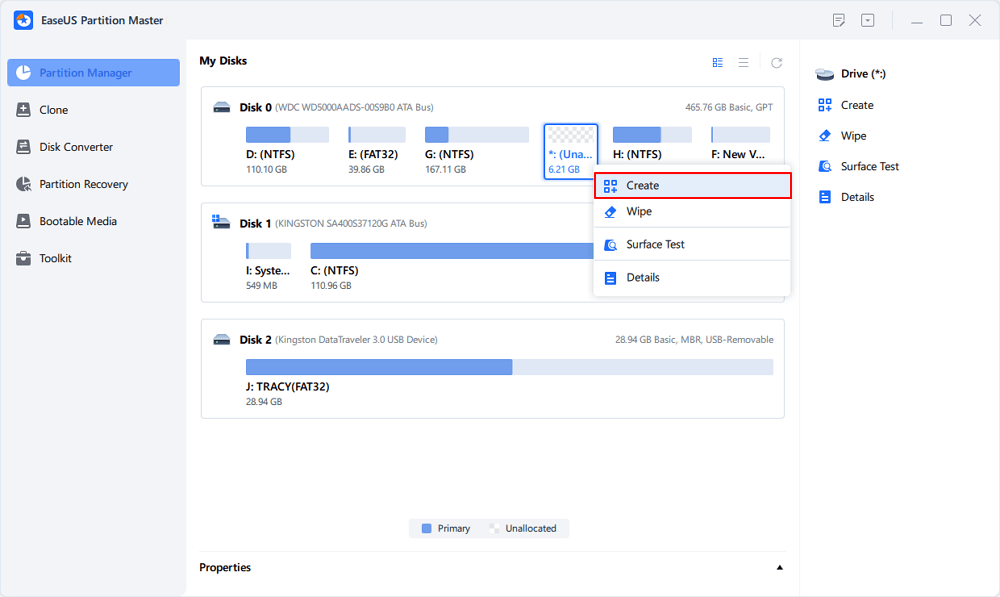
Customize the partition size, partition drive letter, partition label, file system (NTFS, FAT32, EXT2/3/4, exFAT) and more in the Advanced Settings. Click "OK".
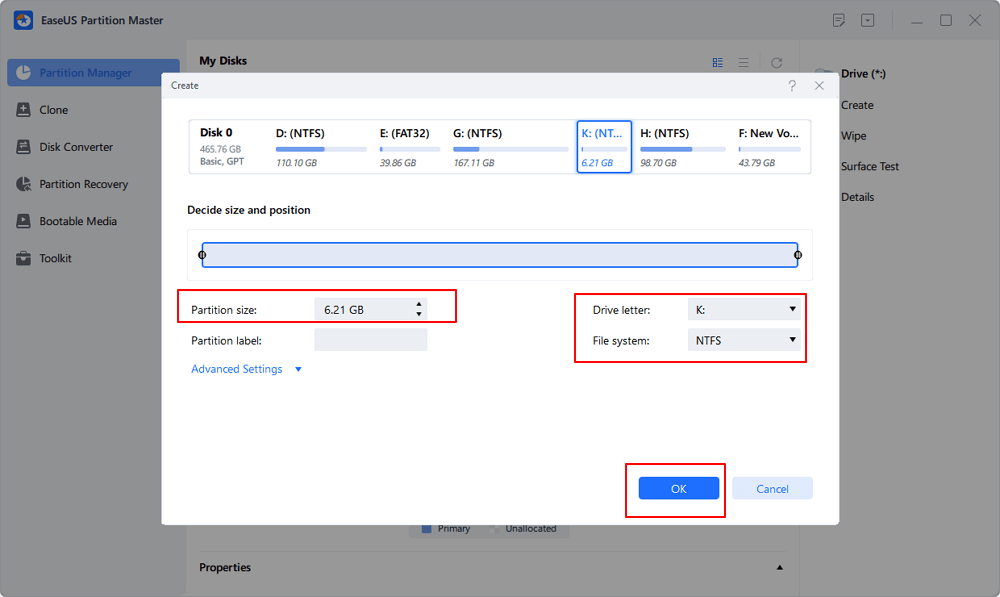
Finally, click "Execute * Task" and "Apply" to complete creating partition with the unallocated space on your disk. Repeat the steps to partition a hard drive and get many more partitions.
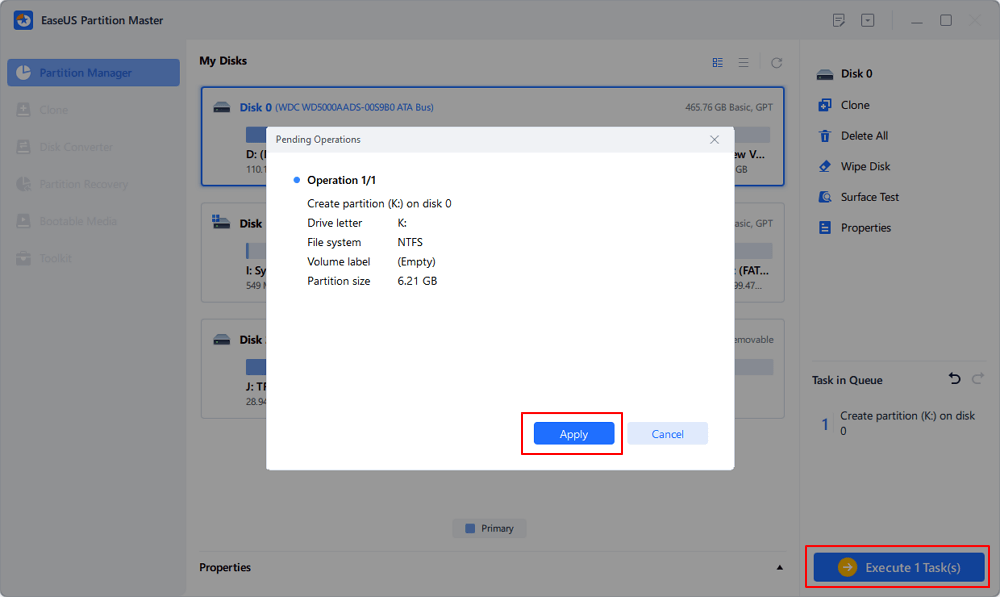
EaseUS Partition Master is a powerful tool to manage disks and partitions. It is also capable of repairing corrupted USB drives. If you have any problems, you can find the solution with EaseUS Partition Master.
Way 2. Partition A USB Drive via Disk Management
What is Disk Management? Disk Management is a tool provided by Windows 10 that allows you to shrink, expand, and create partitions on your USB drive. You can use the "New Simple Volume" feature to partition your USB drive.
Step 1. Connect the USB drive you want to partition to your Windows computer.
Step 2. Right-click on the Windows icon and select "Disk Management."
Step 3. Locate the USB drive that needs to be partitioned, right-click on its unallocated space and select "New Simple Volume."

- Tip
- If New Simple Volume greyed out, it is possible that your USB is larger than 2TB and you need to check your disk format and convert MBR to GPT. You can use EaseUS Partition Master to solve your problem.
Step 4. Set the volume size to be created and select "Next."

Step 5. Set the drive letter for the USB drive and select "Next."

Step 6. Set the file format of the USB drive and click "Next."

Step 7. Click "Finish" to finish partitioning the USB drive on Windows.
Way 3. Partition A USB Drive via Diskpart
Diskpart command is a tool provided by Windows for advanced users. Using the command line tool, you can do more with USB partitions. However, the command is complex and needs to be entered carefully.
Step 1. Right-click the Windows icon and open the "Run" window.
Step 2. Type "diskpart" and press Enter.

Step 3. Type the following commands in turn and press "Enter" after each command.
list disk (view all disks)
select disk 1 (select USB drive)
create partition primary size=20480 (set the size of the USB partition)
assign letter=H (assign a disk letter to the USB partition)
format fs=ntfs (set the file format of the USB partition)

Step 4. type "exit" and press Enter to end the partitioning of the USB
Conclusion
This article introduces the need to partition a USB drive and provides three ways to partition a USB. EaseUS Partition Master can meet a wide range of partitioning needs. And it is very easy to use.
Diskpart and Disk Management can meet basic partitioning needs. If you have more questions about USB partitioning, please continue reading the next section.
FAQs About How to Partition A USB Drive Windows 10
This section has three common questions about USB drives. Hope they are helpful to you.
1. Can a USB flash drive be partitioned?
Of course, USB flash drives can be partitioned. You can create a new partition space on a new USB or shrink the USB partition and query the amount of space available for partitioning.
2. How do I create a one USB drive partition?
This article describes three ways to partition a USB drive. The easiest is to use EaseUS Partition Master to partition the USB. You can also use Disk Management to create partitions on USB.
Step 1. Connect the USB drive to the PC.
Step 2. Select the unallocated space on the USB and choose "New Simple Volume."
Step 3. Follow the wizard to set the size and drive letter to finish partitioning the USB drive.
3. How do I make my USB a FAT32 partition?
If your USB drive is not partitioned in FAT32 format, you can directly use EaseUS Partition Master to convert NTFS to FAT32 without losing data. Or you can use Disk Management's "Format" function.
How Can We Help You
About the Author
Sherly joined EaseUS in 2022 and she has always loved writing articles and enjoys the fun they bring. She receives professional training here, focusing on product performance and other relative knowledge. She has written over 200 articles to help people overcome computing issues.
Cici is the junior editor of the writing team of EaseUS. She accepted the systematic training on computers at EaseUS for over one year. Now, she wrote a lot of professional articles to help people resolve the issues of hard drive corruption, computer boot errors, and disk partition problems.
Product Reviews
-
I love that the changes you make with EaseUS Partition Master Free aren't immediately applied to the disks. It makes it way easier to play out what will happen after you've made all the changes. I also think the overall look and feel of EaseUS Partition Master Free makes whatever you're doing with your computer's partitions easy.
Read More -
Partition Master Free can Resize, Move, Merge, Migrate, and Copy disks or partitions; convert to local, change label, defragment, check and explore partition; and much more. A premium upgrade adds free tech support and the ability to resize dynamic volumes.
Read More -
It won't hot image your drives or align them, but since it's coupled with a partition manager, it allows you do perform many tasks at once, instead of just cloning drives. You can move partitions around, resize them, defragment, and more, along with the other tools you'd expect from a cloning tool.
Read More
Related Articles
-
File Too Large for Destination: How to Copy/Transfer Files Larger than 4GB to FAT32
![author icon]() Brithny/2024/08/29
Brithny/2024/08/29 -
Partition Resizer for Win 11/10/8/7 | Free Download💡
![author icon]() Sherly/2024/08/26
Sherly/2024/08/26 -
Can I Install Windows 11 on Windows 10? Download Windows 11 Now
![author icon]() Tracy King/2024/10/16
Tracy King/2024/10/16 -
Failed to Create a New Partition on the Selected Unused Space? Fix Now!
![author icon]() Tracy King/2024/09/19
Tracy King/2024/09/19
Hot Topics in 2024
EaseUS Partition Master

Manage partitions and optimize disks efficiently


