Page Table of Contents
About the Author
Hot Topics
Updated on Aug 29, 2024
Valorant is a free first-person hero shooter game developed and published by Riot Games. It is one of the most popular games among global gamers. However, many players have reported vgk.sys blue screen error, which occurs while they are launching, loading, or playing Valorant.

The BSOD could be caused by many reasons, and there are multiple different error codes, such as:
- SYSTEM THREAD EXCEPTION NOT HANDLED
- KMODE EXCEPTION NOT HANDLED
- CRITICAL PROCESS DIED
- PAGE FAULT IN NONPAGED AREA
If you are having one of those errors or other issues, read this article from EaseUS and learn 9 solutions to bring the Valorant back.
🔥Hot Post: How to Uninstall Valorant [Free & Completely]
9 Solutions to Vgk.sys Blue Screen Error
This BSOD won't cause a Windows PC boot issue in most cases since the system will recover after rebooting. But the vgk.sys blue screen might repeatedly occur when it comes to Valorant, which is really annoying. So, continue reading and try the following solutions to resolve the problem.
- Way 1. Repair Valorant in Riot Client
- Way 2. Reinstall Vanguard and Check the Service
- Way 3. Put Windows on the GPT Disk
- Way 4. Update Windows and Drivers
- Way 5. Allow Full Control for Vgk.sys
- Way 6. Disable Virtualization-based Security
- Way 7. Run Boot Repair via EaseUS Partition Master
- Way 8. Uninstall and Reinstall Valorant
- Way 9. Reset Windows
Way 1. Repair Valorant in Riot Client
The last method is to repair Valorant in Riot client. Even though it may not be that powerful to repair errors on Vanguard, it's still worth giving it a try.
Step 1. Launch the Riot client. Click the Profile icon and select Settings.
Step 2. Select Valorant and hit the Repair button.

Step 3. Wait for it to fix the error, then restart your game.
Way 2. Reinstall Vanguard and Check the Service
One of the possible reasons that are causing vgk.sys failed is the failure of the anti-cheat engine - Vanguard. Many players have complained about Vanguard affecting their gaming experience or causing unexpected problems. Thus, you can try to reinstall it and check if its service is configured correctly.
Step 1. Open the Start menu and go to "Apps" > "Apps & features."
Step 2. Search for Vanguard and then uninstall it.
Step 3. Launch Valorant and it will automatically download and install Vanguard again. See if the BSOD occurs now. If it still happens, move to the next step.
Step 4. Type services in the search box and open it.
Step 5. Find vgc, right-click on it, and select "Properties."
Step 6. Set the Startup type as "automatic" or "manual" and then hit "Start." Then, hit "Apply" and "OK."

Now, run the game and see if it works. If not, try the next method.
Way 3. Put Windows on the GPT Disk
If your Windows 11/10 is on an MBR disk, you will probably encounter vgk.sys BSOD issue. Although Windows 11/10 is still available on MBR disks, the most appropriate partition style for Windows 11/10 OS is GPT. Thus, you can try to convert the MBR disk to GPT if your Windows OS is on an MBR disk.
The standard method will take a lot of time and energy since it requires reinstalling Windows and your applications on the disk. Thus, to do this without reinstalling Windows, you can use reliable software like EaseUS Partition Master Professional.
Its Disk Converter feature can help you convert a disk from MBR to GPT with a few simple clicks. Before you execute the task, you may need to check the BIOS Mode first to find out which boot mode your PC is using.
📖Related article: How to Know If Windows Using UEFI or Legacy (1min-Check)
#1. Perform the Disk Converter
Step 1. Download and launch EaseUS Partition Master on your computer.
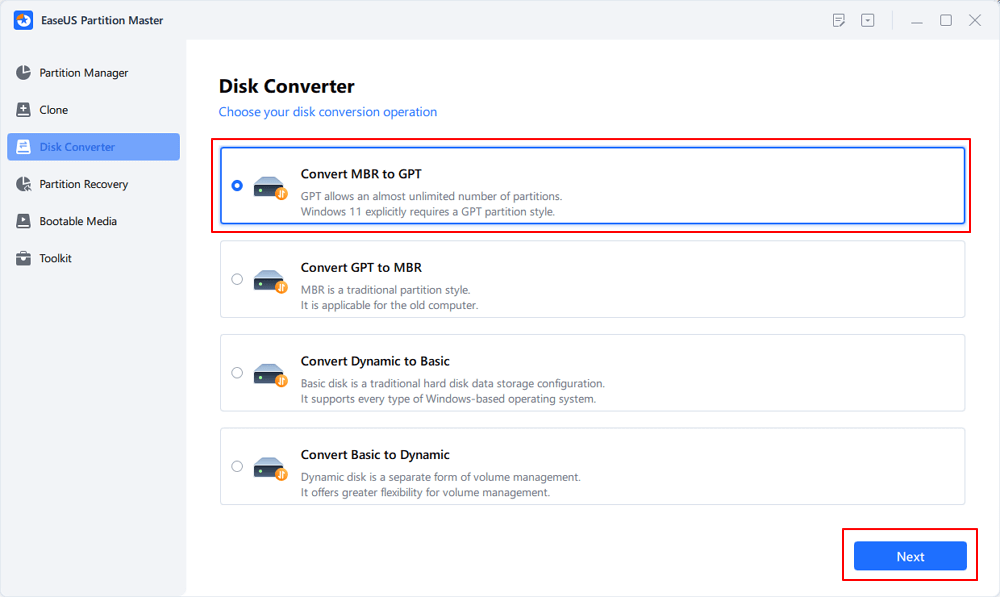
Step 2. Go to Disk Converter, select "MBR => GPT" and click "Next" to continue.
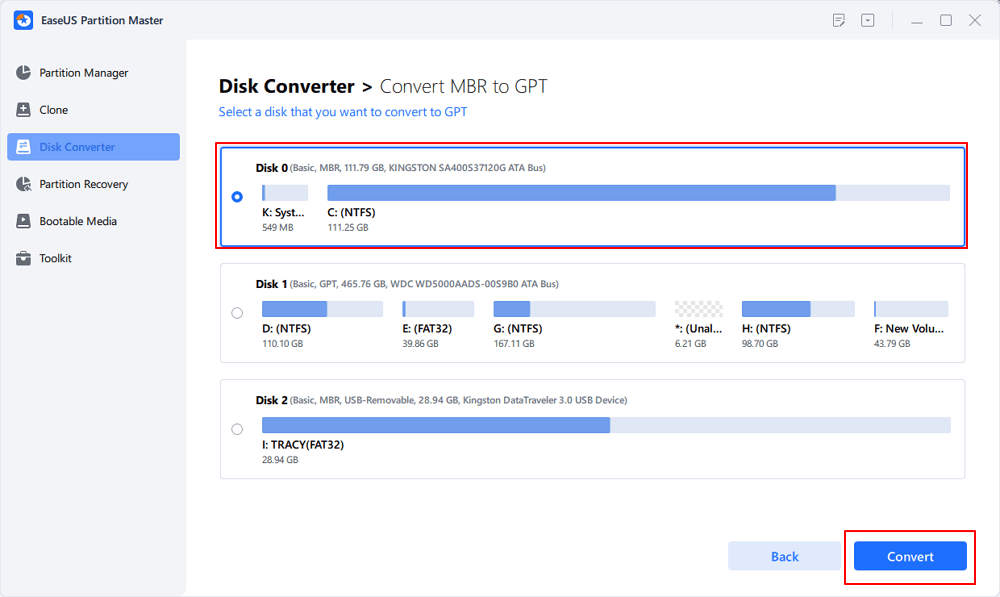
Step 3. Select the target MBR disk that you tend to convert to GPT, and click "Convert" to start the conversion.
#2. Check TPM 2.0 and Secure Boot
After the process, you should check the TPM 2.0 and enable Secure boot because Valorant requires them to be activated on Windows 11 OS. You can read the following articles for the tutorial and more information.
- Notice:
- If your motherboard does not support TPM2.0, you must downgrade from Windows 11 to Windows 10 to launch Valorant.
⭐Additional Help
To effectively guide for additional queries, users can use the following consultation entrance and contact EaseUS support:
EaseUS experts are available to provide you with 1-on-1 manual services (24*7) and help fix Windows boot error, BSOD or computer boot loop issues. Our experts will offer you FREE evaluation services and efficiently diagnose and resolve system boot failure, Windows stop codes and OS lagging issues using their decades of experiences.
- 1. Fix BSOD - blue/black screen of death error due to Windows update or other reasons.
- 2. Get rid of Windows boot error such as no bootable device found, or BCD file corruption.
- 3. Serve to fix 0X000_error codes on Windows system or OS boot loop issues.
Way 4. Update Windows and Drivers
Outdated Windows and drivers, especially the graphics driver, will affect the launch and performance of Valorant. Performing Windows updates and updating the drivers can improve the performance of your computer and might eventually allow your PC to run Valorant without issues.
For Windows updates, you can go to "Settings" > "Windows Update" and check for updates. You should be able to see the notice if there is a new patch for update.
For graphics drivers, you can go to the official site of NVIDIA Driver or AMD Drivers to install the appropriate driver for your computer.
Way 5. Allow Full Control for Vgk.sys
The vgk.sys blue screen error might occur if Vanguard has no advanced permission on your computer. Therefore, the second way you can try is to give full control to vgk.sys.

Step 1. Go to the Riot Vanguard directory. The default folder is:
C:\Program Files\Riot Vanguard
Step 2. Right-click on vgk.sys and select "Properties."
Step 3. Go to the Security tab and click on "Edit."
Step 4. Allow "Full control" for all the users. Then, hit "Apply" and "OK."
Step 5. Restart your computer and launch Valorant.
By doing so, you should be able to get the Vanguard anti-cheat service to a normal state.
Don't forget to share this practical article with informative solutions on your social media to help more Valorant players.
Way 6. Disable Virtualization-based Security
There is another tested way that can fix the error and get rid of vgk.sys BSOD - disable Virtualization-based security. The Virtualization-based Security features on Windows 11 could affect the gaming performance or even cause troublesome issues like vgk.sys blue screen. You can disable it to enhance the gaming performance and lower the system failure risk.
Step 1. Search and open Turn Windows features on or off in the search box.
Step 2. Find and uncheck "Hyper-V", "Microsoft Defender Application Guard", "Virtual Machine Platform", and "Windows Hypervisor Platform."
Step 3. Click "OK" and restart your PC to finish the procedure.
Step 4. Press "F1", "F2", "F10", "F12", "Del", or "Esc" to enter BIOS.
Step 5. Go to the Advanced tab and disable the Virtualization option. Then, save the changes and exit.
(The settings may differ on different motherboards.)

Way 7. Run Boot Repair via EaseUS Partition Master
Sometimes, Valorant cannot launch correctly because of the failure of certain system files. However, it is hard to determine where the source of BSOD is. Therefore, you can perform the Boot Repair feature in EaseUS Partition Master to detect and repair the error automatically.
Step 1. Start EaseUS Partition Master after connecting the external drive/USB to your computer, go to "Bootable Media," and click "Create bootable media."

Step 2. Select an available USB Drive or CD/DVD and click "Create." You can also burn the Windows ISO file to the storage media.
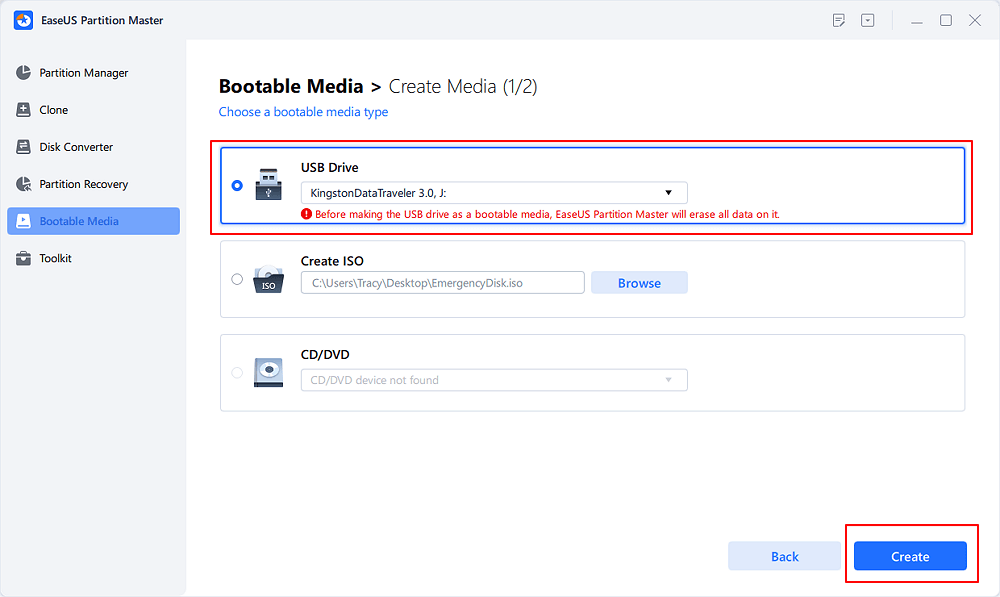
Step 3. Connect the created bootable drive to the new computer and reboot the computer by pressing and holding F2/Del to enter the BIOS. Then, set the WinPE bootable drive as the boot disk and press F10 to exit.
Step 4. Boot the computer again and enter the WinPE interface. Then, open EaseUS Partition Master and click "Boot Repair" under the "Toolkit" option.
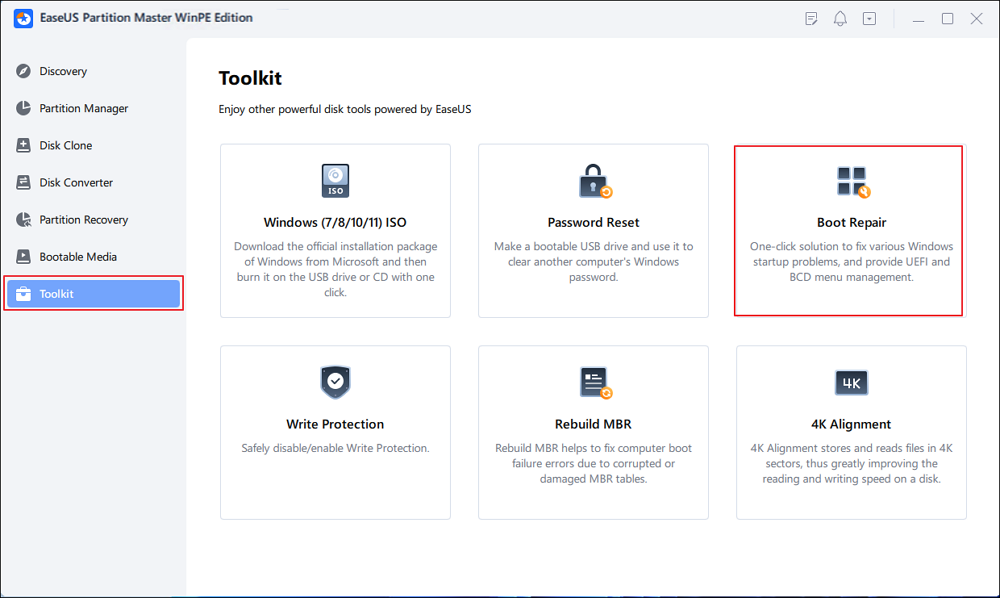
Step 5: Select the system you want to repair and click "Repair."
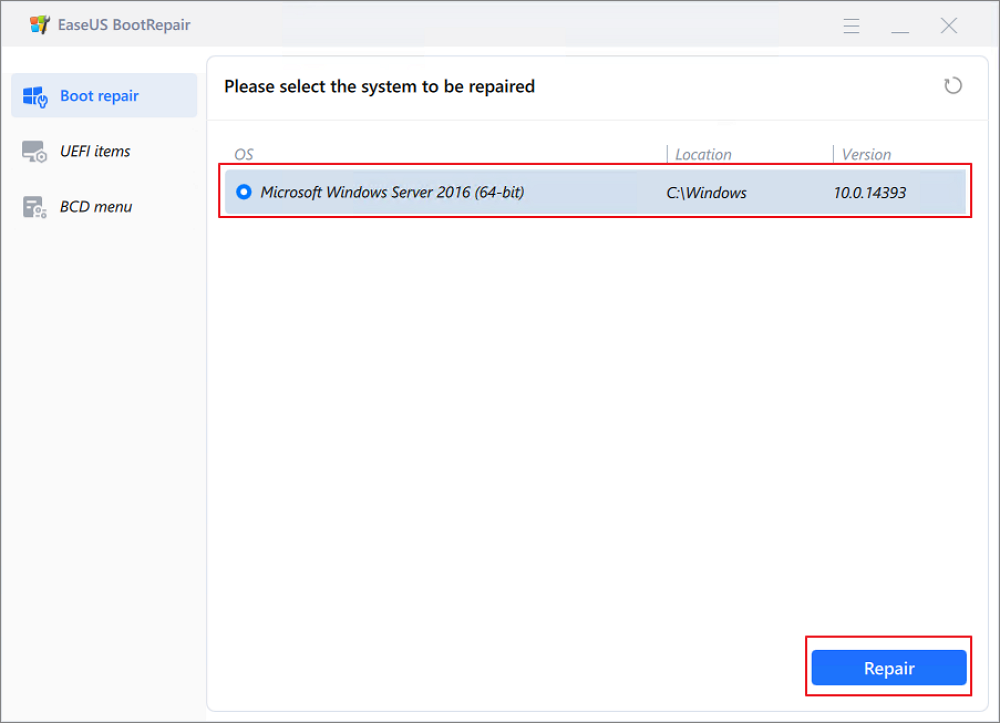
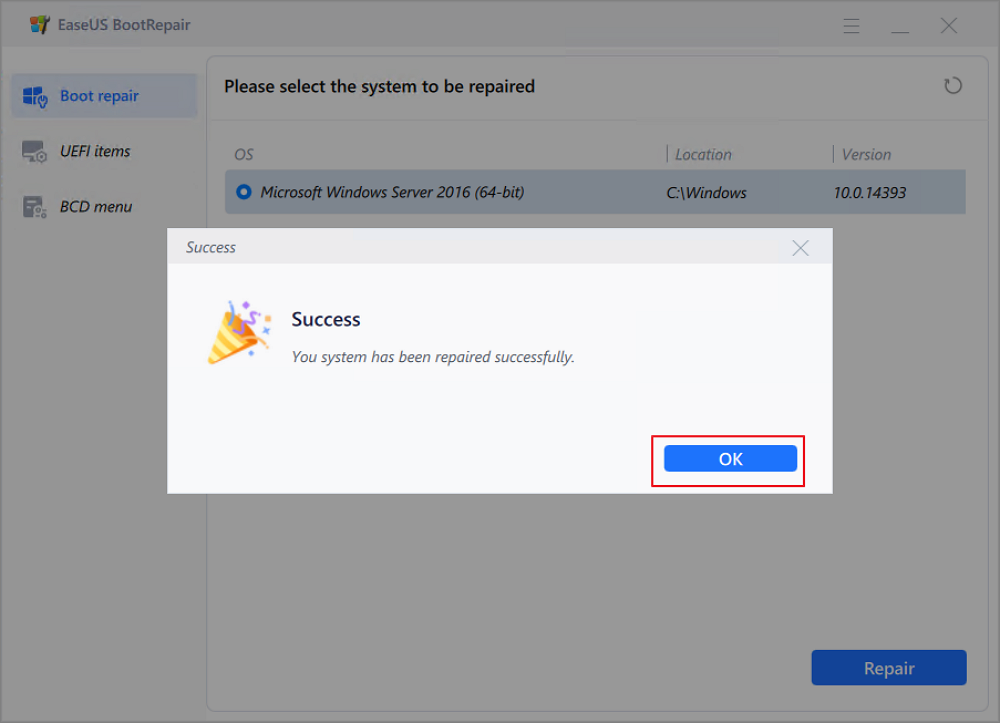
Step 6. Wait a moment, and you will receive an alert that the system has been successfully repaired. Click "OK" to complete the boot repair process.
Download this powerful tool and try both methods that can be done with it to get the joy of Valorant back.
Way 8. Uninstall and Reinstall Valorant
Uninstalling Valorant and then reinstalling it might also be able to fix the vgk.sys failed issue. Just to be sure, you can also uninstall and reinstall the Riot client to have a comprehensive file replacement.
Step 1. Search and open "Control Panel" in the Windows search bar.
Step 2. Go to "Programs" > "Uninstall a program."
Step 3. Find "Riot Vanguard", "Valorant," and "Riot Client", then uninstall them by order.
Step 4. After uninstalling them completely, go to the official site of Riot Games to download the Riot client and reinstall Valorant.
Way 9. Reset Windows
If all the methods above cannot help you fix vgk.sys blue screen, the last choice is to reset your PC and hope it can correct the incompatible files and configuration.
Step 1. Open Settings, go to "System" > "Recovery," and hit "Restart now" under the "Advanced startup" tab.
Step 2. Navigate to "Troubleshoot" > "Reset this PC".
Step 3. Choose "keep my files" and follow the prompts to reset your PC.
Hopefully, all those methods can help you fix the BSOD error and allow you to launch Valorant normally. If you can't launch Valorant normally after all attempts, contact Riot's official customer service for technical assistance.
You can share this informative article on your social media to help more Valorant players.
Possible Causes For Vgk.sys BSOD
There are many different reasons that could cause vgk.sys failed when you launch, load, or play Valorant. The most common factors are:
- Vanguard service failure. If the Vanguard anti-cheat service is not enabled correctly, it might have an impact on the game and lead to unexpected problems.
- Corrupted files. When a bug occurs in the game, it could result in corrupted game files, which may prevent you from launching Valorant as usual. But it usually gets repaired after an update with new patches and bug fixes.
- Driver issues. The outdated or incompatible drivers will affect the gaming performance, even stopping the game from running normally. Sometimes, the latest updated drivers with bugs or inappropriate configuration may cause such issues as well.
Conclusion
Valorant vgk.sys blue screen issue is common among global players. Such an issue is discussed in the forum from time to time. To help gamers enjoy the game without annoying errors, this article has presented 9 methods. One of the basic requirements is to run Valorant on Windows 11/10 since it no longer supports Windows 7, 8, and 8.1 for security reasons.
If you can't launch Valorant correctly because the OS is on an MBR disk, you can resort to EaseUS Partition Master. With its assistance, you can convert an MBR disk to GPT without reinstalling Windows.
FAQs on Vgk.sys Blue Screen
If you have other questions related to vgk.sys blue screen or Valorant, you can check the FAQs below. Here might be the answers you are looking for.
1. How do I clean my Riot client?
If you want to uninstall the Riot client and clean the data completely, you should delete certain files manually after uninstallation:
- Open File Explorer.
- Go to the path: C:\Users\User_Name\AppData\Local\Riot Games.
- Delete the folder and empty the Recycle Bin.
2. What is VGK PC?
The Vgk. sys is a vital file that is associated with the Vanguard anti-cheat engine. Most of the BSODs are caused by the issue related to vgk.sys. The most common way to fix it is by updating Windows and reinstalling the Vanguard anti-cheat.
3. How to fix Valorant TPM 2.0 and Secure Boot errors?
If you get the message saying Vanguard requires secure boot to be enabled in order to play, you'll need to check TPM 2.0 and secure boot.
- Open Settings, navigate to "System" > "Recovery," and hit "Restart now" under the "Advanced startup" tab.
- Go to "Troubleshoot" > "Advanced options" > "UEFI Firmware settings."
- Click the "Restart" button. Then, hit the advanced/security/boot settings page.
- Find the TPM 2.0 and Secure Boot options and set "Enabled."
However, if you have bypassed Secure Boot and TPM Settings on Windows 11, you'll have to upgrade to match the essentials or roll back to Windows 10 to play Valorant.
How Can We Help You
About the Author
Roxanne is one of the main contributors to EaseUS and has created over 200 posts that help users solve multiple issues and failures on digital devices like PCs, Mobile phones, tablets, and Macs. She loves to share ideas with people of the same interests.
Oliver is an EaseUS professional writer who dares explore new areas. With a passion for solving tech issues with straightforward guides for common users, Oliver keeps honing his writing craft by developing in-depth solutions for disk and partition management, computer boot-up issues, file transfer, etc.
Product Reviews
-
I love that the changes you make with EaseUS Partition Master Free aren't immediately applied to the disks. It makes it way easier to play out what will happen after you've made all the changes. I also think the overall look and feel of EaseUS Partition Master Free makes whatever you're doing with your computer's partitions easy.
Read More -
Partition Master Free can Resize, Move, Merge, Migrate, and Copy disks or partitions; convert to local, change label, defragment, check and explore partition; and much more. A premium upgrade adds free tech support and the ability to resize dynamic volumes.
Read More -
It won't hot image your drives or align them, but since it's coupled with a partition manager, it allows you do perform many tasks at once, instead of just cloning drives. You can move partitions around, resize them, defragment, and more, along with the other tools you'd expect from a cloning tool.
Read More
Related Articles
-
Fix High RAM Memory Usage Issue on Windows 11/10 [10 Practical Fixes]
![author icon]() Brithny/2024/10/25
Brithny/2024/10/25 -
How to Fix DiskPart Virtual Disk Service Errors in 2024
![author icon]() Brithny/2024/09/23
Brithny/2024/09/23 -
Windows 10 Won't Boot after Partition Resize [How to Fix & Why]
![author icon]() Oliver/2024/06/13
Oliver/2024/06/13 -
How to Create Bootable USB Windows 10
![author icon]() Tracy King/2024/09/19
Tracy King/2024/09/19
Hot Topics in 2024
EaseUS Partition Master

Manage partitions and optimize disks efficiently


