Ways to Delete Windows 7 Backup [Updated 2025]
Daisy updated on Jan 09, 2025 to Knowledge Center | How-to Articles
This article tells you why you need to delete Windows 7 backup on your computer. You will also find the complete guide on how to delete Windows 7 backup in this post.
To avoid accidental data loss, you back up your computer data from time to time. However, you will find your computer runs slower and slower after a while. How does this happen? What causes it? It is the accumulated backup files that make your computer slow. You need to delete unnecessary Windows 7 Registry backups on your computer to guarantee that there is always enough space for your computer operation.
This article will provide a complete guide on how to delete Windows 7 backups on your computer. Just read through and follow the guide.
You may be curious about why you need to delete your Windows 7 backup. Backup is a method to avoid data loss. But a computer cannot always backup files for its limited computer storage space. If backup files and folders have taken up too much freedom of a computer, the computer will run slower. So, it is necessary to delete Windows 7 backups on your computer. You can also achieve the goal of freeing up space on your computer by setting scheduled backup deletion. Read through the article, and we will guide you on how to delete Windows 7 backups and set scheduled backup deletions on your computer.
You may be interested in Solutions: Windows 7 Backup on Windows 10 Not Working
Now you have checked whether you need to delete Windows 7 backup or not. If you need to delete Windows 7 backup, here we will provide two manual ways to help you delete Windows 7 backup on your computer.
First, this way is to use the control panel to delete Windows 7 backup on your computer. Follow the steps below.
Step 1. Click "Start" and type Control Panel in the search box. Open Control Panel.
Step 2. Go to "System and Security." Choose "Backup and restore."
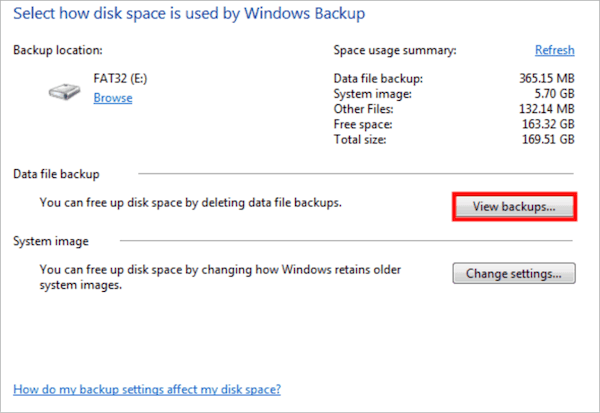
Step 3. Click "Manage Space." Then choose "View backups." The backup on your computer will appear in a window.

Step 4. Choose the specific backup file you want to delete and then click "Delete." After this, you have succeeded in Windows 7 backup deletion.
The method above is to delete Windows 7 backup manually. Here we will provide a guide on how to delete Windows 7 backup automatically by changing backup settings. Just follow the steps below.
Step 1. Click "Start" and type Control Panel in the search box. Open Control Panel.
Step 2. Go to "System and Security." Choose "Backup and restore."
Step 3. Click "Change Settings" under "System image."
Step 4. Choose "Keep only the latest system image and minimize space used by backup."
Step 5. Choose "OK." You have managed to change the system image settings.
Another way to delete Windows 7 backup manually is File History. The step-by-step guide is below; you can follow the guide to delete Windows 7 backups on your computer.
Step 1. Click "Start" and type File History in the search box. Open "File History."
Step 2. Choose "Advanced settings" from the left bar.
Step 3. Select "Clean up versions." Then choose a way to delete the backup files and folders. You have managed to delete the Windows 7 backup on your computer.
Here we have collected several hot topics about deleting Windows 7 backup on the Internet. You can check the questions below and find the answers yourself.
The Windows 7 backup files and folders are stored in "System Volume Information." It is a locked folder that requires the administrator's permission to access it.
Yes, Windows backup deletion is necessary, and it is a way to free up your computer space.
In this post, we have told you why you need to delete Windows 7 backups on your computer. We have also provided a guide to help you delete Windows 7 backup manually and automatically. I hope this article helps you a lot. Thanks for reading!
Related Articles
Introduction to Gigabyte and Terabyte: How Many Gigabytes Are There in a Terabyte
What Is Disk Image Mounter on Mac and How to Use It
How to Kill All the Processes in Windows 10/11
Discord Hardware Acceleration: Everything You Need to Know