How to Format External Hard Drives on a Mac [2025 Guide]
Cici updated on Apr 01, 2025 to Partition Master | How-to Articles
Need to format your external hard drive for Mac compatibility? Learn how to format external hard drives on a Mac with this comprehensive 2024 guide. Follow step-by-step instructions to prepare your drives for optimal use.
Formatting an external hard drive on a Mac can become necessary to resolve compatibility issues, as Windows and macOS do not support the same file system formats. This may confuse you if you're not familiar with the process and file system formats both operating systems support. Well, don't worry, just follow this guide.
In this EaseUS guide, you'll learn how to format external hard drives or external hard drives on a Mac with detailed step-by-step instructions. Ditch the facade of confusion and follow the clear path!
In this section, we'll learn three effective ways to format an external hard drive or external hard drive on a Mac. Remember, formatting will erase all data on the drive, so it's crucial to back up any important files beforehand to prevent data loss.
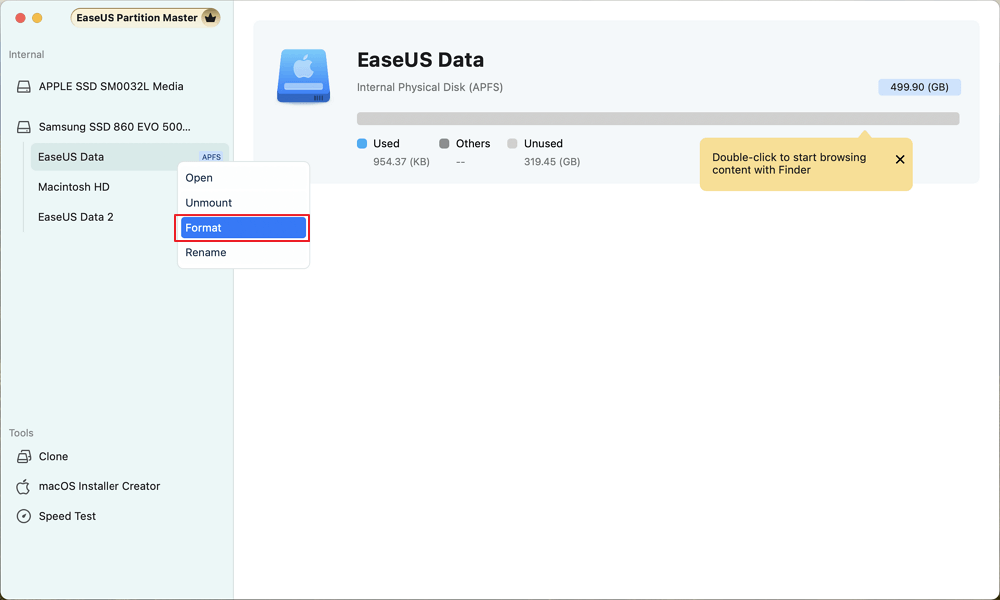
If you want to enjoy a simple and straightforward formatting process, use EaseUS Partition Master for Mac. This tool simplifies disk management tasks. Users can manage, optimize, and format their external hard drives. The biggest advantage of using EaseUS Partition Master for Mac is its intuitive interface, making the process simple even for beginners. This tool provides an all-in-one solution with advanced features and flexibility.
Follow the steps:
Step 1. Run EaseUS Partition Master for Mac, right-click on a target disk drive and select "Format".

Step 2. Rename the volume, select a new format to the target volume and click "Continue" to confirm.
Step 3. Let the program to format the selected disk volume and click "Finish" when the formatting process completes.
Give EaseUS Partition Master a try and see how effectively it formats and converts external hard drives.
With the Disk Utility tool, users can manage and format drives with ease. I'd insist and suggest that you should temporarily move your data to another location from the external hard drive to prevent data loss during the formatting process.
Follow the steps:
Step 1. Connect your external hard drive to your Mac.
Step 2. In the Finder menu, navigate to Go, select Utilities, and double-click the Disk Utility icon to launch it.
Step 3. In the sidebar, select the external hard drive you want to format.
Step 4. Click on "Erase" at the top of the window.
Step 5. Choose a file system format (such as exFAT or APFS), and name your drive.
Step 6. Click "Erase" to confirm. Wait for the process to complete.
The Terminal is a command-line utility, so only try this if you're an expert and comfortable with command lines. Otherwise, a small mistake can lead to disaster.
Follow the steps:
Step 1. Connect your external hard drive to your Mac.
Step 2. Launch Terminal by going to Applications > Utilities > Terminal.
Step 3. In Terminal, type diskutil list and press Enter to list all connected storage devices, including your internal and external drives.
Step 4. Look through the list of drives to find your external hard drive by its name and size. Take note of its identifier, which can be in the format diskX, (for example, disk5).
Step 5. To prevent data loss, unmount the drive before formatting it. Type the command diskutil unmountDisk /dev/diskX, and press Enter to unmount the drive. Replace X with your drive's identifier.
Step 6. Type diskutil eraseDisk FORMAT NAME /dev/diskX to format your drive. Replace FORMAT with the file system type (e.g., APFS, ExFAT, HFS+), NAME with the desired name for your drive, and diskX with your drive's identifier. Press Enter to start.
Once formatting is complete, type diskutil list again to verify that your drive appears with the new name and format.
Choosing the right file format is essential for ensuring compatibility, performance, and ease of data backup. Below is a comparison of the common file formats available on macOS:
#1. APFS (Apple File System):
#2. HFS+ (Mac OS Extended):
#3. ExFAT:
Choose APFS for MacOS use, which has high speed and advanced features. Use HFS+ for older macOS versions or Time Machine compatibility. Pick ExFAT for cross-platform access between macOS and Windows. Select the format that best suits your specific needs.
With these step-by-step methods, formatting your external hard drives and external hard drives should now be straightforward. Be sure to choose a file system format that aligns with your specific needs and device compatibility.
For an even smoother experience, consider using EaseUS Partition Master for Mac. This robust tool simplifies the process and offers additional features for efficient drive management and formatting. Give it a try to make your disk management tasks easier and more efficient.
Do you have more queries? Check out these FAQs!
1. What is the difference between Erase and Format in Disk Utility?
There's a slight distinction. Erasing a drive removes all data but leaves the underlying file system intact. Formatting completely wipes the drive, including the file system, and prepares it for new data.
2. Why is my external hard drive not showing up on my Mac?
A poor connection, faulty cable, or corrupt hard drive data can prevent your external drive from showing up on your Mac.
3. Can I use an external hard drive formatted for Windows on a Mac?
A compatible file system format, such as exFAT, works smoothly on Mac and Windows computers.
Related Articles
How to Format M.2 SSD? [Easy Instructions]
How to Partition SD Card for Android
How to Format Bootable Pendrive [4 Safe Solutions]
How to Turn Off Bitlocker in Windows 11/10 (Lenovo, Dell, Asus)