How to Install Active Directory in Windows 11
Gap updated on Nov 25, 2024 to Todo Backup Guide | How-to Articles
Active Directory is widely used on Windows Server OS. However, you can also easily install Active Directory in Windows 11. This article will guide you on how to install Active Directory in Windows 11 and recommend using EaseUS Todo Backup to back up your Active Directory to ensure data safety.
Active Directory is a widely used service on Windows Server for managing Windows networks, making it easy for you to manage users, computers, security policies, and more. However, you can also install Active Directory on Windows 11 computer and use it for network management and security.
In this article, we will show you how to install Active Directory in Windows 11 and recommend using EaseUS Todo Backup to back up your Active Directory to ensure data safety.
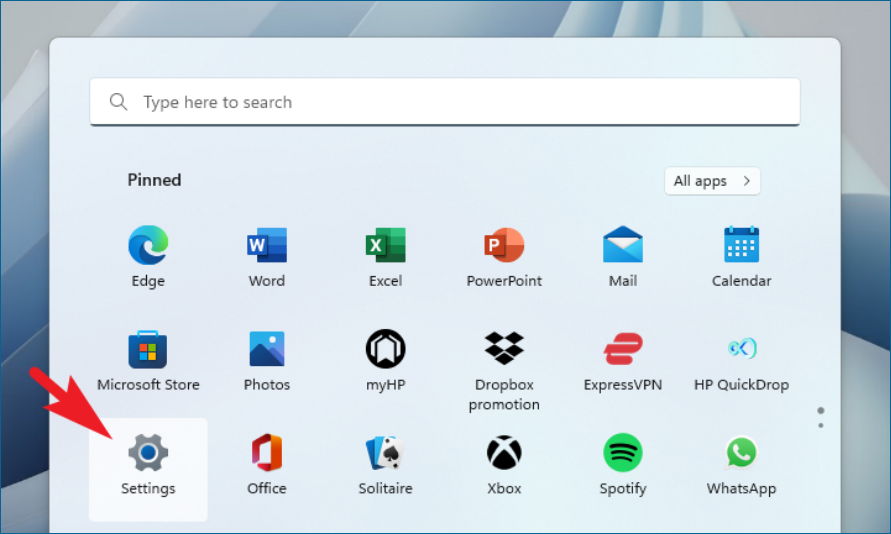
On Windows servers, administrators can install Active Directory using the Server Manager service. The process on Windows 11 is different. To begin with, navigate to the Start Menu and locate the 'Settings' tile, which can be found under the 'Pinned apps' section. Alternatively, simply type 'Settings' in the menu search bar to quickly access it.
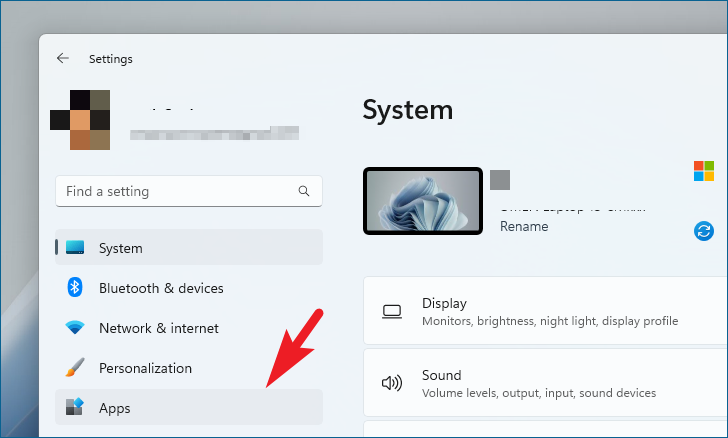
After that, on the Settings window, click on the ‘Apps’ tab present on the left sidebar to proceed.
Then, from the right section of the window, locate and click on the ‘Optional features’ tile to continue.
In the following screen, find the 'Add an optional feature' tile and select the 'View features' button situated at the far right edge of the display. This action will launch a new window on your screen.
Subsequently, in the 'Add an optional feature' window, enter 'Active Directory' in the search bar to find the desired tool. From the search results, identify the 'RSAT: Active Directory Domain Services and Lightweight Directory Services and select the accompanying checkbox. Finally, click on the 'Next' button located at the bottom of the overlay window to advance.
On the next screen, click on the ‘Install’ button present on the window to initiate the installation.
It might take a few minutes to install the services on your system, wait till the process is finished.
Once successfully installed, head to the Start Menu and type Windows Tools to perform a search for it. Then, from the search results, click on the ‘Windows Tools’ tile to open it.
Now, on the Windows Tools window, locate and double-click on the ‘Active Directory Users and Computers’ tile to open and manage the devices connected to your server.
Once the configuration is complete, you can start managing Active Directory. However, due to the importance of network data involved in Active Directory, backup is crucial. To protect your system, we recommend using EaseUS Todo Backup Enterprise back up your Active Directory. This backup software can help you easily back up and restore your Active Directory, safeguarding your data and system security.
Before backing up your Active Directory with EaseUS Todo Backup, make sure you have downloaded and installed the software.
Upon selecting the Active Directory option, a comprehensive list of all available active directories is presented for your convenience. From this list, you are able to easily and quickly select the desired directory with ease.
Basic Settings:
Destination - Click Browse... to select your backup destination.
Plan Name & Description - An accurate plan name and appropriate description can help you find the needed image file easily.
Advanced backup settings
Advanced backup settings are useful when you want to create a flexible and automatic backup plan. The schedule is to create an automatic backup plan. The backup option is to edit the advanced parameters. Backup Cleanup is to reserve the limited image as per the image retention rule.
Installing Active Directory in Windows 11 can enhance network management and security. Backing up your Active Directory with EaseUS Todo Backup will protect your data and system security. Take action now and start enjoying better network management and safety!
1. What are the system requirements for installing Active Directory on Windows 11?
The system requirements for installing Active Directory on Windows 11 are similar to those of Windows Server 2019. It requires a 64-bit processor with at least 4 GB of RAM and 32 GB of available storage. It also needs a network adapter that is compatible with Ethernet standards.
2. How do I verify that Active Directory has been successfully installed on my Windows 11 machine?
Once you have completed the installation process for Active Directory on your Windows 11 machine, you can verify its successful installation by checking the "Active Directory Users and Computers" tool. This tool should be available in the Administrative Tools folder. If it is present, you can open it and navigate through the different organizational units and objects of your domain to confirm that Active Directory is functioning properly. Additionally, you can use the "dcdiag" command in the Command Prompt to run a domain controller diagnostic test to ensure that all the domain controller services are running as expected.
3. Can Active Directory be installed on any edition of Windows 11, or only specific editions?
Active Directory can only be installed on the Windows Server editions of the Windows Operating System. Therefore, only the Windows Server editions of Windows 11 can have Active Directory installed.
4. What are some common errors or issues that may occur during the installation of Active Directory on Windows 11, and how can they be resolved?
Some common errors that may occur during the installation of Active Directory on Windows 11 include insufficient disk space, network connectivity issues, and DNS misconfiguration. These errors can be resolved by freeing up disk space, checking network cables and settings, and verifying that DNS forwarding is enabled. Microsoft offers a Troubleshooting Active Directory Installation guide that can help address such issues.
Related Articles
A Complete Guide to Windows Server Backup and Restore [2024 Update]
How to Perform Synology NAS Incremental Backup
Remote Management Backup Tools for MSP
Backup and Restore SQL Database from One Server to Another: 2 Tips