How to Use Hyper-V Checkpoint
Gap updated on Jul 09, 2024 to Todo Backup Guide | How-to Articles
What can be done to resolve a failure that occurs on a Hyper-V virtual machine? This article will walk you through utilizing the built-in checkpoint feature or an intuitive backup tool, EaseUS Todo Backup Enterprise to resolve this issue.
A checkpoint is a snapshot of a virtual machine that captures its memory, disks, and settings. Using Hyper-V checkpoints allows you to effortlessly restore a virtual machine to a prior state while retaining all the data and settings that were saved subsequent to the checkpoint. This feature empowers you to experiment with various configurations, updates, or applications without jeopardizing the stability or performance of the virtual machine.
Here are the steps:
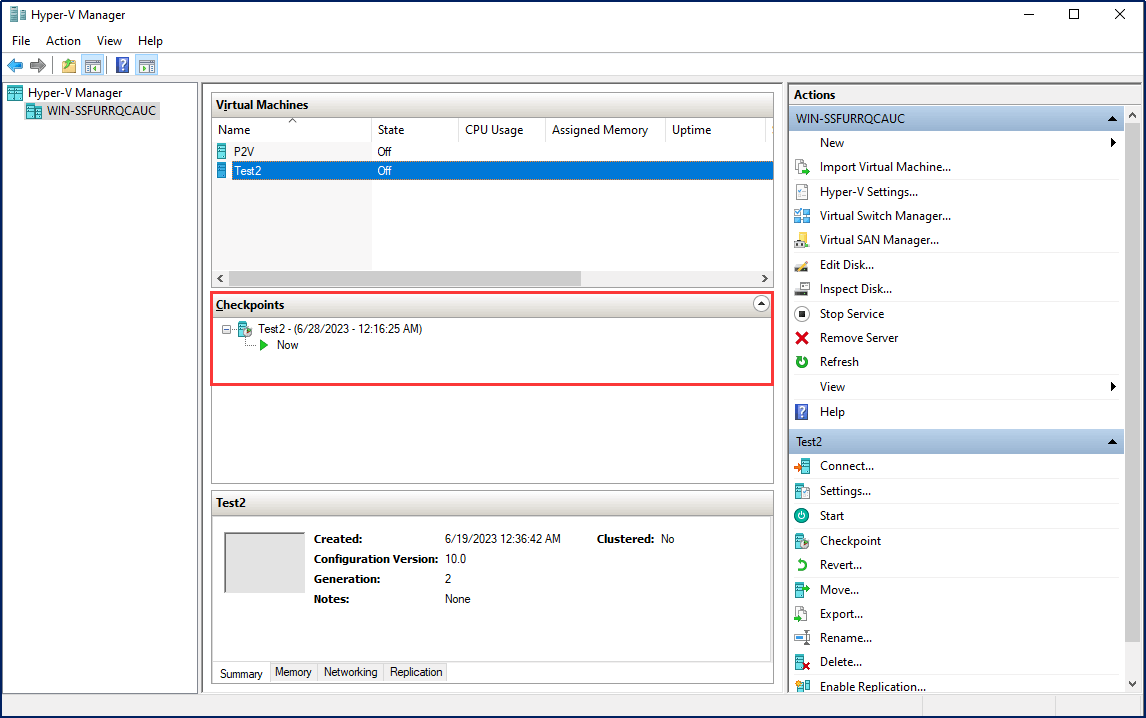
1. In Hyper-V Manager, select the virtual machine, and then click Checkpoint.

2. When the process is complete, the checkpoint will appear under Checkpoints in the Hyper-V Manager.

3. Select Settings to configure options for the checkpoints.

Note: There are two types of checkpoints in Hyper-V: Standard checkpoints and Production checkpoints. Both types capture the current state, data, and configuration details of a running virtual machine (VM). However, the difference lies in the level of data consistency they offer. While a standard checkpoint ensures application consistency, it does not guarantee data consistency.
To Restore Hyper-V Checkpoint, just select the checkpoint you wish to restore and then click Apply.
The utilization of Hyper-V checkpoints offers various advantages that make them convenient and flexible for certain scenarios. However, their reliability and security for disaster recovery purposes can be questionable, as their effectiveness relies on the availability and dependability of the parent disk. Conversely, employing a reliable backup tool like EaseUS Todo Backup can present a superior and more secure option for disaster recovery due to its inherent benefits. Backups are self-sufficient and portable, as they do not rely on the parent disk, and they can be stored in a distinct location or on different media.
Backup
To begin, it is essential to install EaseUS Todo Backup Enterprise on the Hyper-V virtual machine directly. Then proceed to create a backup image of the Hyper-V system by clicking New Task.
Restoration
Right-click on the backed-up image and select Recovery or check the image and simply click on the feature Recovery located at the top of the home page to perform the necessary restoration task.
By following these 2 steps, you will be able to backup and restore Hyper-V using EaseUS Todo Backup.
When it comes to protecting your data and applications on Hyper-V in the event of a disaster, you may be seeking a more effective solution. While Hyper-V checkpoints offer the ability to save the state of a virtual machine at a specific point in time, they come with drawbacks such as consuming disk space and resources. These checkpoints create multiple files that gradually grow in size, ultimately impacting the performance of the virtual machine.
We would like to recommend a more intuitive option: EaseUS Todo Backup. This software allows you to effortlessly copy the data and configuration of a virtual machine to another location. With EaseUS Todo Backup, backups are consistent and accurate, supporting application-aware and transactional consistency. The software also ensures the integrity of backups by flushing the memory and buffers before creating them.
What sets EaseUS Todo Backup apart is its flexibility and customization options. You have the freedom to choose what to back up, when to back up, and how to back up, catering to your specific needs and preferences.
Additionally, backups created with EaseUS Todo Backup are easily recoverable and restorable. In the event of a failure, corruption, or loss, you can confidently restore a virtual machine to a previous state. This can be done on the same host or even on a different host.
With EaseUS Todo Backup, you can enhance your data and application protection strategy, simplifying the process and providing peace of mind.
We hope you find this information helpful in making your decision. Please do not hesitate to reach out if you have any further questions or need assistance.
You may have concerns regarding the usage of checkpoints or backups in Hyper-V. Here are some other issues that may help you understand better. Please check them below.
1. Do Hyper-V checkpoints affect performance?
Checkpoints may slow down the entire host the longer you are keeping them. Because they consume disk space and resources, as they create multiple files that grow over time and affect the performance of the virtual machine.
2. How many Hyper-V checkpoints can a VM have?
Hyper-V can house up to 50 checkpoints per VM using Hyper-V Manager. With System Center Virtual Machine Manager or SCVMM, this limit can be extended to 64 checkpoints. The checkpoint tree is based on the parent disk.
3. Is it safe to delete Hyper-V checkpoint?
Deleting checkpoints' files from the disk directly leads to data loss. Instead, the checkpoints should be deleted from the Hyper-V Manager. PowerShell can be used as well to delete them especially if there is no delete option in the Hyper-V Manager GUI.
4. What is the difference between Hyper-V checkpoint and backup?
There are 2 options to backup Hyper-V. One is to use Hyper-V checkpoints, which let you save the state of a virtual machine at a point in time. Another option is to use backups, which allow you to copy the data and configuration of a virtual machine to another location. Both methods have their pros and cons, depending on your needs and preferences.
Related Articles
How to Schedule MySQL Automatic Backup in 3 Quick Ways [Beginner's Guide]
How to Create EaseUS Bootable USB, CD/DVD, and ISO Image with EaseUS Todo Backup
How to Backup Multiple Computers to One Hard Drive
How to Take SQL Server Database Backup Using Command Prompt