Start Your Free Trial!
Sign up to our newsletter, stay updated on news and exclusive offers from EaseUS. Don't worry, if you change your mind, you can unsubscribe at any time, free of charge. We value your privacy (Privacy Policy).
Tracy King updated on Jan 24, 2025 | Home >Computer Instruction
Mac is one of the most well-known computer systems globally. The high functionality and impressive working of the OS make it immensely popular. The Apple menu on the Mac is a significant part of the system. It is a drop-down menu that offers access to multiple options.
Using these options makes it easier for users to navigate the system. For instance, you can go to the App Store quickly or gain access to the list of recent items. In this article, we will talk about the Apple menu and how to use it on Mac.
Are you wondering what the Apple Menu on Mac is? The Apple Menu is the drop-down menu you can see on the left of the menu bar in Mac systems. Though the role of the Apple Menu has changed, it usually displays the Apple logo.
The Apple menu has the same design regardless of your system, be it MacBook Pro, MacBook Air, etc. You can identify it via the Apple logo.
The Apple Menu has several items you can use when you click on it.
About This Mac: You can get more information on your system. These generally include the processor type, macOS version, memory storage, etc.
There is a distinct difference between the menu bar and the Apple Menu on the Mac.
| Menu Bar | Apple Menu |
|---|---|
| The menu bar is the thin, horizontal bar present on the top part of the screen. | The Apple menu is one of the menus present in the menu bar of the Mac screen. |
| The menu bar contains different menus such as Apple, File, Edit, View, History, Bookmarks, Desktop, Windows, Help, Status menus, Open Spotlight, Open Control Centre, Ask Siri, and Open Notification Centre. | The Apple menu contains various options such as About This Mac, System Preferences, App Store, Location, Recent items, Force Quit Finder, Sleep, Restart, Shut Down, and Log Out Guest User. |
There are various issues users can encounter while using the Apple Menu on Mac. For instance, you might want to add or remove items from the menu bar. In that case, you need to follow the steps given below.
Step 1: Go to the Apple Menu present in the top-left corner of the screen. Select "System Preferences".

Step 2: Click on the "Dock & Menu Bar".

Step 3: You will come across different items on the left part of the pane.
To add the item to the menu bar, you must check Show on the Menu Bar option in the right-hand side settings.
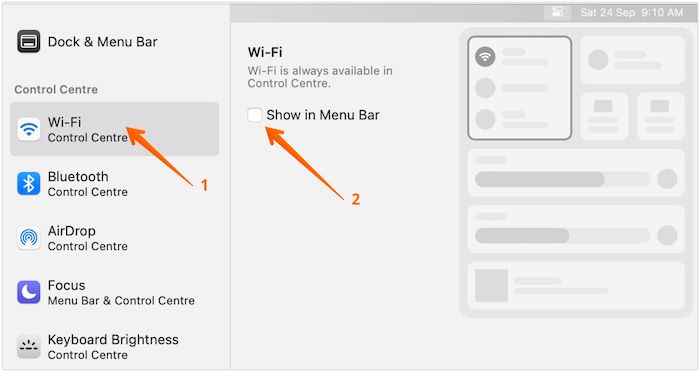
If you want to remove a specific item, uncheck it. Do you want to change the clock item in the menu bar?
For that, you must adopt the below-mentioned steps:
Step 1: Go to System Preferences. Click on the "Dock & Menu Bar". You need to select the "Clock" option from the left-side pane.
Step 2: You will get two options for the date: Show the day of the week and the date. Choose the one you want. You can choose both too.
Step 3: For a time, you get multiple options. These include an option between digital and analog. You can also opt for the Show AM/Pm option, Use a 24-hour clock, Flash the time separators, and Display the time in seconds.

Step 4: You can also opt for the "Announce the time" option. You can choose the voice and when you want the time to be announced.
Though changing over the years, the Apple Menu plays a significant role in Mac. You can quickly identify it by the Apple logo, which is generally present on the top-left part of the screen. The drop-down menu has multiple options such as System Preferences, App Store, Shut down, and more!
It is easy to use the Apple menu. Moreover, you can also make changes in the event of any problem. For instance, you can add an item on the Menu bar or change the style of the date or time.
Undoubtedly, the Apple Menu is a crucial part of the Mac. However, it is imperative to gather more knowledge if you want to use it seamlessly. Take a look at the questions and answers listed here to know more!
It would help if you used the keyboard to reach the Apple menu on a Mac without a mouse. Press CNTL+ FN+F2 to highlight the Apple logo. Tap the down arrow to expand the menu and the down arrow again to choose your desired function. After that, press Enter.
Apple menu preferences are available in the Apple menu in the menu bar. You need to go to the top-left part of the Mac screen. Now, select System Preferences.
To manage the menu bar on a Mac, you need to go to System Preferences. After that, select Dock & Menu Bar to manage the menu bar. You can add or remove items with ease.
Was This Page Helpful?
Daisy is the Senior editor of the writing team for EaseUS. She has been working at EaseUS for over ten years, starting as a technical writer and moving on to being a team leader of the content group. As a professional author for over ten years, she writes a lot to help people overcome their tech troubles.
Written by Tracy King
Tracy became a member of the EaseUS content team in 2013. Being a technical writer for over 10 years, she is enthusiastic about sharing tips to assist readers in resolving complex issues in disk management, file transfer, PC & Mac performance optimization, etc., like an expert.
Related Articles
[Too Slow!] Fix: Windows 10 APPs Take Forever to Load
![]() Brithny/2025-02-08
Brithny/2025-02-08
How To Switch Monitors 1 and 2 On Windows 10 Computer
![]() Larissa/2025-01-24
Larissa/2025-01-24
How to Fix Last USB Device Malfunctioned Error on Windows [Efficient Ways]
![]() Daisy/2025-01-24
Daisy/2025-01-24
Manor Lords Save File Location & Config File Location on PC/Stean/Xbox
![]() Larissa/2025-01-24
Larissa/2025-01-24
EaseUS Data Recovery Services
EaseUS data recovery experts have uneaqualed expertise to repair disks/systems and salvage data from all devices like RAID, HDD, SSD, USB, etc.
Copyright © 2004 - 2025 EaseUS. All rights reserved.
CHOOSE YOUR REGION
Start Your Free Trial!
Sign up to our newsletter, stay updated on news and exclusive offers from EaseUS. Don't worry, if you change your mind, you can unsubscribe at any time, free of charge. We value your privacy (Privacy Policy).
Start Your Free Trial!
Sign up to our newsletter, stay updated on news and exclusive offers from EaseUS. Don't worry, if you change your mind, you can unsubscribe at any time, free of charge. We value your privacy (Privacy Policy).