Start Your Free Trial!
Sign up to our newsletter, stay updated on news and exclusive offers from EaseUS. Don't worry, if you change your mind, you can unsubscribe at any time, free of charge. We value your privacy (Privacy Policy).
Page Table of Contents
How to Fix Black Screen After Installing Windows 10HOT
Why Black Screen After Installing Windows 10HOT
ConclusionHOT
FAQs About Black Screen After Installing Windows 10HOT
About the Author
Hot Topics
Updated on Apr 28, 2025
In the ever-evolving digital landscape, transitioning to Windows 10 promises efficiency, innovation, and enhanced user experience. However, amidst the excitement of upgrading, you can occasionally witness a black screen after installing Windows 10. It's a problem many users encounter, causing frustration and confusion. But worry not. EaseUS will serve as your beacon in the storm of technical glitches. Let's unravel the mysteries behind the enigmatic black screen, offering solutions and peace of mind.
EaseUS will provide a detailed exploration of the black screen after installing Windows 10. We'll demystify the causes, guide you through troubleshooting steps, and empower you with actionable solutions. Share this solution-rich guideline with people who need help:
Now, we will discuss fixing the black screen after installing Windows 10. Before learning about the solutions, ensure you have your computer or smartphone ready to embark on this troubleshooting journey. But first, take a moment to check your cables and remove any unnecessary connections, as sometimes, the most straightforward solutions can yield the best results.
Here is the overall list of all solutions:
When it comes to resolving the black screen issue, EaseUS Partition Master Professional is your go-to solution because of its versatility. This tool determines the current issue and opens doors to various system optimizations. Unlike other methods, EaseUS Partition Master offers a user-friendly interface, making the troubleshooting process a breeze.
Advantages of EaseUS Partition Master
Here are the steps to fix the black screen with EaseUS Partition Master:
Step 1. Start EaseUS Partition Master after connecting the external drive/USB to your computer, go to "Bootable Media," and click "Create bootable media."

Step 2. Select an available USB Drive or CD/DVD and click "Create." You can also burn the Windows ISO file to the storage media.
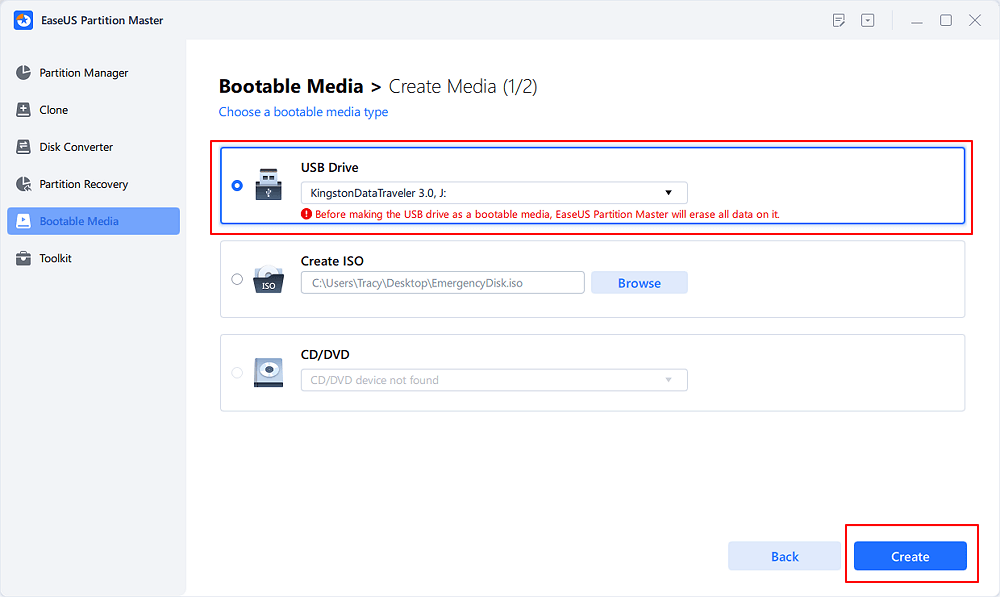
Step 3. Connect the created bootable drive to the new computer and reboot the computer by pressing and holding F2/Del to enter the BIOS. Then, set the WinPE bootable drive as the boot disk and press F10 to exit.
Step 4. Boot the computer again and enter the WinPE interface. Then, open EaseUS Partition Master and click "Boot Repair" under the "Toolkit" option.
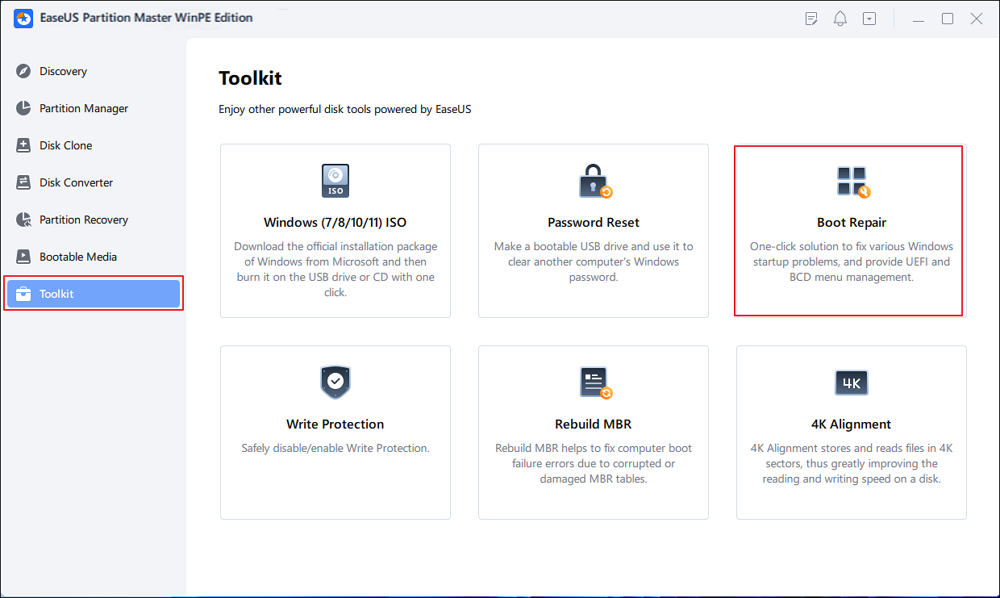
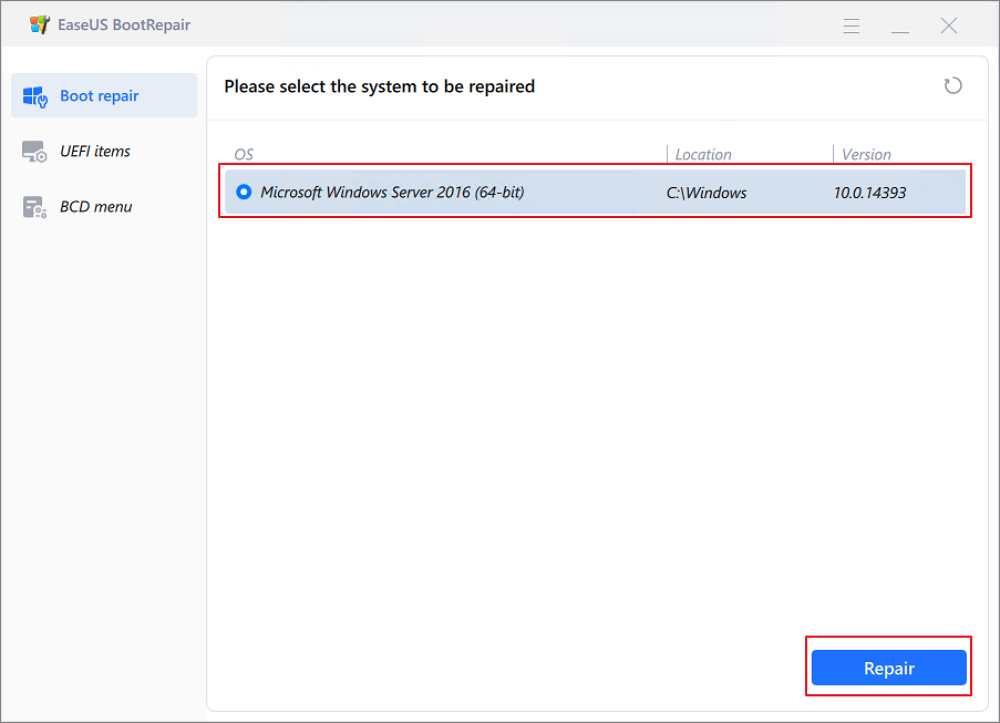
Step 5: Select the system you want to repair and click "Repair."
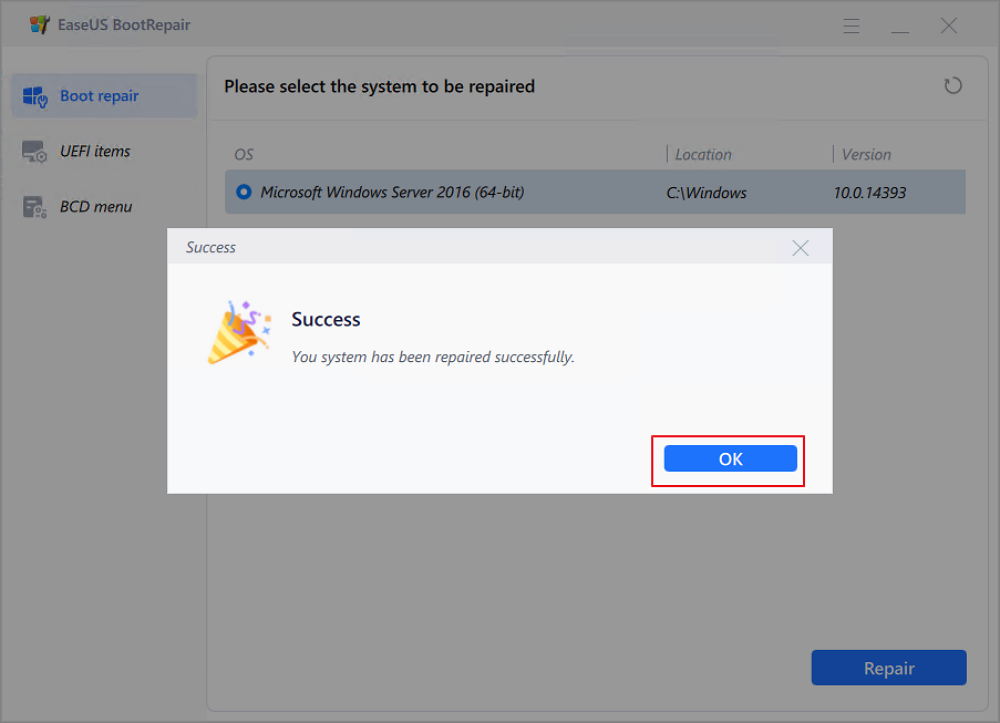
Step 6. Wait a moment, and you will receive an alert that the system has been successfully repaired. Click "OK" to complete the boot repair process.
Additional Features of EaseUS Partition Master
Try using EaseUS Partition Master to eliminate the black screen issue seamlessly. Explore its unique features and take the first step toward a trouble-free Windows 10 experience.
When EaseUS Partition Master isn't your preferred choice, running a Windows Repair can be an effective alternative.
Simplified steps that can help the user fix the boot failure:
Step 1. Boot the computer using a Windows installation media or a system repair disc.
Step 2. Choose your language preferences and click "Next."
Step 3. Click "Repair your computer" and select "Troubleshoot."

Step 4. Choose "Advanced options" and then select "Startup Repair."

Step 5. Windows will diagnose and fix the issue automatically.
Once the repair process is complete, restart your computer to see if the black screen issue is resolved.
Further Reading:
How to Fix Windows 11 Black Screen with Cursor| 100% Works
Do you want to fix the Windows 11 black screen with a cursor? Follow this guide to fix it quickly and get your PC in a normal state.

Outdated or incompatible graphic card drivers can lead to the black screen problem. Updating them can often resolve this issue.
Detailed instructions:
Step 1. Right-click on the Start icon and locate "Device Manager."

Step 2. Expand the "Display adapters" category to find your graphic card.
Step 3. Right-click and locate your graphic card and choose "Update driver."
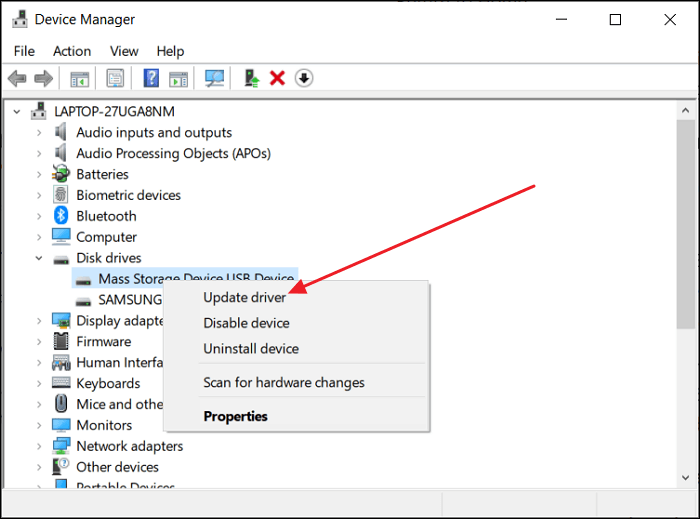
Step 4. Select "Search automatically for updated driver software."
Step 5. Windows will start searching and installing the latest driver automatically.
Step 6. Follow the on-screen instructions to complete the process.
If the black screen issue persists, restart your computer after the update. Or you can check the following article and find applicable ways:
How to Fix Black Screen of Death Windows 10 | 8 Ways
If you are entangled in the black screen dilemma, you will discover multiple reliable solutions in this article.

You May Also Like:
Another option for fixing the Black Screen Of Death error after you install Windows 10 on your computer is to take a customized service for help. EaseUS expects will be available to fix this issue on your PC and make Windows 10 running as fresh as new on the machine.
EaseUS experts are available to provide you with 1-on-1 manual services (24*7) and help fix Windows boot error, BSOD or computer boot loop issues. Our experts will offer you FREE evaluation services and efficiently diagnose and resolve system boot failure, Windows stop codes and OS lagging issues using their decades of experiences.
Hardware errors can sometimes manifest as a black screen. Identifying and repairing these errors can restore your system's functionality. Follow the tutorial to check and repair your hardware error:
Step 1. Select the tool and type "Windows Memory Diagnostic" in the Start menu search bar.
Step 2. Choose "Restart now and check for problems."
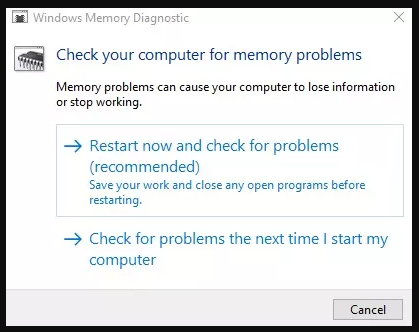
Step 3. Windows will restart and perform a memory test. Be patient; this may take a while.
Step 4. Input cmd in the Start menu search box, locate Command Prompt, and select "Run as administrator."
Step 5. In Command Prompt, type chkdsk /f /r C: and press Enter.
Step 6. Press "Y" and then press Enter. Restart your computer.
Windows will scan and repair disk errors during the restart process.
Booting in Safe Mode can help troubleshoot software-related issues, potentially resolving the black screen problem. Below is the comprehensive guide you should refer to:
Step 1. Restart your computer and hold the "F8" or "Shift + F8" key before the Windows logo shows.
Step 2. Choose "Troubleshoot," then "Advanced Options," and then "Startup Settings."

Step 3. Click "Restart" and then press the "4" or "F4" key to enter Safe Mode.
Step 4. While in Safe Mode, check if the black screen problem persists. If not, it indicates a software conflict.
If the black screen issue started after a recent Windows update, reverting to the previous version can be a viable solution. Here is the full guide:
Step 1. Go to Settings > Update & Security.

Step 2. In the left pane, select "Recovery."
Step 3. Under the "Go back to the previous version of Windows 10" tag, select the "Get started" option.
Step 4. Provide a reason for rolling back (optional) and click "Next."
Step 5. Click "No, thanks" to bypass the feedback request, and then click "Next."
Windows will initiate the rollback process and restart your computer automatically.
Unwanted programs or incompatible software might trigger the black screen problem. Removing them can restore your system's stability.
Step 1. From the Start menu, click Control Panel.
Step 2. Then click "Programs" and choose "Programs and Features."

Step 3. Examine the list of installed apps to find the most recent ones producing problems.
Step 4. Right-click the troublesome program and select "Uninstall."
Step 5. Follow the on-screen instructions to finish the uninstalling process.
Step 6. Restart your computer after removal to see if the black screen issue still exists.
You can resolve the black screen issue and fix Windows 10 by following these steps. Here are two related guidelines about black screen after installing Windows 10:
Have you ever wondered why the enigmatic black screen rears its head after installing Windows 10? It's a question worth pondering, as understanding the issue's roots can empower users to prevent and troubleshoot this frustrating problem.
Here are some reasons:
One of the primary reasons behind the black screen issue is faulty connections. Loose or damaged cables between your monitor and computer can disrupt the signal, leading to a black screen. Checking and securing these connections can often resolve the issue, ensuring a seamless visual experience.
Outdated or incompatible display drivers can create issues during system startup. Black screens can occur when your graphics card driver isn't compatible with Windows 10. Updating your drivers ensures compatibility and optimal performance.
Sometimes, the installation files themselves can be corrupted. These corrupted files can manifest as a black screen post-installation, whether due to a faulty download or an interrupted installation process. Verifying the integrity of your installation files and ensuring a clean installation can mitigate this risk.
Viruses and malware frequently disrupt system functions, and the black screen issue is no exception. You might see a black screen if your system is infected with a malicious virus. Malware can interfere with critical system processes, causing your system to become unresponsive. Updating your antivirus software regularly can help guard you against these threats.
By understanding these underlying causes, users can navigate the complex terrain of Windows 10 installations more confidently.
In Windows 10 installations, the black screen after installation is a formidable challenge. Throughout this comprehensive guide, we've delved into the heart of this issue and presented clear, user-friendly solutions. From faulty connections to corrupted installation files and the sneaky infiltration of viruses, we've covered every possible cause, equipping you with the knowledge to troubleshoot effectively.
At the heart of our troubleshooting arsenal stands EaseUS Partition Master. Its user-friendly interface, comprehensive solutions, and time-efficient approach make it a standout choice. Whether you're grappling with the black screen or seeking to optimize your system, this tool offers a seamless experience, ensuring you can enjoy Windows 10 to its fullest potential.
If you have any further questions about the black screen after installing Windows 10, don't worry; we've got you covered. Here are answers to some common queries:
1. How do I solve the black screen after updating Windows 10?
When the screen goes black post-Windows 10 updates, it can be concerning. But fret not. Follow these steps to resolve the Windows 10 black screen after the update:
2. Why does my Windows 10 remain black screen in safe mode?
Windows 10 might show a black screen in Safe Mode due to corrupted graphic drivers or incorrect resolution settings, preventing the display from functioning correctly in this mode.
3. How do I fix my laptop turning on but no display?
When your laptop powers up but the screen stays blank, don't panic. Follow these steps to illuminate your display:
How Can We Help You
Updated by Tracy King
Tracy became a member of the EaseUS content team in 2013. Being a technical writer for over 10 years, she is enthusiastic about sharing tips to assist readers in resolving complex issues in disk management, file transfer, PC & Mac performance optimization, etc., like an expert.
Cici is the junior editor of the writing team of EaseUS. She accepted the systematic training on computers at EaseUS for over one year. Now, she wrote a lot of professional articles to help people resolve the issues of hard drive corruption, computer boot errors, and disk partition problems.
It won't hot image your drives or align them, but since it's coupled with a partition manager, it allows you do perform many tasks at once, instead of just cloning drives. You can move partitions around, resize them, defragment, and more, along with the other tools you'd expect from a cloning tool.
Read MoreI love that the changes you make with EaseUS Partition Master Free aren't immediately applied to the disks. It makes it way easier to play out what will happen after you've made all the changes. I also think the overall look and feel of EaseUS Partition Master Free makes whatever you're doing with your computer's partitions easy.
Read MorePartition Master Free can Resize, Move, Merge, Migrate, and Copy disks or partitions; convert to local, change label, defragment, check and explore partition; and much more. A premium upgrade adds free tech support and the ability to resize dynamic volumes.
Read MoreIt won't hot image your drives or align them, but since it's coupled with a partition manager, it allows you do perform many tasks at once, instead of just cloning drives. You can move partitions around, resize them, defragment, and more, along with the other tools you'd expect from a cloning tool.
Read MoreI love that the changes you make with EaseUS Partition Master Free aren't immediately applied to the disks. It makes it way easier to play out what will happen after you've made all the changes. I also think the overall look and feel of EaseUS Partition Master Free makes whatever you're doing with your computer's partitions easy.
Read MoreRelated Articles
Does SSD Get Slower When Full? Fix SSD Slowing Down [Easy Tricks]
![]() Tracy King/2025/04/28
Tracy King/2025/04/28
How to Read SD card Serial Number [Step-by-Step Guide]
![]() Cici/2025/04/28
Cici/2025/04/28
Hard Drive Keeps Losing Disk Space
![]() Jean/2025/04/28
Jean/2025/04/28
SD Card Shows 0 Bytes? Easy and Quick Fixes Here 🔥
![]() Sherly/2025/04/28
Sherly/2025/04/28
EaseUS Partition Master

Manage partitions and optimize disks efficiently
Your best companion for disk partitioning, MBR to GPT/GPT to MBR conversion,even OS migration
CHOOSE YOUR REGION
Start Your Free Trial!
Sign up to our newsletter, stay updated on news and exclusive offers from EaseUS. Don't worry, if you change your mind, you can unsubscribe at any time, free of charge. We value your privacy (Privacy Policy).
Start Your Free Trial!
Sign up to our newsletter, stay updated on news and exclusive offers from EaseUS. Don't worry, if you change your mind, you can unsubscribe at any time, free of charge. We value your privacy (Privacy Policy).