Start Your Free Trial!
Sign up to our newsletter, stay updated on news and exclusive offers from EaseUS. Don't worry, if you change your mind, you can unsubscribe at any time, free of charge. We value your privacy (Privacy Policy).
Page Table of Contents
Tip 1. Restart Your PC & Close Unused AppsHOT
Tip 2. Install the Latest Update for Windows & Device DriverHOT
HOT
Tip 3. Disable Unnecessary Startup ProgramsHOT
HOT
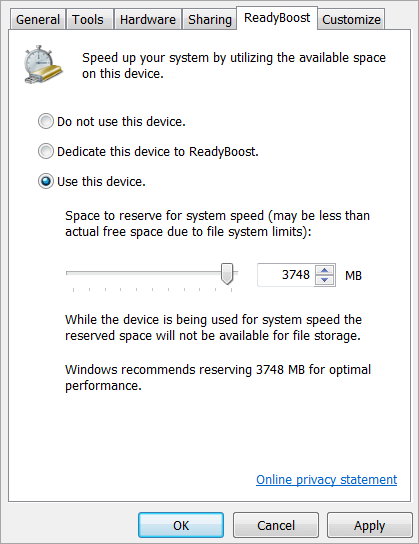
Tip 4. Use ReadyBoost to Speed Up Windows 11/10HOT
Tip 5. Clean Up Disks/Run Disk Cleanup HOT
HOT
Tip 6. Disable OneDrive syncingHOT
Tip 7. Adjust the Appearance and Performance of WindowsHOT
HOT
HOT
HOT
HOT
Tip 8. Check and Clear Viruses and Malware HOT
Tip 9. Upgrade Your RAM/Add More RAMHOT
Tip 10. Perform a System RestoreHOT
To Sum UpHOT
How to Speed Up Windows 11/10 FAQsHOT
About the Author
Hot Topics
Updated on Jan 23, 2025
Although Windows 11/10 is getting faster, more stable, and more powerful, your PC or laptop may slow down due to various factors, including, but not limited to, compatibility issues, bugs, viruses, bloated software, hardware failures, or other issues. This article is for users with the following questions.
EaseUS will walk you through 10 effective methods to speed up Windows 10 and optimize and improve your computer performance.
Restarting your PC should be the first step in speeding up Windows 10. It can clear out the computer's memory and stop any processes that might be taking up resources. When you run your computer for a long time without shutdown, Windows 10 will automatically put the display to sleep, but the processes that were started before will continue to run. These will accumulate over time and slow down your computer.
Always remember to open the Apps you need and close those Apps that are not used anymore.
You can fix this issue by restarting your PC. After your PC restarts, open just the apps you need, then close them when you're done.
See Also:
One of the best ways to make the most of your computer is to ensure that you have the latest version of Windows 10. Updating can fix Windows 10 very slow problem caused by system bugs. When you check for updates, your computer will also search for the latest device drivers, which can also help improve the performance of your computer and make Windows 10 faster.
Step 1. Click the "Start" button, then select "Setting" > "Update & Security" > "Windows Update" > "Check for updates".
Step 2. Select the updates you want to install, then select Install. Restart your PC and see if Windows 10 runs better.

If too many programs start up automatically, your boot time will increase dramatically. Also, too many apps running in the background will make Windows 11/10 run sluggishly. Thus, by disabling unwanted startup programs, you can also speed up your Windows 11/10 tremendously.
Step 1. Right-click anywhere on your taskbar and choose "Task Manager".
Step 2. In the Task Manager window, go to the "Startup" tab.
Step 3. Select the programs you rarely use or don't always need on startup, and click "Disable" to remove it from the startup programs.

ReadyBoost allows you to speed up Windows 10 and improve your computer's performance by utilizing the available space on a removable drive, like a USB flash drive, without opening your computer and adding more memory (RAM). To use ReadyBoost, you need a USB flash drive or a memory card with at least 500MB of free space and a high data transfer rate.

Unlike disk defragmentation, which rearranges the files, Disk Cleanup works to remove unnecessary files on the hard drive and helps to reclaim your disk space.
Step 1. Open This PC, right-click on your system drive and choose "Properties."
Step 2. Click "Disk Cleanup" under the "General" tab, and the utility will start scanning your drive and calculating how much space you can free.
Step 3. When done, choose "Clean up system files" in the window to let the tool scan your disk again.
Step 4. After the second scan, click "OK" in the new window. You will then see a notification asking, "Are you sure you want to delete these files permanently?" Click Delete Files. Since these operations remove unnecessary files from your system, you don’t need to worry about losing important files.
If disk cleanup is not working in Windows 10, learn how to fix it first here.

Temp files only need to exist temporarily and will become useless later. It's unreasonable to store these files on a disk with limited space. Does deleting temporary files speed up your computer? Definitely. Many users have reported noticeable performance improvements by deleting their temp files.
Step 1. Hit the Windows Key, type run, and click Run, as shown in the list.
Step 2. Type %temp% and click OK. You will then be directed to the Windows Temp folder.
Step 3. Select and delete all the files within the folder.
Step 4. Go to the Run box again, type temp, and click "OK."
Step 5. When you see a notification saying you don't have permission to access this folder, click "Continue".
Step 6. Select and delete all the files.
Step 7. Go to the Run box and enter prefetch. Click "Continue," then delete all files within the folder.

As an advanced free partition software, EaseUS Partition Master Free enables you to enlarge your system drive to improve performance easily.
In addition to resizing a partition, this tool also enables you to create partitions as well as format/convert/clone/hide/wipe your disk or existing partition. In a word, it's a versatile disk/partition management tool that will help you improve your computer's performance in every possible way.
Let's see how to extend C drive with this partition management software.
Extend System C drive with unallocated space
The pro version of EaseUS Partition Master also allows you to allocate space from the D drive to the C drive directly to increase the C drive.
If you don't have much space on your system disk to add to your system partition, your best option is to transfer your Windows 11/10 to another larger HDD or switch your disk from HDD to a better-performing SSD.
The OS migration can be completed with EaseUS Partition Master mentioned above. The linked article thoroughly details the tutorial, including video and text, to transfer Windows to another drive. Follow the guide to make your Windows 11/10 substantially faster.
Check the following steps on migrating OS to SSD or another bigger HDD.
Steps to migrate OS to HDD/SSD:
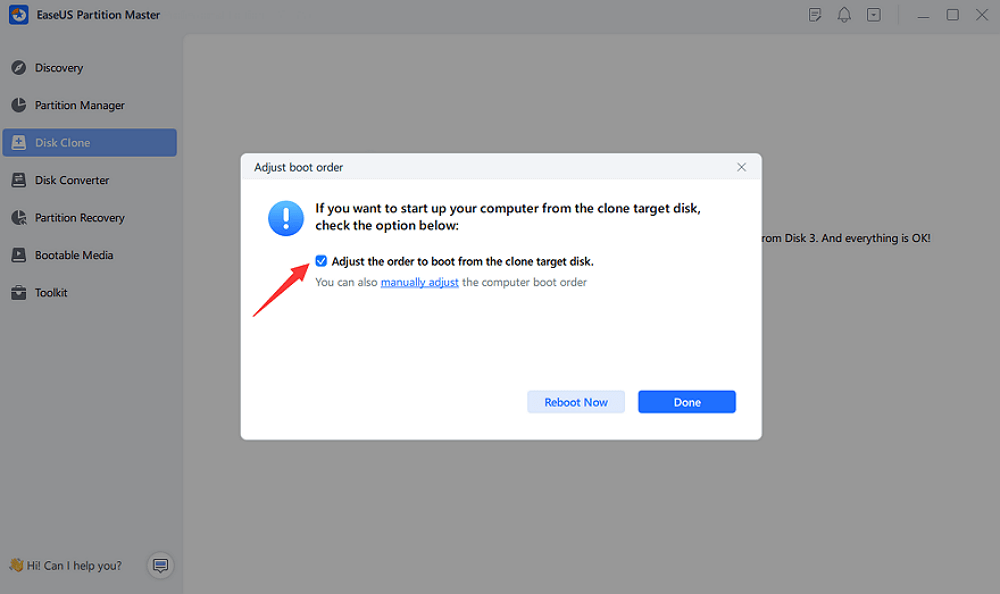
"Reboot Now" means to keep the changes instantly, while "Done" means you need to restart the computer later manually.

Note: The operation of migrating OS to SSD or HDD will delete and remove existing partitions and data on your target disk when there is not enough unallocated space on the target disk. If you saved important data there, back up them to an external hard drive in advance.
OneDrive is the built-in synchronization service in Windows that allows you to sync your files to the cloud and access them on any PC using the same OneDrive account. This can be a useful feature. However, the automatic syncing is likely to slow down your PC. You can easily manually sync an important file to OneDrive once automatic sync is disabled. To see whether OneDrive syncing is affecting your Windows 11/10 performance, Right-click on the OneDrive icon on the right side of the taskbar, Click Pause syncing, and choose a time period. If you experience an improved performance of your computer during the pause, follow the steps below to turn off syncing and choose an alternative way to back up your computer that doesn't come at the cost of reducing your computer's performance.
Step 1. Right-click the OneDrive icon and select "Settings" > "Account."
Step 2. Choose "Unlink this PC" > "Unlink account."
The seven methods above are what you can do to make your Windows 10 faster while booting/running or for gaming by changing your computer settings. The next three solutions utilize third-party software to easily perform advanced tasks to speed up your Windows 11/10 system.
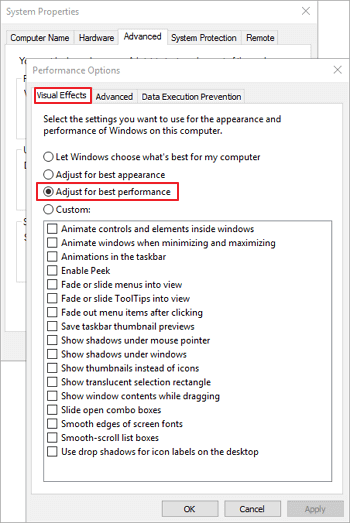
You may use many visual effects, such as animations and shadow effects on Windows 10, to make your computer look great. However, these visual effects use additional system resources and can slow down your PC. You can adjust the appearance and performance of Windows to speed up Windows 10 when your PC has a smaller amount of memory (RAM).
How to disable or adjust the visual effects in Windows 10
Step 1. In the search box on the taskbar, type Advanced system settings. Click the "Advanced" tab > "Settings" > "Visual Effects".
Step 2. On the Visual Effects tab, select "Adjust for best performance" > "Apply".
Restart your PC and see if that speeds up Windows 10. If the fonts on your computer are affected, and you want to keep fonts crisp and more readable, you can select the Custom option.

A virus, malware, or malicious software may run slowly if your computer has been infected. The best way to remove viruses and malicious software is to try to prevent them by running antimalware and antivirus software and keeping it up to date, like Bitdefender, Norton, Kaspersky, Avast, etc.. Windows Security, included in Windows 10, can also scan your PC for viruses or other malicious software.
One of the most effective ways to speed up Windows 11/10 is to increase the amount of virtual memory (RAM). To run smoothly, Windows 11/10 requires a minimum of 4GB.
When your laptop or PC has too little RAM, it cannot support too many applications to run smoothly, and it will run very slowly. In this case, installing a new RAM chip to increase the RAM capacity is quite effective for improving the performance of your computer.
To see the specific condition of your RAM, click "Performance" and "Memory" in the Task Manager.

Have these methods helped you speed up your PC running Windows 10? If so, share this post with more users:
If you have recently installed apps, drivers, or updates for Windows, your PC and Windows may get running slow. In this case, you need to restore your system to the previous time point:
Step 1. Click on the Start menu or press the Windows key. Search for System Properties.
Step 2. Hit the System Restore button and click Next when the System Restore Wizard prompts.
Step 3. A list of available restore points will appear. Choose a restore point from the list. If you want to see more options, check the box for Show more restore points.
Step 4. Review the list of programs that will be affected and click Close if you're okay with it.
Step 5. Click Next > Finish > Yes to proceed.
This article provides the most comprehensive methods for speeding up Windows 11/10, such as restarting your PC and opening only the apps you need, using ReadyBoost to help improve performance, checking for low disk space and freeing up space, extending your system drive, upgrading to an SSD, increasing the capacity of RAM, and more. You can choose the best tip for your computer situation and improve its performance.
Check the following questions that are highly relevant to how to speed up Windows 10 and make it faster.
1. Why is my Windows 10 computer so slow?
2. How can you increase your computer speed?
To increase your computer speed, you can:
3. How can I make Windows 10 2022 faster?
How to speed up Windows 10 2019, 2020, or 2022:
How Can We Help You
Roxanne is one of the main contributors to EaseUS and has created over 200 posts that help users solve multiple issues and failures on digital devices like PCs, Mobile phones, tablets, and Macs. She loves to share ideas with people of the same interests.
Written by Tracy King
Tracy became a member of the EaseUS content team in 2013. Being a technical writer for over 10 years, she is enthusiastic about sharing tips to assist readers in resolving complex issues in disk management, file transfer, PC & Mac performance optimization, etc., like an expert.
It won't hot image your drives or align them, but since it's coupled with a partition manager, it allows you do perform many tasks at once, instead of just cloning drives. You can move partitions around, resize them, defragment, and more, along with the other tools you'd expect from a cloning tool.
Read MoreI love that the changes you make with EaseUS Partition Master Free aren't immediately applied to the disks. It makes it way easier to play out what will happen after you've made all the changes. I also think the overall look and feel of EaseUS Partition Master Free makes whatever you're doing with your computer's partitions easy.
Read MorePartition Master Free can Resize, Move, Merge, Migrate, and Copy disks or partitions; convert to local, change label, defragment, check and explore partition; and much more. A premium upgrade adds free tech support and the ability to resize dynamic volumes.
Read MoreIt won't hot image your drives or align them, but since it's coupled with a partition manager, it allows you do perform many tasks at once, instead of just cloning drives. You can move partitions around, resize them, defragment, and more, along with the other tools you'd expect from a cloning tool.
Read MoreI love that the changes you make with EaseUS Partition Master Free aren't immediately applied to the disks. It makes it way easier to play out what will happen after you've made all the changes. I also think the overall look and feel of EaseUS Partition Master Free makes whatever you're doing with your computer's partitions easy.
Read MoreRelated Articles
4 Quick Solutions for SSD Freezes Up on Windows 10/11
![]() Sherly/2025/03/28
Sherly/2025/03/28
Top 8 Windows 11 Repair Tools | 2025 Best Picks
![]() Cici/2025/01/23
Cici/2025/01/23
How to Boot from External SSD on Windows 10/11
![]() Cici/2025/03/28
Cici/2025/03/28
Full Guide to Check and Fix Disk Error in Windows 11
![]() Tracy King/2025/01/23
Tracy King/2025/01/23
EaseUS Partition Master

Manage partitions and optimize disks efficiently
Your best companion for disk partitioning, MBR to GPT/GPT to MBR conversion,even OS migration
CHOOSE YOUR REGION
Start Your Free Trial!
Sign up to our newsletter, stay updated on news and exclusive offers from EaseUS. Don't worry, if you change your mind, you can unsubscribe at any time, free of charge. We value your privacy (Privacy Policy).
Start Your Free Trial!
Sign up to our newsletter, stay updated on news and exclusive offers from EaseUS. Don't worry, if you change your mind, you can unsubscribe at any time, free of charge. We value your privacy (Privacy Policy).