Start Your Free Trial!
Sign up to our newsletter, stay updated on news and exclusive offers from EaseUS. Don't worry, if you change your mind, you can unsubscribe at any time, free of charge. We value your privacy (Privacy Policy).
Page Table of Contents
When to Check Disk Space Usage with PowerShellHOT
How to Check Disk Usage in PowerShell [With Pictures]HOT
Bonus Tip: Check Disk Space with PowerShell Alternative SoftwareHOT
A Brief Review of PowerShellHOT
Conclusion HOT
About the Author
Hot Topics
Updated on Jan 23, 2025
Many Windows users want to check their disk space using PowerShell, but they might find it confusing to perform operations. This tutorial aims to introduce multiple ways to check disk space with PowerShell and an alternative tool to show disk usage.
| ⏱️Duration: | 5-10 minutes |
| 🎯Goal: | Check disk space with Powershell script on Windows computers |
| 🧰Tools: |
|
Here are a few examples of specific situations or symptoms that may prompt you to check your computer's disk space using PowerShell:

If you have experienced any of the situations mentioned above, you can refer to the tutorial in the coming section and check disk space using PowerShell. By the way, if you are a beginner or want to avoid data loss during the process, download EaseUS Partition Master Free. This free tool can check disk space with one click and help locate large or duplicate files.
After installing it on your PC, you can navigate to the next part to learn how to use it to check disk space and manage the disk partitions.
There are multiple methods available to check the disk space in PowerShell. This section introduces the three most commonly used ways to check your disk space using PowerShell commands. Comparatively, these are less complicated and functional for Windows users.
Get-Volume is the easiest command to find disk storage information. Using this command, you can check the space details of all the volumes at once. It displays the essential information, including health, system type and free/used space in GB. In addition, we will show how you can check the storage space information of a specific drive.
1) Show All Volumes and space allocation
Step 1: Go to the Search bar and type PowerShell.
Step 2: Select the "Run as Administration" option.

Step 3: Type Get-Volume in PowerShell window and hit Enter.

Now, you will find a list of partitions along with their information.
2) Show a Specific drive
To inquire about the details of a specific drive, such as the C drive, insert the following command: Get-Volume -DriveLetter C. If you want to get the information for another drive, simply replace the drive letter accordingly.

It is another effective yet simple way to check disk space using cmdlet. Here are two different commands to follow:
# 1. Check the Space of All Drives
This command displays the free disk space of all drives in GB.
Step 1: Open the PowerShell window.
Step 2: Type Get-PSDrive command, and hit Enter to run it.

It will display a detailed view of used/free disk space, provider, and root of all partitions in the local drive.
# 2. Check the Space of a Specific Drive
Check the used/free disk space for a particular drive by running the following command: Get-PSDrive C. Replace the latter of the target drive instead of C.

This method is a slightly complicated but practical alternative compared to the earlier-mentioned methods. It provides detailed information about your drives. Two scripts of this method provide detailed information, including media type, drive's total size in GB, and employed/free space.
1) Check Total Allocated Space
Select the following command, copy and paste it into PowerShell, and hit Enter.

See the displayed details. You can easily determine the space allocation of all partitions of the local drive.
2) Check the Storage Capacity Assigned to Each Drive
Run the following command to check the detailed space portion of each drive specifically. It shows free/total disk space and the free percentage of each drive in your computer.
All you need to do is drag and drop the given command on PowerShell. See the screenshot to know how it works.

If you are a beginner without extensive computing experience or familiarity with PowerShell, we recommend using a reliable third-party tool - EaseUS Partition Master. You can take a view of this software in the next part.
EaseUS Partition Master is a popular alternative software to check disk space in minutes. As a free disk space analyzer, it is known for its rich features and appealing interface. It has all the options that drive users to check disk space and free it up easily. For example, by utilizing its Disk Space Analyzer feature, they can view information for individual drives without requiring a scan.
A single click can scan all the drives on your local computer. It offers lots of user-friendly functionalities to help users. For a step-by-step guide, you may follow this tutorial for help:
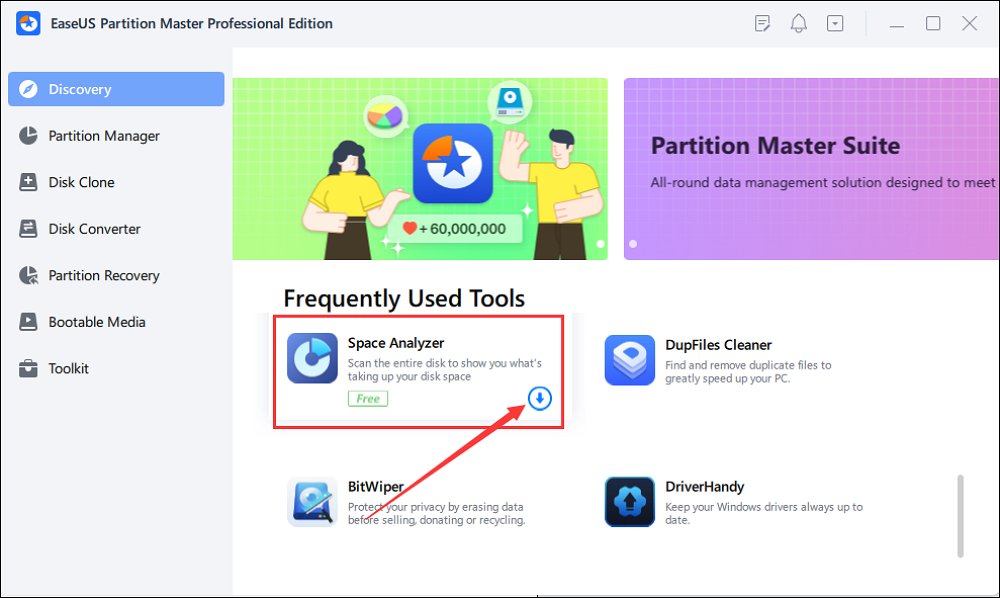
Step 1. Launch EaseUS Partition Master and turn to Discovery. Find and Download Space Analyzer below Frequently Used Tools.

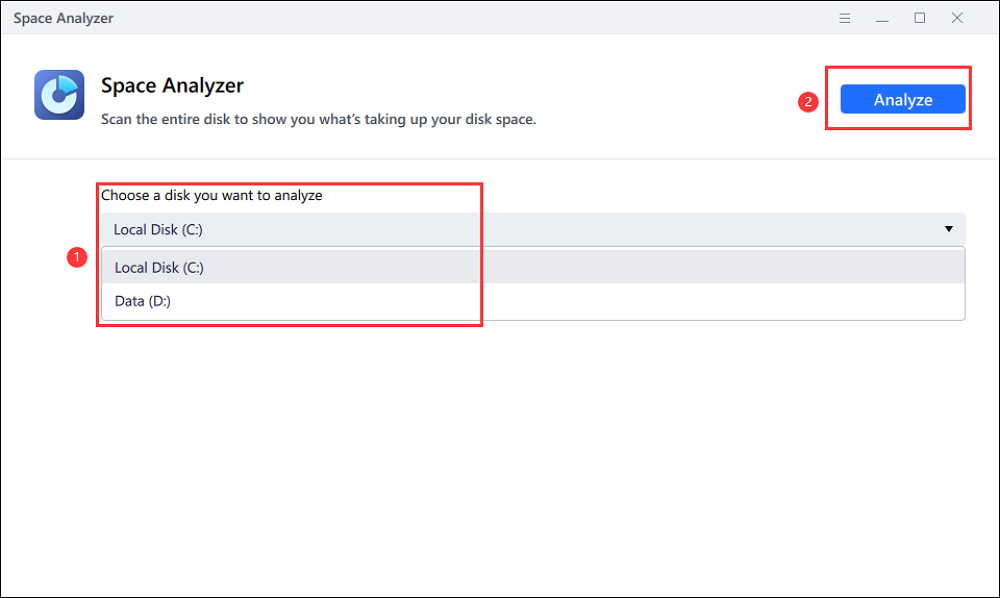
Step 2. In the Space Analyzer pop-up window, select the target disk to be analyzed and click Analyze in the upper right corner.

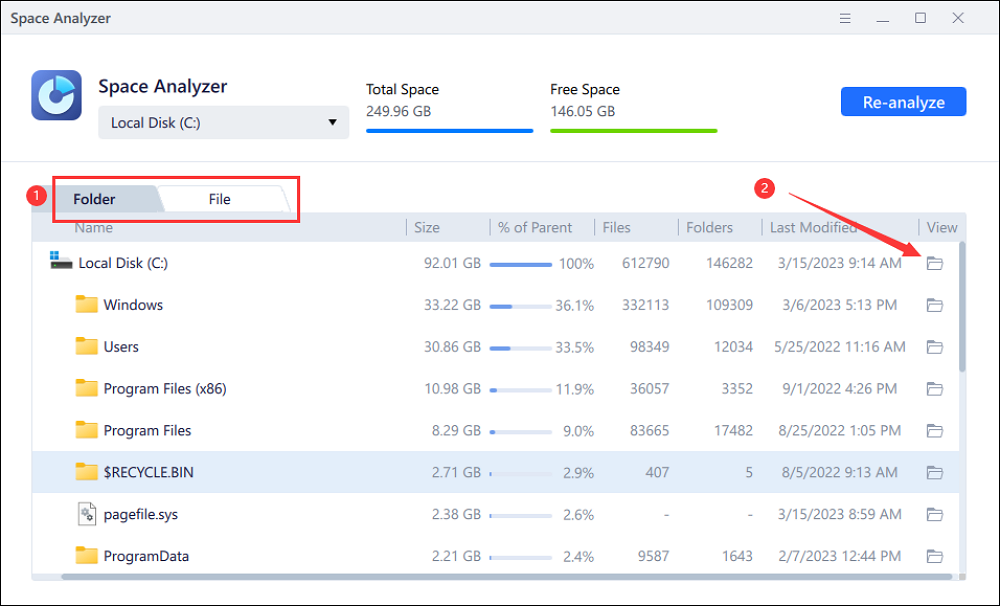
Step 3. Wait a while, and you will see the detailed data. You can click on Folder/File to view different data types and click on the small folder icon to see more information inside the file.

Here is a comparison table, and you can take a view and learn what makes EaseUS Partition Mater with its Disk Space Analyzer feature surpass PowerShell:
| EaseUS Partition Master | PowerShell |
|---|---|
|
|
In addition, EaseUS Partition Master is not only a tool for checking disk space but also allows you to manage disk space with the listed features below, including:

PowerShell is an efficient command-line shell and scripting language tool. It is designed to manage Windows administrator tasks using multiple commands, scripts, and modules. Windows users can perform different tasks, including checking disk space, installing Windows Updates, etc.
PowerShell works seamlessly on all Windows operating systems. Its extensive array of cmdlets provides users with multiple options to execute tasks. For instance, users can choose from several commands to check disk space with PowerShell and can also enhance the level of detailed results by adding different commands. As a result of its versatility, this tool is extensively used by professionals.
If you feel like the provided tips on this page for checking disk space with PowerShell or its alternative tool, share and help more friends around you online:
We hope this tutorial helps you to check and manage your disk space. You are free to opt for any method to get the work done. However, we recommend only advanced Windows users should operate the PowerShell utility. Whereas beginners can employ EaseUS Partition Master because it is effortless to operate with any level of expertise.
In addition, we advise you to follow the given tips and manage your disk space more efficiently:
Follow our FAQs section to find answers if you have more doubts about checking disk space using PowerShell.
1. What PowerShell script can I use to get the disk space report?
If you want to get the disk space report through PowerShell, run the "Get-PSDrive" script. It will show you information like used/available disk space, total capacity, and used space.
2. How do I check disk space in CMD?
You can CMD to check the disk space. Follow the steps:
Step 1: Open the Windows Search bar, type Command Prompt, and click Rus as administrator.
Step 2: Type wmic diskdrive get size and press Enter.
It will show you the total size of your hard drive.
3. Can I run PowerShell to check disk space on Windows Servers?
Yes, to check the disk space on Windows Servers, run the following command in PowerShell: Get-DiskSpaceReport.
The script will collect information on all the Windows Servers and save it as a CSV file on the local disk. Open File Explorer and navigate the saved file in C:\Temp\DiskSpaceReport.
How Can We Help You
Sherly joined EaseUS in 2022 and she has always loved writing articles and enjoys the fun they bring. She receives professional training here, focusing on product performance and other relative knowledge. She has written over 200 articles to help people overcome computing issues.
Written by Tracy King
Tracy became a member of the EaseUS content team in 2013. Being a technical writer for over 10 years, she is enthusiastic about sharing tips to assist readers in resolving complex issues in disk management, file transfer, PC & Mac performance optimization, etc., like an expert.
It won't hot image your drives or align them, but since it's coupled with a partition manager, it allows you do perform many tasks at once, instead of just cloning drives. You can move partitions around, resize them, defragment, and more, along with the other tools you'd expect from a cloning tool.
Read MoreI love that the changes you make with EaseUS Partition Master Free aren't immediately applied to the disks. It makes it way easier to play out what will happen after you've made all the changes. I also think the overall look and feel of EaseUS Partition Master Free makes whatever you're doing with your computer's partitions easy.
Read MorePartition Master Free can Resize, Move, Merge, Migrate, and Copy disks or partitions; convert to local, change label, defragment, check and explore partition; and much more. A premium upgrade adds free tech support and the ability to resize dynamic volumes.
Read MoreIt won't hot image your drives or align them, but since it's coupled with a partition manager, it allows you do perform many tasks at once, instead of just cloning drives. You can move partitions around, resize them, defragment, and more, along with the other tools you'd expect from a cloning tool.
Read MoreI love that the changes you make with EaseUS Partition Master Free aren't immediately applied to the disks. It makes it way easier to play out what will happen after you've made all the changes. I also think the overall look and feel of EaseUS Partition Master Free makes whatever you're doing with your computer's partitions easy.
Read MoreRelated Articles
How to Format M.2 SSD? [Easy Instructions]
![]() Tracy King/2025/03/28
Tracy King/2025/03/28
How to Create a Bootable USB for Mac High Sierra — 2 Ways
![]() Tracy King/2025/03/29
Tracy King/2025/03/29
How to Remove USB Partition on Windows 10/11
![]() Tracy King/2025/01/23
Tracy King/2025/01/23
Stalker 2 System Requirements (Minimum/Recommended)
![]() Oliver/2025/03/28
Oliver/2025/03/28
EaseUS Partition Master

Manage partitions and optimize disks efficiently
Your best companion for disk partitioning, MBR to GPT/GPT to MBR conversion,even OS migration
CHOOSE YOUR REGION
Start Your Free Trial!
Sign up to our newsletter, stay updated on news and exclusive offers from EaseUS. Don't worry, if you change your mind, you can unsubscribe at any time, free of charge. We value your privacy (Privacy Policy).