


Start Your Free Trial!
Sign up to our newsletter, stay updated on news and exclusive offers from EaseUS. Don't worry, if you change your mind, you can unsubscribe at any time, free of charge. We value your privacy (Privacy Policy).
EaseUS Partition Master
Whether you're planning a clean installation, setting up multiple Macs, or resolving system issues, a bootable installer is an essential tool. This page offers you a detailed tutorial on how to create a bootable installer for macOS.

Content
Page Table of Contents
What Is A Bootable Installer for macOSHOT
PreparationHOT
Way 1. Create A Bootable Installer for macOS AutomaticallyHOT
Way 2. Create A Bootable Installer for macOS ManuallyHOT
Additional Tip: How to Use the Bootable InstallerHOT
ConclusionHOT
Create A Bootable Installer for macOS FAQsHOT
About the Author
Hot Topics

Whether you're a beginner looking to install a different version of macOS or an IT professional managing several devices, creating a bootable installer for macOS provides the flexibility and control necessary for effective system maintenance.
If you don't know how to create a bootable installer for macOS, this page from EaseUS can help you with a detailed tutorial. Read on to learn more.
| Comparison | Create Bootable Installer Automatically | Create Bootable Installer Manually |
|---|---|---|
| 🛠️Tool | Terminal | |
| ⏱️Time duration | 20 to 40 minutes | 30 to 45 minutes |
| 🧩Complexity | Easy👍🏻 | Difficult |
| 🪜Steps |
|
|
A bootable macOS installer is a USB drive or external disk that contains the full macOS installation files. It allows users to boot Mac from the media and install a different macOS version (Sonoma, Ventura, Monterey, Big Sur, Catalina, etc.) without needing to download the installer each time.
It is particularly useful when you want to perform a clean installation, troubleshoot system issues using macOS Recovery, or set up multiple Macs. A bootable macOS installer is an essential tool for both home users and IT professionals with its reliable and efficient way of managing macOS installations.
To ensure the success of bootable macOS installer creation, here are a few things you need to prepare in advance:
After this, you can follow either of the methods below to create the bootable macOS installer.
For users who are not familiar with macOS or the procedure of bootable installer creation, the easiest choice is to use a professional tool - EaseUS Partition Master for Mac. This tool can help you create the bootable installer in a few simple clicks instead of complex command lines.
With its clear interface and step-by-step prompts, the procedure can be completed quickly and safely. Here are the detailed steps.
Note: This procedure will automatically erase your USB drive to a compatible format. Due to all data on the USB drive will be erased during the process, create a backup if needed.
Step 1. Connect an external disk like a USB drive to your Mac.
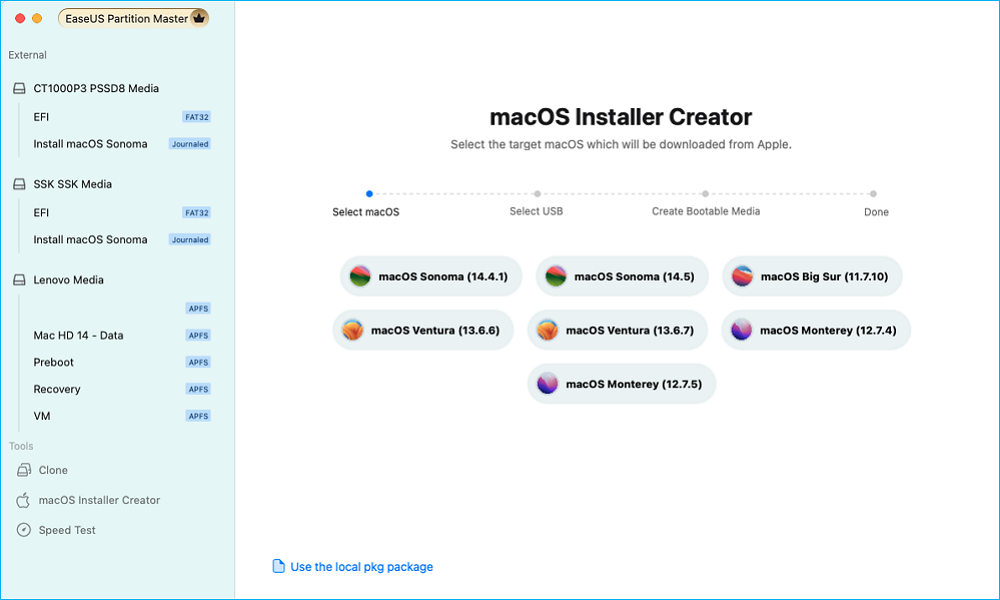
Step 2. Launch EaseUS Partition Master for Mac and navigate to the macOS Installer Creator.
Step 3. Select the macOS you want and the tool will download it from Apple automatically. Also, you can use the local pkg package if you already have one on your device.
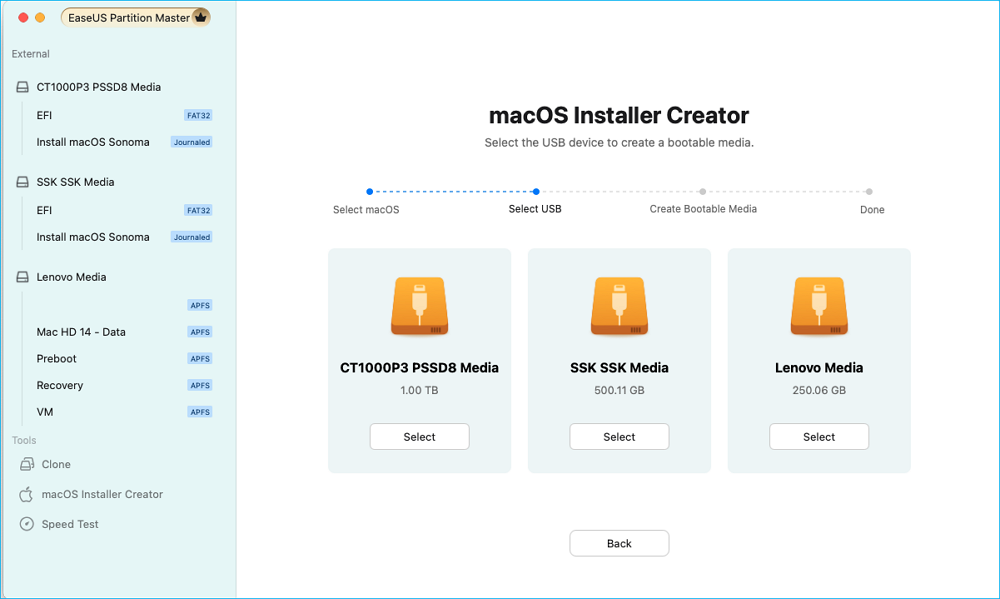
Step 4. Then, select the target USB drive to create a bootable media.
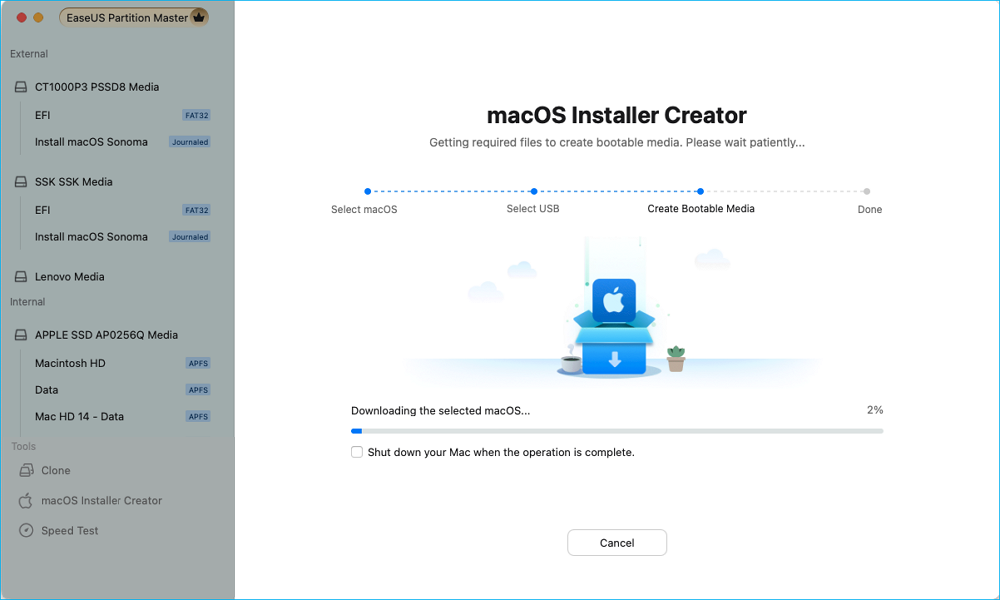
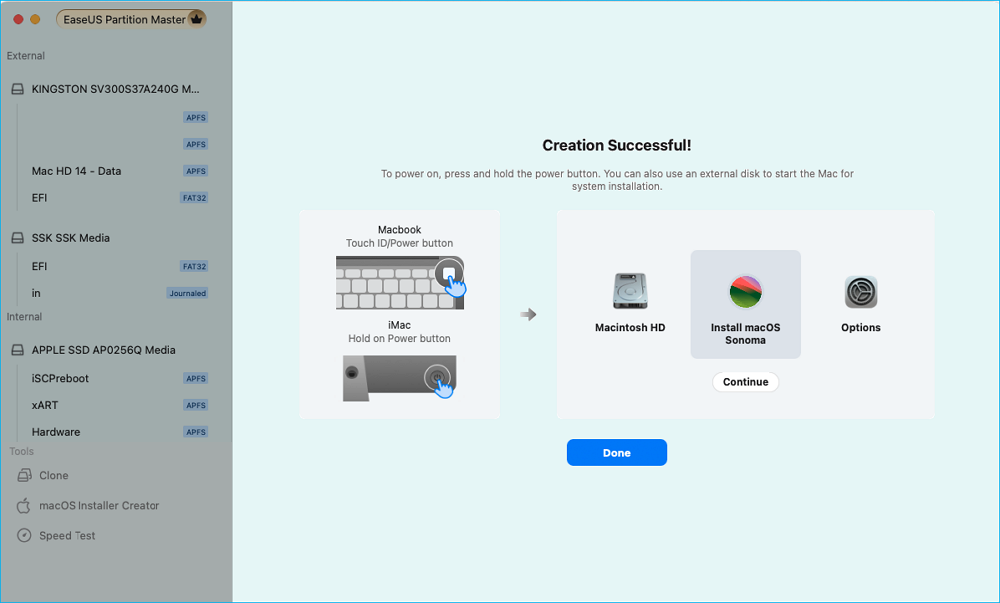
Step 5. Finally, perform the operation and wait patiently till the macOS installer is created successfully.
Step 6. Once the bootable installer creation is completed, you can restart your Mac from the USB drive for new macOS installation.
For Apple Silicon Macs:
For Intel Macs:
Feel free to click the button below and share this practical software with other Mac users.
If you don't like third-party tools, Mac also allows users to create a macOS installer with its installation files. However, this takes more steps that might be complex for some users. Make sure you carefully follow the guide below.
Step 1. Download the full macOS installer from Apple. Ensure it's downloaded to your "Applications" folder as that's where the Terminal command will find the installer. Also, make sure the macOS installer is named correctly as "Install macOS [Version]" and that it's ".app," instead of ".dmg" or ".pkg."
Step 2. Connect the USB drive to your Mac.
Step 3. Open Finder, go to "Applications" > "Utilities," and open Disk Utility.
Step 4. Select your USB drive from the left panel.
Step 5. Click on "Erase." Name it (e.g., MyVolume) and choose "Mac OS Extended (Journaled)" as the format. Click "Erase" to format the drive, which will delete all existing data.

Step 6. Launch the Terminal application (also in "Applications" > "Utilities").
Step 7. Now, run the createinstallmedia Command. Enter the following command in Terminal, replacing "MyVolume" with the name of your USB drive. (Each command assumes that the installer is located in your Applications folder.)
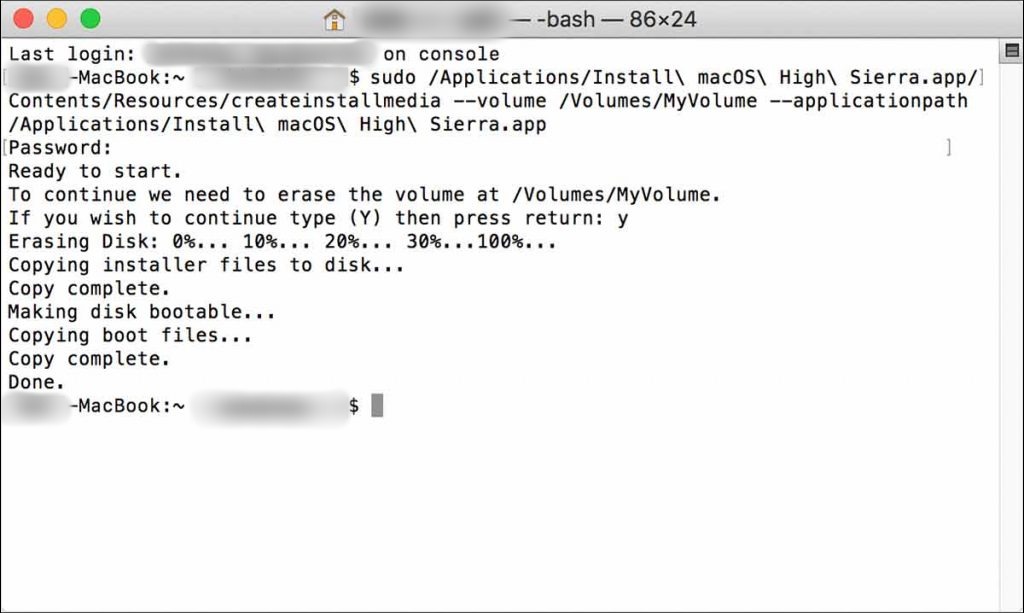
Step 8. Press "Return." You will be prompted to enter your administrator password (note that Terminal will not show any characters as you type).
Step 9. Terminal will ask if you want to erase the volume. Type Y and press "Return" to confirm.
Step 10. Then, Terminal might prompt a confirmation to access files on a removable volume. Click "OK" to continue.
Step 11. Once the process is completed, you'll notice the volume is named the same as the installer you downloaded.
You can then quit Terminal and eject the USB drive.
After the bootable macOS installer is created, you can use it to perform a clean installation of new or old macOS versions. Here's how:
Step 1. Connect the USB Drive to the Mac where you want to install macOS.
Step 2. Start the Mac:
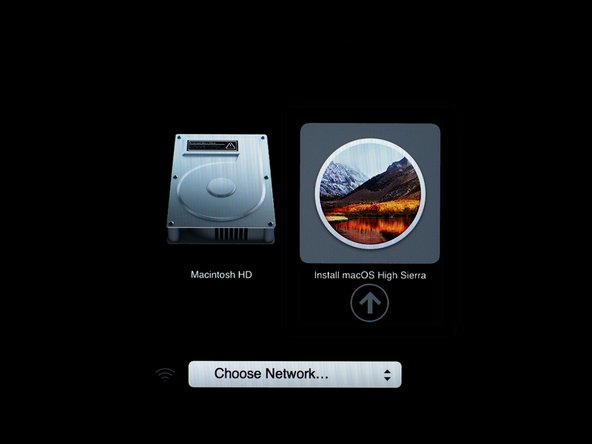
Step 3. Once the installer opens, follow the on-screen prompts to install macOS.
If you like this informative article, don't forget to share it with others who might also benefit from it.
This page covers two practical methods for Mac users to learn how to create a bootable installer for macOS, along with an extra tip on how to boot from the USB drive and install a new version of macOS for the device. Among the two means, EaseUS Partition Master for Mac makes the whole procedure easier and safer, benefiting users who are looking for an automatic solution to this.
1. How to create a bootable installer for Windows 10 on Mac?
To create a Windows 10 bootable installer on a Mac, you can:
2. Where do I find the macOS installer?
You can find the macOS installer in the Applications folder on your Mac after downloading it from the App Store. It will typically be named as "Install macOS [Version]."
3. Why is installer not working on Mac?
The macOS installer may not be working because of insufficient storage space, a corrupted installer file, incompatibility with your Mac, issues with the startup disk, software conflicts, or problems with macOS Recovery.
How Can We Help You
Sherly joined EaseUS in 2022 and she has always loved writing articles and enjoys the fun they bring. She receives professional training here, focusing on product performance and other relative knowledge. She has written over 200 articles to help people overcome computing issues.
Oliver is an EaseUS professional writer who dares explore new areas. With a passion for solving tech issues with straightforward guides for common users, Oliver keeps honing his writing craft by developing in-depth solutions for disk and partition management, computer boot-up issues, file transfer, etc.
It won't hot image your drives or align them, but since it's coupled with a partition manager, it allows you do perform many tasks at once, instead of just cloning drives. You can move partitions around, resize them, defragment, and more, along with the other tools you'd expect from a cloning tool.
Read MoreI love that the changes you make with EaseUS Partition Master Free aren't immediately applied to the disks. It makes it way easier to play out what will happen after you've made all the changes. I also think the overall look and feel of EaseUS Partition Master Free makes whatever you're doing with your computer's partitions easy.
Read MorePartition Master Free can Resize, Move, Merge, Migrate, and Copy disks or partitions; convert to local, change label, defragment, check and explore partition; and much more. A premium upgrade adds free tech support and the ability to resize dynamic volumes.
Read MoreIt won't hot image your drives or align them, but since it's coupled with a partition manager, it allows you do perform many tasks at once, instead of just cloning drives. You can move partitions around, resize them, defragment, and more, along with the other tools you'd expect from a cloning tool.
Read MoreI love that the changes you make with EaseUS Partition Master Free aren't immediately applied to the disks. It makes it way easier to play out what will happen after you've made all the changes. I also think the overall look and feel of EaseUS Partition Master Free makes whatever you're doing with your computer's partitions easy.
Read MoreRelated Articles
3 Safe Ways to Format SSD With No Harm to It
![]() Sherly/2025/04/28
Sherly/2025/04/28
How to Run SSD Performance Test on Windows 11/10 (with Pictures)
![]() Cici/2025/04/28
Cici/2025/04/28
Clone Seagate HDD to SSD with Seagate Disk Clone Software
![]() Tracy King/2025/04/28
Tracy King/2025/04/28
How to Disable Low Disk Space Warning in Windows 11/10
![]() Tracy King/2025/04/28
Tracy King/2025/04/28
EaseUS Partition Master

Manage partitions and optimize disks efficiently
Your best companion for disk partitioning, MBR to GPT/GPT to MBR conversion,even OS migration
Copyright © 2004 - 2025 EaseUS. All rights reserved.
CHOOSE YOUR REGION
Start Your Free Trial!
Sign up to our newsletter, stay updated on news and exclusive offers from EaseUS. Don't worry, if you change your mind, you can unsubscribe at any time, free of charge. We value your privacy (Privacy Policy).
Start Your Free Trial!
Sign up to our newsletter, stay updated on news and exclusive offers from EaseUS. Don't worry, if you change your mind, you can unsubscribe at any time, free of charge. We value your privacy (Privacy Policy).