Start Your Free Trial!
Sign up to our newsletter, stay updated on news and exclusive offers from EaseUS. Don't worry, if you change your mind, you can unsubscribe at any time, free of charge. We value your privacy (Privacy Policy).
Page Table of Contents
How to Format SanDisk Extreme Portable SSD on Windows?HOT
Which Format Should I Choose for SanDisk Extreme Portable SSDHOT
ConclusionHOT
About the Author
Hot Topics
Updated on Apr 28, 2025
It's important to know how to properly format your SanDisk Extreme Portable SSD when you come across these situations: clone your Windows operating system to a SanDisk SSD, delete sensitive file data from your storage device, or simply refresh it.
However, formatting a SanDisk Extreme Portable SSD is not an easy task for some beginners. In this article, EaseUS will walk you through various methods to format your SanDisk Extreme Portable SSD on Windows.
Before formatting your SanDisk Extreme Portable SSD, it's crucial to back up important files in your SSD, as all data will be deleted once the formatting process begins. Otherwise, you risk losing data originally stored in the SSD.
After you back up your data, you can start formatting your SanDisk Extreme Portable SSD. Here are four ways we collected for you. Pick one to solve your problem.
Users may need to format SanDisk Extreme Portable SSD drives on Windows for various reasons. In this section, we will introduce you EaseUS Partition Master Professional. This software is a professional disk format tool designed to help users manage their SanDisk Extreme Portable SSD partitions efficiently, including those who want to format their SSDs with ease.
Let's get started with this powerful tool.
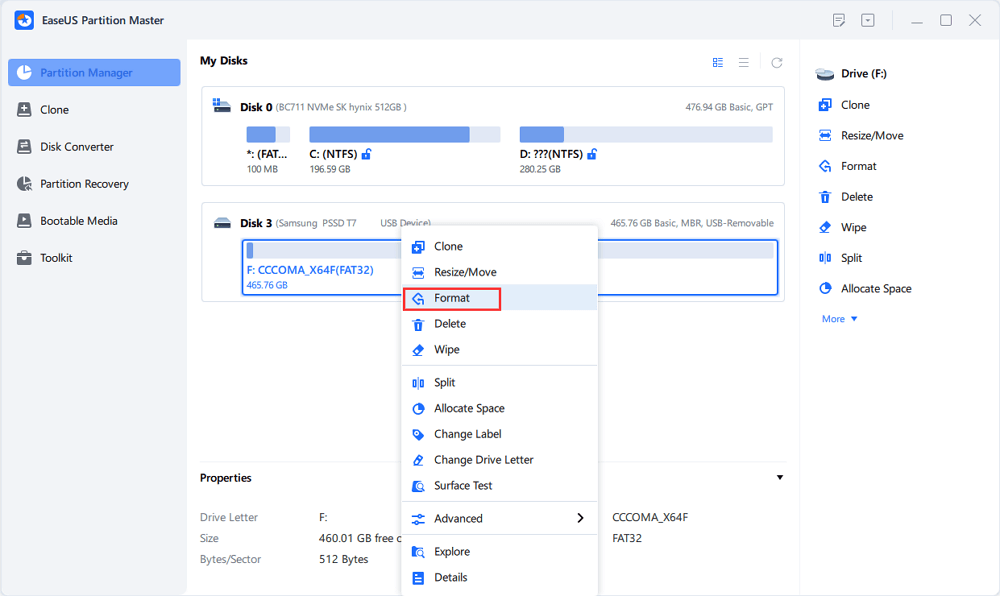
Step 1. Launch EaseUS Partition Master, right-click the partition on your external hard drive/USB/SD card which you want to format and choose the "Format" option.

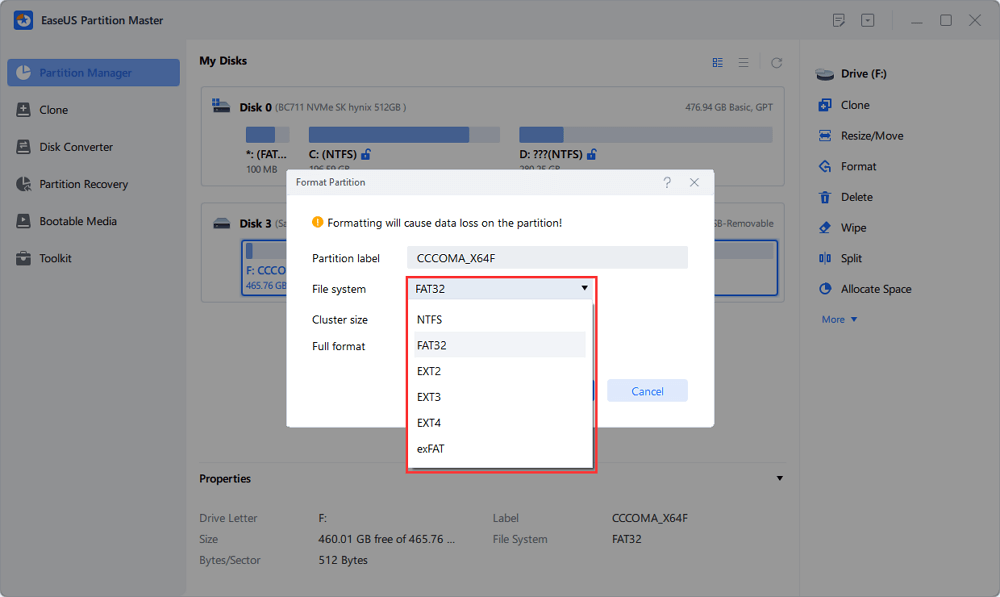
Step 2. Assign a new partition label, file system (NTFS/FAT32/EXT2/EXT3/EXT4/exFAT), and cluster size to the selected partition, then click "OK".

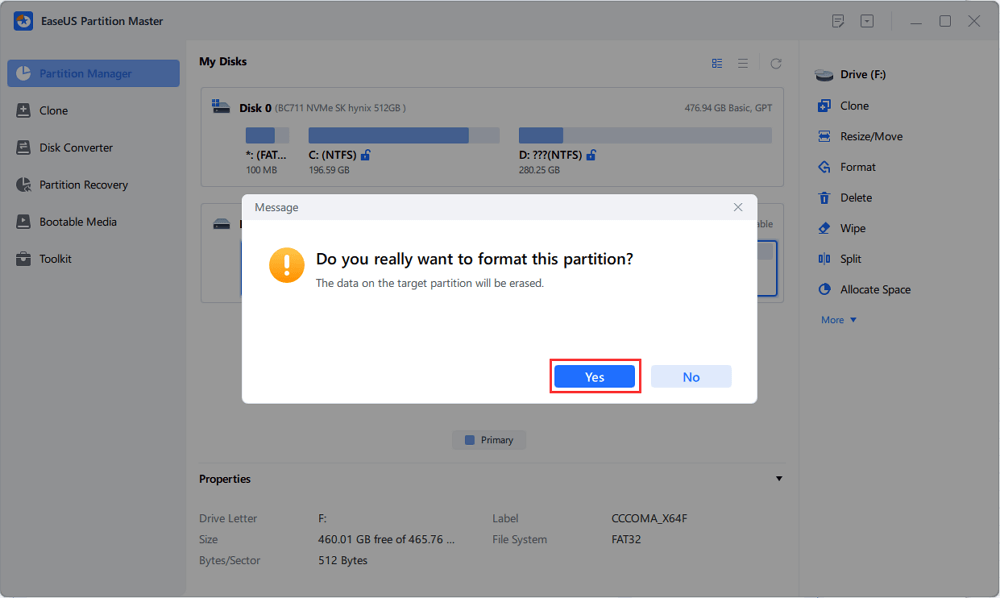
Step 3. In the Warning window, click "Yes" to continue.

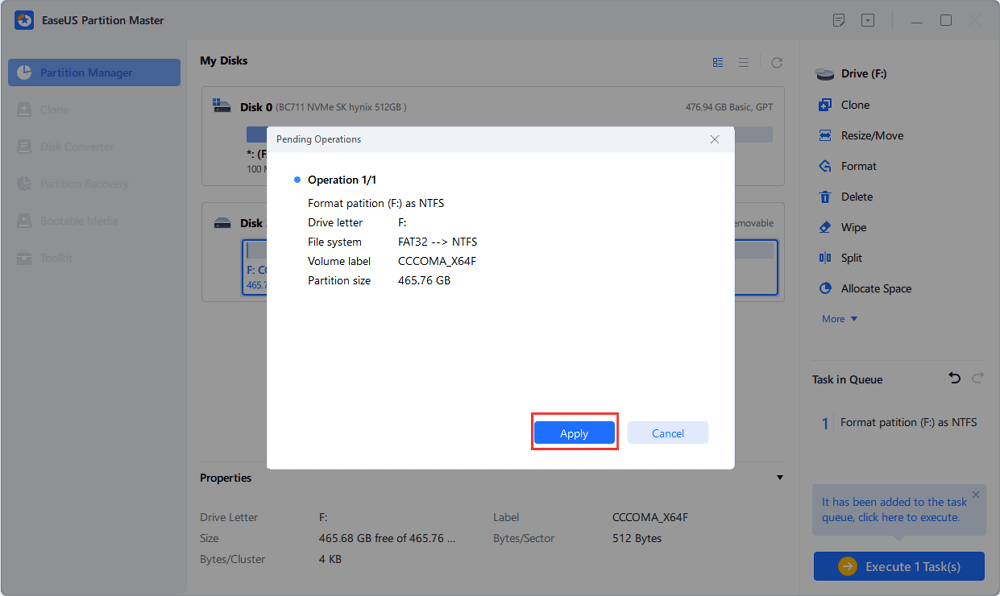
Step 4. Click the "Execute 1 Task(s)" button in the top-left corner to review the changes, then click "Apply" to start formatting your external hard drive/USB/SD card.

In addition to format SanDisk Extreme Portable SSD, here is a list of the main features of EaseUS Partition Master that you may also like:
In Windows, you can use Disk Management, the built-in hard drive formatting tool, to format your SanDisk Extreme Portable SSD. Here are the steps for you:
Step 1. Right-click on the "Start" icon and select "Disk Management," where you can see the information about your SanDisk Extreme Portable SSD.
Step 2. Right-click the SanDisk SSD you want to format. Choose "Format" in the menu.

Step 3. Rename your SanDisk SSD in the volume label textbox.
Step 4. Select the file system you want, and click "OK."
Step 5. Tick the "Perform a quick format" option. Click the "Start" button at the bottom.
Using File Explore is another way to format your SanDisk Extreme Portable SSD. Here is a step-by-step guide:
Step 1. Insert your SanDisk Extreme Portable SSD and then launch the File Explore.
Step 2. Select your SanDisk SSD, and right-click on it. Choose "Format".
Step 3. Select a file system for your SanDisk SSD. Tick "Quick Format", and then click "Start."

If this method works, please share this post with your friends and families to help them format their SanDisk SSD for reuse with ease.
If you are an advanced user, you can also try to format your SanDisk Extreme Portable SSD on Windows by using the Command Prompt. Take the format SanDisk Extreme Portable SSD to FAT32 as an example, here is how:
Step 1. Press Windows + R, type cmd, and hit "Enter" to open Command Prompt.
Step 2. Input each of the commands given below and press Enter after each command:

Step 3. Wait for the formatting process to end.
SanDisk Extreme Portable SSDs are known as high-capacity storage devices, with capacities ranging from 500GB to 2TB. To make use of their storage space, different file system formats need to be selected for different operating systems.
If you plan to use the portable SSD only with a PC with Windows, NTFS is an excellent choice due to its support for large files and advanced security features. However, it is only compatible with Windows.
If you intend to use the SanDisk SSD across both Windows and macOS, exFAT is recommended as it offers compatibility without file size limitations. Also, exFAT can be widely used in your USB flash drives and HDDs.
In summary, formatting your SanDisk Extreme Portable SSD on Windows can be accomplished through several methods. Each method has its advantages depending on user preference and technical expertise. For those seeking an efficient and straightforward experience, EaseUS Partition Master is highly recommended, offering robust features for managing disks and partitions effectively. Download and run it to save your time and energy now!
1. Why can't I format the SSD in Disk Management?
The reasons why you can't format the SSD are as follows:
To solve this issue, you can refer to: Fix No Option to Format SSD in Windows 10/11
2. Can I format a SanDisk SSD for both Mac and PC?
Yes. If you want to use SanDisk SSD across both Windows and macOS, you can format it to exFAT. This file system can be compatible with many operating systems, such as Windows, macOS, and Linux.
3. What should I do if my SanDisk SSD is write-protected?
If your SanDisk SSD is write-protected, you need to remove the write protection first. To learn more details, you can read this article: How to Remove Write Protection and Format Write Protected SSD
How Can We Help You
Cici is the junior editor of the writing team of EaseUS. She accepted the systematic training on computers at EaseUS for over one year. Now, she wrote a lot of professional articles to help people resolve the issues of hard drive corruption, computer boot errors, and disk partition problems.
It won't hot image your drives or align them, but since it's coupled with a partition manager, it allows you do perform many tasks at once, instead of just cloning drives. You can move partitions around, resize them, defragment, and more, along with the other tools you'd expect from a cloning tool.
Read MoreI love that the changes you make with EaseUS Partition Master Free aren't immediately applied to the disks. It makes it way easier to play out what will happen after you've made all the changes. I also think the overall look and feel of EaseUS Partition Master Free makes whatever you're doing with your computer's partitions easy.
Read MorePartition Master Free can Resize, Move, Merge, Migrate, and Copy disks or partitions; convert to local, change label, defragment, check and explore partition; and much more. A premium upgrade adds free tech support and the ability to resize dynamic volumes.
Read MoreIt won't hot image your drives or align them, but since it's coupled with a partition manager, it allows you do perform many tasks at once, instead of just cloning drives. You can move partitions around, resize them, defragment, and more, along with the other tools you'd expect from a cloning tool.
Read MoreI love that the changes you make with EaseUS Partition Master Free aren't immediately applied to the disks. It makes it way easier to play out what will happen after you've made all the changes. I also think the overall look and feel of EaseUS Partition Master Free makes whatever you're doing with your computer's partitions easy.
Read MoreRelated Articles
How to Move Windows 10 to Another Drive Without Reinstalling Windows
![]() Jerry/2025/04/24
Jerry/2025/04/24
How to Clone NVMe to NVMe Without USB Enclosure
![]() Jerry/2025/04/23
Jerry/2025/04/23
How to Clone C Drive to SSD Windows 10 Without Losing Data
![]() Jerry/2025/04/17
Jerry/2025/04/17
How to Manage Disk Before Cloning
![]() Jerry/2025/04/23
Jerry/2025/04/23
EaseUS Partition Master

Manage partitions and optimize disks efficiently
Your best companion for disk partitioning, MBR to GPT/GPT to MBR conversion,even OS migration
CHOOSE YOUR REGION
Start Your Free Trial!
Sign up to our newsletter, stay updated on news and exclusive offers from EaseUS. Don't worry, if you change your mind, you can unsubscribe at any time, free of charge. We value your privacy (Privacy Policy).
Start Your Free Trial!
Sign up to our newsletter, stay updated on news and exclusive offers from EaseUS. Don't worry, if you change your mind, you can unsubscribe at any time, free of charge. We value your privacy (Privacy Policy).