Page Table of Contents
Reviews and Awards
- #1. EaseUS Todo PCTrans
- #2. Cut and Paste
- #3 Use Command Prompt
- #4. Drag and Drop Files in Windows 11
- #5. Add Copy/Move to Folder to Context Menu on Windows 11
How to move files and folders in Windows 11? Which is the fastest way to transfer files in Windows 11? This post from EaseUS describes the top 5 file movers for Windows 11, where you will find exciting options with excellent skills and flexible features to ease your file transfer jobs.
Top 5 File Mover Windows 11 | With How to Guide
File moving on Windows 11 requires a suitable tool that can easily save your precious time and, of course, protect you from unwanted troubles. Here, we are going to explore the top five file movers, each offering useful and convenient options for varying requirements.
#1. EaseUS Todo PCTrans
EaseUs Todo PCTrans provides users with reliability and usability. Thus, this software program tops the list as the best file mover for people who want to move data conveniently. It's a total solution that allows transferring not only files but also programs and operating system settings, leaving no files or applications behind.
Whatever the need, EaseUS Todo PCTrans proves to be a powerful and flexible file mover utility. It allows transferring files and applications, along with OS settings, from one drive to another or from one computer to another. This software program is suitable for all users, regardless of experience level.
Benefits and Features
It offers users plenty of advantages. Its smart and interactive interface allows novice users to navigate the entire process efficiently. This file mover supports flexible transfer modes and is compatible with all Windows computers. Moreover, it delivers high transfer speed, data integrity, and flexible transfer settings to meet varying requirements.
Key features:
- Transfer Mode: Drive to Drive, PC to PC
- Transfer Content: Files, folders, programs with settings, OS, and boot files
- Compatibility: All Windows PCs
- Fast Transfer Speeds: Quickly move large amounts of data
- Data Integrity: Ensures all data is transferred accurately
- Flexible Transfer Options: Customize the transfer process to suit your needs
Step 1. Create a backup file of the source hard drive
Launch EaseUS Todo PCTrans on your Windows computer. Navigate to the "Backup & Restore" mode and click "Start".

Hover your mouse over "Data Backup", and click "Next". Later, confirm the default settings of the file name and file path, or you can customize the settings on your own.

Now select the items you want to transfer to the other hard drive. EaseUS Todo PCTrans allows users to create backup files of multiple file types, including applications, personal data, and user accounts. To transfer files from one drive to another, deselect the "Applications" and "Accounts", hover your mouse over "Files", and click "Edit".

This is where you need to select files on the source drive. Expand the drive so you can selectively choose desired files, after then click "Finish". In the end, click "Backup". Wait for the process completes.

Step 2. Restore the file to the destination drive
Launch EaseUS Todo PCTrans and follow the same way to reach the step of selecting a transfer method. This time choose "Data Restore" and click "Next".

Choose the existing backup file presenting on the interface, or navigate to the exact file path where the backup file is, click "Restore".

You're back to the "Files", click "Edit" to get in. The backup file is viewable here. You need to click the pencil icon to set the target location, which is the other hard drive, and submit the change. After the basic settings, click "Finish" and finally "Restore". Wait patiently until the transfer process is over.

EaseUS Todo PCTrans makes file transfers simple, making it a reliable choice for Windows 11 users. Download this file mover to ensure a seamless and efficient data transfer.
#2. Cut and Paste
All Windows computer users might find it the easiest way to move files in Windows 11. But it also comes with some limitations. It can take a while for large files and sometimes leads to data loss if interrupted. This may not be a great thing, but it is a quick way to move a small file from one computer to another.
Step 1: Open File Explorer and locate the file or folder you want to move.
Step 2: Right-click on the file or folder and select 'Cut' from the context menu.
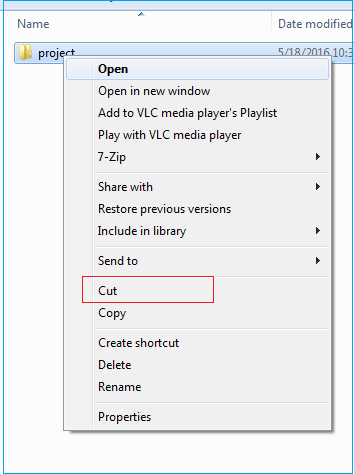
Step 3: Navigate to the destination folder where you want to move the file.
Step 4: Right-click in the destination and select 'Paste' from the context menu.
This method is simple and effective for small file transfers. However, other methods might be more suitable for larger files or more complex transfers. Share these ways to let more users know how to move files in Windows 11.
#3 Use Command Prompt
Using the Command Prompt provides an additional way to move files and directories. It could be a complex method for users who are inexperienced in inputting commands. Additionally, if something goes wrong or if you terminate the procedure in the middle, you run the risk of losing your data. Here is how to move files using Command Prompt in Windows 11:
Step 1: Open the Command Prompt by going to the search bar, searching for "cmd," and clicking on it.
Step 2: Use the cd command to type the path of the folder containing the file to be transferred.
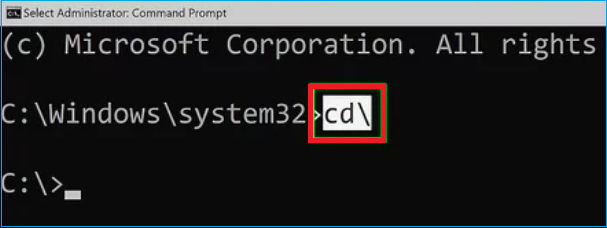
For example, type cd C: UsersYourUsernameDocuments and hit Enter.
Step 3: Finally, type the move command to transfer the file. For example, type move filename.ext D:\DestinationFolder and hit Enter.
Tip* replace "filename" with the original name of the file/folder you want to move.
Step 4: Now, verify that the file is moved by opening the destination folder in File Explorer.
It is easy and gives complete control over transferring files, but it is recommended to use it only if you know what you are doing because, as said, it is the best way to lose your data.
#4. Drag and Drop Files in Windows 11
This considerably simple process to move files. But if you drop the files in the wrong location, you might misplace them. So, let's learn how to move files by dragging and dropping.
Step 1: Locate the file or folder you wish to move. You can do this by navigating through your File Explorer or desktop.
Step 2: Press the left mouse button on the file or folder.
Step 3: While holding the mouse button, drag the file to the desired location. As you move the file, a small icon will indicate its movement.
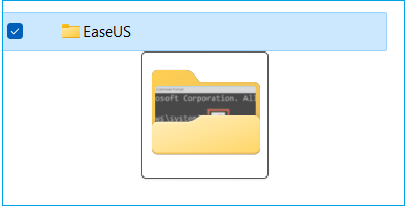
Step 4: Release the mouse button to drop the file into the new location. The file will now be moved to the destination you selected.
#5. Add Copy/Move to Folder to Context Menu on Windows 11
For Windows 11 users, you can add "Copy to Folder" or "Move to Folder" to the context menu for a more effortless file transfer experience. This way, when you right-click files or a folder, you can select the destination in the context menu.
Step 1: Press Win + R to open the Run dialog box. Then, select Registry Editor by typing "regedit" and hitting Enter.
Step 2: Navigate to HKEY_CLASSES_ROOT\AllFilesystemObjects\shellex\ContextMenuHandlers.
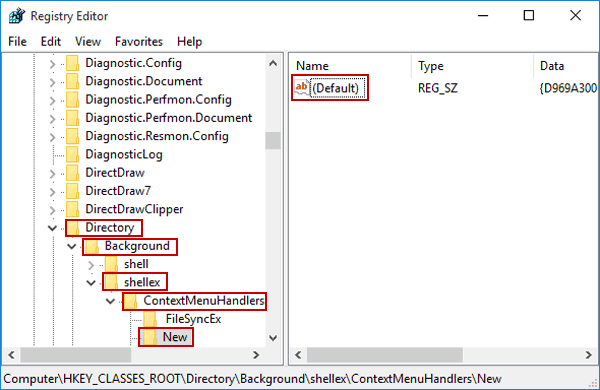
Step 3: Right-click on ContextMenuHandlers, select New, then Key. Name the new Copy to Key.
Step 4: Double-click on the new Copy to Key. In the Value data field, enter {C2FBB630-2971-11D1-A18C-00C04FD75D13} and press OK.
Step 5: Repeat Steps 3 and 4 to create another key named Move to with the Value data {C2FBB631-2971-11D1-A18C-00C04FD75D13}.
Step 6: Close the Registry Editor and restart your computer to apply the changes.
Conclusion
We hope the article helped guide you to the best choice when moving some of your files to Windows 11. It included everything from basic copy-paste to advanced tools to assist you. Nevertheless, the needs of every user are specific to that individual, so you should choose the more useful one. Also, if you are searching for a reliable and full-featured solution, we strongly recommend EaseUS Todo PCTrans, a reliable file mover for Windows 10/11. Its intuitive UI, along with the feature-rich tool, should appeal to you.
FAQs About File Mover Windows 11
To assist you with the file transfer in Windows 11, here are some of the most common questions you may be asked. Whether you are found at any level, these answers will help you during the process.
1. How do I move files in Windows 11?
As mentioned earlier, there are several directions in Windows 11 that one can use to move files. Ctrl + X is the hotkey for cutting files. Select a file you want to move and press that keyboard shortcut to cut it. Then, you can move it anywhere by pressing the Ctrl + V keyboard shortcut.
2. What is the best file mover for Windows 11?
In this case, with Windows 11, we can use the operating system to move files from one location to another via the classic cut and paste and drag and drop. But if you can spare a bit of time and want more functionality offerings and guaranteed results, we suggest EaseUS Todo PCTrans. It includes an easy interface and helps users with multiple essential features, such as transferring files, programs, and settings between different PCs.
3. How do you move files without copying in Windows 11?
To move files without copying them in Windows 11, you can use Command Prompt. This method is suitable for users with essential IT technology skills. We do not recommend it to inexperienced users as it may cause potential data loss.
About the Author
Sherly joined EaseUS in 2022 and she has always loved writing articles and enjoys the fun they bring. She receives professional training here, focusing on product performance and other relative knowledge. She has written over 200 articles to help people overcome computing issues.
Reviews and Awards
-
EaseUS Todo PCTrans Free is a useful and and reliable software solution created to serve in computer migration operations, be it from one machine to another or from an earlier version of your OS to a newer one.
Read More -
EaseUS Todo PCTrans is by the folks at EaseUS who make incredible tools that let you manage your backups and recover your dead hard disks. While it is not an official tool, EaseUS has a reputation for being very good with their software and code.
![]() Read More
Read More
-
It offers the ability to move your entire user account from your old computer, meaning everything is quickly migrated. You still get to keep your Windows installation (and the relevant drivers for your new PC), but you also get all your apps, settings, preferences, images, documents and other important data.
Read More
Related Articles
-
How to Uninstall Adobe Creative Cloud | 3 Methods
![author icon]() Roxanne/2024/06/13
Roxanne/2024/06/13 -
How to Transfer Twitter from One Account to Another
![author icon]() Tracy King/2024/06/13
Tracy King/2024/06/13 -
![author icon]() Jean/2024/04/19
Jean/2024/04/19 -
How to Change Webex Meeting Location
![author icon]() Tracy King/2024/06/13
Tracy King/2024/06/13