
Creating a Windows 11 24H2 bootable USB drive can help you install the latest Windows 11 version, but how to create Windows 11 24H2 bootable USB? How best can you do that? Don't look anywhere else since this tutorial has all the necessary answers. EaseUS will describe 4 methods you can apply to create the bootable USB drive of Windows 11 24H2.
Why Do You Need a Windows 11 24H2 Bootable USB Drive
Windows 11 24H2 is the latest release of the Windows operating system updates. It comes with several improvements compared to the previous updates. It has Copilot + PC features like Cocreator in Paint, Recall, and Windows Studio effects.
It also includes Microsoft Copilot and arm and emulsion features. You can directly upgrade to Windows 11 24H2 via settings. This could sometimes be problematic due to a few issues. The following incidents may warrant creating a Windows 11 24H2 bootable USB:
- Update failing to install: updating to Windows 11 version 24H2 could sometimes be problematic. An effective solution is to create a bootable USB containing the update and install it on your system.
- Your PC crashes after the update: sometimes, installing Windows 11 24H2 may cause your computer to misbehave. The alternative option is to clean install Windows 11 24H2 via a bootable USB.
- Your PC doesn't meet all the requirements for the update: your computer needs to fulfill some requirements like sufficient RAM before you can install a Windows 11 24H2 update. However, creating a bootable USB allows you to bypass this requirement.
Keep reading to learn how to conveniently install Windows 11 24H2 on your PC via bootable media.
How to Create Bootable Windows 11 24H2 USB for Free
This section will discuss the following methods to develop a bootable USB without incurring any costs:
- Method 1. Using Professional Bootable USB Creator
- Method 2. Using Windows Media Creation Tool
- Method 3. Using Command Prompt
- Method 4. Using Rufus
Method 1. Using Professional Bootable USB Creator
It's best to do things professionally to create an efficient bootable USB drive. Try EaseUS OS2Go to create a Windows 11 24H2 install media conveniently. This free bootable USB creator allows you to bypass all the requirements you must fulfill before installing Windows 11. It lets you install your OS without checking the TPM2.0 and secure boot requirements or downloading the ISO file.
You also won't have to associate your device with any Microsoft account. This Windows To Go Creator lets you download Windows 11 24H2 ISO to create a bootable USB and install your Windows on an external HDD or USB drive. This enhances the portability of your operating system. You can also use it to create a bootable emergency disk. What more? EaseUS OS2Go allows you to run Windows applications on Mac via a portable Windows USB.
Ensure you download EaseUS OS2Go now to create a Windows 11 24H2 bootable USB today professionally.
Step 1. Install EaseUS OS2Go on your Windows computer. Plug in a USB drive or external hard drive that is large enough.
Step 2. Choose the third tab "Windows Install Drive Creator". First choose the Windows versions you want to install, EaseUS OS2Go supports creating Windows 11/10/8.1 installation media. You could also select a local ISO file. When all set, click "Create".

Step 3. Then you will see a safety warning message, telling you that all data on the selected disk will be deleted. Click "Continue" to proceed.

Step 4. Then EaseUS OS2Go will start to create the Windows Installation media. It usually takes a while to download a ISO file, the time it takes depend on your OS and Network condition. When the progress reaches 100%, the USB drive should be bootable now.

Step 5. Insert the Windows Installation media to your computer and start the installation process.
Share this article on social media to help others find an easy way to create a Windows 11 24H2 bootable USB!
Method 2. Using Windows Media Creation Tool
This tool offers an alternative option if you don't want to use professional software. It's a product provided by Microsoft to aid users in creating a Windows bootable USB drive. Below are the steps to use the Media Creation Tool.
Step 1. Connect your flash drive and navigate to the Windows 11 download page.
Step 2. Go to "Create Windows 11 Installation Media." Click on the "Download Now" button next to it.

Step 3. Click the downloaded file to run it, and click the "Accept" button to accept the terms of service.
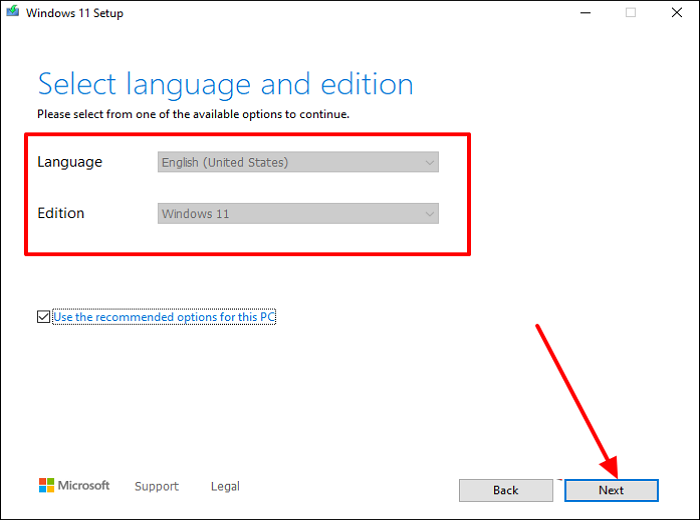
Step 4. Select your "Language" and Windows "Edition" and click Next.
Step 5. Under the "Choose which media to use" window, select "USB flash drive." Click Next and select the USB drive you had connected to your computer.

Step 6. Click Next to initiate the process and follow the on-screen instructions. You'll now have a bootable USB drive.
Method 3. Using Command Prompt
You can also create Windows 11 24H2 without any software using CMD. This is made possible by typing some commands on the CMD window. Check the steps below to create a Windows bootable USB without software:
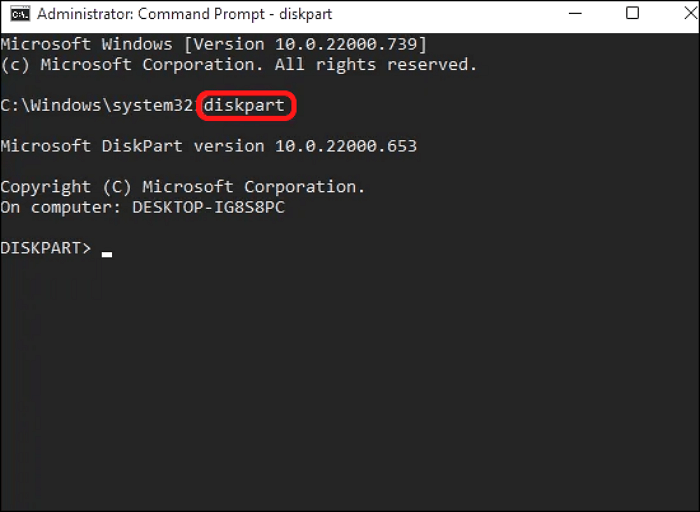
Step 1. Launch CMD as an admin. Type "diskpart" and press Enter.
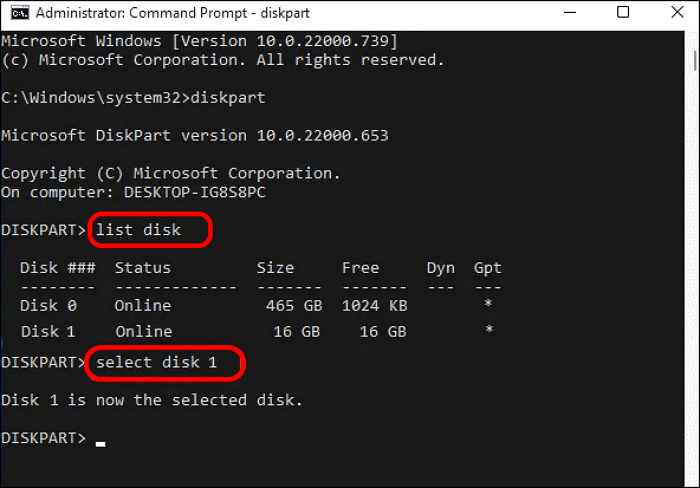
Step 2. Type "list disk" and hit Enter. Choose your USB drive by typing "select disk 1" (replace "1" with your correct drive number).
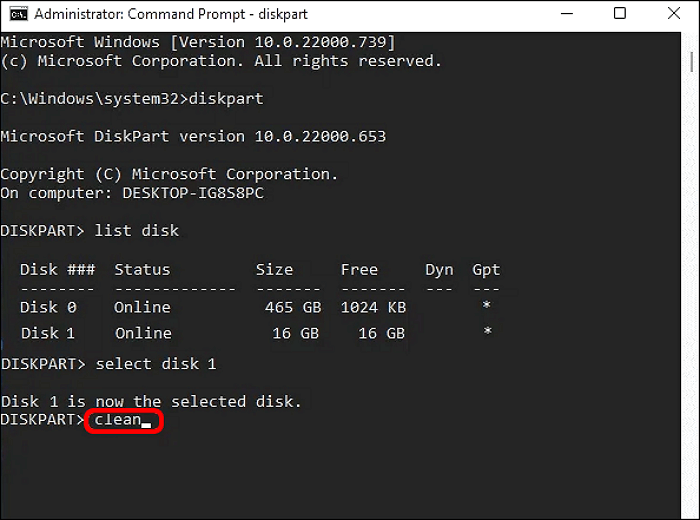
Step 3. Type "clean" and then "Enter" to format your drive.
Step 4. Next, type the following chain of commands and press Enter after each:
- create partition primary
- list par
- active
- select partition 1
- format FS=NTFS label="bootableUSB" quick override
- assign letter=X
- exit
Step 5. Mount the ISO file by pasting the command below and hitting Enter (replace the file path with the correct one on your device):
- PowerShell Mount-DiskImage -ImagePath "C:\path\to\Windows11.iso"
Step 6. Type the commands below and press Enter after each:
- Diskpart
- List volume
- Exit
Step 7. Lastly, type the commands below and hit Enter after each of them (replace "X" and "E" with the matching drive letters for your ISO file and USB flash drive, respectively):
- E:
- cd boot
- bootsect /nt60 X:
- xcopy E:\*.* X:\ /E /F /H
After that, you will have a Windows 11 24H2 bootable USB created by CMD.
Method 4. Using Rufus
This tool is free to download and use. It burns a downloaded Windows 11 24H2 ISO file to a USB drive and boots your OS. Check these steps.
Step 1. Download Rufus from its official website.
Step 2. Open the downloaded file to start Rufus. Select your USB drive and open the ISO file.

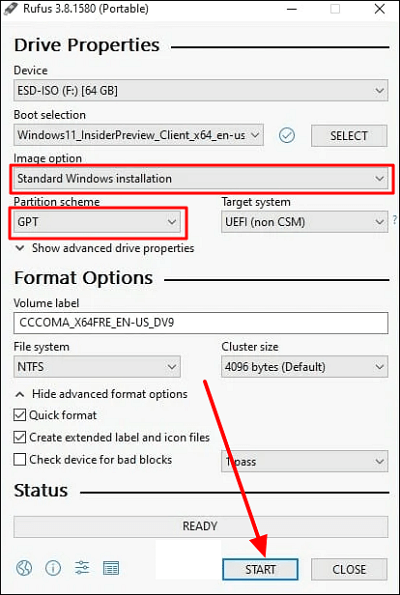
Step 3. Navigate to the "Image option" and select "Standard Windows installation." Pick "GPT" as your "Partition Scheme." Click Start.
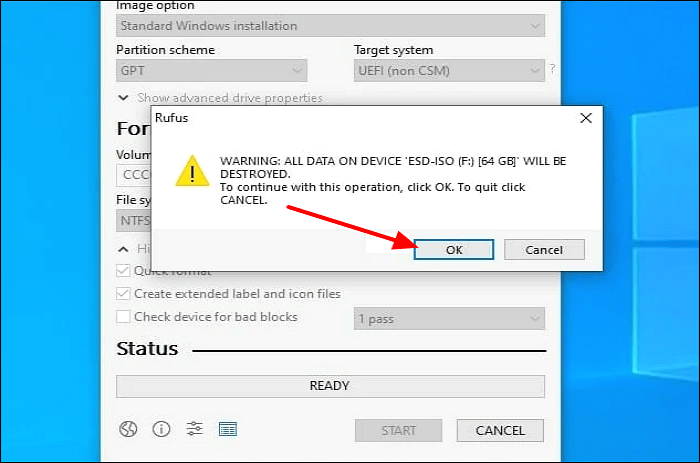
Step 4. A warning message will then display, indicating that the system will delete all data on your USB drive. Click OK to initiate the process. You can stay patient as Rufus burns the ISO file to your USB drive.
Step 5. You now have a bootable drive.
Share this article on social media to help others find an easy way to create a Windows 11 24H2 bootable USB!
To Wrap Things Up
This tutorial has outlined the different situations that may require you to create Windows 11 24H2 bootable USB. You may want to do this due to an update failing to install or your PC crashing constantly. We've looked at four strategies you can apply to create a bootable drive. The best option is to use a professional tool.
Try EaseUS OS2Go today and create a bootable USB drive quickly. You won't need to fulfill all the requirements before using this tool. It allows you to create a Windows To Go installer and run it on any system. Download this tool now to start experiencing its unique features.
FAQs on Creating Windows 11 24H2 Bootable USB
The common FAQs include:
1. Why Can't I Create Bootable USB Drive Windows 11?
Check these reasons:
- You haven't formatted your drive to FAT32 or NTFS.
- BIOS/UEFI doesn't recognize your USB drive.
- Your USB drive is less than 8GB.
- The USB port of your PC is faulty.
Try addressing these issues.
2. How to Create Windows 11 Repair Bootable USB?
You can apply the following methods:
- Use a professional bootable USB creator.
- Use Windows Media Creation Tool
- Use Command Prompt.
- Use Rufus.
Browse the previous sections of this article to get the detailed steps for each method.
3. How Can I Force to Install Windows 11 on Unsupported PC?
You can use a professional bootable USB creator tool. Try EaseUS OS2Go to conveniently install Windows 11 on your PC without meeting all the requirements. It allows you to bypass TPM2.0 and secure boot requirements.
4. How Do I Create a Bootable USB from an ISO Manually?
You can use a free tool like Rufus. Check the previous sections of this guide for the detailed steps.
Was This Page Helpful?
Related Articles
-
Top 3 Best Windows To Go Creator Software for Windows 11/10/8/7
![]() Jean/2024-12-04
Jean/2024-12-04 -
What Is Bootable USB Drive? All You Should Know About Bootable USB Drive
![]() Jean/2023-07-20
Jean/2023-07-20 -
Windows To Go for Mac: How to Install and Use
![]() Jean/2024-12-04
Jean/2024-12-04 -
How to Create a Windows 10/11 Bootable USB
![]() Jean/2024-12-04
Jean/2024-12-04
EaseUS OS2Go
- Create portable Windows to USB
- Copy installed Windows OS to USB
- Clone Winodws OS drive to USB
- Run Windows 11 on any PC
- Run Windows 11 on unsupported PC
- Run Windows 11/10 on a Mac