Table of Contents
![]() About the Author
About the Author
![]() Related Posts
Related Posts
AI-Enhanced

- Fix videos with different issues, such as broken, unplayable, no sound, etc.
- Repair corrupted images and enhance their quality with advanced AI algorithms.
- Fix documents in various formats, including PDF, Word, Excel, and PowerPoint files.
100% Safe Download
It's frustrating to be unable to examine photographs, videos, or documents in Finder without thumbnails on your Mac. Thumbnails not showing on Mac are standard among Mac users for several reasons, such as damaged files, disabled previews, or more.
In this article, we'll explore the most pervasive reasons for thumbnails not appearing and suggest solid strategies to solve them. Whether the issue is due to file corruption, cache difficulties, or system settings, we'll help you recover your thumbnails and restore seamless operation to your Mac.
Why Are My Thumbnails Not Showing on Mac
Macs often lack thumbnails, making Finder ineffective for picture and video previews. When thumbnails fail to load, it might slow down your work. System settings and file corruption may cause this problem. Here, we'll examine the most common reasons Mac users don't see thumbnails or can't open images and provide solutions to fix the issue.
- 📃Corrupt or Damaged Files: Thumbnails may not appear when previewing damaged files. File corruption may result via transfers, downloads, and storage issues.
- ❌Disabled Icon Preview: In your Mac's Finder settings, the Icon Preview option may be disabled, preventing thumbnails from being shown. This parameter must be enabled to display thumbnails.
- 🗂️Cache Issues: The Finder utilizes cached data to show thumbnails quickly. If the cache gets overcrowded or damaged, thumbnails may not appear. Clearing the cache may resolve this issue.
- 🖥️Outdated macOS: Older macOS versions may cause thumbnail issues. MacOS updates include the latest bug fixes and system enhancements.
Understanding these factors will allow you to diagnose better and resolve thumbnails that do not appear on Mac problems. In the next part, we'll look at some practical remedies.
5 Ways to Fix Thumbnails Not Showing on Mac
Do you have Mac thumbnail issues? Luckily, multiple efficient ways exist to remedy this problem and restore Finder pictures and video previews. We'll show you five simple ways to fix Mac thumbnails.
1. Fix Thumbnails Not Showing Mac with Repair Software
If your thumbnails are not visible due to file corruption, employing reputable repair software such as EaseUS Fixo Photo Repair is your best option. This utility addresses many photo-related issues, including missing or damaged thumbnails. EaseUS Fixo Photo Repair is highly recommended for repairing corrupted files on Mac caused by incomplete downloads or inappropriate transfers.
Key features of EaseUS Fixo Photo Repair:
- The utility can repair corrupted photos on Mac, including JPEG, PNG, and others, assuring compatibility with different devices.
- Batch repair allows users to correct several corrupted photographs simultaneously, saving time and effort.
- Before saving, you may examine the corrected photographs to validate the outcome.
- Easy-to-use interface Even novices will find EaseUS Fixo Photo Repair easy to browse and utilize.
Now, let's learn how to correct thumbnails using this tool.
Step 1. Launch EaseUS Fixo on your Mac, go to the "Photo Repair" tab and click the "Add Photo" button to add the corrupted photos, including JPEG, PNG, JPG, CR3, CR2, NEF, NRW, RAF, etc.
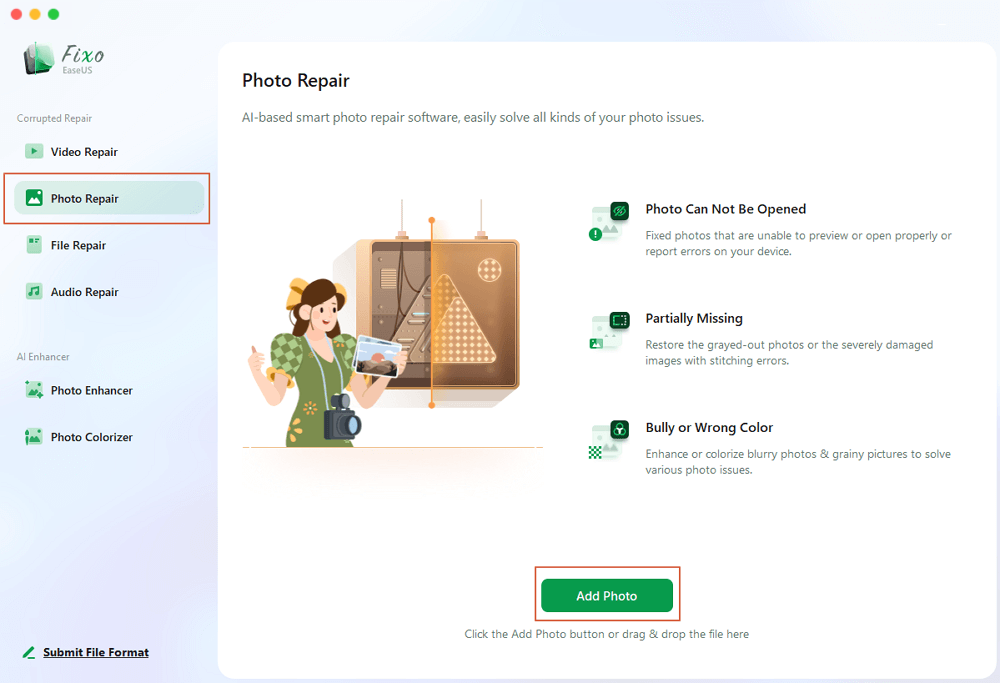
Step 2. Select a photo and click the "Repair" button to start the single photo repair process. If you want to repair all the corrupted photos, click "Repair All".
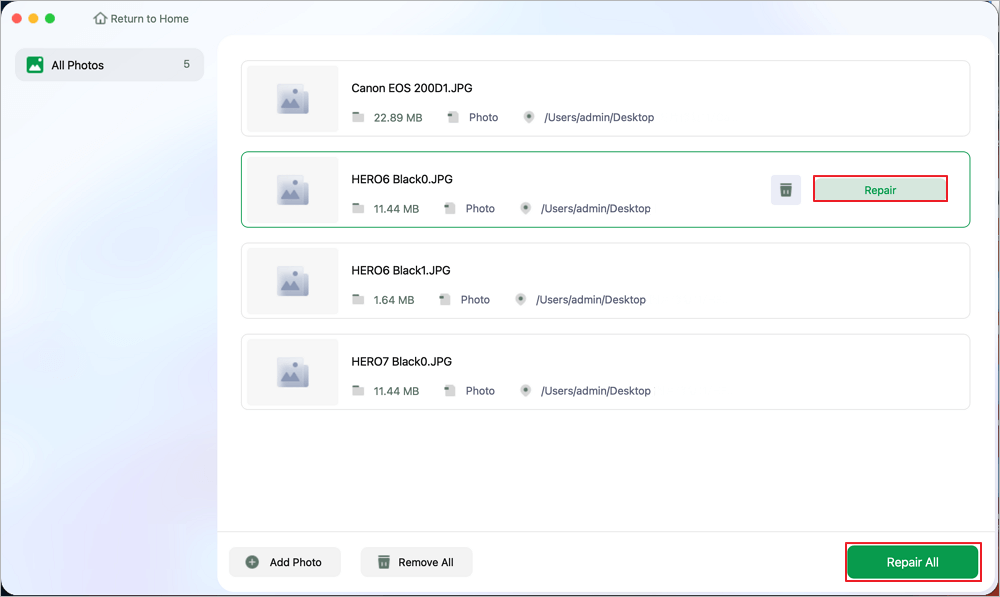
Step 3. Click on the eye icon to preview a repaired photo and click "Save" to save it on your Mac. Choose "Save All" to save all the repaired photos. Click "View Repaired" to locate the repaired folder.

Remember to share this information on social media to aid others experiencing similar problems!
2. Enable Icon Preview on Mac
If your Mac isn't seeing thumbnails, it's possible that Icon Preview was mistakenly deactivated. The icon preview function guarantees that picture thumbnails and other file previews appear in the Finder. If deactivated, you can only view generic icons rather than thumbnails. Re-enabling this feature is a simple step that usually resolves the issue instantly; learn how:
Step 1. Launch Finder on your Mac by clicking the Finder icon on the Dock.
Step 2. In the top menu bar, choose "View" then "Show View Options." Alternatively, use the keyboard shortcut Command + J to access the View Options.
Step 3. Tick the box next to the Show icon preview.
![]()
Step 4. Close the View Options panel, and your thumbnails should now appear in Finder.
3. Use Terminal Commands to Clear Cache
You may encounter missing thumbnails when your Mac's thumbnail cache gets damaged. Deleting the cache using Terminal on Mac instructions will refresh the thumbnail data and restore any lost previews. Running these steps may resolve the underlying cache problem without requiring a complete system reset.
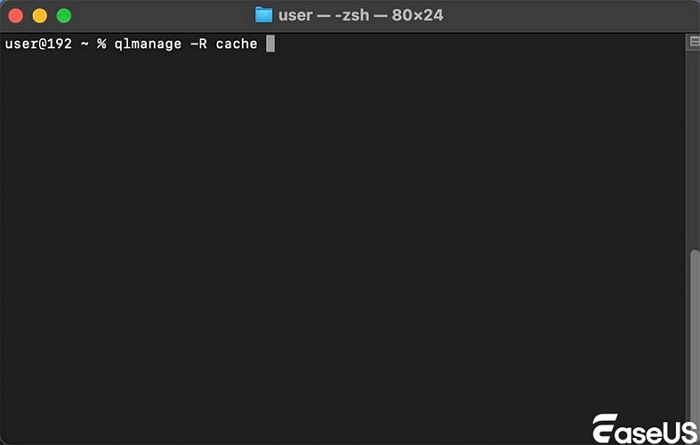
Step 1. To open Spotlight Search, press Command + Space, search "Terminal," and click "Return" to launch the Terminal app.
Step 2. In the Terminal window, enter the following command to remove the thumbnail cache and hit Return:
qlmanage -R cache
Step 3. Run the following command to reset Quick Look, which maintains your file previews.
QlManage -R
Step 4. To resume the thumbnail production process, execute the following commands sequentially:
Kill all com.apple.quicklook.ThumbnailsAgent
Killall Dock
After executing these commands, Finder will refresh, and your thumbnails should display after the cache has been refreshed. If this solution succeeds, thumbnails will appear again in Finder.
4. Restart Finder
A simple restart of Finder may cure the problem of thumbnails not appearing. The Finder oversees your file browsing; thumbnails may cease appearing if it finds a problem. Restarting the Finder process will refresh it and may resolve the issue.
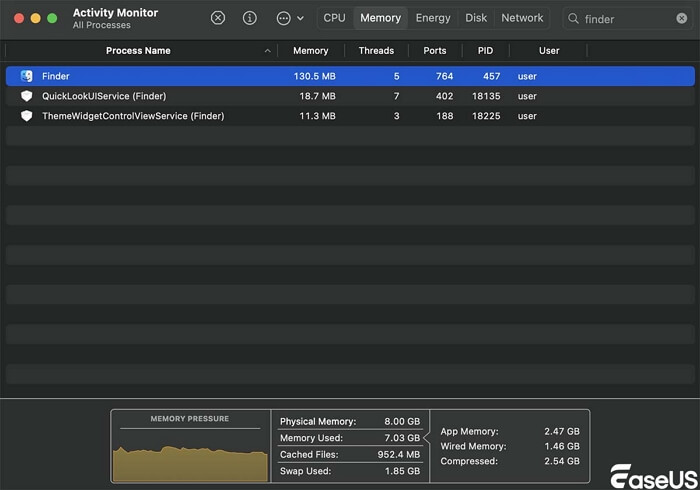
Step 1. To open "Spotlight" Search, press Command + Space. Then, type "Activity Monitor" and hit Return.
Step 2. In Activity Monitor, locate "Finder" in the list of ongoing programs. Clicking on it will choose it.
Step 3. To forcibly stop Finder, click the "X icon" at the top left of Activity Monitor. You will be required to confirm, so choose Force Quit.
Step 4. Finder will resume automatically after being closed, updating the thumbnails in Finder.
This short fix resolves minor Finder problems that may prevent thumbnails from appearing. Once Finder resumes, thumbnails should appear again.
5. Update macOS
If none of the preceding ways work, you may be using an older macOS version, which may have problems impacting the Finder and thumbnail previews. Apple periodically provides updates to address concerns and enhance system efficiency, including thumbnail issues. Upgrading to the most recent macOS version may fix any system problems preventing thumbnails from appearing.
Step 1. Click the "Apple" logo in the top left corner and choose "System Settings" from the drop-down menu.
Step 2. Select "General" and then "Software Update" in System Settings.
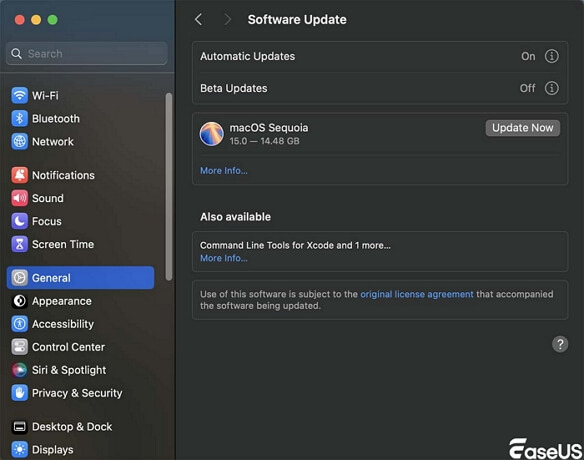
Step 3. Click "Update Now" to install the latest macOS version if available. Follow the on-screen directions to finish the Update.
MacOS upgrades should improve system performance and fix thumbnail issues. To avoid similar troubles, update your operating system.
Conclusion
Overall, Mac thumbnails not appearing might be aggravating, but with the appropriate technique, it can be fixed. Using icon previews, Terminal to clear cache, restarting Finder, or upgrading macOS should fix the problem immediately. If file corruption continues, EaseUS Fixo Photo Repair is a solid option. This utility restores damaged images and creates thumbnails for file accessibility.
Please share this advice on social media if it is useful. Remember to download EaseUS Fixo Photo Repair for future picture file corruption concerns. This powerful tool ensures easy picture repair.
Thumbnails Not Showing on Mac FAQs
Read the answers to these FAQs to solve the thumbnails not showing the problem on Mac:
1. Why are my thumbnails not showing up on Windows?
Windows thumbnails might be missing due to system settings, file explorer setup, or cache difficulties. Windows Explorer thumbnail previews may not appear if the thumbnail cache is damaged or deactivated. Check folder settings to enable thumbnails and clear the cache to fix this.
2. Why are the icons on my Mac not showing?
Mac icons may not appear owing to faulty cache files, Finder glitches, or disabled icon previews. Restarting Finder, cleaning the cache in Terminal, or activating icon preview in Finder options may fix the icons. To avoid Finder-related issues, upgrade macOS.
3. How do you get files to show thumbnails on Mac?
To see thumbnails on Mac, enable icon preview in Finder. Start Finder, choose View > Show View Options, and tick Show icon preview. Remove the thumbnail cache or restart Finder to refresh previews if this doesn't work.
Was This Page Helpful?
About the Author
Jaden is one of the editors of EaseUS, who focuses on topics concerning PCs and Mac data recovery. Jaden is committed to enhancing professional IT knowledge and writing abilities. She is always keen on new and intelligent products.