
Content
Page Table of Contents
About the Author
Hot Topics

In this article, EaseUS will guide you on how to upgrade your Dell Inspiron SSD. Sometimes it becomes essential due to several reasons, and many users want to upgrade their Dell Inspiron SSD, but due to lack of knowledge and technical experience, they can't move forward. So, don't worry; we'll guide you through the entire process, from buying a reliable SSD to removing the original SSD, preparation, cloning, and installation.
Let's look at the table below to understand some necessary things before getting started.
| 🚩Stage | 🔨Tools Required | 🔎Duration |
|---|---|---|
| ①💡Preparation | Screwdriver | 3-5 minutes |
| ②💻Cloning | 3-5 minutes | |
| ③💽Physical Upgrade | New SSD, SATA cable (if necessary) | 10-20 minutes |
| ④🔦Verification | BIOS check, Change boot | 5-7 minutes |
This guide applies to upgrading SSD for Dell Inspiron 5599, 3580, 3581, 7559, 3593, 5567, 3501, 3567, 5570, 3505. Also, feel free to share this guide online to help more Dell owners upgrade their laptops to faster SSD efficiently:
Prepare for the Dell Inspiron SSD Upgrade
Before beginning the Dell Inspiron SSD upgrade process, users need to take the following steps regarding preparations:
🚩Buy a certificated SSD: Consider factors such as performance, speed, price, capacity, and quality when selecting the new storage device.
- Recommended new SSD storage: 30% - 50% bigger storage than your current SSD.
🚩Connect the SSD to Dell via an SSD enclosure: Insert the SSD to an SSD enclosure and connect it to the Dell Inspiron as an external storage.
🚩Initialize the target SSD for use: The target new SSD must be prepared for use, which involves correctly initializing the SSD and setting it up.
🚩Download a reliable SSD cloning tool - EaseUS Partition Master: We recommend you use EaseUS Partition Master for its efficient and user-friendly cloning feature. This tool simplifies the process of transferring data from the old drive to the new SSD.
Prepare the tools to install the new SSD: Gather essential tools like screwdrivers, SATA to USB cable, cloning tool, and optionally an external enclosure to install the new SSD in the Dell Inspiron laptop.
Stage 1. Clone Dell Inspiron HDD/SSD to a New SSD
To ease you from the complexity of upgrading a Dell HDD or SSD to a newer and faster SSD, you can rely on efficient disk cloning software. EaseUS Partition Master preserves the integrity of your original Dell Inspiron HDD/SSD data via its Disk Cloning feature. With this tool, you can effortlessly replicate your HDD/SSD, ensuring a smooth transition of all your data, programs, and settings to the new drive.
Now, let's learn the step-by-step process of cloning the original Dell Inspiron HDD/SSD to a new SSD using the EaseUS Partition Master:
Step 1. Select the source disk.
- Click the "Clone" from the left menu. Select the "Clone OS Disk" or "Clone Data Disk" and click "Next".
- Choose the source disk and click "Next".
Step 2. Select the target disk.
- Choose the wanted HDD/SSD as your destination and click "Next" to continue.
- Read Warning message and confirm "Yes" button.
Step 3. View the disk layout and edit the target disk partition size.
Then click "Continue" when the program warns it will wipe out all data on the target disk. (If you have valuable data on the target disk, back up it in advance.)
You can select "Autofit the disk", "Clone as the source" or "Edit disk layout" to customize your disk layout. (Select the last one if you want to leave more space for C drive.)
Step 4. Click "Start" to start the disk cloning process.
So, download EaseUS Partition Master to easily clone your original Dell Inspiron HDD/SSD and preserve all your data, games, programs, software, and settings.
Stage 2: Remove the Original SSD From Dell Inspiron
In this stage, we'll learn how to remove the original SSD from Dell Inspiron to change and upgrade with a new one. Also, if your Dell laptop has two SSD slots, you can skip this stage and move to Stage 3 to add the new SSD to your computer.
If the laptop only has one SSD slot, here's how you can remove the original SSD from Dell Inspiron:
Step 1. Shut down your PC/Laptop, and disconnect all cables and external devices.
Step 2. Open the back panel of your PC/laptop using the screwdriver.
Step 3. Locate and remove the screws securing the old SSD in its position. Be sure to store the screws safely to ensure they are readily available for reinstallation later.

Step 4. Carefully lift the old SSD at an angle of approximately 35 or 45 degrees and gently pull it out of the drive bay.
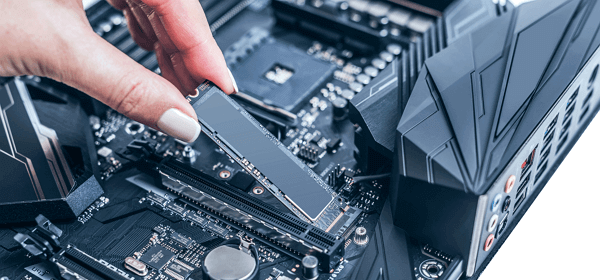
Stage 3. Install the New SSD to Dell Inspiron
After cloning and removing your original SSD from Dell Inspiron, you need to install the new SSD to Dell Inspiron. This process overlaps with the previous stage.
Here's how to insert a new SSD to your Dell laptop:
Step 1. Keep your PC's back panel opened, and find the empty SSD slot to install the new SSD.
Step 2. Insert your SSD at the exact SSD slot.
Now, take the newly cloned SSD and install it securely in the same spot.
Step 3. Remember to use the screws you removed earlier to fasten the SSD in place, and then reinstall it back into the computer backplane.
That's it. Now you can remove and install a new SSD on your own. Please share this article with others to help them change and upgrade the Dell Inspiron SSD on their own.
Once you successfully install a new SSD on your Dell Inspiron, you must set the cloned SSD as the boot drive. Or you will meet errors like cloned SSD won't boot.
Stage 4. Set the Cloned SSD as Boot Drive
Congratulations! At this point, your Dell Inspiron should be ready to boot directly from the cloned OS SSD, providing a seamless experience. Nevertheless, in the rare event that you encounter any issues during the boot process, fret not! We have some troubleshooting steps that you can follow manually.
To begin, let's check the boot order. Ensuring that the boot order is set correctly can often resolve booting problems. If you find that the boot order is already correct, the issue might lie in the boot mode, either UEFI or BIOS.
In such a scenario, the first step is to identify the disk style of the cloned SSD. If it is set to MBR (Master Boot Record), you may need to switch between UEFI and Legacy mode, or vice versa, to resolve the booting issue successfully. Making this adjustment can often restore the smooth functioning of the boot process.
Follow the steps to set the cloned SSD as a boot drive:
Step 1. Ensure the cloned SSD is installed in your Dell Inspiron.
Step 2. Turn on your Dell Inspiron and wait for it to boot into the operating system installed on the original hard drive.
Step 3. As the laptop starts, repeatedly press the appropriate key to access the BIOS/UEFI settings. The key to access this menu varies depending on your laptop model but is commonly Del, F2, F12, or Esc.
Step 4. Navigate to boot options inside the BIOS/UEFI setup, and locate the "Boot" or "Boot Order" section. This section controls the order in which the laptop searches for bootable drives.
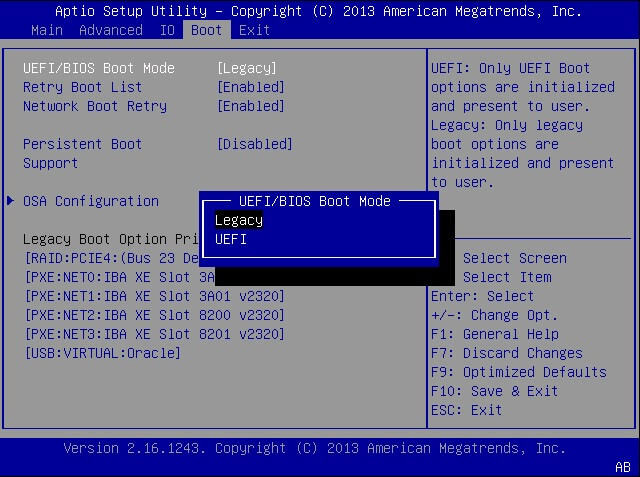
Step 5. In the Boot Order section, use the arrow keys to move the cloned SSD to the top of the boot device list.
Step 6. After setting the cloned SSD as the first boot device, save the changes by following the on-screen instructions and choose "Save and Exit" to exit the BIOS/UEFI setup.
The laptop will restart. Remove any external storage devices, like USB drives, to prevent the laptop from booting from them accidentally. After successfully booting from the cloned SSD, it's a good idea to check and update drivers if necessary.
Why Perfrom Dell Inspiron SSD Upgrade
As technology advances, users often seek ways to enhance the performance and lifespan of their devices. Upgrading the storage of an old Dell Inspiron laptop has become a popular trend among users seeking improved speed, responsiveness, and overall system efficiency. In this regard, upgrading to a Solid State Drive (SSD) offers a compelling solution.
- 🧩Enhanced Performance: SSD significantly boosts the performance of your Dell Inspiron. SSDs offer faster read/write speeds, reducing boot times, application and game load times, and overall system responsiveness.
- 📖Read Also: Does SSD Speed Matter for Gaming
- ⚙️Improved Reliability: SSDs have no moving parts, unlike HDDs, making them more resistant to physical damage and mechanical failures.
- 🚩Increased Storage Capacity: With the advancement of SSD technology, larger storage capacities are now more affordable.
- 🔨Energy Efficiency: SSDs are power savers, as they consume low power than traditional HDDs, leading to improved battery life for your Dell Inspiron laptop.
- 🔎Compatibility and Easy Installation: Most modern SSDs are designed to be compatible with various laptop models, including Dell Inspiron.
In today's fast-paced tech landscape, upgrading old laptops, especially Dell Inspiron models, with SSDs has emerged as a prominent trend. This trend is driven by users' desire to optimize their laptop's performance and breathe new life into their aging devices.
Before launching the Dell Inspiron SSD upgrade journey, following the tutorials and guidelines mentioned in this article is essential to ensure a successful and smooth upgrade process. Taking the time to understand the steps and precautions will help users achieve the desired results and maximize the benefits of this upgrade.
Conclusion
Upgrading the SSD of your Dell Inspiron laptop presents an exciting opportunity to elevate your computing experience. With this comprehensive step-by-step tutorial, you now have the knowledge and guidance to upgrade your Dell Inspiron SSD on your own. You can enjoy enhanced performance, improved reliability, increased storage capacity, and energy efficiency. The trend of upgrading old Dell Inspiron laptops with SSDs reflects the growing desire among users to optimize their devices for the future.
EaseUS Partition Master is a reliable helper for you to do so. This tool has helped you transfer all the data, apps, and setting from the original drive to the initialized SSD. Now, let's check its key features:
- Disk cloning features
- Intuitive and user-friendly interface
- Support for various disk types and file systems
- Resize and manage partitions
There are some links about Dell and storage upgrades; check them if you need help:
Dell Inspiron SSD Upgrade FAQs
If you have more questions/queries, you can find these FAQs with concise answers and helpful guidance.
1. Can I upgrade the SSD in the Dell Inspiron laptop?
Yes, you can upgrade the SSD in your Dell Inspiron laptop. The process involves selecting a compatible SSD, preparing it for cloning, and installing it correctly on the laptop. Refer to the earlier sections in this article for a step-by-step guide on performing the Dell Inspiron SSD upgrade.
2. How do I run Dell Inspiron 15 3000 SSD upgrade?
To run Dell Inspiron 15 3000 SSD upgrade, follow these steps:
Step 1. Choose a compatible SSD for your Dell Inspiron 15 3000.
Step 2. Prepare the new SSD for cloning using a reliable tool like EaseUS Partition Master.
Step 3. Clone the original HDD/SSD to the new SSD.
Step 4. Remove the old drive and install the new SSD in your Dell Inspiron 15 3000.
Step 5. Set the cloned SSD as the BIOS/UEFI settings boot drive.
3. How many SSD slots does a Dell Inspiron laptop have?
The number of SSD slots in a Dell Inspiron laptop varies depending on the specific model and configuration. Some Dell Inspiron laptops have a single SSD slot, while others may have multiple slots. To find the exact number of SSD slots in your Dell Inspiron laptop, refer to the user manual or visit Dell's official website for detailed specifications.
How Can We Help You
About the Author
Updated by Tracy King
Tracy became a member of the EaseUS content team in 2013. Being a technical writer for over 10 years, she is enthusiastic about sharing tips to assist readers in resolving complex issues in disk management, file transfer, PC & Mac performance optimization, etc., like an expert.
Sherly joined EaseUS in 2022 and she has always loved writing articles and enjoys the fun they bring. She receives professional training here, focusing on product performance and other relative knowledge. She has written over 200 articles to help people overcome computing issues.
Product Reviews
-
I love that the changes you make with EaseUS Partition Master Free aren't immediately applied to the disks. It makes it way easier to play out what will happen after you've made all the changes. I also think the overall look and feel of EaseUS Partition Master Free makes whatever you're doing with your computer's partitions easy.
Read More -
Partition Master Free can Resize, Move, Merge, Migrate, and Copy disks or partitions; convert to local, change label, defragment, check and explore partition; and much more. A premium upgrade adds free tech support and the ability to resize dynamic volumes.
Read More -
It won't hot image your drives or align them, but since it's coupled with a partition manager, it allows you do perform many tasks at once, instead of just cloning drives. You can move partitions around, resize them, defragment, and more, along with the other tools you'd expect from a cloning tool.
Read More
Related Articles
-
Full Guide to Check and Fix Disk Error in Windows 11
![author icon]() Tracy King/2024/10/15
Tracy King/2024/10/15 -
Steam Deck Disk Speed Test Tutorial 2024 [Your Guide Is Here]
![author icon]() Tracy King/2024/06/17
Tracy King/2024/06/17 -
How To Create Bootable USB for Windows Server
![author icon]() Tracy King/2024/04/22
Tracy King/2024/04/22 -
Solved: Black Screen After Installing Windows 10
![author icon]() Roxanne/2024/07/05
Roxanne/2024/07/05
Hot Topics in 2024


EaseUS Partition Master

Manage partitions and optimize disks efficiently