
Content
Page Table of Contents
About the Author
Hot Topics
The basic input/output system (BIOS) is the firmware that controls the flow of information between the Operating System and any attached hardware, including the hard drive, keyboard, mouse, and printer. Then, is it possible to partition SSD from BIOS? The answer is negative because BIOS does not support disk partitions. Don't worry. EaseUS will introduce two workable and effective methods to help you to create partitions on your SSD without booting the Windows OS. Below is a comparison table of the two solutions that you can get more information from:
| 🆚Comparison | 🥇EaseUS Partition Master | 🥈BIOS |
|---|---|---|
| ⏰Duration | 10 Minutes | 15 Minutes |
| 🔒Difficulty | Simple | Complicated |
| 😀Pros |
|
|
| 🤢Cons |
|
|
| 👩💻Suitable Users | All users: including beginners | Experienced users |
Keep reading and find out how to perform the two methods on Windows computers.
Best Alternative - EaseUS Partition Master
Although BIOS doesn't support disk partitioning, you can still create partitions on your SSD before without booting the Windows system - using Windows bootable media. Since Windows doesn't offer any built-in tool to create bootable media, we recommend EaseUS Partition Master in this case. It is an efficient partition manager with corresponding functionality for creating bootable media and partitioning hard drives.
With its "Bootable Media" feature, you can create a Windows bootable media effortlessly. Then, you can partition your SSDn smoothly with its "Create" feature. Now, you can install the EaseUS Partition Master and follow the step-by-step instructions below to find out how to partition your SSD from BIOS.
1. Create EaseUS Bootable Media
Step 1. To create a bootable disk of EaseUS Partition Master, you should prepare a storage media, like a USB drive, flash drive or a CD/DVD disc. Then, correctly connect the drive to your computer.
Step 2. Launch EaseUS Partition Master, and find the "Bootable Media" feature on the left. Click on it.
Step 3. You can choose the USB or CD/DVD when the drive is available. However, if you do not have a storage device at hand, you can also save the ISO file to a local drive, and later burn it to a storage media. Once made the option, click the "Create" button to begin.
- Check the Warning message and click "Yes".
Step 4. When the process finishes, you'll see a pop up window, asking if you want to restart computer from the bootable USB.
- Reboot Now: it means you want to restart the current PC and enter EaseUS Bootable Media to manage your disk partitions without OS.
- Done: it means you don't want to restart the current PC but to use the bootable USB on a new PC.
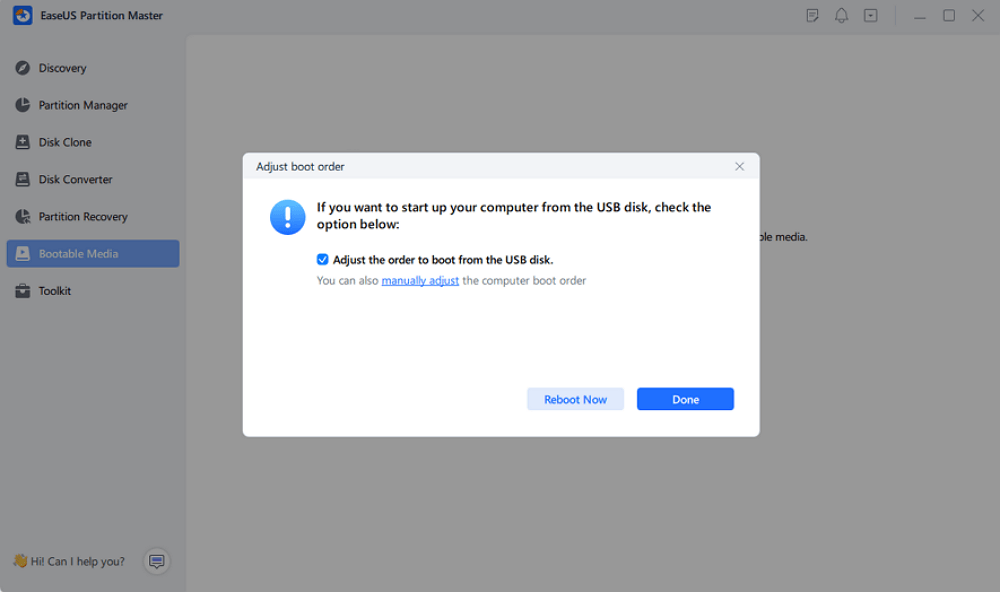
Note: To use the bootable disk on a new PC, you need to resart the target computer and press F2/F8/Del key to enter BIOS, and set the USB bootable disk as the first boot disk.
Wait patitiently and your computer will automatically boot up from the USB bootable media and enter EaseUS WinPE desktop.
2. Partition SSD from BIOS
Step 1. Launch EaseUS Partition Master to check for free space at the Partition Manager section.
- If your hard drive has unallocated space, jump to Step 3 to create partition.
- If the hard drive has no unallocated space, continue with Step 2.
Step 2. Shrink a disk partition to create unallocated space.
Right-click on the target drive partition with a lot free space and select "Resize/Move".
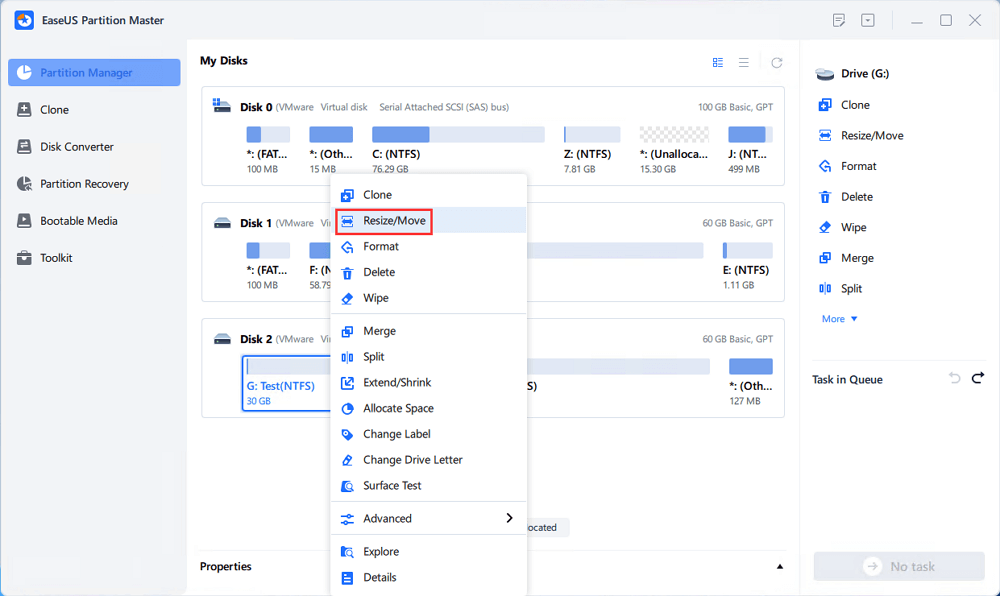
Drag either end of the partition rightwards or leftwards to shrink the partition size so as to get ample unallocated space. You can visually know how much space you've decreased in the "Partition size" area. Click "OK".

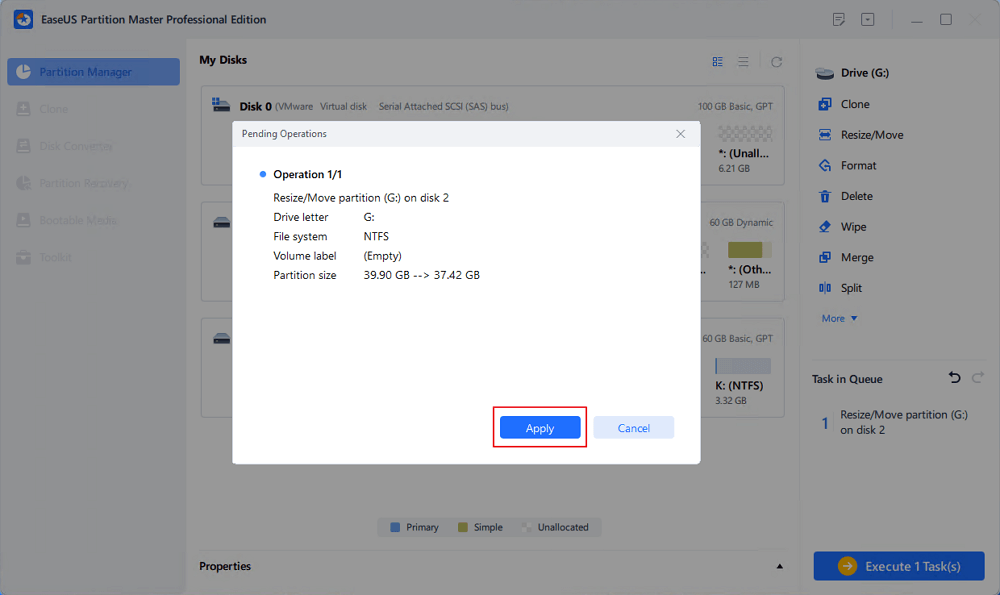
Click "Execute xx Task" and then "Apply" to save all the changes.
Go back to Partition Manager, there should be unallocated space appearing on the same disk and you can continue with the next step to create new partition on your hard drive.
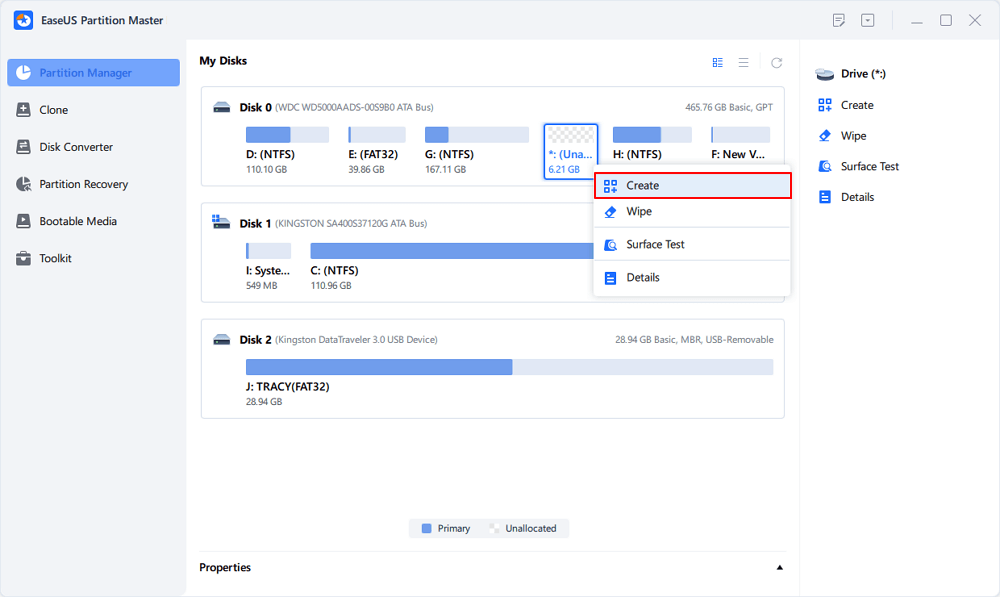
Step 3. Create a new partition with unallocated space on the target hard drive.
Right-click on the unallocated space and choose "Create".
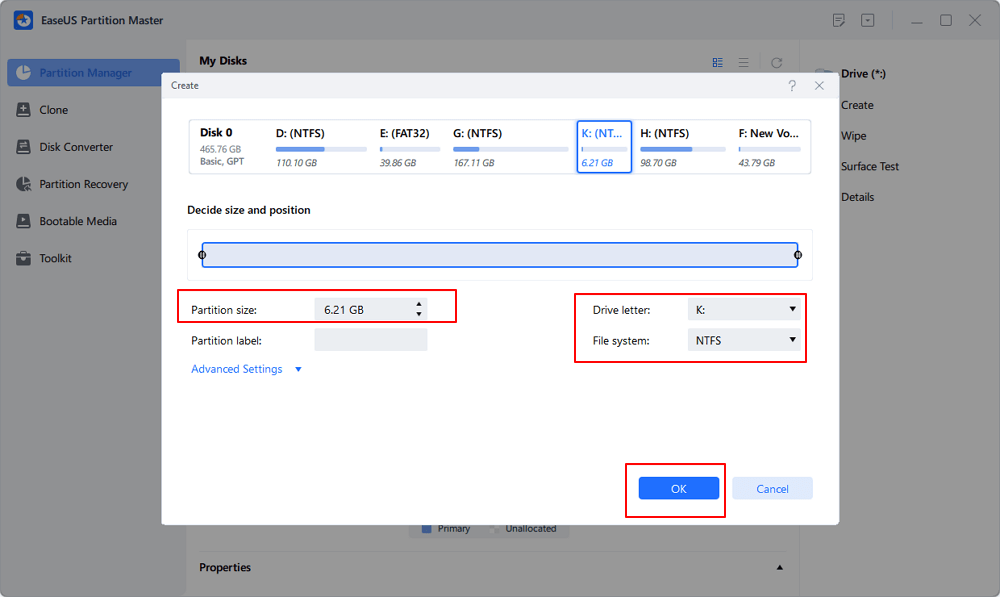
Customize the partition size, partition drive letter, partition label, file system (NTFS, FAT32, EXT2/3/4, exFAT) and more in the Advanced Settings. Click "OK".
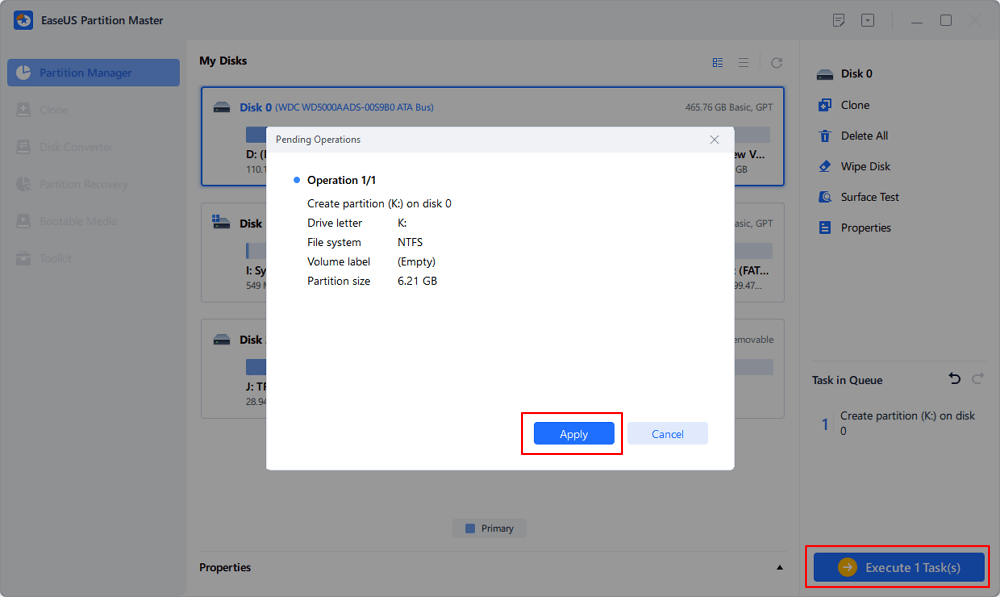
Finally, click "Execute * Task" and "Apply" to complete creating partition with the unallocated space on your disk. Repeat the steps to partition a hard drive and get many more partitions.
Other Advantages of EaseUS Partition Master
Beyond creating WinPE bootable media and partitioning your SSD, EaseUS Partition Master can empower you to apply various operations on your disk and partition without the risk of losing data:
- New Disk Guide: Partition a new SSD with one click.
- Resize Partition on SSD using unallocated space without losing data.
- Remove Partitions from SSD Windows 10/11
- Easily merge Partitions on SSD within three steps.
If you are attracted to the above features, download this tool and give it a try today!
How to Partition SSD From BIOS
The second way is to download the Windows Media Creation Tool to create a Windows bootable media (DVD/CD/USB) and then use command lines to partition your SSD. It could be a little challenging if you're not a professional user. Use the steps listed below to create a bootable USB in Windows 10 from the Windows Media Creation tool:
1. Create a Bootable Media
Step 1. Download and launch Media Creation Tool from Microsoft.
Step 2. Select "Create installation media" and hit "Next." We suggest choosing "USB flash drive" as the media in the next window. Click "Next."

2. Set the Bootable Media as First Boot Media
Step 1. Plug the bootable USB into your computer. Restart the PC and press F2/F8/Del key to enter BIOS settings.
Step 2. Navigate to the "Change Boot Order" and set the bootable USB as the boot device. Hit "F10" to save the change.

Step 3. After Windows Setup is launched, you can choose an appropriate language in "Language to install."
Step 4. Then, click "Repair your computer" at the bottom and then choose "Command Prompt" under the "Troubleshoot" option.

If the methods in this page can work out on your case, you can share it on your social media to help others in need:
3. Partition SSD via Diskpart
Step 1. Type diskpart to launch the CMD, input the below command, and hit "Enter" after each:
- list disk
- select disk
- list volume
- select volume
- shrink desired=2048 (Replace the number with the size you want to shrink.)
- create partition primary size=2048(You can replace primary and the number as the partition type and size you want.)
- assign letter P(Replace P with the new partition name.)

Step 2. Enter exit to close diskpart and reboot your computer.
Conclusion
In summary, this article is about how to partition SSD from BIOS. Although users cannot create partitions on SSD directly in BIOS settings, they can access it using a Windows bootable media. Thus, we have introduced two tested ways of creating bootable media and partition SSD, including EaseUS Partition Master and Windows built-in tools.
EaseUS Partition Master is a fantastic software with a user-friendly interface and reliable solutions for partitioning SSD and managing disk partitions. We have rounded up several articles below so that you can get more details about what else you can do with this powerful partition manager:
FAQs about How to Partition SSD From BIOS
Do you still have additional questions about how to partition SSD from BIOS? This part includes what you may look for. The following frequently asked questions are shown along with their responses:
1. How to see my SSD from BIOS?
If you want to confirm whether your SSDs show up in BIOS. You can verify the boot order to see how it is by performing the following steps:
Step 1. Boot the computer and press F1, F2, F10, F11, or F12 keys to open BIOS settings.
Step 2. Use the right arrow key to switch to "Startup" and then hit "Enter" under "Boot."
Step 3. In this window, you can see the devices that can boot, and your SSD should be shown here.
2. How can I split my SSD into partitions?
If you have a new SSD and want to split it into partitions, you should try EaseUS Partition Master, which can partition a new SSD within three steps. Its "New Disk Guide" feature will enable you to create multiple partitions simultaneously. Here are the detailed steps:
- Download and run EaseUS Partition Master, the new SSD will be recognized, and the New Disk Guide window will pop up.
- Choose "Partition this disk" and set the partition number. Adjust the partition size and other properties. Select "Proceed" to continue the process.
- Select "Execute 1 Task" and then click "Apply."
3. How can I partition my SSD using CMD?
You can create partitions on your SSD using command lines. Here we take logical partition as an example:
Step 1. Enter the Command Prompt by pressing "Windows + X,"
Step 2. Input the following command lines individually:
- diskpart
- list disk
- select disk N (Replace N with your SSD number)
- create partition logical size=1024 (change the number regarding the size you need)
- create partition logical
Step 3. Enter exit to close Diskpart when the process is finished.
How Can We Help You
About the Author
Updated by Tracy King
Tracy became a member of the EaseUS content team in 2013. Being a technical writer for over 10 years, she is enthusiastic about sharing tips to assist readers in resolving complex issues in disk management, file transfer, PC & Mac performance optimization, etc., like an expert.
Roxanne is one of the main contributors to EaseUS and has created over 200 posts that help users solve multiple issues and failures on digital devices like PCs, Mobile phones, tablets, and Macs. She loves to share ideas with people of the same interests.
Product Reviews
-
I love that the changes you make with EaseUS Partition Master Free aren't immediately applied to the disks. It makes it way easier to play out what will happen after you've made all the changes. I also think the overall look and feel of EaseUS Partition Master Free makes whatever you're doing with your computer's partitions easy.
Read More -
Partition Master Free can Resize, Move, Merge, Migrate, and Copy disks or partitions; convert to local, change label, defragment, check and explore partition; and much more. A premium upgrade adds free tech support and the ability to resize dynamic volumes.
Read More -
It won't hot image your drives or align them, but since it's coupled with a partition manager, it allows you do perform many tasks at once, instead of just cloning drives. You can move partitions around, resize them, defragment, and more, along with the other tools you'd expect from a cloning tool.
Read More
Related Articles
-
The Best 5 Hard Drive Cleaner for Windows [2024 Review] 🔥
![author icon]() Cici/2024/04/22
Cici/2024/04/22 -
Best Portable Partition Manager Software for Windows
![author icon]() Cici/2024/04/22
Cici/2024/04/22 -
How to Stop Disk Checking and Stock CHKDSK on Startup in Windows 11
![author icon]() Tracy King/2024/04/22
Tracy King/2024/04/22 -
Windows 11 Shrink Partition: 3 Ways to Shrink Windows Partition
![author icon]() Tracy King/2024/04/22
Tracy King/2024/04/22
Hot Topics in 2024


EaseUS Partition Master

Manage partitions and optimize disks efficiently