(Top 8 Ways) How to Fix Windows 10 Black Screen with Cursor
Jerry updated on Jan 24, 2025 to Computer Instruction | How-to Articles
Do you know how to fix Windows 10 black screen with cursor? If you do not know, you are on the right page. This article will describe how to fix a black screen with a cursor Windows 10. After reading this article, you can pick one to help you fix it.
You may occasionally be able to boot your computer correctly and view the Windows 10 login screen, but you may also have the "Windows 10 black screen with cursor" issue. This problem affects many Windows users when the Windows 10 PC is stuck at a black screen with only the cursor. This problem may annoy you and prevent you from using your laptop or computer. However, you can use several solutions to resolve the Windows 10 blank screen with only the cursor before login.
There are numerous ways to resolve the black screen with cursor issue in Windows 10. You can try any of the methods listed below to see if they can help you solve the problem.
You can attempt uninstalling or updating the graphics card drivers to fix the Windows 10 black screen with cursor issue if your computer's graphics card drivers are incorrect. The detailed steps are as follows:
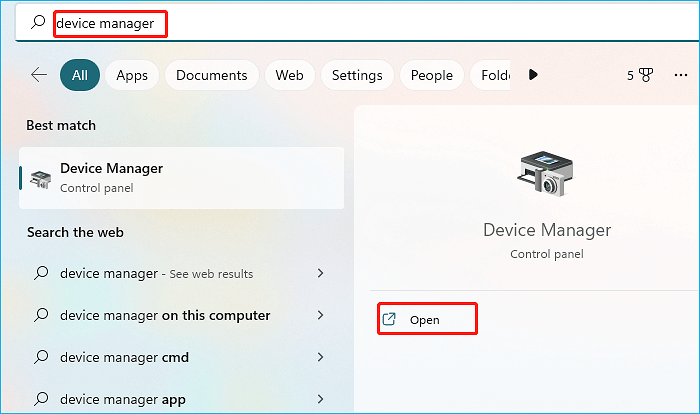
Step 1. Type Device Manager in the Windows search bar and open it.

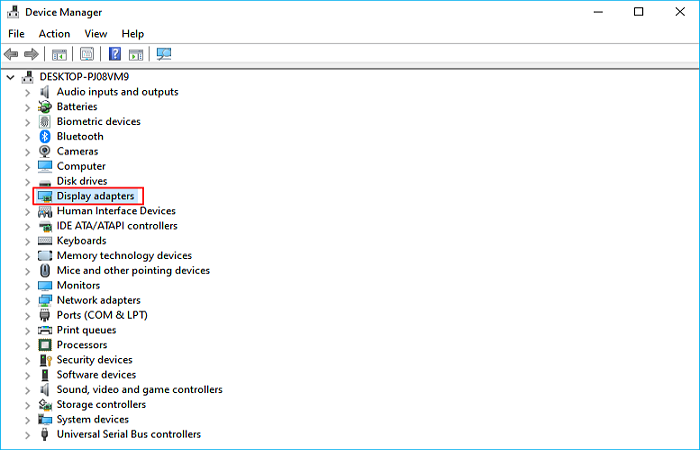
Step 2. Expand the Display adapter.

Step 3. Right-click on the graphics device and select Update driver.
Step 4. Select Search automatically for drivers.
Step 5. Windows will search for a pending update and download it.
Step 6. Once done, you can see if you have fixed the issue.
Microsoft included a tool called Fast Startup in Windows. It shortens the time it takes Windows to boot from sleep mode or shutdown. However, numerous users claim it causes compatibility problems when Windows first starts up. The Windows 10 black screen with just cursor issue could be solved by disabling Fast Startup. This is how you can do it:
Step 1. Restart your PC in Safe Mode.
Step 2. Type Control Panel in the search box, and click on Control Panel in the pop-up menu.
Step 3. View by Small icons and click on Power Options.
Step 4. Click Choose what the power buttons do.
Step 5. Click Change settings that are currently unavailable.
Step 6. Uncheck Turn on fast startup(recommended), then click on Save changes and close the window.
You need to upgrade the BIOS to resolve the problem of Windows 10 having a black screen with a cursor if the BIOS version is too outdated. Updating the BIOS is a procedure for advanced users. However, remember that you could permanently harm your hardware if you don't do it correctly.
Step 1. Press F6 to launch Safe Mode with a network connection in the Windows recovery environment.
Step 2. Open the Run dialogue by pressing the Windows + R keys, entering msinfo32, then pressing Enter to launch System Information.
Step 3. It is possible to find the BIOS Version in the System Information window. First, note the Date and Manufacturer, then use your browser to search for and download the most recent BIOS version to your USB drive from the manufacturer's website.
Step 4. Your PC will restart and enter the BIOS once more once you insert the USB flash drive with the most recent BIOS file. Next, find the downloaded BIOS update file and run the update.
Please note: Avoid disconnecting the power or turning off your computer while the BIOS is being updated, as this could harm your computer.
Windows 10 can also boot to a black screen with a cursor due to a corrupted user profile. The functioning user profile folder can be swapped out for the corrupted user profile folder. Here is what to do:
Step 1. Restart your PC in Safe Mode.
Step 2. Login with an active user account.
Step 3. Navigate to the folder below:
C:\Users\{working-user-profile-name}\AppData\Local\Microsoft\Windows\Caches
Step 4. Copy the Caches folder. Then log in with the corrupted user account.
Step 5. Navigate to the following folder:
C:\Users\{broken-user-profile-name}\AppData\Local\Microsoft\Windows\Caches
Step 6. Replace that Cashes folder with the folder from the working user file.
Try restoring your system to a previous operating state if none of the above solutions work. For that:
Step 1. Type "restore" in the taskbar search box when in safe mode, then find and click "Create a restore point."
Step2. Click System Restore... in the System Protection tab under the System Properties window.
Step 3. Select the restore point before the problem happens by clicking the Choose a different restore point option in the System Restore window. Then click Next and wait for the system restore to finish.
You can also try to run the Automatic/Startup Repair in WinRE to fix the laptop black screen with cursor issue. The following is how to run it step by step.
Step 1. Boot up your computer after inserting your Windows installation CD, DVD, or USB bootable device.
Step 2. Enter the BIOS.
Step 3. Select the DVD or USB flash drive as the primary boot disk, then start the Windows 11/10 computer from that device.
Step 4. To access WinRE, click Repair your computer in the bottom-left corner.
Step 5. To proceed, you must select Troubleshoot in the pop-up window.
Step 6. To advance to the following page, choose Advanced options.
Step 7. In the Advanced options window, select Startup Repair, and then wait for the procedure to be finished.
Try performing the DISM, and SFC commands to repair Windows images if the problem is still present. These commands are needed to fix damaged files, including system and DLL files. Run these commands in the terminal by following the below instructions if you can launch Task Manager.
Step 1. Type cmd in the search box, select it, and run as administrator.
Step 2. Type sfc /scannow and hit Enter.
Step 3. If it doesn't fix the problem, type DISM.exe /Online /Cleanup-image /Restorehealth and then hit Enter.
Step 4. Restart your PC.
If none of the previously mentioned fixes may resolve the "PC black screen with mouse" problem, the only remaining option is to reset Windows 10. But this will reinstall Windows entirely. Therefore, it is highly recommended that you create a backup of your Windows 10 PC. Here's how to go about it:
Step 1. Restart your PC in Safe Mode.
Step 2. Type settings in the search box, then click Settings in the menu.
Step 3. Click on Update & security.
Step 4. Click Recovery.
Step 5. Under the "Reset this PC" window, click on Get started. Then follow the instructions to reset your PC.
What should you do after resolving the bothersome problem? Backing up your computer is strongly advised so that you can restore it once something goes wrong. You can use Windows 10 built-in backup utilities to help you back up your PC. However, you sometimes may encounter Windows 10 backup taking so long issue. In that case, it's better to use professional backup software. EaseUS Todo Backup Home is the one that can meet your needs.
EaseUS Todo Backup Home is a professional backup and recovery tool. It can help you automatically back up your files, systems, disks, partitions, and computer APPs. In addition, you can use it to create diverse backup modes, such as full, incremental and differential backups. It can also help you image a hard drive on Windows 10 PC and back up an SSD to an image. Finally, it is worth noting that it offers you a security zone and 250G free cloud to help store your data or backups.
Here is how to back up your Windows 10 PC:
Step 1. Launch EaseUS Todo Backup on your computer, and click Create Backup on the home screen and then hit the big question mark to select backup contents.
Step 2. To back up your Windows operating system, click "OS" to begin the backup task.
Step 3. Your Windows operating system information and all system related files and partitions will be automatically selected so you don't need to do any manual selection at this step. Next, you'll need to choose a location to save the system image backup by clicking the illustrated area.
Step 4. The backup location can be another local drive on your computer, an external hard drive, network, cloud or NAS. Generally, we recommend you use an external physical drive or cloud to preserve the system backup files.
Step 5. Customiztion settings like enabling an automatic backup schedule in daily, weekly, monthly, or upon an event, and making a differential and incremental backup are available in the Options button if you're interested. Click "Backup Now", and the Windows system backup process will begin. The completed backup task will display on the left side in a card style.
When you update your Windows operating system, install Windows, or put in Windows connecting several displays, this issue may occur. This issue could also arise if you haven't updated the device drivers or used the computer. This issue is characterized by a black, empty screen that only shows a cursor. As a result, you are unable to shut off your computer, log in, or use your PC.
Some primary causes that can be cited as the culprits are described below.
When you encounter Windows 10 black screen with cursor issue, do not worry. You can try any above ways to help you solve Windows laptop black screen with a cursor. Hopefully, one of these fixes can help resolve your Windows 10 black screen with just cursor error.
It would be best if you always create a backup of your Windows computer. Using professional backup software, like EaseUS Todo Backup Home, will be your excellent choice. EaseUS Todo Backup Home can help back up almost everything on your computer and restore the backups to your computer or a new computer. You can also use it to compress backups and back up QuickBooks automatically.
1. Does resetting PC fix black screen with cursor?
Windows that are more likely to fix the black screen with the cursor problem in Windows will be reinstalled if you choose to reset Windows. However, all settings, applications, and files will be deleted if the PC is reset. Therefore, before completing the instructions below, it is highly recommended that you back up any crucial data while in Safe Mode.
2. What is the difference between BSOD and black screen?
The blue screen problem often doesn't damage your computer, but it might be inconvenient if it occurs while you're working on something. The black screen error, commonly referred to as the BSOD (Black Screen of Death), typically results from a problematic device driver, a flaw in the hardware, or a Windows software mistake.
Related Articles
[Full Guide] OpenCore Legacy Patcher Download on Mac
Recover Not Showing Up/Disappeared User Folder and Files in Windows 10
How to Solve No Usable Free Extent Could Be Found [Efficient Solutions]
Time Machine Not Working on Mac: Possible Causes and Proven Solutions