How to Save Files to iCloud on Mac in 3 Easy Ways
Jaden updated on Feb 14, 2025 to Mac File Recovery | How-to Articles
Are you wondering how to save files to iCloud on a Mac? This page provides methods and steps for finding the saved file location and accessing your data in iCloud on a Mac.
iCloud is Apple's cloud-based storage service and app server. It is designed to allow customers to store everything from device backups and app data, like save states, to documents, images, and music. To know how to save files to iCloud on Mac with higher efficiency and keep reading. We will provide you 3 Easy Ways.
To add items from your computer to your iPhone, iPad, or iPod, you can sync them using iTunes. You can have iTunes sync items automatically, manually drag items to your device or both. You can also remove items from your device automatically or manually.
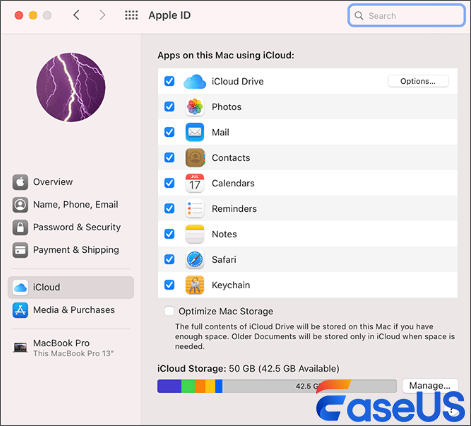
If you haven't already, you can configure iCloud Drive on Mac right now in the iCloud settings.
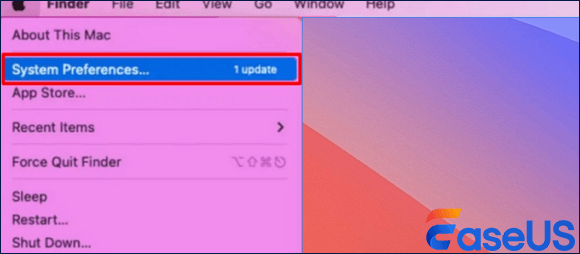
Step 1. Select "System Preferences" from the Apple menu on your Mac.

Step 2. Click in the sidebar's upper section.
Step 3. Click Sign in with your Apple ID if your name isn't displayed. Then, enter your password after entering your Apple ID and any Reachable At phone number or email address you added in the Apple ID settings.
Step 4. Toggle on "Sync this Mac" by clicking "iCloud Drive" on the right.

With iCloud, you can easily store and synchronize files across all your Apple devices. However, when data stored in iCloud is lost, it can be annoying. This part will teach you how to perform iCloud recovery on a Mac and save them to the iCloud drive.
The "iCloud Recovery" tab offered by EaseUS Data Recovery Wizard for Mac significantly reduces the time users must spend searching through their iCloud accounts for the needed data. The tool uses advanced scanning technology to identify specific file types directly in the iCloud data and shows all recoverable files quickly.
You Can Trust EaseUS Data Recovery Software
EaseUS Data Recovery Wizard has acquired an extensive technical base in data recovery and trusted by billions of users since 2005. Check out reviews on Trustpilot.
Step 1. Choose iCloud Recovery
Select the iCloud tab from the left list, choose the "Recover data from iCloud account" option to recover your iCloud Drive data, and click "Next" to log in to your iCloud account.
Step 2. Choose the "iCloud Drive" category
EaseUS software will quickly scan all the recoverable data from your iCloud account. Check the "iCloud Drive" category, and click the "Next" button.
Step 3. Recover iCloud Drive data from iCloud
Select the iCloud Drive data you want to restore, click the eye icon to preview the details, and then click the "Recover" button to get them back.
Step 4. Save recovered iCloud Drive data
Choose a safe storage location on your Mac hard drive to save the recovered iCloud Drive data. You can also save the recovered data to your cloud drives, such as DropBox, OneDrive, GoogleDrive, etc.
If you find this information helpful, please share it with others on social media to help them overcome this common challenge.
The newest offering in the iCloud range - iCloud Optimized Storage, conserves hard drive space on your Mac by keeping documents you don't use frequently in iCloud. If your Mac's storage is getting low and you already have an iCloud plan for your iPhone, you can use it to stop receiving "Disk Space Full" alerts.
Step 1. To access the options, go to "Apple Menu" > "About This Mac" > "Storage" > "Manage".
Step 2. When you do this, the System Information app will launch, and you can set up iCloud Optimized Storage. The setting that needs to be enabled is "Store in iCloud."
On the other hand, "Optimize Storage" only optimizes your iTunes files. Additionally, you can examine huge files for deletion and automatically empty the trash from this location.
Step 3. Optimized Storage is turned on by default on more recent macOS versions, so you might not need to do anything.
How to Restore Mac from iCloud Backup | 2024 Guide
is post will introduce how to recover permanently deleted files from iCloud. Install EaseUS Data Recovery Wizard for Mac to recover permanently deleted files! Read more >>
You can also manage your iCloud Drive files through a web browser by going to iCloud.com and logging in with your Apple ID.
Remember that any changes made to files saved in iCloud Drive will sync across all your devices logged in with the same Apple ID, provided they have iCloud Drive enabled and are connected to the internet.
If you can't move or save a document to iCloud Drive, your iCloud storage might be full. The document will remain on your Mac and be uploaded to iCloud Drive when space becomes available. If you can't find files stored in Mac's iCloud, try the EaseUS Data Recovery Wizard, which can also swiftly scan the Mac disk to find certain data not kept on iCloud Drive.
If you still have some questions about saving files to iCloud on Mac, check the quick answers below to help yourself out:
1. How do I add documents to iCloud?
You have two options in iCloud Drive on iCloud.com: Drag files to the iCloud Drive window or a folder icon from your computer's desktop or folder window. A folder icon becomes highlighted as you drag to it, indicating that the thing you are dragging will actually go into the folder.
2. How do I backup everything on my Mac to iCloud?
Related Articles
How to Recover Missing/Lost Files After macOS Ventura Update
How to Fix and Recover Data from Uninitialized Disk on Mac [macOS 13/12/11]
How to Recover SR2 File Mac | SR2 RAW Recovery
How to Force Empty Trash on Mac | 4 Working Fixes