How to Move Windows 11 to Another Drive | Ultimate Guide🔥
Cici updated on Apr 01, 2025 to Partition Manager | How-to Articles
Cici updated on Apr 01, 2025 to Partition Manager | How-to Articles
How to move Windows 11 to another drive? This post will introduce two safe and efficient tips that can help you transfer Windows 11 to a new drive without reinstallation.
Are you considering enhancing the performance and storage capacity of your computer? The fastest way is to use a high-performance new drive as your main storage, which requires you to transfer all data, including OS, to another drive. EaseUS will walk you through two practical Windows system migration tools in this guideline. Additionally, this post shares a comprehensive tutorial of pre/peri/post operations.
To help other Windows 11 users who want to upgrade their storage, use the social media buttons to share this article with one click:
Follow this section and learn what to prepare and how to migrate Windows 11 to a new hard drive with two practical methods.
Before moving Windows 11 to another drive, you need to ensure the following preparations are completed:
1️⃣Download the OS Migration Tool
As an efficient data migration tool, EaseUS Partition Master Professional facilitates a seamless data transfer without the hassle of reinstalling your operating system or applications. With its help, you can move Windows 11 to another drive quickly and simply.
2️⃣Prepare a New Drive
You can choose an HDD or SSD with a larger storage capacity than the C drive on your system disk. You will need a SATA cable. Then, install and initialize it as follows:
This powerful software can work with all Windows systems. Let's learn how to move Windows 11 to another drive effortlessly with the assistance of EaseUS Partition Master:
Note: The operation of migrating OS to SSD or HDD will delete and remove existing partitions and data on your target disk when there is not enough unallocated space on the target disk. If you saved important data there, back up them to an external hard drive in advance.
Step 1. Select "Clone" from the left menu. Select the "Migrate OS" and click "Next" to continue..
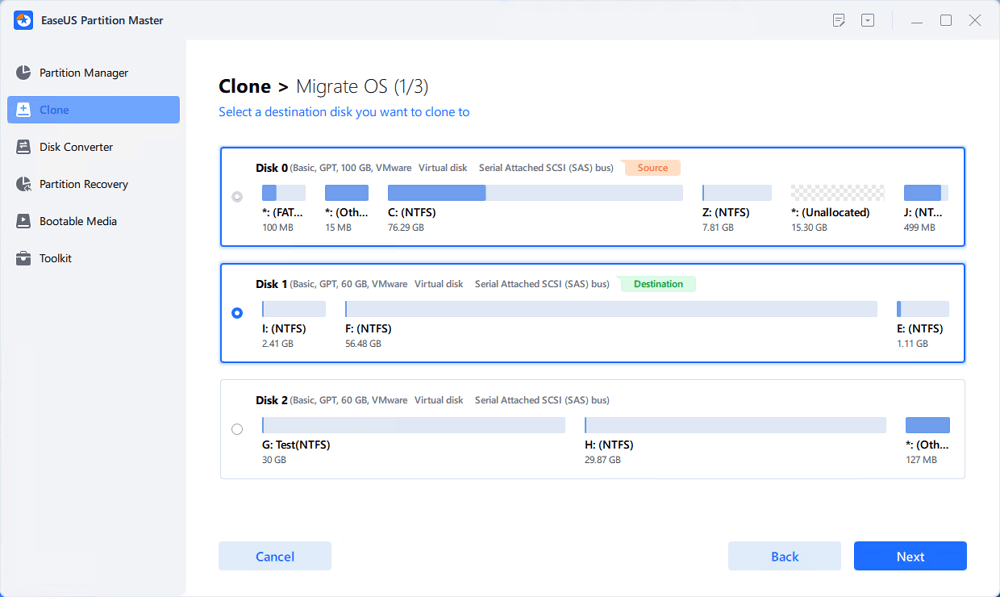
Step 2. Select the target disk you want to clone. Click "Next".
Step 3. Click "Yes" after checking the warning message. The data and partitions on the target disk will be deleted. Make sure that you've backed up important data in advance. If not, do it now.
Step 4. Preview the layout of your target disk. You can also click the disk layout options to customize the layout of your target disk as you want. Then click "Start" to start migrating your OS to a new disk
Step 5. When you see a confirming message, asking "If you want to start up computer from the clone target disk", tick "Adjust the order to boot from the clone target disk" and click the respective button through your demands.
Here are some of its noble features:
What if you want to migrate Windows 10 to a new hard drive or SSD? This related page will meet your demand perfectly:
There is a system image tool on Windows that can help users transfer the Windows system by making a bootable USB. However, this requires more manual operations: first, you need to create a backup system image and a recovery USB flash drive, and last, move the Windows 11 system image to another drive.
Note: You need to prepare two new external storage devices(USB/SSD/CD).
Step 1. Create a Windows 11 System Image:
Step 2. Make a Windows Media Creation Tool:
Step 3. Transfer Windows 11 to the New Drive:
After completing the Windows 11 migration process, you can set the new drive as the first boot device in the BIOS/UEFI. Below is what you should follow:
Step 1. Restart the target computer and press F2/F12/Del key to open BIOS Settings.
Step 2. Switch to the "Boot" tab and change the new hard drive to the boot drive.
Step 3. Save the changes, close BIOS, and restart the computer.
By following the step-by-step instructions above, you can move Windows 11 to another drive effectively. EaseUS Partition Master is more operable for beginners and can keep all your boot files and settings intact. Whether you want to upgrade your computer's storage or simply desire the benefits of a faster drive, you can now enjoy improved performance and increased storage capacity without reinstalling Windows 11 from scratch. Remember to back up your data before starting the process and take your time to ensure a smooth transition.
Are you looking for further information about how to move Windows 11 to another drive? This section is what you need since it covers additional queries and answers:
1. Should I install Windows 11 on an external SSD?
It is highly recommended that you use the latest fast SSD to run Windows 11. And it's simple to migrate Windows 11 to a new hard drive or SSD. You can also install other apps or any software on the drive.
2. Can I move Windows 11 to another drive that already has one Windows OS?
Yes, you can have two Windows systems on one hard drive as long as you install them separately (on two different partitions). You can choose which Windows OS you want to boot only by changing the boot device in BIOS Settings.
3. What is the difference between system cloning and migration?
While migration often involves moving data or information from one system, disk, or drive to another, cloning is making an identical duplicate of the current system. For more details, you can refer to the article below:
🚩Read More: System Clone VS System Migration: What's the Differences
Related Articles
Is 8GB RAM Enough? Get the Answers Here!
How to Partition Western Digital Hard Drive on Windows 11/10/8/7
How to Crack Windows 10 Password - 3 Ways
How to Use Clonezilla on Windows 10/11 [2025 Guide] 💡