How to Create macOS Bootable USB on Mac
Cici updated on Apr 01, 2025 to Partition Master | How-to Articles
By following the detailed steps in this tutorial, you can create a bootable USB installer for macOS, allowing for easy installation or recovery of your operating system.
Are you looking to create a macOS bootable USB on your Mac but unsure where to start? Whether you need to perform a clean installation of macOS, troubleshoot issues, or have a portable version of macOS for on-the-go use, having a bootable USB drive can be a lifesaver. In this comprehensive guide, EaseUS will walk you through the process of creating a macOS bootable USB on your Mac using both automatic and manual methods.
Before going straight to the detailed steps, you need to make full preparations to ensure the success of macOS bootable USB creation. Here are what you need:
Now you are ready to go. Don't forget to share this guideline with more users:
Using third-party software can simplify the process of creating a bootable USB drive. Here's how to do it automatically. EaseUS Partition Master for Mac is a powerful disk management tool designed specifically for Mac users, offering a range of features that simplify the process of managing disk space and creating bootable USB drives for macOS installations.
It supports various macOS versions, including Catalina, Big Sur, Monterey, Ventura, Sonoma, and Sequoia. The software is compatible with multiple storage devices, such as internal and external HDDs/SSDs, USB drives, and SD cards.
Note: This procedure will automatically erase your USB drive to a compatible format. Due to all data on the USB drive will be erased during the process, create a backup if needed.
Step 1. Connect an external disk like a USB drive to your Mac.
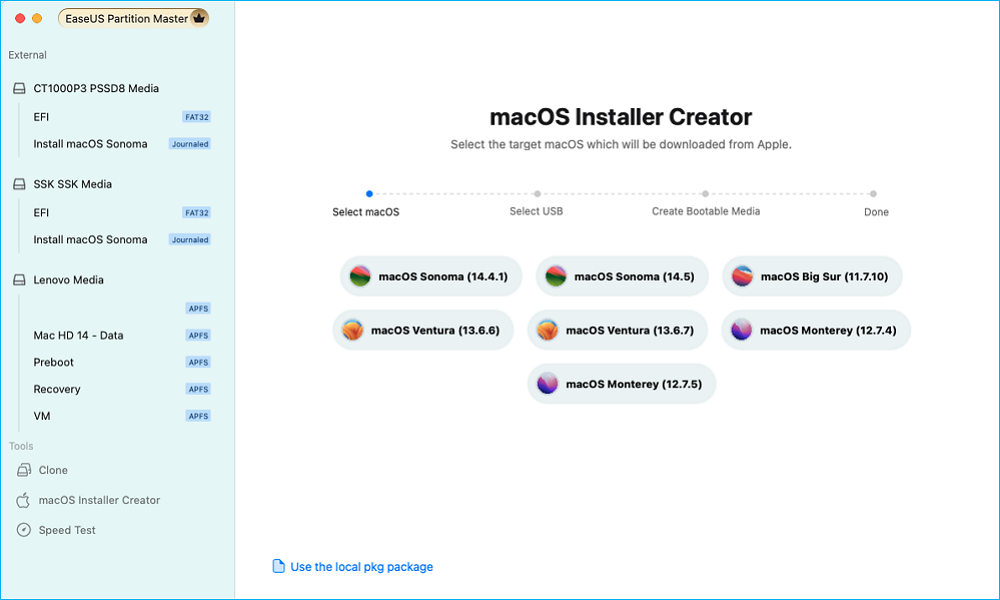
Step 2. Launch EaseUS Partition Master for Mac and navigate to the macOS Installer Creator.
Step 3. Select the macOS you want and the tool will download it from Apple automatically. Also, you can use the local pkg package if you already have one on your device.

Step 4. Then, select the target USB drive to create a bootable media.
Step 5. Finally, perform the operation and wait patiently till the macOS installer is created successfully.
Step 6. Once the bootable installer creation is completed, you can restart your Mac from the USB drive for new macOS installation.
For Apple Silicon Macs:
For Intel Macs:
How to Create A Bootable Installer for macOS
Check this post out, and you will find two effective ways to make a macOS bootable installer for all Mac users.
The manual way is more complex and time-consuming, which is suitable for advanced users. If you prefer to use the macOS installer instead of third-party software, follow this guide carefully:
Step 1. Open the App Store, locate and download the version of macOS you want to download (e.g., Sequoia, Sonoma, Ventura).
Step 2. Navigate to "Applications" > "Utilities" > "Terminal."
Step 3. Enter one of the following commands in Terminal depending on which macOS version you downloaded: (Replace "MyVolume" with whatever name you assigned to your USB drive.)
sudo /Applications/Install\ macOS\ Sonoma.app/Contents/Resources/createinstallmedia --volume /Volumes/MyVolume
sudo /Applications/Install\ macOS\ Ventura.app/Contents/Resources/createinstallmedia --volume /Volumes/MyVolume
sudo /Applications/Install\ macOS\ Monterey.app/Contents/Resources/createinstallmedia --volume /Volumes/MyVolume
sudo /Applications/Install\ macOS\ Big\ Sur.app/Contents/Resources/createinstallmedia --volume /Volumes/MyVolume
sudo /Applications/Install\ macOS\ High\ Sierra.app/Contents/Resources/createinstallmedia --volume /Volumes/MyVolume
Step 4. Press "Enter," then input your administrator password when prompted.
Step 5. Type Y and press "Enter" to confirm that you want to erase the volume.
Step 6. The process will take some time as files are copied to your USB drive.
Step 7. Once Terminal indicates that the process is complete, close Terminal and safely eject your USB drive from Finder.
To boot from your bootable USB installer, you will need to access your computer's BIOS settings. Here's how you can do it:
Remember to change the boot order back to the original settings once you are done using the bootable USB installer to avoid booting from it every time you restart your computer.
In today's post, we shared two solid methods to help Mac users seamlessly create bootable macOS USB. This is an essential skill that can help streamline installations and troubleshooting processes. Whether you choose to use automatic software tools or manual methods via Terminal, having a bootable installer ready ensures that you're prepared for any situation that may arise with your operating system. For users who are not familiar with macOS operations, we highly recommend the automatic tool EaseUS Partition Master For Mac.
1. Can I create a macOS installation USB on Windows?
Yes, it is possible to create a macOS installation USB on a Windows computer, but it requires some additional steps and tools. One common method is to use a virtual machine software like VirtualBox to run macOS on a Windows PC, download the macOS installer from the App Store within the virtual machine, and then create the macOS installation USB using Terminal commands.
2. How can I burn ISO to USB on a Mac?
You can burn an ISO to USB on a Mac using Disk Utility. Simply format the USB drive, then use Terminal to copy the ISO file to the USB drive using the dd command.
3. Can you install macOS on a bootable USB?
Yes, it is possible to install macOS on a bootable USB drive. This allows you to run macOS from the USB drive on any compatible Mac without changing the computer's internal storage. Creating a bootable macOS USB drive is useful for troubleshooting, installing macOS on multiple Macs, or running macOS on a Windows computer.
Related Articles
Download Partition Magic Server 2008 (R2) to Manage Server 2008 Disk Partition Safely
Format/Reformat Seagate External Hard Drive on Windows or Mac
How to Remove SD Card Notification in Samsung S7/S7 Edge
MBR2GPT Cannot Find Room for the EFI System Partition