How to Get BitLocker Recovery Key Using PowerShell
Oliver updated on Sep 28, 2025 to Partition Master | How-to Articles
If you lost the BitLocker recovery key and you couldn't find it anywhere, what can you do? This article will show you how to get BitLocker recovery key using PowerShell with a detailed guide.
The BitLocker recovery key is a unique 48-digit numerical password that is essential for regaining access when standard unlocking methods fail. So, it's crucial to store it securely in multiple locations, such as a USB drive, printed copy, or Microsoft account.
However, some users may lose their BitLocker recovery key. Don't panic. Here, EaseUS will offer you a step-by-step guide on how to get BitLocker recovery key using PowerShell.
BitLocker is a complex encryption technology that comes with Windows, so before we start, you need to ensure your system meets a few conditions so that we can proceed with the BitLocker recovery key finding without any hassle in the next section.
After you check and find that all things are set, we can then head to the next section to learn how to use PowerShell to retrieve your BitLocker recovery key.
🔍You May Also Like: How to Disable Bitlocker in CMD
PowerShell offers a straightforward method to retrieve this key without needing a Microsoft account. To retrieve the BitLocker recovery key using PowerShell, you can follow these simple steps.
Step 1. Press "Windows" + "X" and select "Windows PowerShell (Admin)."
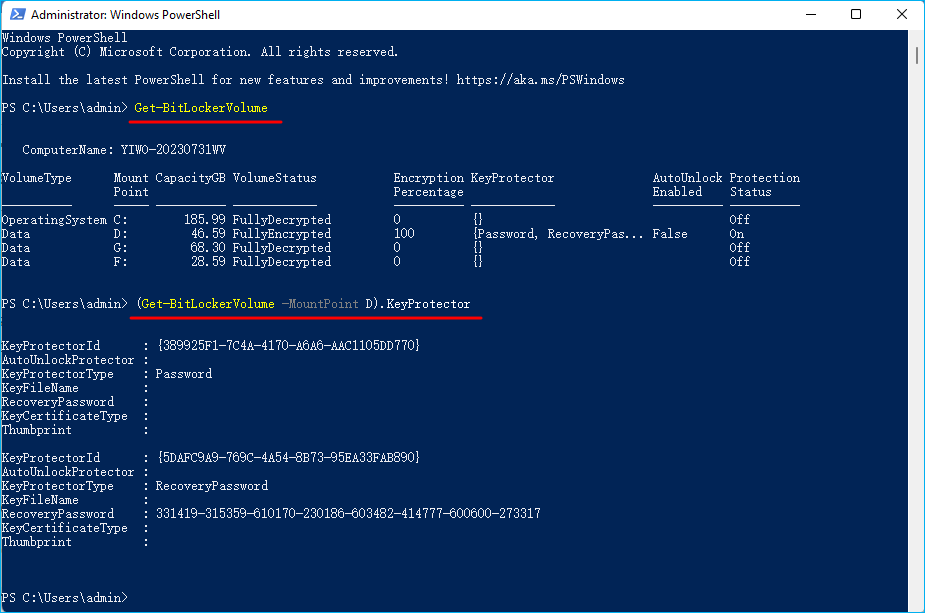
Step 2. Type in Get-BitLockerVolume and hit "Enter" to get a list of BitLocker-protected drives.
Step 3. Type in (Get-BitLockerVolume -MountPoint X).KeyProtector and hit "Enter" to retrieve the recovery key. (Replace X with your target drive letter.)

The BitLocker recovery key will then appear beside RecoveryPassword. You can copy and save it to a local text document.
By following these steps, you can efficiently access your BitLocker recovery key using PowerShell, ensuring you can regain access to your encrypted data when needed. If you find it useful, don't hesitate to share this practical tip with other users.
Now that you have the BitLocker recovery key, let's see how to unlock the encrypted partition with a few clicks.
As a comprehensive disk manager, EaseUS Partition Master Free offers quick access to unlock BitLocker encryption. With a simple click on the lock icon, you can then unlock it with the recovery key.
Step 1. Open EaseUS Partition Master and go to the Partition Manager tab.
Step 2. The BitLocker encrypted partition will be marked with a lock icon.
Step 3. Click on the lock icon, and you will be prompted to enter your BitLocker password.
Step 4. Enter the password or use the recovery key option to unlock the encrypted drive.
| Want to learn more about BitLocker in one place—start with our BitLocker troubleshooting guide. |
Can you retrieve the BitLocker recovery key via PowerShell? Yes! This article helps you find the BitLocker recovery key via PowerShell and offers an additional tip on how to unlock the BitLocker encryption for your drive. With a powerful tool, EaseUS Partition Master, you can even remove BitLocker encryption with a few simple clicks.
Check here if you still have some related questions.
1. How to get BitLocker recovery key from PowerShell?
To get the BitLocker recovery key from PowerShell:
2. How do I get the BitLocker recovery key from Command Prompt?
To get the BitLocker recovery key from Command Prompt:
The recovery key will be displayed on the screen.
3. Can you remove BitLocker without a recovery key?
Removing BitLocker without a recovery key is generally impossible unless you have a third-party key finder or are willing to reformat the drive, which will erase all data.
Related Articles
How to Format WD My Passport Windows 10 [4 Easy Ways]
We Couldn't Update the System Reserved Partition Win 10/11
How to Fix Current Read-Only State Yes [Tested & Safe Ways]
Clone USB to USB for Free with Simplest Tutorial Guide