How to Merge D and E Drive (No Data Loss)
Oliver updated on Mar 29, 2025 to Partition Master | How-to Articles
For users who want to merge D and E drives without losing data on them, this article offers an easy guide for your assistance. Read on to learn more.
I am having difficulties on combining my D and E drive into one new drive without losing any documents... Can I merge D drive and E drive without losing data? - Microsoft Forum
The answer is YES! One option is to use third-party tools like EaseUS Partition Master that can combine two partitions directly without data loss. Another option is to back up all data from the E drive first and then use Windows Disk Management to delete the E drive and extend the D drive.
Luckily, in this article from EaseUS, we'll dive into these safe ways to merge your D and E drives without risking your files. Two methods will be introduced to combine your drives.
EaseUS Partition Master Free really makes your work easy with the hard drive. The best thing is that you would not lose any data while you merge the drives. You can combine one or more full drives together for easier usage. You just need a few clicks to complete all of the processes with this tool. It is not specifically for computer experts but for common people, which makes it quite helpful for most users.
Here is an easy guide of how you can merge your D and E drives using this tool.
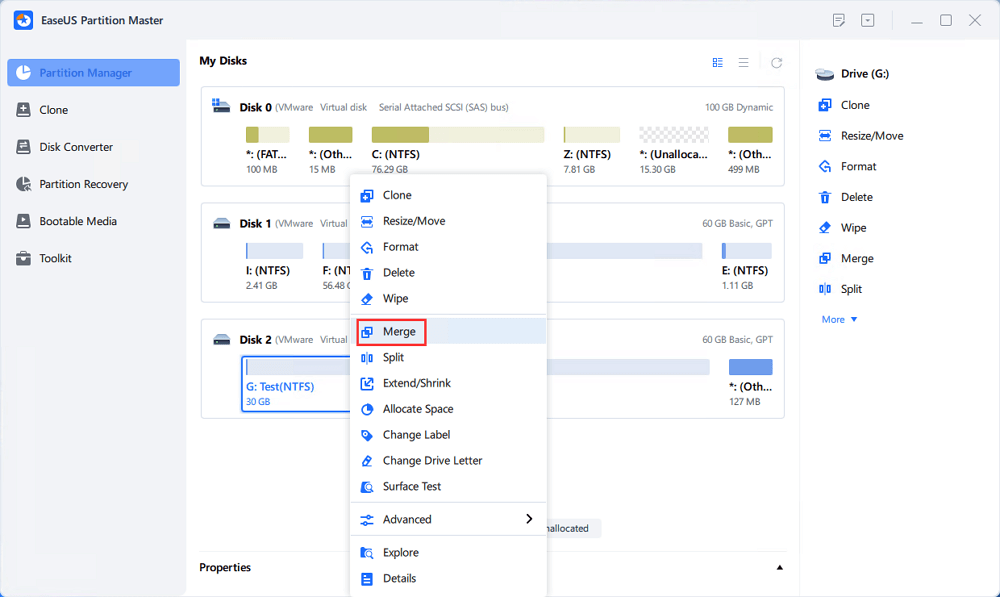
Step 1: Select the target partition
Right-click on the partition which you want to add space to and keep, and select "Merge".

Step 2: Select a neighbor partition to merge
Select one partition next to the former selected partition to merge.
And click "OK" to continue.
Step 3: Execute operation to merge partitions
1. Click the "Execute Task" button at the top and then click "Apply".
2. The program will merge space and add files from the second partition to the first partition.
After this process, all your drives will become one, and no data will be lost.
If you believe this might help, share it with a friend or colleague who might need to solve the same problem. EaseUS Partition Master is a safe tool for managing disk partitions, so by sharing, you would help others avoid losing data.
You can also merge drives using a built-in tool offered by Windows known as Disk Management. It is a reliable option for tech-savvy people who do not wish to use third-party software. The procedure is, however, not very secure, and it wipes up all the data unless you create a backup.
So here is the procedure for combining D and E drives using the Windows Disk Management tool.
Step 1. Right-click over the Windows Start menu, then type Disk Management. Select the result from the from the list.
Step 2. Right-click on the E drive and select "Delete Volume."
(This is going to erase all the data off of that drive; be sure your backup is performed.)
Step 3. Now, right-click on the D drive and then select "Extend Volume" to use unallocated free space for expanding storage.
After doing all this, your drives will be merged, but remember you will have lost the data from the deleted drive. If you saved your data, you can now copy it back to the newly merged drive.
If the D drive and E drive are not next to each other, third-party software like EaseUS Partition Master is your only option for merging two non-adjacent partitions since Windows built-in utilities are unable to deal with such tasks.
This tutorial showed two ways to merge drives D and E. If you want to keep your files safe, use a utility like EaseUS Partition Master. It makes the process easier and protects your files.
However, to utilize the pre-installed tools under Windows, be sure to back up all of your files before you attempt Disk Management. This process will need to wipe everything on one of your hard disks. In addition, picking the right tool can matter, so consider what is best for your needs. And if you're ever unsure, EaseUS Partition Master is available to assist you.
If you have questions, don't worry! Here are answers to a few of the common questions people ask about combining D and E drives.
1. How do I combine two disk drives?
You can combine two disk drives with either third-party software, such as EaseUS Partition Master, which incurs no data loss, or by using the Windows Disk Management tool, wherein one drive must be deleted. Using the tool is a safer and more accessible solution for most users when utilizing a third-party tool.
2. Can I merge two volumes on different disks?
No, you can't join two volumes if they are placed on different physical disks. You can merge partitions only if they are located on the same disk. If you want to utilize storage space on different disks, you may look at other ways, such as creating a storage pool using Windows Storage Spaces.
3. How can I move space from E drive to D drive?
You can move space from your E drive to your D drive either through third-party tools or Disk Management. But you should note that you'll have to delete E drive first (data will be lost) and then extend D drive if using Disk Management.
Related Articles
How to Check Blue Screen Logs in Windows 11 - 4 Ways
Can I Upgrade Windows 8.1/8 to Windows 11? Detailed Guide
The Local Device Name Is Already in Use
How to Clone Hard Drive From Boot [Step-by-Step Guide]