2 Ways to Move AppData to Another Drive on Windows 10
Sherly updated on Apr 01, 2025 to PC Transfer | How-to Articles
Sherly updated on Apr 01, 2025 to PC Transfer | How-to Articles
Do you want to create an extra space in the C drive for better system performance? Go through this article to learn about the different methods of moving AppData to another drive on Windows 10 to fulfill your purpose.
Within the C drive of your computer, AppData is a hidden system folder that stores application-specific data and settings. As we know, your C drive can fill up quickly, especially if you have many applications installed on your PC. To avoid this issue, we recommend you move AppData to another drive on Windows 10 to free up significant space. Other than that, you can carry out this transfer process to improve application performance.
However, moving AppData can cause issues with installed applications and system stability if not done correctly. So, we recommend you back up your data before making such changes and proceed with caution. EaseUS aims to put forward the two best methods to help you move AppData to another drive on Windows 10.
As discussed, users may need to migrate AppData from their C drive to other drives present on their PC for performance optimization. For this purpose, you can utilize the copy-and-paste method, containing many complexities, including creating a new user with administrator permissions and utilizing command lines.
However, you also have the option to utilize third-party transfer tools for this purpose. Users who want to move AppData to another drive on Windows 10 can get help from these valuable methods.
Users who lack the technical knowledge to apply complex AppData transfer methods can utilize this third-party software due to its easy-to-navigate interface. Using EaseUS Todo PCTrans , you will be able to move the AppData folder from the C drive to another without data loss.
With the help of this offline software, you can secure your data using the backup and restore feature before trying to make changes to the system application. Now, Download this data tool to move AppData to another drive on Windows 10.
Step 1. Create a backup file of the source hard drive
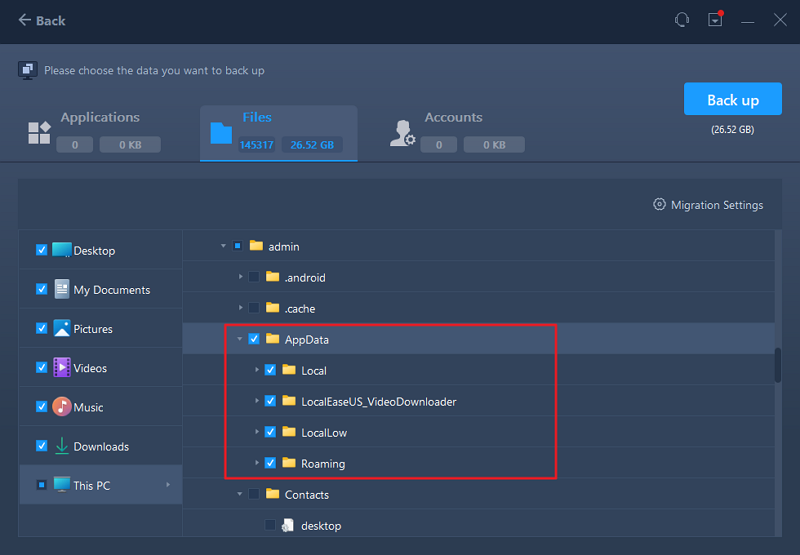
Step 2. Restore the Appdata Folder to the destination drive
Key Features
All these features indicate the multi-functionality of this software, so download this tool to enjoy effective data migration capabilities. To make it easier to transfer AppData to another drive on Windows 11/10/8/7, it's time to download it.
AppData too big? This method can help you move AppData to another drive on Windows 10. With the help of this technique, you have to create a new user with administrative prowess to simply copy and paste AppData from one drive to another. However, users need to create a directory junction to successfully implement this method.
Moreover, this AppData transfer technique can cause data loss and severe system problems. So, you need to back up your system using EaseUS Todo PCTrans before applying the following steps to move AppData to another drive on Windows 10.
Start the process by creating a new user within the Local Users and Groups console and give it administrative permission using the following instructions.
1. First, press "Windows + R" to enter the "Run" dialog box, after which you can paste the "lusrmgr.msc" command to access the Local Users and Groups window.
2. Moving forward, right-click on the "Users" tab on the left of this window and choose the "New User" option from the dropdown menu.
3. Within the newly appeared "New User" dialog box, fill in your details and check the "Password Never Expires" box before pressing the "Create" button.
4. Now, double-click on the newly added user within the "Local Users and Groups" console and enter the "Member Of" tab. After pressing the "Add" button, write "Administrators" in the relevant text box and press the "OK" button to create this new user successfully.
Upon creating a new user with administrative capabilities, we will proceed to move AppData to another drive on Windows 10 using the steps given below:
1. After logging into the newly created user, navigate to the C drive within "File Explorer" and enter the "Users" folder. From the above ribbon, access the "View" tab and check the "Hidden Items" box to reveal AppData folders.
2. Afterward, access the user's account from which you want to copy the AppData. Now, cut this data from the particular user account and paste it into the desired destination drive. Once you paste the data, you need to tick the "Do this for all current items" box and hit the "Skip" button in case an error appears. Moreover, you need to repeat the procedure and press the "OK" button to confirm the migration of the TBRES and other such file types.
3. Upon moving AppData to another drive on Windows 10, go back to the original location of the AppData and delete this particular folder.
After you move the AppData, the process is still incomplete, as you have to create a new directory junction with the help of the following instructions.
1. Begin this process by launching the Command Prompt as the administrator using the "Run" dialog box. To do so, enter "cmd" in the "Open" text box and press the "Ctrl + Shift + Enter" keys at the same time.
2. Upon entering the terminal, paste the commands below and hit the "Enter" key to execute them successfully.
“cd C:\Users\Administrator\AppData”
“mklink /D AppData E:\AppData”
Here, "/D" represents a command to build a directory symbolic link, and "E:\AppData" shows the path referred by the new link.
Once you have created a new directory junction, proceed to log into your default user to see if the application runs normally. Follow the steps given below to delete the newly created user and troubleshoot any app-related issues.
1. Upon logging into the default user, launch the "Local Users and Groups" consoles with the help of the command pasted above. Now, access the "Users" tab and right-click on the newly created users to reveal a pop-up menu. From here, choose the "Delete" option to successfully remove this user from the system.
2. Now, check if your application is running normally after deleting the new user from the computer. To fix abnormal application behavior, enter PowerShell through the "Run" dialog box and paste the following command.
"Get-AppXPackage *WindowsStore* -AllUsers | Foreach {Add-AppxPackage -DisableDevelopmentMode -Register "$($_.InstallLocation)\AppXManifest.xml"}"
Here, you can add the name of your problematic application in place of "WindowsStore."
Users who get successful in moving AppData to another drive on Windows 10 using this method should share this article in their circle to help others carry out this process.
After reading this article, you will learn the best two methods to move AppData to another drive on Windows 10. As we have seen, the copy-and-paste method requires technical knowledge to carry out the complex steps. So, we recommend you utilize EaseUS Todo PCTrans due to its ability to transfer any type of data from one drive to another with just a few clicks.
We have tried our best to explain the complex procedure of migrating AppData from one drive to another using the copy and paste method. However, if you still have any questions left go through the detailed answers given below for better understanding.
1. Is it safe to copy and paste the AppData to another system drive?
When moving AppData to another drive on Windows 10, you have to be cautious, as this method has the capability to crash your system applications. We recommend you backup your data before carrying out this procedure in case anything goes wrong due to your mistake. In addition, several users have reported performance issues after migrating data from one drive to another.
2. Can you move the AppData folder to another drive?
Yes, users can easily migrate the whole AppData folder within different drives using the copy and paste method. To do so, you have to create a new user account with administration powers before pasting the AppData folder to the destination drive. Afterward, create a new directory junction using CMD and then delete the newly created user account to complete the process.
3. How do we move the AppData folder from the C to the D drive?
To successfully transfer this particular folder from your C drive to any other drive, such as D, you need to follow the steps given below.
1. Begin this AppData transfer process by creating a new user through the "Local Users and Groups" console and assigning it administrative permissions.
2. Moving forward, you need to check the "Hidden Item" box from the "View" tab after accessing the "Users" folder in the C drive. Now, copy the AppData folder from the source user account and paste this copied folder within the D drive.
3. Afterward, you need to build a directory junction by executing the following commands within CMD.
“cd C:\Users\Administrator\AppData”
“mklink /D AppData E:\AppData”
4. Once this junction is created, log into the default user account and delete the newly created user to complete this task.
Related Articles
Can I Transfer Installed Programs to SSD without Reinstallation in Windows 11
How to Increase File Transfer Speed Over WiFi
Transfer WhatsApp Backup from PC to iPhone free | Best Way
[Solved] Windows Easy Transfer 7 to 11/10 [Step-by-Step]