How to Raise Hand in Zoom on Windows/Mac/Mobile
Crystal Chen updated on Jul 13, 2022 to EaseUS RecExperts | How-to Articles
Crystal Chen updated on Jul 13, 2022 to EaseUS RecExperts | How-to Articles
No matter which Zoom meeting you participate in, you will need to use the virtual hand to speak something. But do you know how to raise your hand in Zoom? If not, this detailed guide will surely help a lot.
Almost everyone knows Zoom app since it's free and easier to host personal or professional meetings. Even it is simpler to understand except for a few features for beginners, including the little virtual hand feature of Zoom.
It's like the hand-raising practice in face-to-face meetings to draw speakers' attention since you have some questions to ask or want to contribute to the project. Also, it is possible to raise a hand while being on video, but you may go unnoticed, or it seems unprofessional during a job meeting.
However, you might not know how to raise hand in Zoom. This guide will benefit you in that scenario because it offers step-by-step tutorials for Windows, Mac, and Phones.
Bonus Tips: How to Record Zoom Meeting Without Permission
Whether a personal get-together or a professional meeting, you can use this platform for an easy and smooth video session. Zoom is a video conferencing software that became popular over time, especially after the pandemic. You can use its chat option to connect/collaborate with the other members. However, you have to use the little hand if there is something to contribute or speak up for any reason.
Plus, you can schedule the meeting or only share the screen/whiteboard per your demands. It is a safe and secure platform for easy collaboration, workflows, and productivity. Along with that, you can enjoy its advanced features such as customized Zoom backgrounds, Zoom breakout rooms, a Zoom app marketplace, and many more. Moreover, it offers the feature to connect the apps with Zoom, which is easier than ever. Last but not least, you can adjust the audio/video parameters without any hassle.
Here are the steps for how to raise a hand in Zoom on Windows/Mac, but before that, you need to check your system compatibility with the software.
Step 1. The first step involves downloading Zoom from its official website and launching it. Now, click on "Join", and enter the Meeting ID or Personal Link Name. Edit your name if required, and click "Join" again. You can also disconnect the audio or video easily.
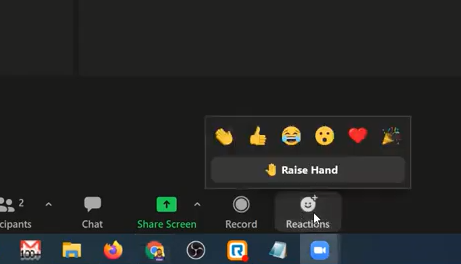
Step 2. Expand the "Participants" tab from the following interface to get a pop-up window. This will display the participants and the small virtual hand in front of every participant.
Step 3. Now, click the "Raise Hand" button to send the notification to the host and other participants that you want to speak up. After you are done, press "Participants" and hit the "Lower Hand".
Note: The functioning will be the same even if you use the web portal of Zoom.
Why do people prefer to raise a hand in Zoom on Mobile? Undoubtedly, Zoom is a stable and efficient mobile app to start new or join the existing meetings compared to the other video hosting applications. The reason for using the Zoom app on Android/iPhone is the user-friendly interface, easy accessibility, and quick functioning.
Moreover, you can mute the audio and video easily or alter the meeting settings according to your needs. Plus, it is possible to ask questions at any moment by raising your hand on your phone, as on the software. Even it allows you to press the clap or thumbs up button if you liked the statement passed by the host/speaker. Most importantly, you can share the screen easily by tapping a button.
Since the procedure of raising a hand in Zoom on mobile is slightly different from that of Windows/Mac, below is the step-by-step tutorial for your ease. Let's follow that!
Step 1. First of all, open the Play Store or App Store to install the Zoom app on your phone. The next step is to open it and join the meeting by entering the required credentials.
Step 2. The next step requires you to click on the "More" tab at the bottom right corner. It will display the various options, including "Raise Hand." Press it to notify your concern.
Step 3. Expand the "More" button again and select "Lower Hand". Leaving the meeting is simple by hitting the "Leave Meeting" option again, available in the top right corner. That's all!
What if you didn't join it earlier and need to review the meeting later to give feedback. Recording the session is the only way out. Though Zoom offers this feature, it takes long and even longer for lengthy videos. If you want to record the Zoom meetings without permission, EaseUS RecExperts is the perfect solution!
It allows you to record the entire screen or the specific region, no matter what's played on the screen. Either you can mute or record the session with audio; even you can increase or decrease the volume as per your choices. Plus, selecting the webcam and recording the screen effortlessly is possible. You can schedule the recordings if you are busy during the required hours. Simply you will get easy, quick, and HD recordings in the end.
Not only this, but this software offers the function of segment recording to capture a small portion of a complete video. Furthermore, it provides you with the auto-split and auto-stop tasks if required. Plus, you can adjust the audio and video preferences such as format, resolution, frame rate, sampling rate, bitrate, and others. You can enable the GPU hardware acceleration technology for fast and high-quality processing.
Features:
Now, download recorder on Windows PC without registration!
Here is a list of steps on recording Zoom meeting without permission:
Step 1. Open Recorder While Joining a Meeting
Download EaseUS RecExperts and install it. Open the recording software and then host or join a meeting in Zoom app. Select the recording area in "Full Screen" or "Region" from the Zoom recorder. To capture the whole screen for the video meeting, you need to choose "Full Screen". For recording a selected area, click "Region".
Step 2. Adjust Zoom Meeting Output Settings
Here, you can choose the output format, quality, frame rate, and other options to record Zoom meeting. From the main interface of this recorder, click "Settings" to apply options.
Step 3. Set the Audio for Video Meeting
You can record audio from Zoom app by enabling the "System sound" option. Find and click the sound icon in the lower left corner. Here you can set the audio resource and adjust the volume. If you want to record microphone sound for Zoom meeting, enable the "Microphone" option, which captures audio from your microphone.
Then, hit "OK" to apply the audio settings in Zoom meeting. Click "REC" to start recording.
Step 4. Stop Recording Zoom Meeting
Before stopping, you have options to take a screenshot. To end the recording, you can hit the red square icon.
Step 5. View the Recorded Zoom Video
After that, a new window with the recorded video will pop up. Or you can go back to its interface and hit "Recordings". Here, you can preview, rename, and even trim the Zoom meeting video.
If you want to find where the recorded meeting video is saved on your computer, choose "Open the file location".
Related Articles
2022 | How to Change Xbox Background on PC/Mobile
7 Methods | ShadowPlay Not Recording
How to Make OBS Not Lag [2022 Guides]
2022 | How to Change Your Roblox Background/Theme