Start Your Free Trial!
Sign up to our newsletter, stay updated on news and exclusive offers from EaseUS. Don't worry, if you change your mind, you can unsubscribe at any time, free of charge. We value your privacy (Privacy Policy).
Tracy King updated on Mar 05, 2025 | Home >Computer Instruction
Here are some solutions and methods that you can apply to fix high CPU usage error in Windows 10 Fall Creators:
Your computer gets slow after Windows 10 Fall Creators update? Does CPU show extremely high use - 99% or even 100% usage in Task Manager on Windows 10 Fall Creators PC?

If your computer runs slower after installing Windows 10 Fall Creators, or CPU shows highly used in task manager, don't worry. Here in the below, you'll find quick fixes and complete methods to fully resolve the high CPU usage issue in Windows 10 Fall Creators and speed up your PC with simple clicks.
This fix can help you quickly end high CPU usage issue in Windows 10 Fall Creators when your PC becomes extremely slow or even get stuck with running programs:
1. Press Ctrl + Alt + Del keys at the same time to bring up Task Manager;
2. Select "Task Manager" > Check and select programs that are taking high memory and CPU usage > Click "End Task" to close selected programs or apps.

1. Press Win + R to bring Run dialog > Type: msconfig to open Task Manager;
2. Click on Startup on "Task Manager "> Select and right-click on unnecessary programs or apps > Select "Disable" to stop them running from Startup.
Download, install and run EaseUS Partition Master in Windows 10 Creators PC;
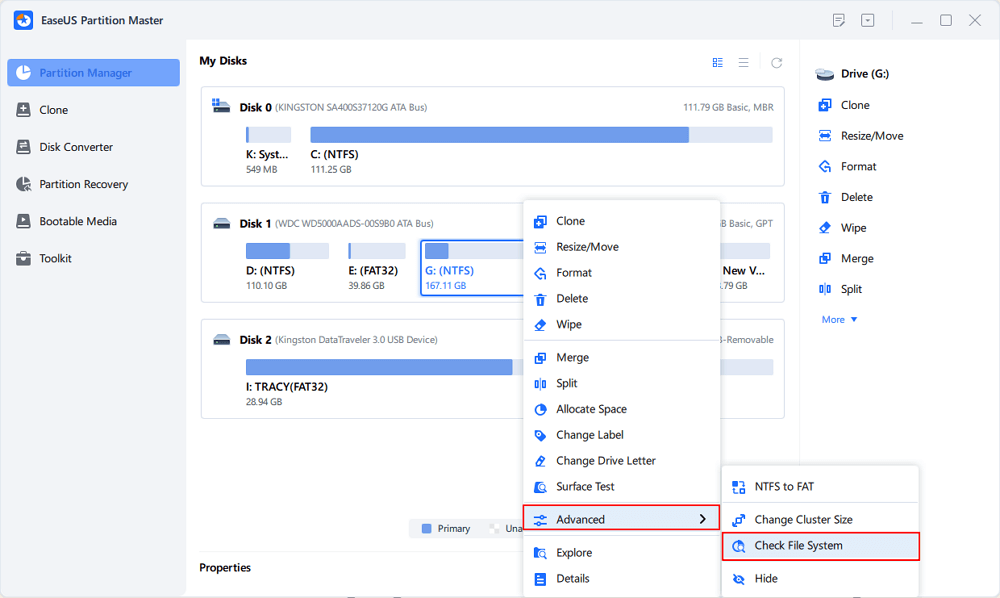
Step 1. Open EaseUS Partition Master on your computer. Then, locate the disk, right-click the partition you want to check, and choose "Advanced" > "Check File System".
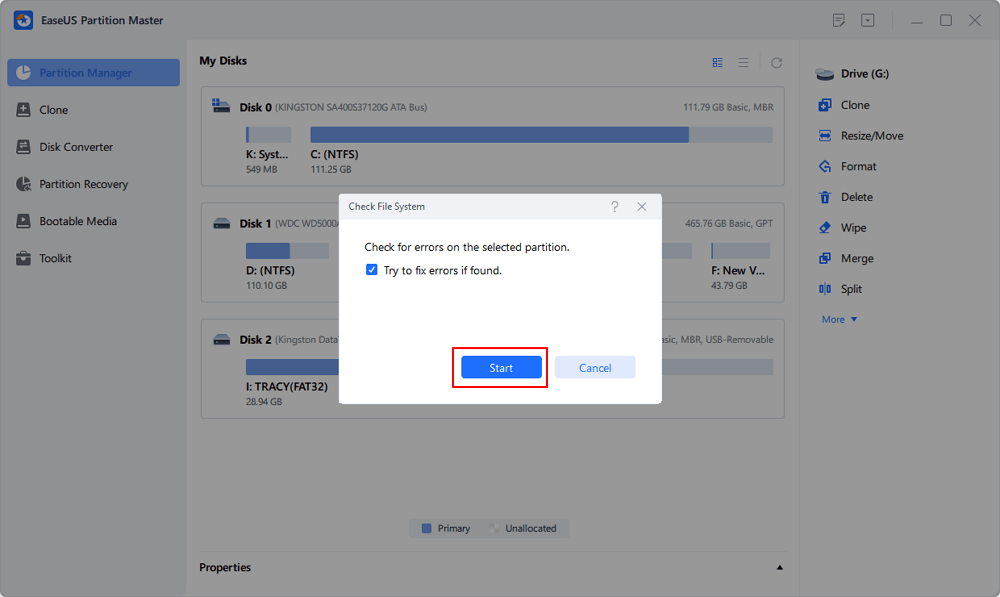
Step 2. In the Check File System window, keep the "Try to fix errors if found" option selected and click "Start".
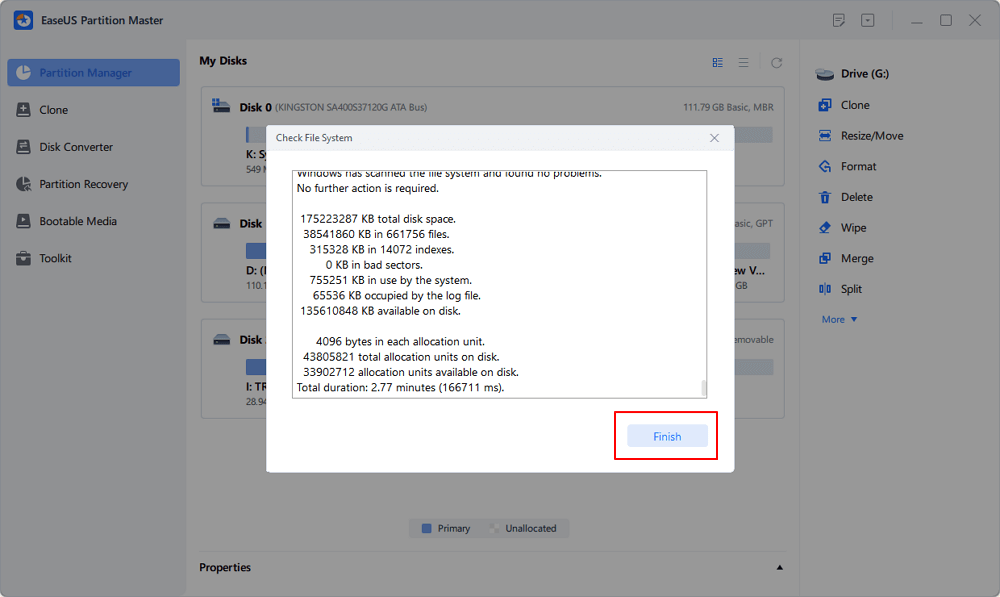
Step 3. The software will begin checking your partition file system on your disk. When it completes, click "Finish".
When the C drive contains is full of junk files, or applications contain caches, the computer CPU will be overloaded. As a result, unexpected high CPU and disk usage issue will occur.
To get rid of this issue, EaseUS CleanGenius with its System Cleanup feature can help:
Step 1. Download and install EaseUS Partition Master Suite.

Step 2. Click PC Cleaner and install EaseUS CleanGinus. Then, click "Cleanup" and click "Scan" to start cleaning up the system and make your PC as good as new.

Step 3. The software will scanning all over your computer to find idle data files that take a huge amount of disk space, you can select useless large files, system junk files and Windows invalid entries and click "Clean" to start system cleanup process.

Step 4. When the scan is complete, click "Done" to finish cleaning system junk files.

1. Right-click on Start and select "Command Prompt (Admin)", sign in with your administrator account;

2. Type: DISM.exe /Online /Cleanup-image /Restorehealth and hit Enter;

3.Type: DISM.exe /Online /Cleanup-Image /RestoreHealth /Source:C:RepairSourceWindows /LimitAccess and hit Enter;
4.Type: sfc /scannow and hit Enter;

Restart PC after this and then CPU high usage or RAM high usage issue has been lowered down by then.
1. Press Ctrl + Shift + Esc to open Task Manager;
2. Go to "Services" tab and click "Open" services;
3. Navigate and locate Superfetch, right click on it and select "Properties";
4. Click "Stop" to end the Superfetch service and click OK to confirm the change;

5. Press Win + R to open Run dialog > Type: msconfig and click OK;
6. Check "Hide all Microsoft services" under Services tab > Uncheck all other remaining services > "OK" to save all changes;
7. Restart Windows 10 Fall Creators > Enable any services individually and reboot PC > Repeat the process till Windows 10 Fall Creators high CPU usage issue gets fixed by then.
Note: One thing that you should know is that Registry Editor may clear and remove some useful files on your PC while running below clear command to fix high CPU usage issue in Windows 10 Fall Creators.
Therefore, please do remember to backup important files and data to an external storage device before you trying below tips.
1. Press Win + R to open Run dialog and type: Regedit, hit Enter;
2. Follow the path: HKEY_LOCAL_MACHINE\SYSTEM\CurrentControlSet\Control\Session Manager\Memory Management;
3. Find: "ClearPageFileAtShutDown" and set its value to 1;
4. Restart the computer and then CUP high usage issue will be fixed.
Was This Page Helpful?
Daisy is the Senior editor of the writing team for EaseUS. She has been working at EaseUS for over ten years, starting as a technical writer and moving on to being a team leader of the content group. As a professional author for over ten years, she writes a lot to help people overcome their tech troubles.
Written by Tracy King
Tracy became a member of the EaseUS content team in 2013. Being a technical writer for over 10 years, she is enthusiastic about sharing tips to assist readers in resolving complex issues in disk management, file transfer, PC & Mac performance optimization, etc., like an expert.
Related Articles
Fixed: File System Check Exit Code Is 8 | Multiple Plans
![]() Dany/2025-02-25
Dany/2025-02-25
How to Open Files With No Extension in Windows 10/11? [Updated 2025]
![]() Daisy/2025-01-24
Daisy/2025-01-24
[Fixed] External Hard Drive Not Showing Up in Disk Management on Windows 10/11
![]() Larissa/2025-01-24
Larissa/2025-01-24
Dell Laptop Stuck on Restarting Screen Windows 10 - Why & How to Fix
![]() Larissa/2025-01-24
Larissa/2025-01-24
EaseUS Data Recovery Services
EaseUS data recovery experts have uneaqualed expertise to repair disks/systems and salvage data from all devices like RAID, HDD, SSD, USB, etc.
Copyright © 2004 - 2025 EaseUS. All rights reserved.
CHOOSE YOUR REGION
Start Your Free Trial!
Sign up to our newsletter, stay updated on news and exclusive offers from EaseUS. Don't worry, if you change your mind, you can unsubscribe at any time, free of charge. We value your privacy (Privacy Policy).
Start Your Free Trial!
Sign up to our newsletter, stay updated on news and exclusive offers from EaseUS. Don't worry, if you change your mind, you can unsubscribe at any time, free of charge. We value your privacy (Privacy Policy).