Start Your Free Trial!
Sign up to our newsletter, stay updated on news and exclusive offers from EaseUS. Don't worry, if you change your mind, you can unsubscribe at any time, free of charge. We value your privacy (Privacy Policy).
Dany updated on Feb 25, 2025 | Home >Computer Instruction
While Apple ensures that older Macs can still install new MacOS updates, some models are still left behind - and it can be frustrating! If you are one of those who have seen the latest announcement of macOS Sequoia and discovered it's not compatible with your Mac, you don't need to worry. We will share the right ways to help you install macOS Sequoia on Unsupported Mac.
Begin by downloading macOS Sequoia Resource, creating a bootable macOS Sequoia USB, installing the OpenCore Legacy Patcher, and then finally installing macOS Sequoia on an unsupported Mac. While it might seem like a couple of quick fixes, you'll need to thoroughly read the guide to avoid any installation problems. Let's get into it!
| Workable Solutions | Step-by-step Troubleshooting |
|---|---|
| Step 1. Download macOS Sequoia Resource | Open your web browser, go to the macOS Sequoia Full Installer Database. Look for the macOS...Full steps |
| Step 2. Create Bootable macOS Sequoia USB | Connect a 16GB USB flash drive to your Mac. Use an empty USB or back up crucial data beforehand...Full steps |
| Step 3. Install OpenCore Legacy Patcher | To obtain the most recent version, go to the OpenCore Legacy page on GitHub and select the...Full steps |
| Step 4. Install macOS 15 on Unsupported Mac | Plug the bootable macOS Sequoia USB drive into the unsupported Mac you want to upgrade...Full steps |
To start the process of installing macOS Sequoia on your unsupported Mac, the first critical step involves downloading the macOS Sequoia installer. Below are the detailed steps on how to obtain the installer directly from Apple using a trusted resource:
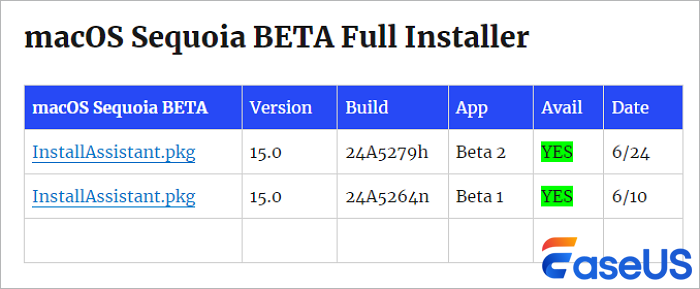
Step 1. Open your web browser and go to macOS Sequoia Full Installer Database.
Note: This database will provide download links for the macOS Sequoia complete Installer pkg files (InstallAssistant.pkg). This is the identical complete installation that you would get from the App Store for Intel and Apple Silicon M1/M2/M3 Mac computers.
Step 2. Look for the macOS Sequoia BETA Full Installer section and download the suitable one. The InstallAssistant.pkg is kept on Apple's servers and includes the whole "Install macOS.app" file.
Step 3. Once downloaded, install the pkg to find the entire macOS installer in your programs folder. You can also download and install macOS Sonoma on unsupported Macs with this website.
Here's a video that may help you learn how to download Sequoia beta and some outstanding new features:

Installing macOS Sequoia on an unsupported Mac requires you to create a bootable USB on a Mac. If the USB you are using is not empty, remember to back up essential data in advance and protect your data before installing macOS Sequoia! To help you create bootable macOS Sequoia installer on a Mac, we recommend EaseUS Data Recovery Wizard for Mac. This utility is great for retrieving files lost during installation and create bootable installer for free.
Check the following guide to learn how to create a macOS Sequoia installer with your USB:
✨Step 1. Connect USB Flash Drive and Choose a macOS Version
Launch EaseUS recovery software, and choose "macOS Installer" from the Advanced Features. Insert a USB that has more than 16GB of free storage space.
Finally, you can choose "Create macOS Installer" to start creating the bootable installer. You can select various macOS versions like macOS Sequoia, Sonoma, Ventura, Monterey, Big Sur, and older versions.

✨Step 2. Erase the USB and Create a macOS Installer
A notice window will appear to warn you this operation will remove everything on this USB. Make sure you have backed up data and nothing important is left on this USB, click the "Erase and create".

✨Step 3. Wait and Check How to Use macOS Installer
The software will automatically format the USB and download macOS installer files. After creating the bootable macOS installer, click the blue link on the interface to learn how to use the macOS Installer boot device to install macOS. Finally, click "Finish" to complete the whole process.

While protecting your sensitive information, the EaseUS Data Recovery Wizard for Mac gives you peace of mind. The outstanding tool can recover deleted files on macOS Sequoia and support multiple file formats such as images, videos, and documents more efficiently in no time. Recover data from USB drives, hard drives, partitions, and more.
This proactive step ensures that your journey to upgrading to macOS Sequoia is smooth and secure. Always remember that safeguarding your data is as crucial as updating your operating system! You can share this product on social media to help more macOS Sequoia users!
Here are the steps to create a bootable USB:
Step 1. Connect a 16GB USB flash drive to your Mac. Use an empty USB or back up crucial data beforehand, as creating a bootable USB flash drive will wipe all data.
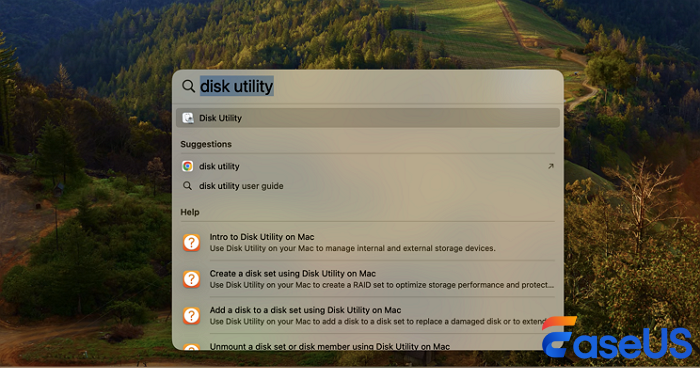
Step 2. Search Spotlight or go to "Applications > Utilities > Disk Utility". Or wake up with Spotlight.
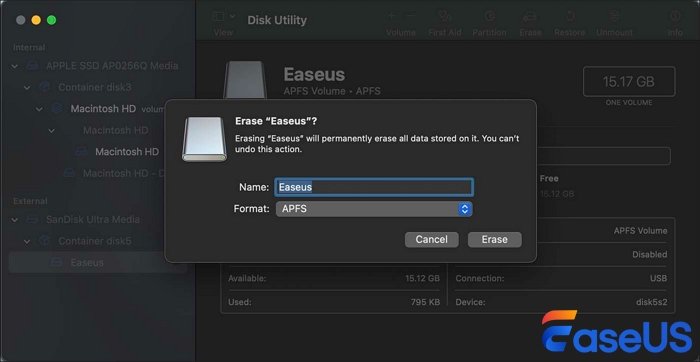
Step 3. In "Disk Utility", choose your USB drive from the sidebar. Click "Erase", choose "Mac OS Extended (Journaled)", and name it "Sequoia". Click "Erase" to continue.
Step 4. After formatting the USB device, open "Terminal" and run the following command, substituting '/Applications/Install macOS Sequoia.app' with your downloaded installation location:
sudo /Applications/Install\ macOS\ Sequoia.app/Contents/Resources/createinstallmedia --volume /Volumes/Untitled
Follow the steps below to complete this section:
Step 1. To obtain the most recent version, go to the OpenCore Legacy page on GitHub and select the "Getting Started" button. Open OpenCore-Patcher (GUI) and choose "Build and Install OpenCore". Follow the on-screen instructions to create the Mac OpenCore package.

Step 2. Once OpenCore Legacy has completed creating the OpenCore package for your Mac, go to the Install OpenCore step.
Step 3. Follow the on-screen instructions to install the package on the USB stick you formatted in the previous section. This creates a bootable USB installer from the Sequoia installer you downloaded.

Step 4. When OpenCore Legacy has completed creating the installer, remove the USB stick from the Mac and insert it into the Mac where you want to install Sequoia.
After creating a bootable macOS Sequoia USB and installing OpenCore Legacy Patcher, you may install it on your unsupported Mac. This brief guide shows how to continue:
Step 1. Plug the bootable macOS Sequoia USB drive into the unsupported Mac you want to upgrade.
Step 2. Power on or restart your Mac, holding down the "Option" key immediately until the boot selection screen appears. Select the "USB drive" containing macOS Sequoia and press Enter.
Step 3. From the macOS Utilities window, choose "Install macOS." Select your Mac's internal drive and start installation using the on-screen instructions. This may take time, so be patient.
Please share this guide on social media to assist others. Sharing your story may help others in similar circumstances!
Installing macOS Sequoia on an unsupported Mac requires downloading the installation files, generating a bootable USB, installing the OpenCore Legacy Patcher, and then installing and running the MacOS 15. The procedure may seem complicated, but following each step will guarantee a successful installation. Remember, planning and detail matter.
Data must be protected before you proceed with the installation process, especially on unsupported Macs. We endorse EaseUS Data Recovery Wizard for Mac. This utility offers comprehensive recovery options if data is lost during installation, and it can create macOS installer automatically for free.
Here are some of the top searched queries related to installing macOS 15 on Unsupported Mac:
1. Can I install macOS Sequoia with OpenCore Legacy Patcher?
MacOS Sequoia may be installed on unsupported Macs using OpenCore Legacy Patcher. This application lets you run the newest macOS version on older hardware, even if Apple doesn't support it.
2. How do I download macOS Sequoia Developer Beta?
Register as an Apple Developer to obtain macOS Sequoia Developer Beta. Visit Apple Developer, sign in, and go to downloads. Download the macOS Sequoia Developer Beta 2 installation there.
3. Why can't I install macOS Sequoia on my MacBook Air?
MacOS Sequoia may not be installed on your MacBook Air if it doesn't fulfill Apple's hardware requirements or Apple doesn't support the installation. MacOS Sequoia is not supported for MacBook Air 2018 and 2019 models.
Was This Page Helpful?
Dany is an editor of EaseUS who lives and works in Chengdu, China. She focuses on writing articles about data recovery on Mac devices and PCs. She is devoted to improving her writing skills and enriching her professional knowledge. Dany also enjoys reading detective novels in her spare time.
Related Articles
How to Export bookmarks from Firefox to Chrome (2025 Tutorial)
![]() Larissa/2025-01-24
Larissa/2025-01-24
How to Create a .TXT File on Mac | Quick & Simple
![]() Dany/2025-01-24
Dany/2025-01-24
Fixed: Windows 10 Reset Stuck or Windows 10 Fails to Reset
![]() Tracy King/2025-01-24
Tracy King/2025-01-24
How to Solve Hard Disk Error 303 and 305
![]() Jean/2025-01-24
Jean/2025-01-24
EaseUS Data Recovery Services
EaseUS data recovery experts have uneaqualed expertise to repair disks/systems and salvage data from all devices like RAID, HDD, SSD, USB, etc.
Copyright © 2004 - 2025 EaseUS. All rights reserved.
CHOOSE YOUR REGION
Start Your Free Trial!
Sign up to our newsletter, stay updated on news and exclusive offers from EaseUS. Don't worry, if you change your mind, you can unsubscribe at any time, free of charge. We value your privacy (Privacy Policy).
Start Your Free Trial!
Sign up to our newsletter, stay updated on news and exclusive offers from EaseUS. Don't worry, if you change your mind, you can unsubscribe at any time, free of charge. We value your privacy (Privacy Policy).