| Workable Solutions | Step-by-step Troubleshooting |
|---|---|
| 1. Download macOS Upgrade | As you're already on your browser, visit the Mac App Store webpage and hit...Full steps |
| 2. Restart Your Mac | Hit the "Apple icon" from the top-left corner of the mac screen to open the...Full steps |
| 3. Remove the Beta Profile | Hit the Apple icon, located at the top-left side of the screen, and choose...Full steps |
| 4. Restart Your Router | The best way is to reboot your router, which will help eliminate...Full steps |
| More Workable Solutions | Sync Your Date and Time Settings > Reinstall your macOS With the Latest Version...Full steps |
Do you want to upgrade your macOS, but the requested version is unavailable? You might face this acute issue when you want to upgrade your PC to its latest version. It may also ensue when you try to update it from the Software Update option in the system preferences or want to upgrade from the App Store.
Update Not Found - The Requested Version of macOS Is Not Available
You must resolve this update not found issue asap because macOS updates consist of numerous exciting features and security updates. These will help safeguard your Mac from spiteful attacks and malware. So, if you're worried about why the requested macOS version is unavailable, we have your back!
In this article, you will get all information on complete fixes to several Ventura update errors, update not found - the requested macOS version is unavailable, etc. So, let's get started with the possible fixes!

The Requested Version of macOS Is Not Available (Why)
Apple keeps releasing several macOS updates to increase your macOS security, stability, and performance. Users flock to update macOS when a new version gets launched. Although not everyone can successfully update to its newest version because often they face an error saying: "the requested version of macOS is not available Ventura". It might detain you at the very beginning prior to downloading the updates.
However, let's see the probable reasons that obstruct you from installing the newest macOS update:
- Unstable network connection.
- The Apple software updater doesn't work.
- The Mac version is too outdated to update.
- Inadequate storage space for installing the newest update.
- macOS says no to new updates or can't detect any updates.
How to Fix Update Not Found - The Requested Version of macOS Is Not Available
Have you been facing this error: "the requested version of macOS is not available?" If macOS 12 Ventura/Monterey/Big Sur/Catalina/Mojave/High Sierra updates are unavailable on the App Store, you must eliminate macOS Beta from Mac. Also, you must wait for the brand-new update version, similar to finding macOS on the App Store or public MacOS.
Otherwise, you might do a clean macOS install on the supported version of Mac. But you must not worry when macOS Monterey or Big Sur update isn't showing in the software update or the requested version is unavailable, as, from this video, you will get to know about the possible solutions to eliminate this error.
- 0:16 Restart your Mac
- 0:37 Use Terminal
- 2:10 Disable VPN
Then, you can follow the steps below to solve your problem.
Fix 1. Download macOS Upgrade from Mac App
The first possible fix to the error: "update not found - the requested version of macOS is not available" is downloading the macOS upgrade from the Mac App Store. You must not always use this software update window to download the newest version of macOS.
Apple lets you download Ventura or Big Sur updates from the Mac App Store. However, here's how to download the macOS Big Sur update from the Mac App Store:
Step 1. Go to Mac App Store
- As you're already on your browser, visit the Mac App Store webpage and hit the View in Mac App Store option. It will quickly open the macOS Big Sur page.
- You might also open the App Store by hitting the "An icon" located at the bottom-right edge of the system tray. Thereafter, you need to search for "macOS Big Sur" from the window's search bar.
Step 2. Download macOS Big Sur
- Hit the "Get" button once you're on the Big Sur page of macOS. After that, don't forget to confirm your choice of downloading the update.
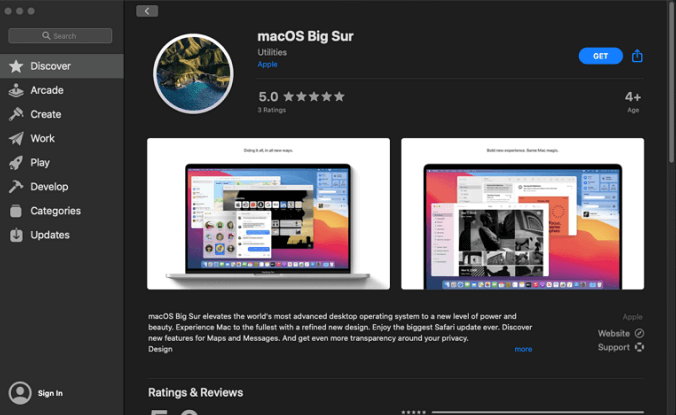
In case you have discovered the update, it would be the best fix to resolve this error: "the requested version of macOS is not available".
Fix 2. Restart Your Mac to Fix Update Not Found Error
People don't like to turn off or restart their PCs as laptops could be pretty mobile and portable. Besides that, restarting Mac every now and then is one of the most healthy habits that eradicates software bugs accumulating in the background. Therefore, by restarting your Mac, you can easily get rid of any technical glitches and bugs related to the OS. First, however, this is how to restart your Mac in these two straightforward steps:
Step 1. Hit the "Apple icon" from the top-left corner of the mac screen to open the drop-down menu.
Step 2. Hit the "Restart" button by moving your mouse down.
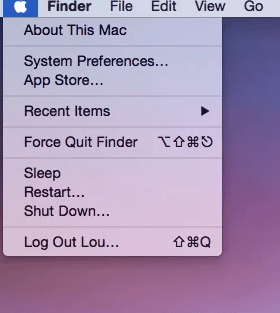
In a nutshell, the fastest reboot is the most efficient way to iron out software problems.
Fix 3. Remove the Beta Profile from Your macOS Ventura/Monterey/Big Sur
In this 3rd fix method, we will help you eliminate the beta profile from the macOS and restart your Mac to check in case this resolves the issue. However, this is how you can eliminate the beta profile from your macOS Big Sur:
Step 1. Hit the Apple icon, located at the top-left side of the screen, and choose "System Preferences."
Step 2. Search for "Software Update" at this stage and hit the option.
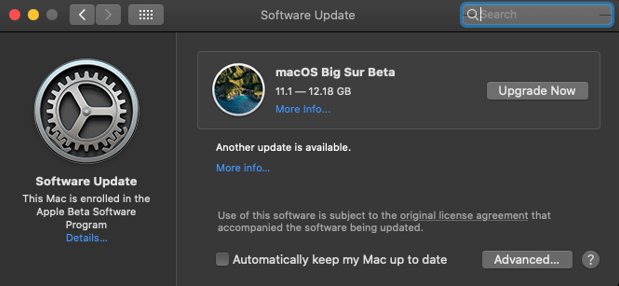
Step 3. You must wait for a few seconds unless a few texts appear under the software update. Now, you have to opt for "Details." However, if you don't see those texts, press the Command + R keys on the keyboard to refresh the Software Update window.
Step 4. Hit the "Restore Defaults" option when a pop-up menu emerges and depart the Apple Beta Software Program.
As you have retrieved the settings back to their default orientation and departed the beta program, it's essential to restart your Mac. It will make sure that every necessary alteration is done to your PC to fix the macOS Big Sur update not being encountered.
Fix 4. Restart Your Router to Fix the Requested Version of macOS Is Not Available
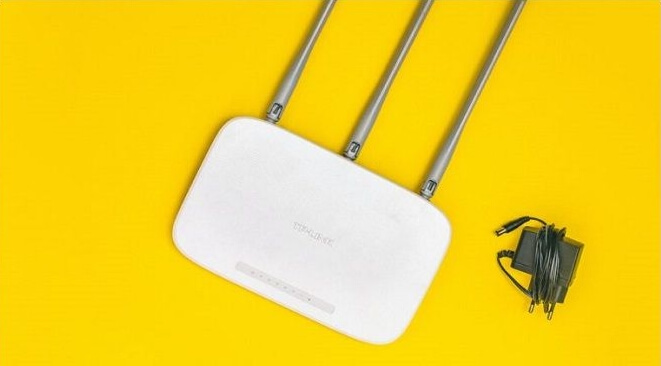
It's imperative to give your router or modem a proper rest now and then to alleviate network issues. The best way is to reboot your router, which will help eliminate any software glitches on the internet. However, in your case, there might be an issue of having an erroneous connection to Apple's server. This is the reason that you can't find the macOS update.
Fix 5. Sync Your Date and Time Settings
Haven't you synced the date and time settings? If not, this could be the main reason for not getting the macOS Big Sur update. However, with the below-mentioned steps, you can easily sync your date and time settings:
Step 1. Hit the Apple menu and open System Preferences.
Step 2. Choose a date and time from there.
Step 3. Press the lock icon at the screen's bottom-left edge, and choose "Set date and time automatically".
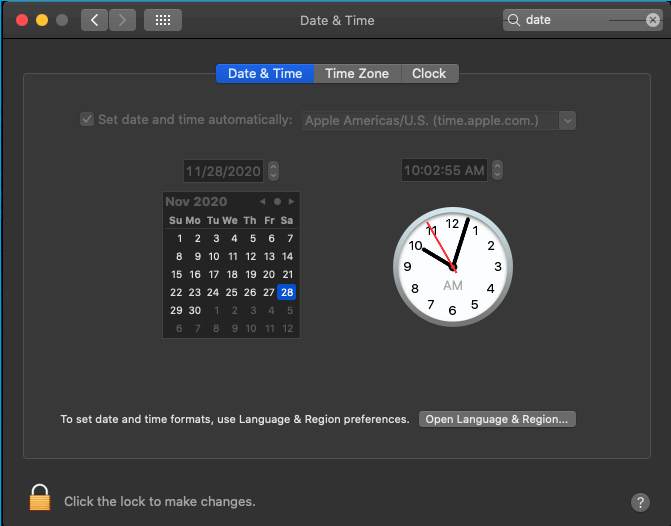
Once you have executed these steps, move ahead and search for the available Big Sur update on Mac.
Fix 6. Reinstall your macOS With the Latest Version
The last fix you can give a shot at is to reinstall your macOS, which might help you install the latest version. This reinstallation will solely touch system-based files and will never mess with your files stored on the Mac. However, these are the steps to reinstall your macOS with the latest version and eliminate this error: "update not found - the requested version of macOS is not available". Follow the steps below to install macOS 13 Ventura:
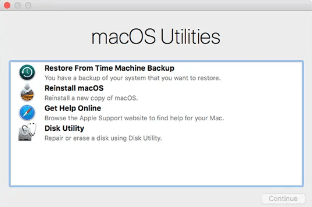
Step 1. You must turn off the Mac and restart it by simultaneously pressing and holding the Option + Command + R keys. You need to hold those keys until you see a spinning globe or an Apple logo.
Step 2. Type your password if required. However, you must be in the macOS utility window when you're done with the credentials.
Step 3. Choose Reinstall macOS from the vast array of options shown on the screen.
The easiest and most effective way to upgrade or install macOS is to use a tool. EaseUS Data Recovery Wizard for Mac provides a free macOS installation feature to help users install new or old macOS from an external hard drive smoothly! Check out the following steps:
Step 1. Select a macOS version
Select a macOS version from the list, or click the "Refresh" option to get the downloaded macOS version. Or you can add a macOS installer from your disk by clicking the "Add" button. Insert a USB flash drive larger than 16 GB to save the macOS installer.

Step 2. Erase the USB flash drive
After choosing the USB flash drive, click the "Erase and create" option in the pop-up window to format your USB flash drive quickly, and then click the "Create macOS installer" button to continue.
- Note: This operation will delete all data on your USB flash drive, please back up important data in advance, or use EaseUS data recovery software to recover your data.

Step 3. Create the macOS installer boot drive
Wait for the process to complete, and click the "Finish" button. Your macOS installer boot drive has been successfully created!

Extra Tips: How to Recover Data After macOS 13/12/11/10 Update
Do you know a professional data retrieval software for Mac that can retrieve lost data? But if you're wondering what that professional software is, EaseUS Data Recovery Wizard will help recuperate the lost data from unexpected deletion or emptied trash bin.
If users go through data loss due to any macOS installation error, they can use EaseUS Data Recovery Wizard for Mac to restore mislaid files. The top recovery features of EaseUS data recovery software come with a heap of streamlined functionalities powering your Mac data retrieval. However, the top recovery features are the following:
- Recover lost photos after upgrading to macOS Ventura/Big Sur/Catalina/Mojave
- Run Mac data recovery, MacBook recovery, and Mac Trash recovery with simple steps
- Recover permanently deleted files from Mac SD card, hard drive, USB, and more
Step 1. Select the location
Select the disk where you lost data after updating to macOS Sonoma/Ventura/Monterey/Big Sur. Then, click "Search for lost files".

Step 2. Find lost data after the scan
EaseUS Data Recovery Wizard for Mac will immediately scan your selected disk volume and display the scanning results on the left pane. Use the file type and file path to find wanted data on Mac.

Step 3. Recover data after macOS update
Select the target files that were unknowingly lost during or after the update and click the "Recover" button to get them all back.

Conclusion
These are the top 6 fixes when the requested macOS version is unavailable. Moreover, the steps are straightforward and might take a while based on the hardware capabilities and the internet. In case the data has been lost while updating macOS 13/12/11/10, you can use EaseUS Data Recovery Wizard for Mac to solve several challenging data loss cases and recover videos, audio, photos, emails, and documents.
The Requested Version of macOS Is Not Available FAQs
The error: update not found - the requested version of macOS is not available may happen at any time. So, these are the FAQs you should know:
1. What Mac is compatible with Ventura?
Apple has affirmed that Ventura supports these Macs:
- MacBook models from 2017 or later.
- MacBook Pro models from 2017 or later.
- iMac Pro (all models).
- MacBook Air models from 2018 or later.
- Mac Pro models from 2019 or later.
- Mac mini models from 2018 or later.
2. How do I upgrade my Mac to Big Sur?
Your Mac will inform you if any update is available when the general release is out. You need to hit the "Install Now" button on the notification. If you want to search for an update, hit the Apple icon in the top-left corner of the desktop, and opt for System Preferences > Software Update.
3. Missing photos after the macOS Ventura update, how to recover?
You can retrieve the missing photos after the Ventura update with the steps below:
- Run EaseUS Data Recovery Wizard for Mac to scan and find lost photos.
- Retrieve lost images after the Ventura update with iCloud.
- Visit photos > settings.
- Choose the iCloud tab.
- Opt for iCloud photos.
4. How to fix macOS 13 Ventura installation failed?
You can remove the Beta Profile from your macOS Ventura to fix macOS 13 Ventura installation failure.
Was This Page Helpful?
Brithny is a technology enthusiast, aiming to make readers' tech lives easy and enjoyable. She loves exploring new technologies and writing technical how-to tips. In her spare time, she loves sharing things about her game experience on Facebook or Twitter.
Related Articles
-
Laptop Turns Off When Unplugged - How to Fix?
![author icon]() Jerry/Jan 24, 2025
Jerry/Jan 24, 2025 -
How to Fix Disk 1 Removable No Media Error [Detailed Guide]
![author icon]() Sherly/Feb 12, 2025
Sherly/Feb 12, 2025 -
How to Download and Install macOS 13 Ventura [Step by Step Navigation]
![author icon]() Dany/Feb 25, 2025
Dany/Feb 25, 2025 -
How to Format Unallocated Disk [Step-by-Step Guide]
![author icon]() Cici/Mar 13, 2025
Cici/Mar 13, 2025