Start Your Free Trial!
Sign up to our newsletter, stay updated on news and exclusive offers from EaseUS. Don't worry, if you change your mind, you can unsubscribe at any time, free of charge. We value your privacy (Privacy Policy).
Jerry updated on Jan 24, 2025 | Home >Computer Instruction
Performing a Windows 11 update is essential for enhancing the security and stability of your system. The update and installation process is smooth most of the time. However, it's possible to encounter a "Windows 11 24H2 failed to install" problem. This tutorial from EaseUS will outline the main causes of the "Windows 11 24H2 update won't install" error and discuss eight fixes you can apply to address Windows 11 24H2 not installing on PC or stuck error.
An update failing to install may affect your computer's ability to run normally. We will describe how you can apply each fix to address the "Windows 11 not updating to 24H2" problem. This section will discuss 8 fixes to the Windows 11 24H2 update problem as follows:
The leading cause of Windows 11 update failure is insufficient disk space. You can easily fix this by deleting some files on your C drive using Disk Cleanup. Check the following steps:
Step 1. Open Disk Cleanup.
Step 2. Select your C drive and click "OK."
Step 3. Select the components to delete under the "Files to delete" section. Click "OK."

Step 4. You'll now have some extra disk space that accommodates the updates.
Minor errors may also prevent your update from installing. You can fix this by easily restarting your device as follows:
Step 1. Click on the Start Menu.
Step 2. Click the Power icon. Choose the "Restart" option.

Step 3. You can then save your work and proceed with the restart. The system will then resume installing your updates.
The Windows Update Troubleshooter lets you find and solve common errors affecting your update. You can run it via the following steps:
Step 1. Open your Windows 11 Settings.
Step 2. Click on "System." Select "Troubleshoot" and then "Other troubleshooters."
Step 3. Click the "Run" button under "Windows Update." This will start the Windows Update troubleshooter service. It will scan for possible issues affecting the update process and fix them.

Step 4. Once the troubleshooter has finished running, you can restart your PC and check whether you can now install the update.
You may also experience the "Windows 11 version 24H2 not downloading" problem because of the interference from connected external devices. You can disconnect these devices temporarily until you finish updating your operating system. They include printers, USB drives, external HDDs, etc.
You can leave critical components like the mouse and keyboard intact. The Bluetooth service may also interfere with the update. Please turn it off until the process finishes.
The SFC scan helps to identify corrupted system files affecting the Windows 11 24H2 update. The DISM command helps to fix the identified and corrupted system files. You can run the two scans simultaneously as follows:
Step 1. Launch Command Prompt. Ensure you've selected the "Run as administrator" option.
Step 2. Run the SFC scan using the following command:

Step 3. You can then run the DISM scan as follows. Hit Enter after writing each command.
Step 4. You can restart your device once the above scan finishes running. You can then check whether the update error has disappeared.
A problem with your system drivers may also lead to Windows 11 version 24H2 not downloading. You can fix such errors as follows:
Step 1. Open Device Manager.
Step 2. Check those with a yellow exclamation mark to identify devices with drive errors.

Step 3. Double-click on each device and select the "Update driver" option.

Step 4. The system will then scan and install the latest drivers for the selected devices. You can restart your device once you've updated all the devices. You can then proceed with installing your Windows updates.
A Windows 11 update may fail to install if you have corrupted components. You can fix the issue by stopping and then restarting the Windows update components. Check the following steps:
Step 1. Open CMD as an admin.
Step 2. Type the following commands and press Enter after each to stop the listed update components:
Step 3. The next step is to rename the SoftwareDistribution and catroot folders. You can do that by pasting the following commands and pressing Enter after each:
Step 4. You can then restart the services using the following commands:
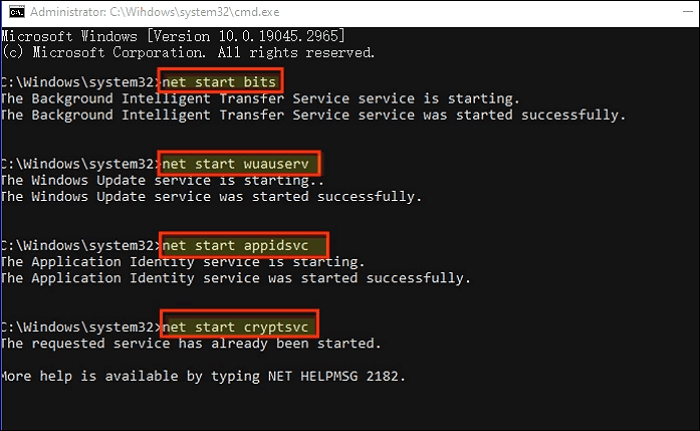
Step 5. Restart your PC to check if the update error has disappeared.
You can apply this method if all the other fixes have failed to address the update problem. This fix entails creating a bootable USB drive. You can then use it to install your OS. The first step is to download the Windows 11 24H2 ISO file. Next, follow these steps:
The following article will describe creating a Windows 11 24H2 bootable USB for clean installing Windows 11 24H2 or update.

How to Create Windows 11 24H2 Bootable USB for Free
You're in the right place if you're wondering how to create Windows 11 24H2 bootable USB. This tutorial will outline 4 methods you can apply to seamlessly create a bootable USB drive for your PC. Read more >>
After creating a bootable USB, you can use it to install or update your Windows:
Step 1. Connect the bootable USB drive to your computer and press the applicable keys to enter BIOS. Choose your USB drive as the bootable device. You can then exit BIOS.
Step 2. The Windows Setup will load once your computer reboots. Select your language and click Next.
Step 3. Click "Install now" and follow the onscreen guide to install your OS.

Data is a crucial component of your computer. It's important to protect it against any loss or damage. Performing a Windows update could be unpredictable. For this reason, it's important to create a backup. Try EaseUS Todo Backup to achieve this seamlessly. This backup solution lets you save your files in multiple locations.
Secure Download
You can copy your data to the cloud or an external hard drive. You can also move them to a shared network or NAS. It guarantees the safety of your files since you'll protect them using a password. You can access your backup data anytime you wish to retrieve them.

Todo Backup allows you to restore them to their original location or a new one. What more? This amazing backup tool also supports incremental and differential backup strategies.
Do you want to back up your Windows 11 data today? Download this tool now to get started. You can achieve this in very simple steps.
Share this article on your social media to help others fix the Windows 11 24H2 not installing error!
Windows 11 24H2 is the latest release of the Windows 11 updates. It comes with many improved functions compared to the previous updates. It includes Copilot + PC features like Cocreator in Paint, Recall, and Windows Studio effects. What more? This 2024 Windows 11 update also has Microsoft Copilot/arm and emulsion features.
Updating to Windows 11 version 24H2 should always be a seamless process. However, it's possible to encounter the "Windows 11 24H2 not installing" problem. This could happen due to the following reasons:
The "Windows 11 24H2 failed to install" error could arise due to multiple causes. You could be running out of disk space or have corrupted system files. The issue may also occur due to interference from external hardware or missing update components. This tutorial has discussed eight fixes that you can apply.
Secure Download
It's important to back up all your files before updating to Windows 11 version 24H2. Try EaseUS Todo Backup now to save all your data. This tool lets you move files to multiple locations for their accessibility. Download it now and check how it works.
The common FAQs on Windows 11 version 24H2 not installing on PC include:
This could happen due to:
Try fixing these issues.
Follow these steps to perform an in-place-upgrade using the latest ISO.
Your PC should have the following:
This may happen if you don't meet all the system requirements. Ensure you have sufficient RAM and disk storage. Your computer must also support Secure Boot and TPM 2.0.
Was This Page Helpful?
Updated by Jerry
"I hope my articles can help solve your technical problems. If you are interested in other articles, you can check the articles at the bottom of this page, and you can also check my Facebook to get additional help."
Related Articles
What Is 'Format FS=NTFS Quick' and How to Use It? [2025 Full Guide]
![]() Cici/2025-03-28
Cici/2025-03-28
How to Solve Convert to MBR Greyed Out in Disk Management [Best Ways]
![]() Cici/2025-03-29
Cici/2025-03-29
How to Fix Unable to Connect to Virtual Disk Service Windows 10/11
![]() Sherly/2025-01-24
Sherly/2025-01-24
Can I run Win 10 with 2GB RAM?
![]() Daisy/2025-01-24
Daisy/2025-01-24
EaseUS Data Recovery Services
EaseUS data recovery experts have uneaqualed expertise to repair disks/systems and salvage data from all devices like RAID, HDD, SSD, USB, etc.
Copyright © 2004 - 2025 EaseUS. All rights reserved.
CHOOSE YOUR REGION
Start Your Free Trial!
Sign up to our newsletter, stay updated on news and exclusive offers from EaseUS. Don't worry, if you change your mind, you can unsubscribe at any time, free of charge. We value your privacy (Privacy Policy).
Start Your Free Trial!
Sign up to our newsletter, stay updated on news and exclusive offers from EaseUS. Don't worry, if you change your mind, you can unsubscribe at any time, free of charge. We value your privacy (Privacy Policy).