-
![]() 3-Step Solution to Recover Deleted Picasa Photos with Ease
3-Step Solution to Recover Deleted Picasa Photos with Ease February 19,2025
 6 min read
 -
![]() How to Boot into Safe Mode Windows 10 in Every Possible WayFebruary 19,20256 min read
How to Boot into Safe Mode Windows 10 in Every Possible WayFebruary 19,20256 min read -
![]() How to Delete a Corrupted File Windows 10? Simple Methods Here!February 19,20256 min read
How to Delete a Corrupted File Windows 10? Simple Methods Here!February 19,20256 min read -
![]()
-
![]()
-
![]() Look! 5 Methods to Fix PNG Files Not Opening in Windows 10/11February 19,20256 min read
Look! 5 Methods to Fix PNG Files Not Opening in Windows 10/11February 19,20256 min read -
![]() [Solved] Recover Data from Ext4/3/2 NAS/Linux DeviceFebruary 19,20256 min read
[Solved] Recover Data from Ext4/3/2 NAS/Linux DeviceFebruary 19,20256 min read -
![]() [Solved] There Are No Previous Versions Available Windows 10/8/7February 19,20256 min read
[Solved] There Are No Previous Versions Available Windows 10/8/7February 19,20256 min read -
![]() How to Recover Video File When Power Off Before Stopping RecordingFebruary 19,20256 min read
How to Recover Video File When Power Off Before Stopping RecordingFebruary 19,20256 min read -
![]()
Page Table of Contents
Your USB drive or external hard drive turned into an ESD USB? It is a USB drive that has been formatted to store Windows installation files, typically by using Microsoft's Media Creation Tool. This Windows tool will remove all the data on the drive and create an ESD-USB partition on the disk. This page covers solutions to undo ESD USB drive and restore your device to total capacity without losing data on Windows 11/10/8/7.
PAGE CONTENT:
What Is an ESD USB and Why Does It Matter
"Does someone know how to restore my 32GB ESD-USB 1TB external hard drive to normal? I mistakenly converted it into an ESD-USB drive while trying to create a Windows media creation tool. Now the drive only has a 32GB partition left. The rest partition and data were all gone."
When generating a bootable installation of Windows on your USB drive, you do so by using an ESD USB, which stands for "Electronic Software Delivery". Besides the shown state of the ESD-USB drives in the above picture, you may also have experienced the listed symptoms on your hard drive or external hard drive:
- 1. Hard drive or external hard drive only showing 32GB or 31GB in Windows Explorer
- 2. Partitions become unallocated on the ESD hard drive or the external hard drive
- 3. Saved data gets deleted or lost
If you lost valuable data on your hard drive or external hard drive, don't worry. You can apply the data recovery software to return your lost files immediately. Download this software and restore your data now!
If you want to convert your ESD-USB or external hard drive to normal instantly, find the solutions in this post's 3rd part.

ESD-USB Data Recovery: Step-by-Step Guide
When you create the Windows Media Installation Tool on the wrong drive, you will lose all partitions and data, with only a 32GB ESD-USB partition left. The urgent task is to recover deleted files when your storage device turns into an ESD-USB drive.
It's recommended to apply file recovery software to scan and restore lost files from your ESD-USB drive first. If you have tried to convert an ESD-USB drive to normal by deleting the partition or reformatting the drive, that might overwrite your old files and cause permanent data loss. Go through this part and learn how to return your lost data as soon as possible.
A practical and secure method is to restore lost files from the ESD-USB device with reliable file recovery software if you are not a data recovery expert.
There are a lot of available hard drive data recovery tools online, and we have chosen one of the best ones for you - EaseUS Data Recovery Wizard. It is one of the best hard drive data recovery software programs, and it can also recover data from lost partitions.
Download this outstanding hard drive recovery software now and recover your precious data!
EaseUS Data Recovery Wizard can thoroughly scan existing and lost files from the ESD-USB drive and restore everything on the device in only three steps.
Step 1. Open EaseUS Data Recovery Wizard, then choose the USB drive where the data was lost. Next, select "Scan".

Step 2. Narrow the scan results using the file format filter in the top left or right corner until you locate the required files. Then, if you'd want to preview a file's content, click the "Preview" button or double-click it.

Step 3. To restore the lost data to a safe location, check the box next to the file and click "Recover". We advise against keeping the restored data on the disk where you previously lost it.

This software is trusted by many users, and you can check the reviews from Trustpilot or G2.
| 📒Reviews |
Wonderful software,I had so much of my corrupted data on my sd card and could not find any way to recover that and so downloaded so many recovering softwares and the experience was best in EaseUS so easy to use,fast scanning and recovering unlimited data .Thanks EaseUS! - from Trustpilot it is easy to download, open, maneuver through the options to recover data on a external drive, make a boot disk, backup and more. The scan wasquick and found every file I thought I lost! - from Trustpilot |
Let us learn to immediately convert your ESD-USB hard drive or external hard drive to normal. Before that, don't forget to mark this passage by sharing it on Facebook, Twitter, or SNS.

Undo ESD USB and Convert Hard Drive Back to Normal
As you know, the existing ESD-USB partition only contains some Windows installation files you do not want. As a result, deleting the existing 32GB partition won't cause data loss on your drive. But you should know that it's not recommended to delete the ESD-USB partition while installing Windows.
Also, to prevent the restored data unopenable issue from happening, EaseUS data recovery experts suggest using file recovery software to scan the whole hard drive in advance. By the way, this software can also recover formatted hard drives.
Follow the steps below to delete the existing ESD-USB partition:
Step 1. Connect your external hard drive to your PC and open Disk Management.
Step 2. Locate and right-click on your device's ESD-USB 32GB partition, and select "Delete Volume".

Step 3. Click "OK" to confirm.
After deleting the partition, the ESD-USB partition is no longer on your external hard drive. The device should now be an unallocated drive.
Therefore, you can create a new partition on the device to undo ESD-USB. By doing so, you will be able to restore your HDD or external hard drive to total capacity:
Step 1. Enter Disk Management and, right-click on the unallocated space, select "New Simple Volume".

Step 2. Enter the New Simple Volume Wizard, and click "Next" to continue.
Step 3. Set the new partition size, file system - NTFS, and partition label on your hard or external hard drives.

Step 4. When you finish all the settings, click "Finish" to complete the process.

💡Note: If you need to create more than one partition on your hard drive, properly allocate the unused space and repeat the process.
After this, you can reuse your hard drive or external hard drive to store relevant data and files. Don't forget to share this passage on social media and mark it!
However, this is not the end yet. Besides, knowing how to protect your data and prevent hard or external hard drives from being converted to ESD-USB is crucial. In the next part, some reliable tips will assist you in resolving this issue with ease.
Protect HDD/External Hard Drive with Data
Knowing how to protect your data and external or internal hard drive will be highly helpful, especially in preventing data loss.
Here are some reliable tips for you to apply and take action to protect your valuable files and storage device immediately:
1. Create Data Backup and Save It to Anther Device or Cloud Drive
Creating a complete backup of your valuable files and data to another hard drive or external storage device is always a good habit. When data get lost on your device, you can always bring them back from the backup.
A time-saving and effective method is to apply reliable file backup software for help.
2. Run Antivirus Software to Clear Viruses, Malware, etc. Regularly
You should also apply antivirus software for help. With reliable antivirus software, you can clear and remove the existing or hibernating viruses, malware, etc., from your hard drive or external storage devices.
Turning on Microsoft Defender is relatively not enough, and here is a list of reliable antivirus software for you to try:
- Norton Security 360/Norton Antivirus Plus
- McAfee
- AVG
- Avira
- Avast
- Malwarebytes
- Kaspersky Antivirus
No matter which software you decide to use, once you finish the installation, run the software immediately. It will thoroughly scan your computer and external storage devices and remove potential viruses.
3. Encrypt and Lock Hard Drive/External Hard Drive with a Password
Another way to keep your device and data safe is to encrypt or lock your external hard drive with a password.
If you are a Windows 10/8/7 user, you can enable BitLocker on your device with the below steps:
Step 1. Open Control Panel and click "BitLocker Drive Encryption".
Step 2. Locate and expand the drive or external hard drive that you want to lock, and select "Turn on BitLocker".

Step 3. Set a password to lock the selected hard drive or external hard drive and click "Next" to continue.
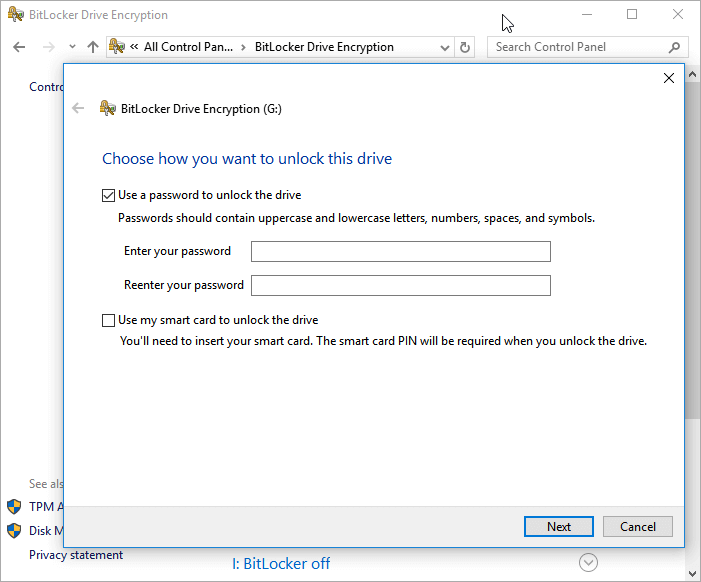
Step 4. Select a way to save your password to your Microsoft account, a USB drive, a file, or print the recovery key and click "Next" to confirm.
Step 5. Choose how much you of your drive to encrypt and click "Next" to continue -
- Encrypt used disk space only (faster and best for new PCs and drives)
- Encrypt entire drive (slower but best for PCs and drives already in use).

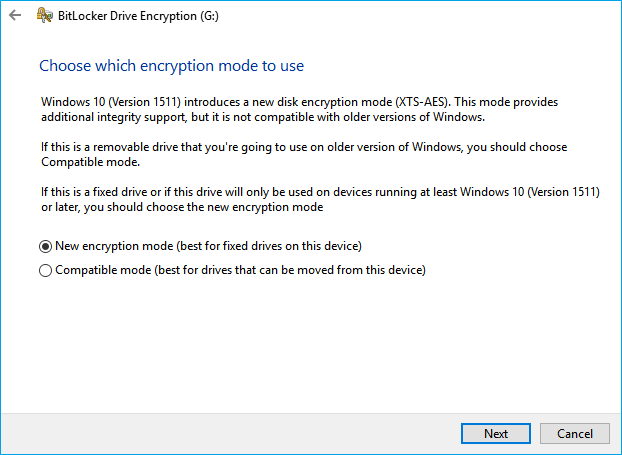
Step 6. Choose which encryption mode to use and click "Next" to continue -
- New encryption mode (best for fixed drives on this device)
- Compatible mode (best for drives that can be moved from this device).
Step 7. Click "Start encrypting" and wait for the process to finish.

Besides, some reliable programs can lock and encrypt your drive with a password. By doing so, no one can directly access your data, hard drive, or external hard drive without a password.
- Tip
- When you need to access and use your files on the locked hard drive or external hard drive, here is how to unlock the device:
- 1. Keep your hard drive or external hard drive connected to your PC.
- 2. Double-click on your drive and enter the password which you've set for the BitLocker encryption.
- 3. After this, you can open your device and use the data securely again.
The Bottom Line
On this page, we've provided you with complete solutions. By using data recovery software first and creating new partitions next, you can revert the ESD-USB drive to normal without data loss.
Applying the provided tips will also gain a complete plan to protect your data from being overwritten or prevent storage devices from being converted to ESD-USB by mistake.
Undo ESD-USB Hard Drive FAQs
Here are 4 additional questions about undoing ESD-USB hard drive. Check here for the answers.
1. How can I recover my data from ESD-USB?
A data recovery application like EaseUS Data Recovery Wizard is the best way to retrieve data from an ESD USB. What you can do is:
- Insert the ESD-USB stick into the computer's port.
- Install and launch EaseUS USB data recovery software on your PC.
- Select the ESD-USB and click Scan.
- Choose the target data and files and click "Recover" to restore them.
2. Is it possible to recover files after formatting?
Yes, files can be recovered after formatting. Previous data will be deleted when you format a storage device—for most users, wiping data after formatting results in permanently losing data. The old data, however, truly stays on the drive until new data replace it. You still have a chance to recover files after formatting if you didn't add any new files or directories to the formatted hard drive.
3. How can I recover files from a corrupted USB for free?
To recover files from a faulty USB, use free drive recovery software. To quickly recover images, movies, documents, and other things from a USB drive, try the free EaseUS data recovery program.
4. Can I install Windows 10 from ESD file?
Yes. To completely install Windows 10, get the ESD file and make your own bootable ISO files. Users may only get the bits for build 10041 through Windows Update, despite Microsoft's pledge to provide ISO files for every new version of Windows 10.
Was this page helpful?
-
Dany is an editor of EaseUS who lives and works in Chengdu, China. She focuses on writing articles about data recovery on Mac devices and PCs. She is devoted to improving her writing skills and enriching her professional knowledge. Dany also enjoys reading detective novels in her spare time. …
-
![]()
Written by
Tracy became a member of the EaseUS content team in 2013. Being a technical writer for over 10 years, she is enthusiastic about sharing tips to assist readers in resolving complex issues in disk management, file transfer, PC & Mac performance optimization, etc., like an expert.…


20+
Years of experience

160+
Countries and regions

72 Million+
Downloads

4.8 +
Trustpilot Score


Hot Recovery Topics
Search