Start Your Free Trial!
Sign up to our newsletter, stay updated on news and exclusive offers from EaseUS. Don't worry, if you change your mind, you can unsubscribe at any time, free of charge. We value your privacy (Privacy Policy).
Page Table of Contents
Why Do You Need to Format Windows 7HOT
1. How to Format Windows 7 Without a CD by Using a Partition ManagerHOT
2. Use Windows 10 Installation Media to Format Windows 7 Without CD for an UpgradeHOT
3. Format Windows 7 Without CD to Use It as a Storage DriveHOT
The Concluding Thoughts HOT
About the Author
Hot Topics
Updated on Apr 28, 2025
Microsoft has come up with Windows 11, which was announced recently through a huge event. However, most of us are still using the Windows 7 operating system. With the support for Windows 7 ending in 2020, continuing to use Windows 7 has been a security issue. That is exactly why you need to format Windows 7. In today's post, we will try finding out how to format Windows 7 without CD.
There can be several reasons that should necessitate the need for formatting your Windows 7. Some of the reasons and scenarios that you would need to format Windows 7 can be summarised as
If you are upgrading to Windows 10 or any other operating system, it is important to format Windows 7. However, in most cases, you do not need to format the disk, as the new operating system itself can handle the task during installation.
You can simply choose the files to keep and the ones to delete, and the installation media can take care of the issues and the files. A disk format is performed before copying the new operating system files.
Selling off a PC can be one of the prime reasons why you would want to format Windows 7. This can be the right way to ensure your privacy so that you do not need to worry about any of your files being left once you sell off your device
Do note that the PC should be formatted beyond recovery. Anyone with powerful data recovery software can easily recover the data and pose a threat to your privacy. It is always advisable to ensure that all the data has been wiped off and overwritten several times.
Yet another reason that you would want to format your Windows 7 PC would be to use it as a storage or backup device.
The right way to do that would be to remove the old drive and install another operating system. Once done, you can re-attach your old drive and then format it from within the Windows interface. Do note that you cannot use Windows 7 as your operating system and format the drive.
While several ways can be used to format Windows 7, we will discuss the three commonly used methods here.
This can be one of the excellent options to help you format Windows 7 without a CD. We would recommend using EaseUS Partition Master as it provides you access to a powerful data erase feature. You can be assured of a complete data format so that it will never be recovered in the future.
Here is how you can make use of the EaseUS Partition Master tool, first is creating a bootable USB drive of EaseUS, and then format Windows 7 in the WinPE environment.
Create a Bootable USB Drive
Step 1. To create a bootable disk of EaseUS Partition Master, you should prepare a storage media, like a USB drive, flash drive or a CD/DVD disc. Then, correctly connect the drive to your computer.
Step 2. Launch EaseUS Partition Master, and find the "Bootable Media" feature on the left. Click on it.
Step 3. You can choose the USB or CD/DVD when the drive is available. However, if you do not have a storage device at hand, you can also save the ISO file to a local drive, and later burn it to a storage media. Once made the option, click the "Create" button to begin.
Step 4. When the process finishes, you'll see a pop up window, asking if you want to restart computer from the bootable USB.
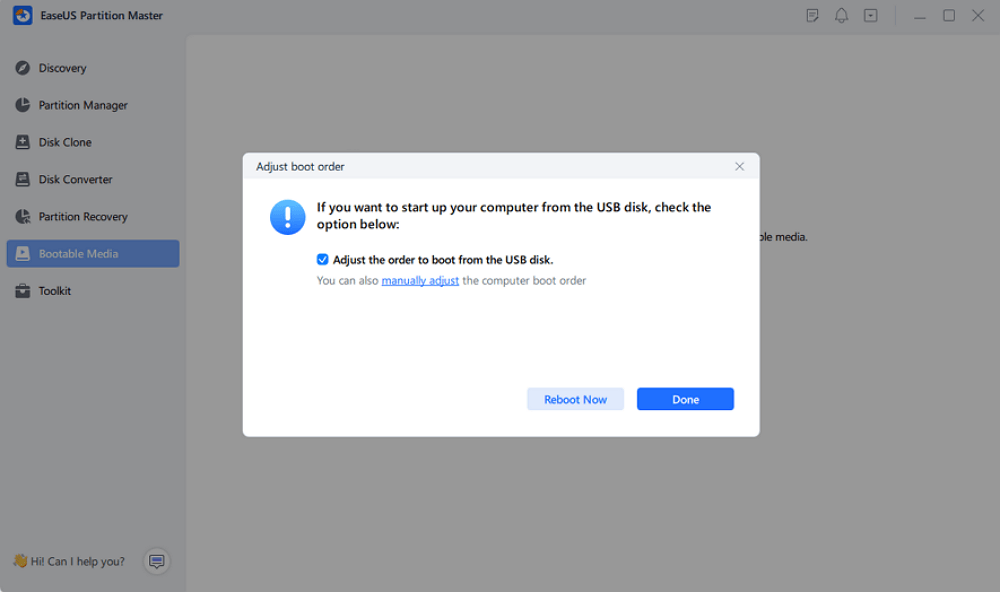
Note: To use the bootable disk on a new PC, you need to resart the target computer and press F2/F8/Del key to enter BIOS, and set the USB bootable disk as the first boot disk.
Wait patitiently and your computer will automatically boot up from the USB bootable media and enter EaseUS WinPE desktop.
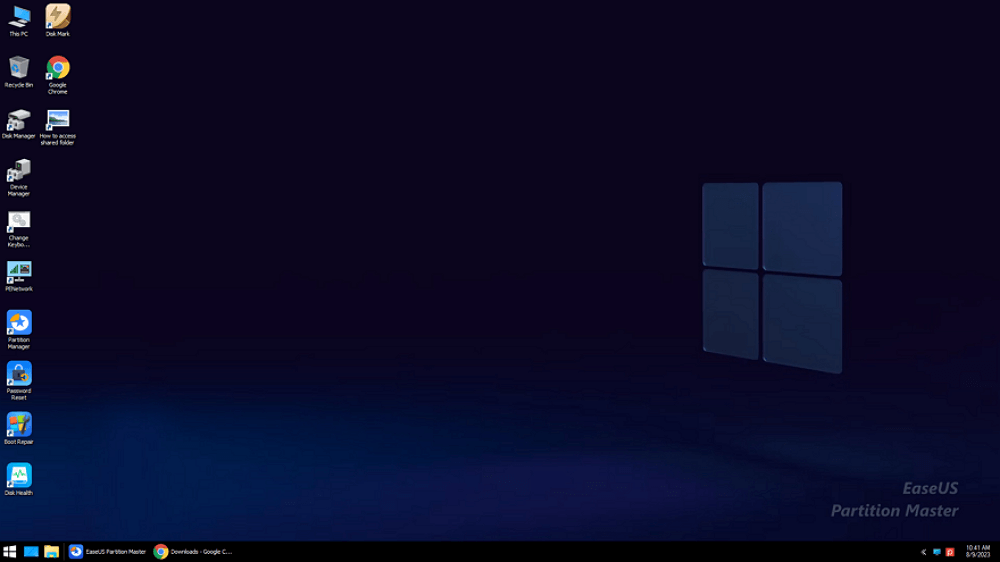
Once the process is completed, your bootable USB drive has successfully been created. You can use this drive for formatting your devices.
Format Windows 7 Without CD with EaseUS Partition Master Bootable USB
Once the bootable drive has been created, the next steps in formatting your Windows 7 should be quite simple and easy with EaseUS partition manager software - Partition Master in the steps below.
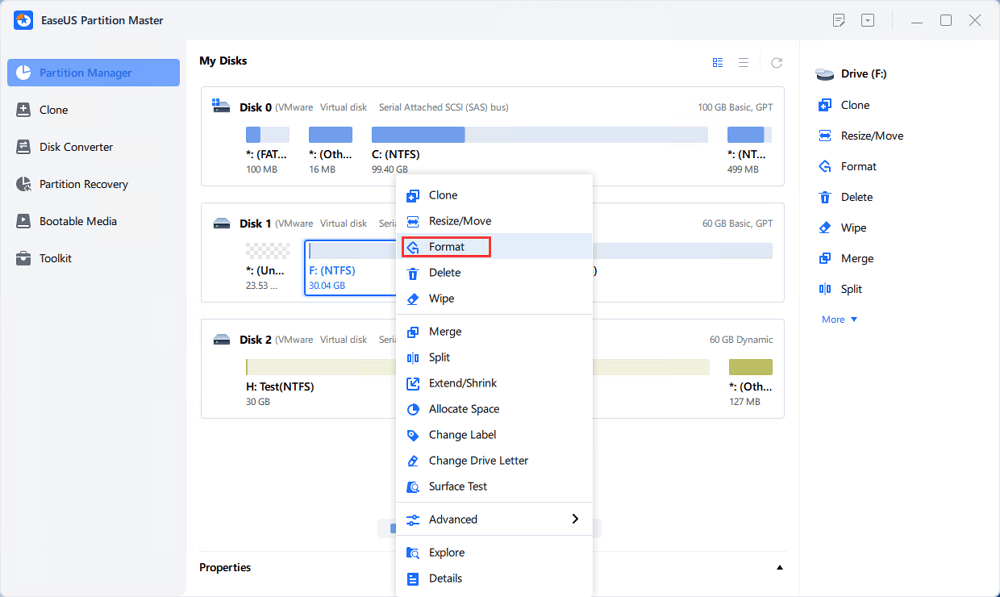
Step 1. Run EaseUS Partition Master, right-click the hard drive partition you intend to format and choose "Format".
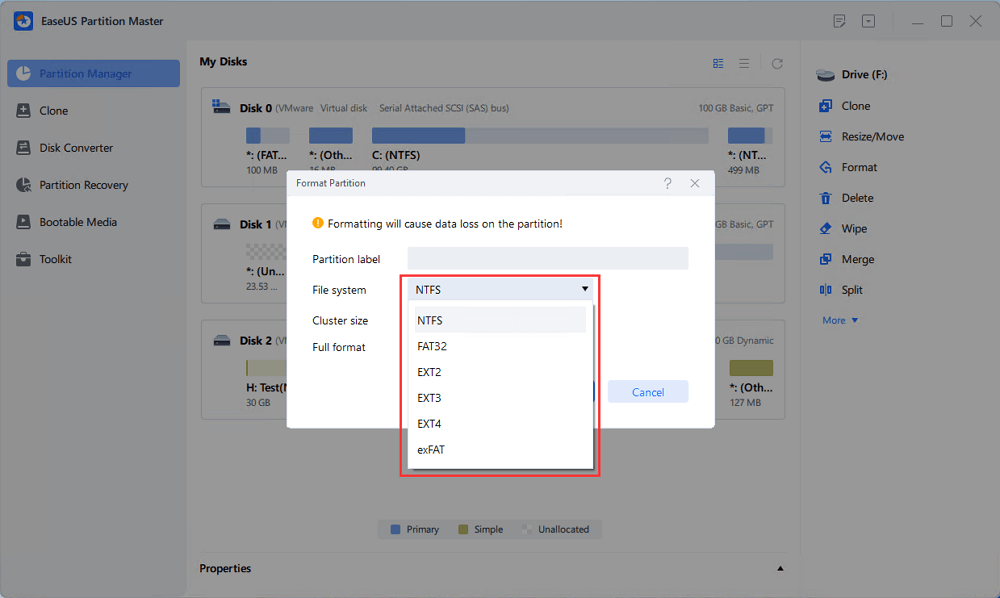
Step 2. In the new window, set the Partition label, File system (NTFS/FAT32/EXT2/EXT3/EXT4/exFAT), and Cluster size for the partition to be formatted, then click "OK".
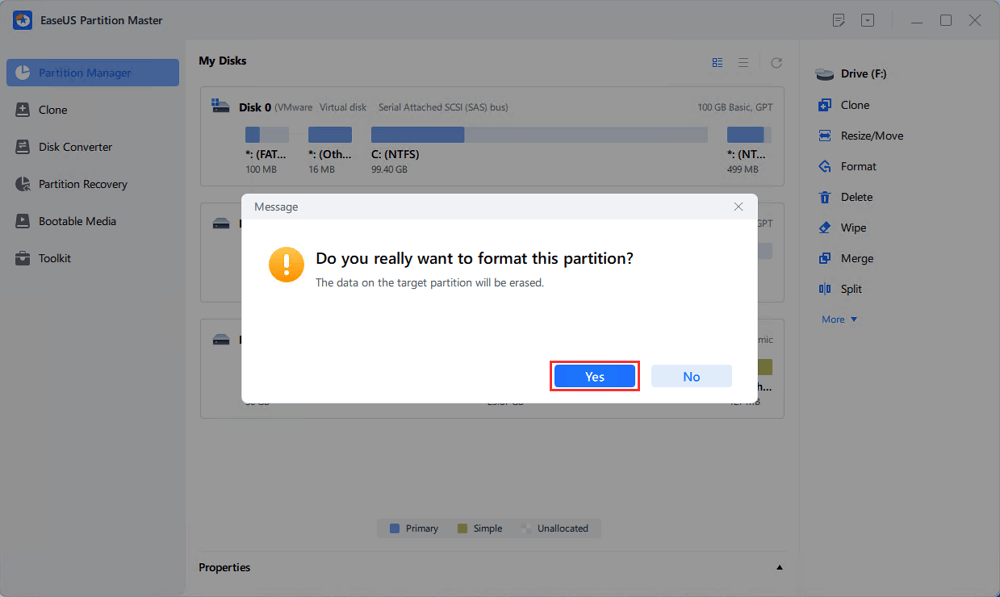
Step 3. Then you will see a warning window, click "Yes" in it to continue.
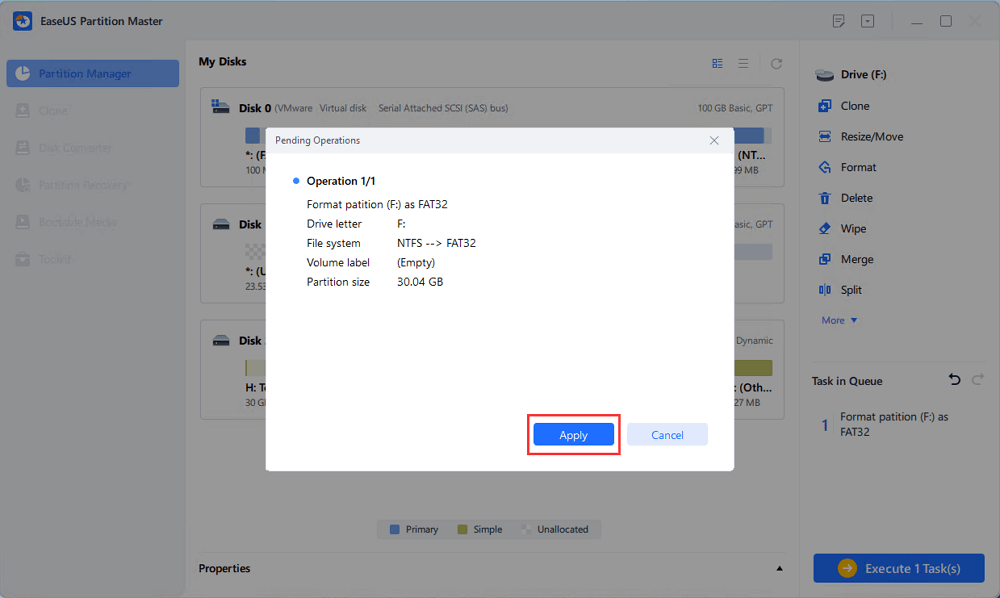
Step 4. Click the "Execute 1 Task(s)" button to review the changes, then click "Apply" to start formatting the partition on your hard drive.
If you are looking to upgrade to Windows 10 or even the upcoming Windows 11, you do not need to format Windows 7 separately. You can simply make use of the Windows installation media to install the new operating system files. The previous system files will be taken care of automatically.
Download the Windows 10 installation media and inert it into your system. You can create your installation media on a USB flash drive or even on any other external media.

Change the boot options from BIOS. You can do this by moving into the BIOS settings for your computer and changing the boot order. Choose the appropriate boot order among CD/DVD-ROM drive OR USB based on how you have created your bootable drive.
Insert the media into your computer and power it on. The bootable drive will begin executing itself. Follow the instructions to install Windows 10. You can choose to keep the specific files or delete the files altogether.

If you want to use the old hard drive as the storage media, this can be the easiest option to achieve the task. In fact, you can easily achieve the task if you upgraded to an SSD drive and the operating system is installed on the SSD.
The steps involved in how to do it would include:
Step 1. Disconnect the old hard drive from your PC.
Step 2. Connect a new disk to the computer.
Step 3. Install Windows 10 or any other operating system on the new disk.
Step 4. Re-attach the old drive to your computer.
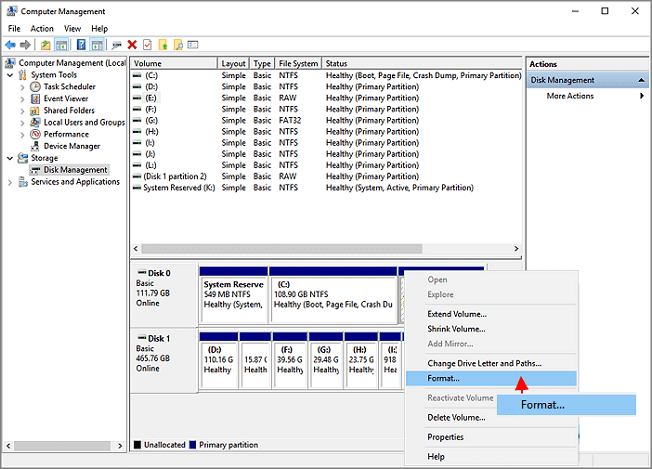
Step 5. Boot your device from the Windows 10 hard drive, and then make use of the Windows Disk Management utility to format the older drive.
Right-click the Windows button and choose Disk Management utility. Right-click the drive you want to format and click on "Format".
Well, formatting the Windows 7 device should be quite an easy option. The plenty of options available for the purpose should ideally help you get access to a better understanding of the concept. We assume the three major or popular methods that have been outlined here should help you get access to the best possible functionality.
Just in case you are selling off your computer, we would recommend using EaseUS Partition master as one of the prominent options. It does provide you access to a high degree of safety in protecting your privacy.
If you have further questions about formatting Windows 7, follow the questions listed below and find answers here instanatly.
1. How can I format my PC without CD?
Back up all valuable files on the PC to an external hard drive in advance.
To format a system drive on a PC, use EaseUS Partition Master:
To format a non-system drive on PC, use Disk Management:
2. How do I wipe Windows 7 computer clean?
If you want to keep Windows 7, right-click non-system partitions to wipe. To wipe Windows 7 with existing disk data, repeat the above steps.
3. How do I force a Windows 7 format?
How Can We Help You
Updated by Tracy King
Tracy became a member of the EaseUS content team in 2013. Being a technical writer for over 10 years, she is enthusiastic about sharing tips to assist readers in resolving complex issues in disk management, file transfer, PC & Mac performance optimization, etc., like an expert.
Cedric Grantham is a senior editor and data recovery specialist of EaseUS. He mainly writes articles and how-to tips about data recovery on PC and Mac. He has handled 10,000+ data recovery cases and is good at data recovery of NTFS, FAT (FAT32 and ExFAT) file systems, and RAID structure reorganization.
It won't hot image your drives or align them, but since it's coupled with a partition manager, it allows you do perform many tasks at once, instead of just cloning drives. You can move partitions around, resize them, defragment, and more, along with the other tools you'd expect from a cloning tool.
Read MoreI love that the changes you make with EaseUS Partition Master Free aren't immediately applied to the disks. It makes it way easier to play out what will happen after you've made all the changes. I also think the overall look and feel of EaseUS Partition Master Free makes whatever you're doing with your computer's partitions easy.
Read MorePartition Master Free can Resize, Move, Merge, Migrate, and Copy disks or partitions; convert to local, change label, defragment, check and explore partition; and much more. A premium upgrade adds free tech support and the ability to resize dynamic volumes.
Read MoreIt won't hot image your drives or align them, but since it's coupled with a partition manager, it allows you do perform many tasks at once, instead of just cloning drives. You can move partitions around, resize them, defragment, and more, along with the other tools you'd expect from a cloning tool.
Read MoreI love that the changes you make with EaseUS Partition Master Free aren't immediately applied to the disks. It makes it way easier to play out what will happen after you've made all the changes. I also think the overall look and feel of EaseUS Partition Master Free makes whatever you're doing with your computer's partitions easy.
Read MoreRelated Articles
How to Convert Dynamic Disk to Basic Without Losing Data [2025]
![]() Tracy King/2025/04/28
Tracy King/2025/04/28
How to Execute Lenovo Wipe Hard Drive [Proven Ways]
![]() Cici/2025/04/28
Cici/2025/04/28
How to Merge C and E Drive Without Losing Data
![]() Oliver/2025/04/28
Oliver/2025/04/28
Change Windows Password Using Command Prompt - 2 Ways
![]() Sherly/2025/04/28
Sherly/2025/04/28
EaseUS Partition Master

Manage partitions and optimize disks efficiently
Your best companion for disk partitioning, MBR to GPT/GPT to MBR conversion,even OS migration
CHOOSE YOUR REGION
Start Your Free Trial!
Sign up to our newsletter, stay updated on news and exclusive offers from EaseUS. Don't worry, if you change your mind, you can unsubscribe at any time, free of charge. We value your privacy (Privacy Policy).
Start Your Free Trial!
Sign up to our newsletter, stay updated on news and exclusive offers from EaseUS. Don't worry, if you change your mind, you can unsubscribe at any time, free of charge. We value your privacy (Privacy Policy).