
Content
Page Table of Contents
About the Author
Hot Topics
Compared to other disk partitions, a recovery partition stores a factory image of the operating system, drivers, and pre-installed software within a computer's hard drive. With the help of this partition, you can restore the system to its original factory settings in case of software problems or system crashes. By default, this partition is usually hidden to prevent users from accidentally modifying or deleting the recovery data stored.
In some situations, users may want to unhide the recovery partition to manually access the recovery tools or files. Other than that, technicians or advanced users might unhide this partition for maintenance purposes, such as updating the recovery image or performing diagnostics. Irrespective of the reason, this article from EaseUS will help you to unhide the recovery partition with two of the easiest methods out there, requiring less technical knowledge.
How to Unhide a Recovery Partition?
As discussed, users may want to unhide their partition for many reasons, including creating a backup or transferring it to another drive. To help users of every kind, we will discuss two methods to unhide the recovery partition in a few steps. Among these methods, EaseUS Partition Master offers the most straightforward way, which even beginners can carry out.
However, using the Command Prompt method, you may need some technical knowledge to unhide this partition. So, without wasting any time, let's explore the steps you need to take to carry out both methods to unhide the recovery partition.
Way 1. Use EaseUS Partition Master
Users without any technical knowledge to perform disk management solutions with the help of the Command Prompt can use a third-party tool. EaseUS Partition Master Professional stands out as a one-stop shop partition manager that can cater to every disk partition-related need. With the help of this software, you can hide or unhide the recovery partition to update the operating system data stored in such partitions.
Using its hide partition feature, you can prevent others from accessing or deleting your sensitive data, which will eventually cause system failure. However, users also get the chance to unhide the recovery partition to make updates or back up the data stored in the partition. In addition to these features, this partition manager allows you to move or resize the disk partitions for effective data management with the hard drive.
Benefits of Using EaseUS Partition Master
- Compatible with Windows 11/10/8/7/XP/Vista
- Easy to use since it doesn't require any command lines
- Hide/unhide, create/delete, extend/shrink, split/merge partitions
After going through the features of this advanced partition management tool, let's examine the steps to unhide a recovery partition using EaseUS Partition Master:
Option 1 - Hide Partition
- Right-click the partition, and choose "Advanced". Select "Hide" from the drop-down menu.
- Then you will see a window showing the notification. Read the instructions and click "Yes" to continue.
- Click the "Execute 1 Task(s)" button in the top-left corner. Then, click "Apply" to hide your partition.
Option 2 - Unhide Partition
- Right-click the partition you want to view and access. choose "Advanced" and select "Unhide" from the drop-down menu.
- Read the instructions and click "Yes" to continue.
- Click the "Execute 1 Task(s)" button in the top-left corner. Check the pending operations, then click "Apply" to unhide the partition on Windows 11/10/8/7.
Considering the simplicity of these steps to unhide the recovery partition, we recommend you get your hands on this all-in-one partition manager.
Way 2. Utilize Command Prompt
If you have technical knowledge of writing different commands, you can also make use of the Command Prompt for this purpose. Using this platform, you can execute entered commands to carry out advanced administrative features and troubleshoot specific Windows issues. When working with the Command Prompt to unhide the recovery partition, you need to be careful.
As we know, incorrect commands can lead to data loss or system instability, so always double-check the commands before pressing Enter. Go through the steps given below to unhide the hidden partitions with the help of this Windows application:
Step 1. Start this partition management task by hitting the "Windows + R" keys to open a "Run" dialog box. Now, type the "cmd" command within the "Open" text box before tapping the "OK" button to start this process for unhiding the recovery partition.
Step 2. Once you enter this Windows application, type "diskpart" and run the command to initiate this task. Moving forward, you have to execute the "list disk" command to access every hard disk within your PC.
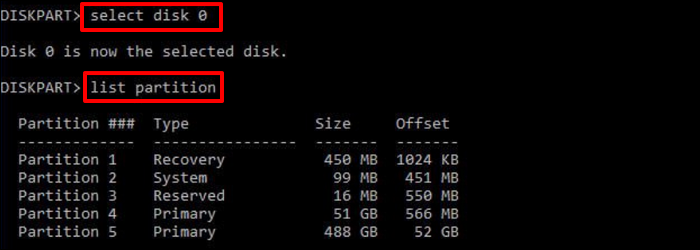
Step 3. After the list appears on your computer screen, enter "select disk n," where "n" is the number of hard disks whose recovery partition you want to unhide. Next, simply run the "list partition" command to reveal all the partitions present within the selected hard drive.
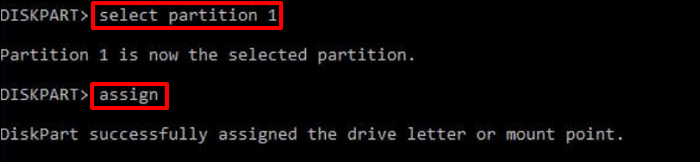
Step 4. Finally, simply identify the hidden recovery partition from the list and execute the "select partition m" command. Here, "m" represents the assigned number recovery partition you want to unhide within your PC. Now, type "assign:" to let the system assign a letter to the latest unhidden recovery disk partition.
Upon successfully revealing the hidden partition with the help of this article, we urge you to share this information within your community to help others unhide the recovery partition.
Conclusion
Throughout this article, we have discussed two of the best methods to help users access the hidden partition drives. Users with technical knowledge can use the Command Prompt method to reveal the hidden drives. However, if you lack the necessary technicality to perform this method, we recommend you use EaseUS Partition Master to get the job done, as it offers the simplest way to unhide the recovery partition.
With this multidimensional partition manager, you can even move or extend the partitions to manage disk data effectively. So, download this software for your system to deal with every problem related to disk partitions.
Check the following topic related to recovery partition if you need:
Show Recovery Partition FAQs
After reading the solutions mentioned in this article, you will be able to unhide the recovery partition with ease. However, you can go through the following answers to gain more knowledge about how to reveal other disk partitions.
1. How to unhide a hidden partition in diskpart?
Within the Command Prompt, you can make use of the "diskpart" functionality to reveal the hidden partitions using the steps explained below.
- 1. Begin by opening the "Run" window and executing the "cmd" command to access this Windows application on your systems.
- 2. Upon entering the Command Prompt, write and execute the "diskpart" command to initiate the Diskpart tool on your system. Moving forward, you must run the "list volume" command to reveal every partition within your device.
- 3. At the end, simply execute the "select volume n" command, where "n" represents the hidden disk partition. Now, all you have to do is run the "assign letter H" command to unhide the partition you can access in Windows Explorer.
2. Why is the recovery partition not showing up on my computer?
This partition is mostly automatically hidden by the system to prevent accidental modification or deletion. It lacks a drive letter, which makes it invisible in File Explorer. Some system settings or third-party security software may also hide it to protect the operating system's backup data.
3. How to unhide the recovery partition in Windows 10?
To unhide the recovery partition using the simplest method, download and utilize EaseUS Partition Master. Follow the steps explained below to show the hidden partition in Windows 10.
- 1. First, launch this tool and access the "Partition Manager" tab to reveal all the partitions within your system.
- 2. Now, right-click on the recovery partition you want to unhide and hover over the "Advanced" option within the pop-up menu. Now, tap the "Unhide" option from the drop-down menu to access a new dialog box where you can press the "Yes" button to proceed with this task.
- 3. Finally, hit the "Execute 1 Task(s)" button present on the bottom-right of your screen and then click the "Apply" option to complete this unhiding process.
How Can We Help You
About the Author
Sherly joined EaseUS in 2022 and she has always loved writing articles and enjoys the fun they bring. She receives professional training here, focusing on product performance and other relative knowledge. She has written over 200 articles to help people overcome computing issues.
Product Reviews
-
I love that the changes you make with EaseUS Partition Master Free aren't immediately applied to the disks. It makes it way easier to play out what will happen after you've made all the changes. I also think the overall look and feel of EaseUS Partition Master Free makes whatever you're doing with your computer's partitions easy.
Read More -
Partition Master Free can Resize, Move, Merge, Migrate, and Copy disks or partitions; convert to local, change label, defragment, check and explore partition; and much more. A premium upgrade adds free tech support and the ability to resize dynamic volumes.
Read More -
It won't hot image your drives or align them, but since it's coupled with a partition manager, it allows you do perform many tasks at once, instead of just cloning drives. You can move partitions around, resize them, defragment, and more, along with the other tools you'd expect from a cloning tool.
Read More
Related Articles
-
Set Up the Boot Mode in MBR for BIOS, Legacy or UEFI - EaseUS
![author icon]() Tracy King/2024/04/22
Tracy King/2024/04/22 -
How to Resize exFAT Partition (Extend/Shrink exFAT Volume)
![author icon]() Oliver/2024/10/14
Oliver/2024/10/14 -
How to Partition SSD From BIOS [2024 New Guide]
![author icon]() Roxanne/2024/09/19
Roxanne/2024/09/19 -
How to Perform Xbox Series S Internal SSD Upgrade💡
![author icon]() Cici/2024/10/11
Cici/2024/10/11
Hot Topics in 2024


EaseUS Partition Master

Manage partitions and optimize disks efficiently