


Start Your Free Trial!
Sign up to our newsletter, stay updated on news and exclusive offers from EaseUS. Don't worry, if you change your mind, you can unsubscribe at any time, free of charge. We value your privacy (Privacy Policy).
EaseUS Partition Master
If you have a BitLocker encrypted drive, how do you wipe it to make data unrecoverable? Check here. We will show you how to wipe a BitLocker encrypted drive permanently with ease.

Content
Page Table of Contents
#1. Wipe BitLocker Encrypted Drive (Recoverable)HOT
#2. Wipe BitLocker Encrypted Drive (Unrecoverable)HOT
How to Wipe BitLocker Encrypted C DriveHOT
ConclusionHOT
About the Author
Hot Topics

BitLocker encryption is a powerful means for protecting sensitive data on your computer, but there may come a time when you have to erase a BitLocker-encrypted drive. This tutorial from EaseUS will guide you through the step-by-step process of whether you are preparing to sell your device or starting afresh.
Now that we have highlighted the significance of backing up your data let's explore some of the different ways you can wipe BitLocker encrypted drives. This approach is safer, as it allows for data recovery if needed, thereby giving those who want to erase their disk the option of possibly retrieving it later.
Let's look at the step-by-step process for each method in detail.
We will first look at the steps to Wipe BitLocker Encrypted Drive by Formatting the Partition:
Step 1. Unlock the drive that has been encrypted with BitLocker.
Step 2. Open File Explorer and go to "This PC" section.
Step 3. Next, right-click on the BitLocker encrypted drive that you want to wipe.
Step 4. Choose "Format" from the context menu.
Step 5. From the format window that appears, choose the file system you want (usually NTFS for Windows). (Entering - Volume label is optional)
Step 6. Under "Format options," click on "Quick Format" if you want a faster procedure or uncheck it to carry out a more thorough formatting

Step 7. Choose "Start" to initiate the formatting.
Step 8. A warning prompt will appear, which you must acknowledge by clicking "OK" after understanding that all data in the drive will disappear.
This method effectively wipes the BitLocker encrypted drive by removing the encryption and all visible data.
If you plan to recover the bitlocker partition that you just deleted, this article can help: 🔖How to Recover Deleted or Lost Partition in Windows
One of the best ways to completely clear out and start again on your BitLocker encrypted drive is by deleting and recreating its partition. This operation completely wipes out the partition structure, including BitLocker encryption, giving you a clean slate.
Follow the steps given below:
Step 1. Right-click on the Start button and select Disk Management.
Step 2. Once the disk management window opens, select the BitLocker encrypted drive you want to wipe.
Step 3. Next, right-click on each partition of the drive and choose "Delete Volume." If you have multiple partitions, you will have to repeat this step several times.

Step 4. Once all the partitions are deleted, you will see the drive as Unallocated Space.
Step 5. Select the Unallocated Space, right-click on it, and choose "New Simple Volume."
Step 6. Use the New Simple Volume Wizard to:
Step 7. Next, hit "Finish" to create the New Partition.
The new partition will be formatted by Windows, showing like a new and unprotected drive when viewed through File Explorer. This technique works better than just formatting the drive since it completely removes the BitLocker encryption. However, it is worth mentioning that some of the information may still be retrievable with specialized tools.
For users who only want to disable BitLocker for the drive, the article below might be what you are looking for.
How to Turn Off Bitlocker in Windows 11/10 (Lenovo, Dell, Asus)
This page covers comprehensive instructions on how to disable BitLocker in Windows 11/10 for Lenovo, Dell, and Asus PCs. Simplify your encryption management for your device with this guide. Read more >>
By now, we understand BitLocker encryption and visible data would be successfully removed using the previous methods, but they may not meet the level of security that sensitive information requires. However, if you need to make sure that your data is entirely unrecoverable, then you will need to look for a more robust solution.
If you are looking for a technique to make it impossible to recover data from a device even after employing sophisticated retrieving tools, then you should definitely consider using third-party encrypted destruction programs. For example, EaseUS Partition Master provides the "Wipe" function, which ensures that your information will be permanently lost, regardless of the recovery systems used in an attempt to restore it.
EaseUS Partition Master is an all-in-one tool for managing disks. It contains many functionalities, such as partitioning, resizing, and managing drives. Its 'Wipe' function is unique since it can overwrite information several times, meeting multiple international criteria for data destruction.
Let's look at the steps to wipe BitLocker Encrypted Drive using EaseUS Partition Master:
We've set two options for you to wipe data. Choose the one you need.
Option 1. Wipe Partition
Option 2. Wipe Disk
Don't forget to share this tool if it helps wipe the BitLocker drive.
We have talked about erasing drives that BitLocker has encrypted until now, but when it comes to the C drive, it is a different ball game altogether, as there are specific problems and dangers associated with it. It usually holds your OS as well as crucial system files, making it harder than ever before. This section is for those who want to wipe C drive that is BitLocker encrypted or even the whole disk.
If you insist on moving forward, it's crucial to be fully prepared:
To continue, you must create a bootable disk using EaseUS Partition Master and boot the computer from it. You cannot wipe the C drive while Windows is running on it.
Follow the steps given to create a bootable disk and wipe the drive:
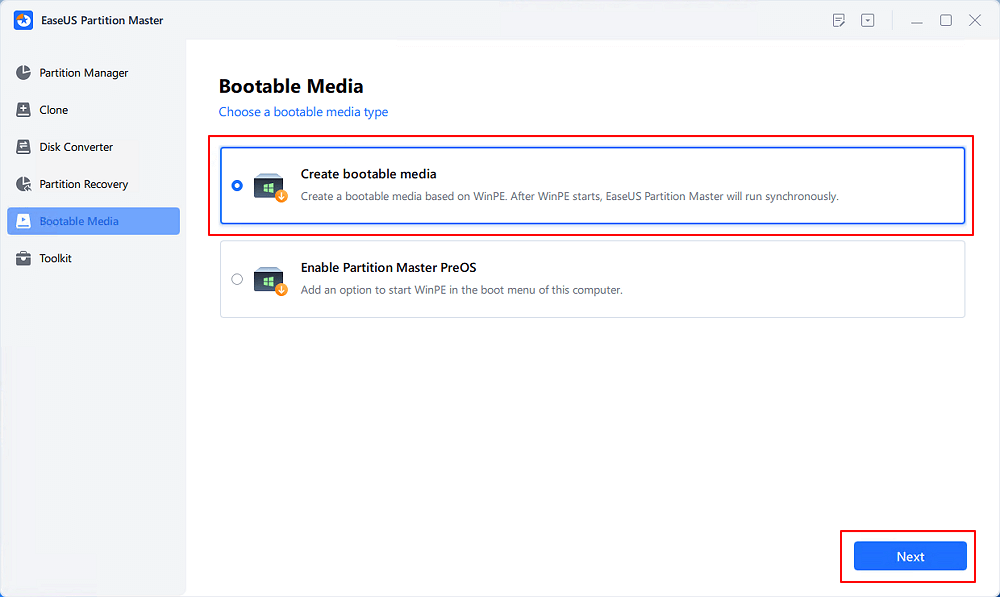
Step 1. Correctly connect a USB drive, flash drive, or a CD/DVD disc to your computer. Then, launch EaseUS Partition Master, go to the "Bootable Media" and click "Create bootable media", click "Next".
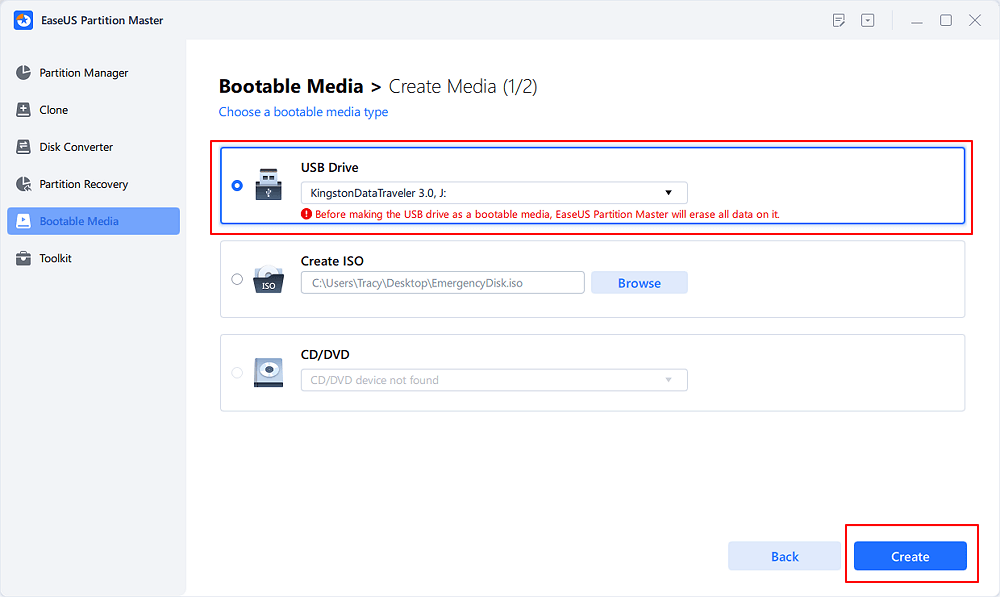
Step 2. You can choose the USB or CD/DVD when the drive is available. Once made the option, click "Proceed".
If you do not have a storage device at hand, you can also save the ISO file to a local drive, and later burn it to a storage media.
Step 3. Connect the WinPE bootable disk to the computer. Restart your computer and press F2/Del at the same time to enter BIOS. Set to boot the PC from "Removable Devices" (bootable USB disk) or "CD-ROM Drive" (bootable CD/DVD) beyond Hard Drive. Press "F10" to save and exit.
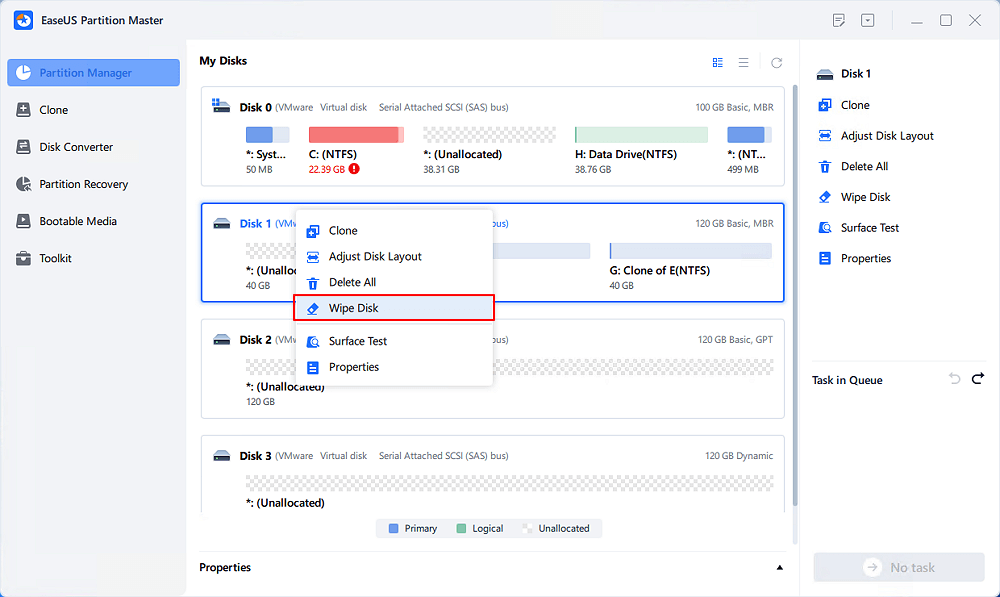
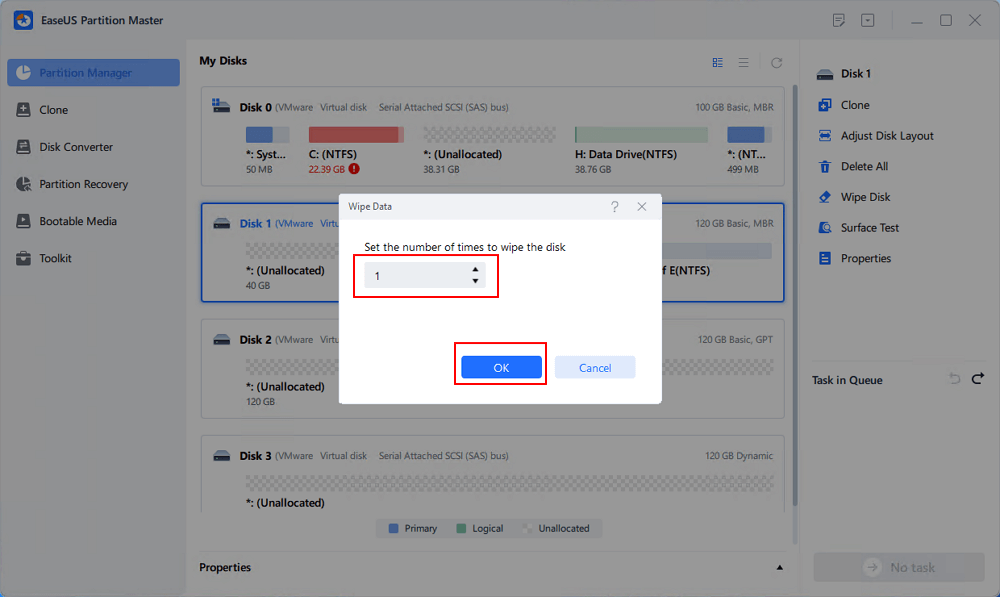
Step 4. Install and launch EaseUS Partition Master. Select the HDD or SSD which you want to wipe. And right-click to choose "Wipe Disk".
Step 5. Set the number of times to wipe data. You can set to 10 at most. Then, click "OK".
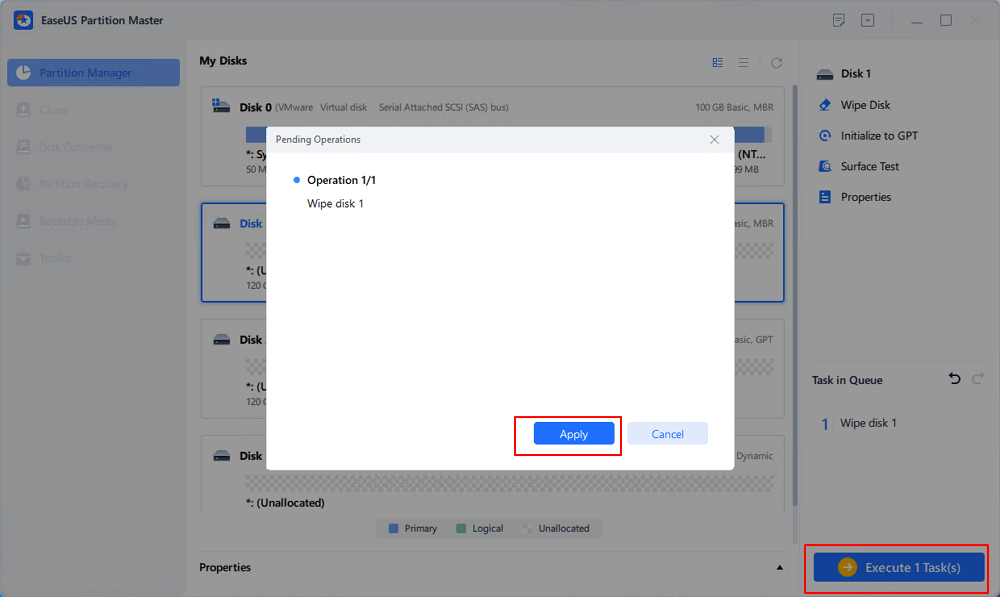
Step 6. Click "Execute 1 Task(s)" and then click "Apply" to start wiping data.
Once you've successfully booted your computer with the help of EaseUS Partition Master, its features can be utilized to delete the data on the C drive or the whole disk.
Once you have completed this process, your C drive will be entirely cleaned and unencrypted. You will have to use the Windows installation media you made beforehand again to reinstall the OS and configure the PC from the beginning.
How to Install Windows 10 on New PC Without Operating System
Do you know how to install Windows 10 on a new PC without OS? Check here to learn how. (Also works for Windows 11.)

This approach ensures that any data stored on your BitLocker-protected C drive is completely and permanently erased, offering the most significant degree of information protection when retiring or reallocating your system.
See also:
In this tutorial, we have discussed several techniques for wiping BitLocker encrypted drives, from easy formatting to more secure, irrevocable methods. We have highlighted both the recoverable and unrecoverable options, which involve the delicate wiping of an encrypted C drive. Throughout, we've emphasized the importance of data backup and careful preparation.
For those looking for a secure solution, we recommend using EaseUS Partition Master. Its advanced functions, such as DoD-standard data wiping and creating bootable media, make it an essential tool for managing encrypted drives, ensuring complete data destruction when required.
Wipe BitLocker Encrypted Drive FAQs
Wiping an encrypted SSD requires special consideration due to the nature of SSD technology and encryption. Here's a general process:
1. If available, try to use the secure erase tool from the SSD manufacturer. Several SSD manufacturers have software that lets users delete their partitions while also encrypting them.
How Can We Help You
Roxanne is one of the main contributors to EaseUS and has created over 200 posts that help users solve multiple issues and failures on digital devices like PCs, Mobile phones, tablets, and Macs. She loves to share ideas with people of the same interests.
Oliver is an EaseUS professional writer who dares explore new areas. With a passion for solving tech issues with straightforward guides for common users, Oliver keeps honing his writing craft by developing in-depth solutions for disk and partition management, computer boot-up issues, file transfer, etc.
It won't hot image your drives or align them, but since it's coupled with a partition manager, it allows you do perform many tasks at once, instead of just cloning drives. You can move partitions around, resize them, defragment, and more, along with the other tools you'd expect from a cloning tool.
Read MoreI love that the changes you make with EaseUS Partition Master Free aren't immediately applied to the disks. It makes it way easier to play out what will happen after you've made all the changes. I also think the overall look and feel of EaseUS Partition Master Free makes whatever you're doing with your computer's partitions easy.
Read MorePartition Master Free can Resize, Move, Merge, Migrate, and Copy disks or partitions; convert to local, change label, defragment, check and explore partition; and much more. A premium upgrade adds free tech support and the ability to resize dynamic volumes.
Read MoreIt won't hot image your drives or align them, but since it's coupled with a partition manager, it allows you do perform many tasks at once, instead of just cloning drives. You can move partitions around, resize them, defragment, and more, along with the other tools you'd expect from a cloning tool.
Read MoreI love that the changes you make with EaseUS Partition Master Free aren't immediately applied to the disks. It makes it way easier to play out what will happen after you've made all the changes. I also think the overall look and feel of EaseUS Partition Master Free makes whatever you're doing with your computer's partitions easy.
Read MoreRelated Articles
How to Check/View Disk Storage/Usage on Windows 10/11
![]() Tracy King/2025/04/28
Tracy King/2025/04/28
Windows Boot Manager Not Showing in BIOS | Fixed
![]() Cici/2025/04/28
Cici/2025/04/28
Windows 10 Boot Repair Tool: 2025 Best Pickes🔥
![]() Cici/2025/04/28
Cici/2025/04/28
Free Partition Manager for Windows 7/Windows 10 64 Bit
![]() Jean/2025/04/28
Jean/2025/04/28
EaseUS Partition Master

Manage partitions and optimize disks efficiently
Your best companion for disk partitioning, MBR to GPT/GPT to MBR conversion,even OS migration
Copyright © 2004 - 2025 EaseUS. All rights reserved.
CHOOSE YOUR REGION
Start Your Free Trial!
Sign up to our newsletter, stay updated on news and exclusive offers from EaseUS. Don't worry, if you change your mind, you can unsubscribe at any time, free of charge. We value your privacy (Privacy Policy).
Start Your Free Trial!
Sign up to our newsletter, stay updated on news and exclusive offers from EaseUS. Don't worry, if you change your mind, you can unsubscribe at any time, free of charge. We value your privacy (Privacy Policy).