
Content
Page Table of Contents
How to Upgrade Your MacBook Pro with SSDHOT
Why Upgrading Mac with SSDHOT
ConclusionHOT
FAQs About How to Upgrade Mac with SSDHOT
About the Author
Hot Topics
With software's ever-rising capabilities, it needs more resources and space to work efficiently. This has led to the declined use of traditional hard disks, which are being replaced by SSDs. SSDs have become almost a must-have requirement for all types of users regardless of their field of work. That has led to Apple consumers ensuring that their Mac keeps up with the pace.
To do that, they will need to replace the internal drive with an SSD. This 2024 tutorial will guide you through how to upgrade SSD for Mac to help all Apple users. We'll cover everything from selecting the suitable SSD to preparing your Mac for the upgrade to the step-by-step installation process. Additionally, EaseUS will discuss how to clone your data effortlessly and ensure your system runs optimally post-upgrade.
How to Upgrade Your MacBook Pro with SSD
While this may be true to an extent, this procedure can become relatively straightforward with the proper knowledge and tools. We'll provide clear and concise instructions on how to upgrade SSD for Mac. From choosing the right drive to physically installing it, we've got you covered.
Preparations: What You Need
Before you go looking for how to upgrade SSD for Mac, it is important to prepare everything accurately. Below, we have outlined the basic instructions you need to follow to ensure a successful procedure.
1️⃣Choose a Proper SSD for Mac
Since there is nothing more important than the SSD you want to use for your Mac, here are the key points to consider when choosing one:
- Read and Write Speed: When choosing storage, it's crucial to prioritize how fast it can work. A quick drive not only reduces boot times but also enhances application launches and overall system performance. To maximize your upgrade, opt for SSDs with high sequential and random read/write speed.
- Capacity: You'll need to assess your storage requirements according to how you use your Mac. A storage drive with more capacity is recommended if you frequently work with large files or resource-intensive software, while a smaller SSD may be sufficient to deal with everyday tasks.
- Reliability: Go on to select an SSD from a well-established manufacturer known for producing reliable products. They tend to be more durable than traditional hard drives in all aspects. Yet it's crucial to opt for one with a low failure rate and features like wear-leveling and error-correcting code.
- Memory Type: When it comes to solid-state drives, there are three different types of memory: TLC or Triple-Level Cel, MLC or Multi-Level Cel, and SLC or Single-Level Cel. TLC drives are known for their affordability and higher storage capacity. MLC and SLC deliver superior performance and longer lifespans. While TLC is a cost-effective option, consider MLC or SLC SSDs for higher durability and speed.
2️⃣Prepare Necessary Tools
The next thing you need to confirm is that all the required accessories and software are at hand before kickstarting the Mac hard drive to an SSD upgrade:
- T8 Screwdriver: A specifically designed tool to fit the screws used in the MacBook Pro casing.
- USB-C to USB-C Cable: For data migration, it must support both power and data transfer features. Keep in mind that the Thunderbolt 3 cables are unsupported.
- Download EaseUS Partition Master: Download the most reliable cloning software of all, EaseUS Partition Master for Mac.
The last step in the preparation is to format the SSD you bought Mac-ready. Doing this will remove any data from the drive and format it according to the relative file system. The guide needed to undertake this procedure is explained below:
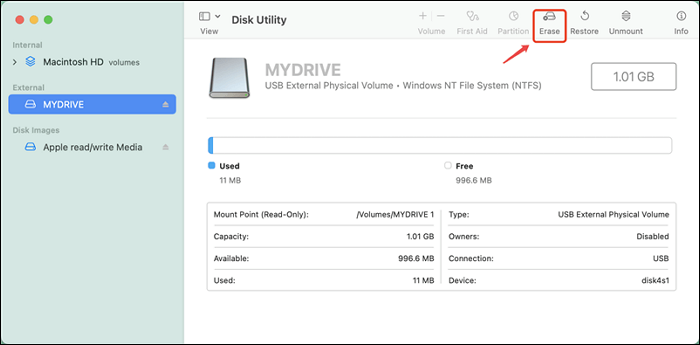
Step 1. Connect your new SSD to your Mac using the USB-C to USB-C cable and access the "Disk Utility" through the "Application" folder. Locate the targeted drive on the left side and click "Erase" from the available options at the top.
Step 2. A box for erasing your storage drive will appear for you to choose the disk name, format, and scheme. Now, select "APFS (Apple File System)" or "Mac OS Extended (Journaled)" as the "Format" and ensure that the "Scheme" is set to "GUID Partition Map."

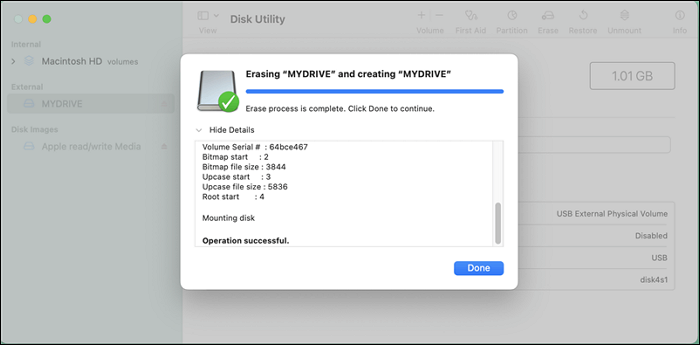
Step 3. Finally, tap the "Erase" button to begin the formatting process after naming the drive. Now, Disk Utility will erase and format the SSD according to your specifications.
Phase 1. Clone Mac Hard Drive to SSD
After formatting your existing Mac hard drive, the next crucial step is to clone it to the new one. This process ensures that all your data, applications, and system settings are effortlessly transferred, allowing you to continue working on your projects without missing a beat.
To simplify the cloning process, we recommend using EaseUS Partition Master for Mac. This powerful tool is designed to efficiently handle disk management tasks, including cloning your hard drive to an SSD. With it, you no longer need to copy/paste data and can clone entire partitions without any data loss. Furthermore, you can clone the OS using this robust software to avoid the reinstallation hassle. Compared to other cloning tools available, EaseUS Partition Master offers several unique advantages.
Its intuitive style guides you through each step of the procedure with clear instructions, making it possible for even non-tech-savvy user to clone their drives securely. Moreover, the tool is known for its reliability in transferring data without hiccups. Additionally, you can optimize the cloning process to complete it as quickly as possible with minimal downtime.
It is recommended that you clone the system to the new drive when upgrading the Mac SSD. Summarized below are the in-depth and quick steps you need to complete this procedure accurately:
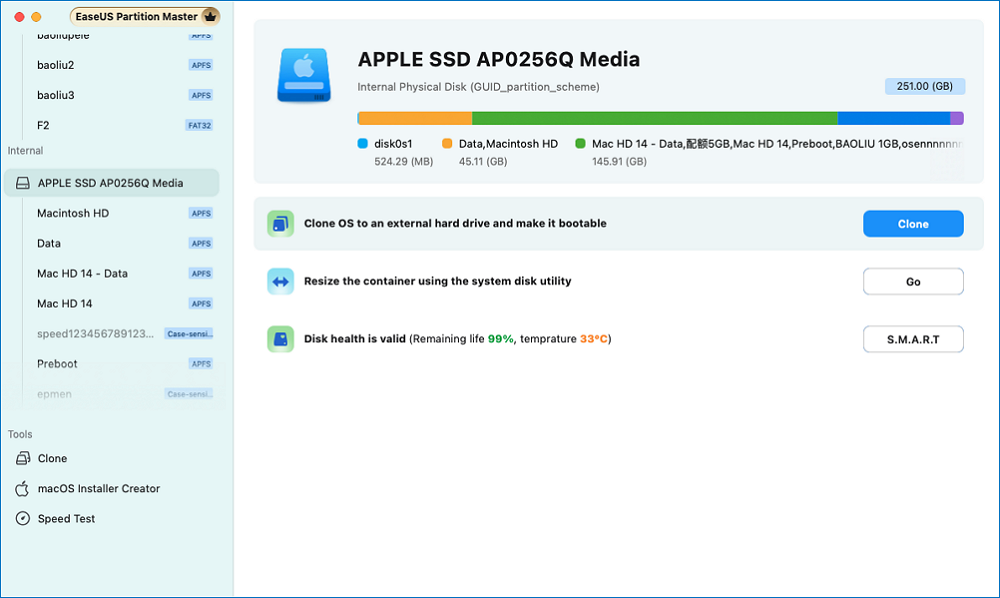
Step 1. Install and connect another new disk to Mac computer, run EaseUS Partition Master for Mac, then, click "Clone" under the Abilities section. Click the "+" icon to browse and locate the macOS disk and target new disk.
Step 2. Select the Source and the Destination disk and click "Select" to confirm.
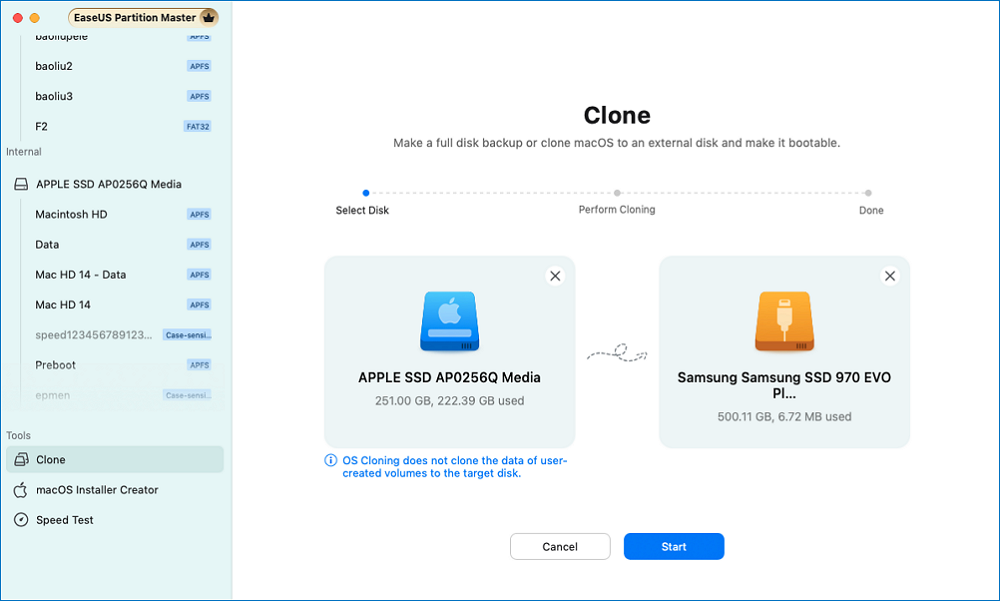
Step 3. Confirm if you've selected the correct macOS OS disk and the new target disk you'd like to clone and upgrade the macOS disk to. Then, click "Start" and click "Yes" to confirm if EaseUS Partition Master for Mac requests you to confirm the operation.
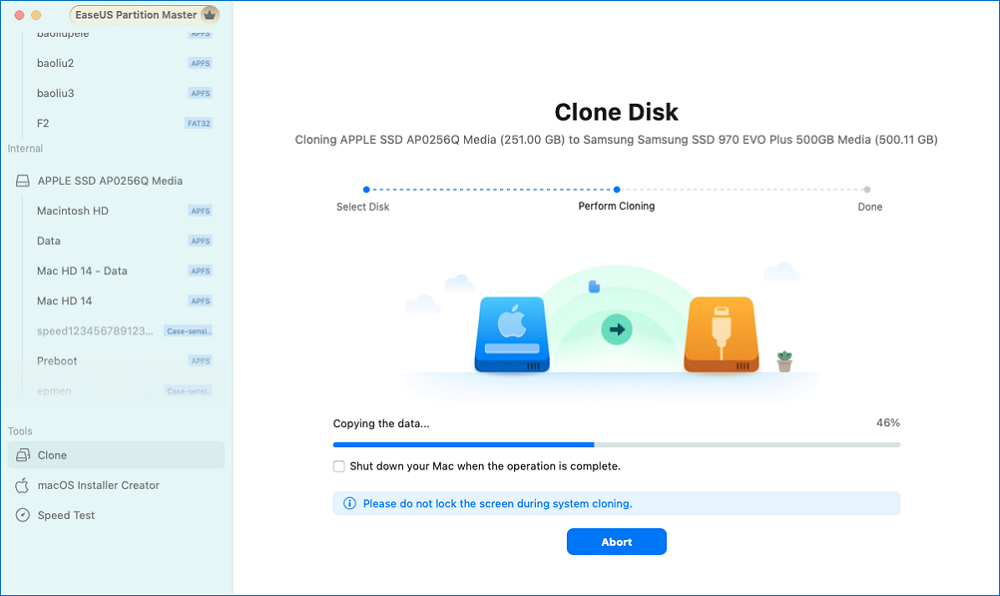
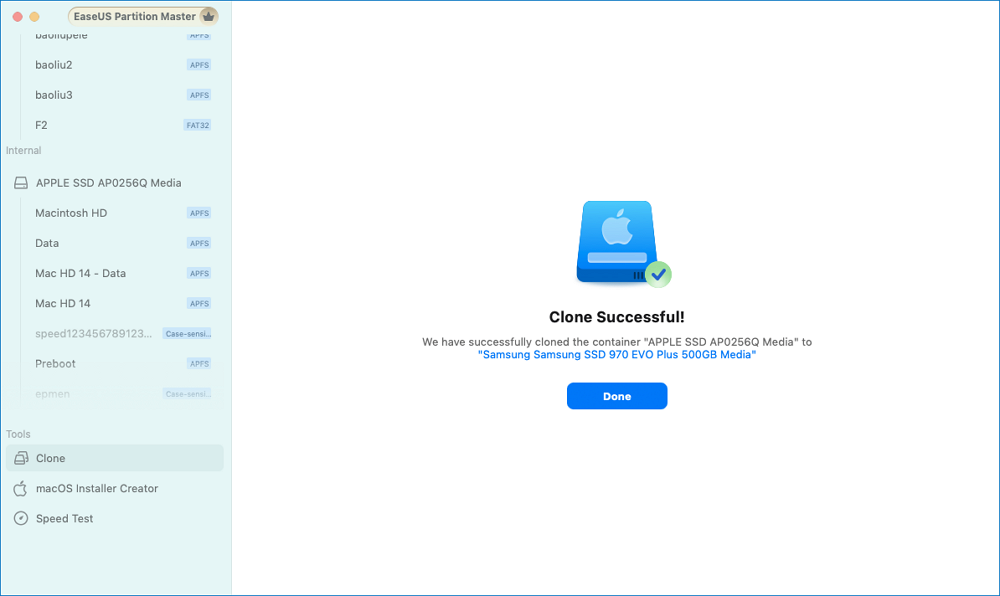
Step 4. Wait patiently and let EaseUS Partition Master for Mac to complete cloning the old macOS disk to the new target disk.
- Clone Mac Hard Drive
- Upgrade from HDD to SSD on Windows PC
- Upgrade PS5 SSD
- Format External Hard Drive for Mac and PC
Given its powerful features and ease of use, we highly recommend trying EaseUS Partition Master for Mac to clone your hard drive to the new SSD. It simplifies the process and ensures a smooth transition to your upgraded Mac.
Phase 2. Remove the Old Hard Drive and Install the SSD
After successfully cloning your system's hard drive to the new disk, it's time to install the SSD into your Mac. This phase involves carefully removing the old hard drive and replacing it with the newly cloned one.
The purpose is to ensure your MacBook is ready to benefit from the enhanced performance. As it is a delicate process how to upgrade SSD for Mac, follow these instructions carefully:
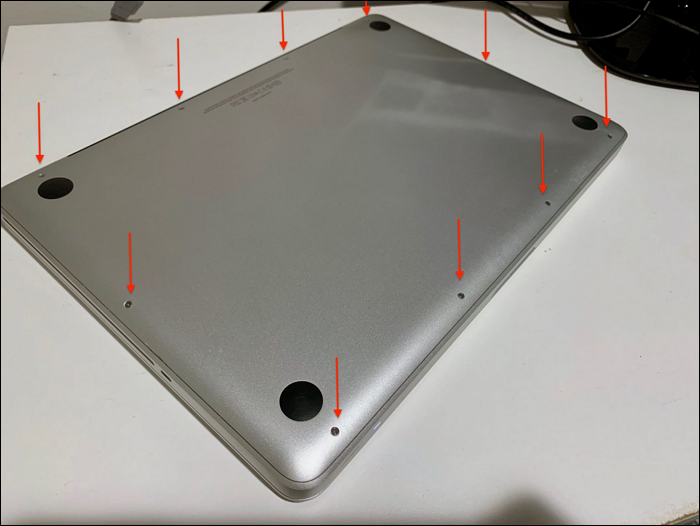
Step 1. Shut down and unplug your Mac completely, and wait a few minutes to ensure all internal components are fully powered down. Then, use the T8 screwdriver to remove the screws from the bottom case of your MacBook Pro.
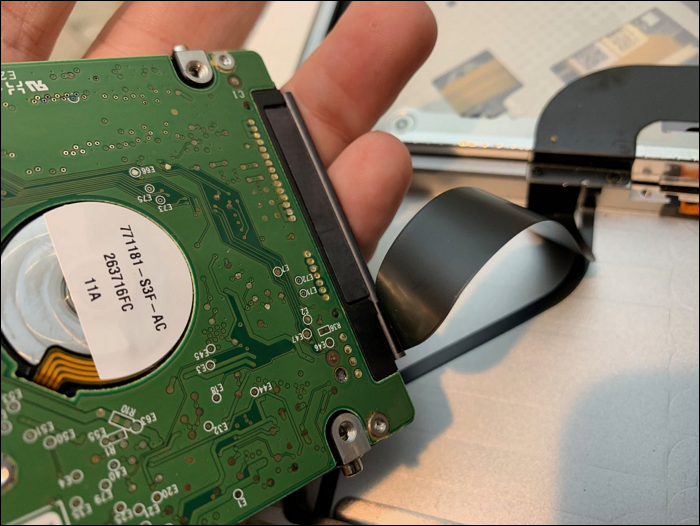
Step 2. Afterward, carefully lift the case to access the internal components and locate the old hard drive. It is typically secured by a bracket and connected with a SATA cable near the battery connector.
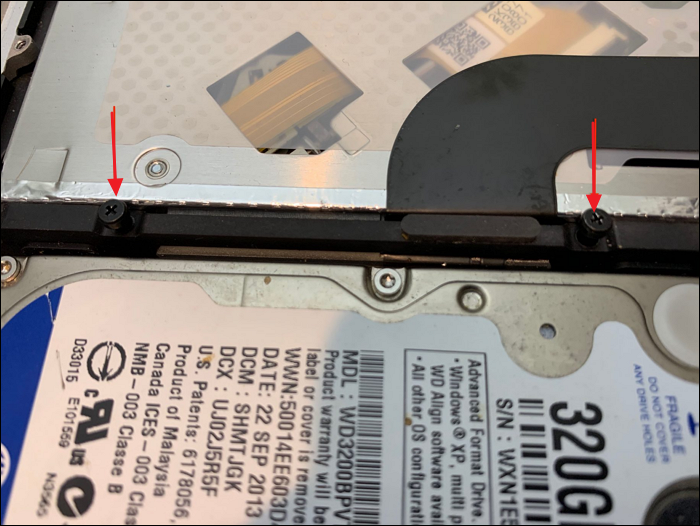
Step 3. Now, loosen the screws carefully to remove the bracket and lift the hard drive from its compartment. Next, disconnect the SATA cable and any other connectors attached to the hard drive.
Step 4. Then, reconnect the SATA cable and any other connectors to the new SSD and secure it in the hard drive bay. Afterward, use the screwdriver to secure the hard drive bracket and place the bottom case back on your MacBook Pro.
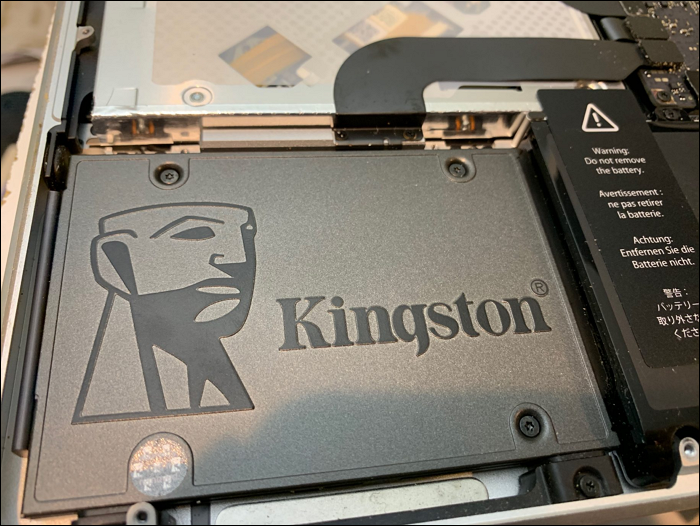
Step 5. Finally, plug in your Mac and power it on after you have secured the new drive. Your Mac should boot up using the newly installed SSD with all your data and settings intact.
Why Upgrading Mac with SSD
As you consider upscaling your Apple system with an SSD, it's essential to reflect on the reasons and benefits behind this decision. Why should you invest time and effort into this upgrade? Let's explore the compelling advantages that make this upscaling a wise choice. Before dealing with how to upgrade SSD for Mac, take a moment to think about your current system usage patterns.
The slow startup times and sluggish app performance can be really annoying and tiring. Similarly, you might always have to remove data to make space for new files and programs. All of these issues can be solved by upgrading your system through an SSD. Doing this will offer a smoother and faster computing experience with a noticeable difference.
You'll also notice a significant decrease in boot time and enjoy faster application launches. An SSD provides faster data access and transfer speeds compared to traditional hard drives. This results in smoother multitasking and far quicker file transfers. Moreover, a more responsive system overall is also a perk when installing these fast storage drives, and SSDs are more resistant to physical shock and less prone to mechanical failure.
After reading this post, you can share the comprehensive tutorial with more Mac users in need:
Conclusion
To wrap up, learning how to upgrade an SSD for a Mac can be a transformative step in significantly enhancing its performance and functionality. In this article, we’ve walked you through all the essential steps of the process, from selecting the right SSD to physically installing the new drive. Each phase is crucial to ensuring a smooth and successful upgrade process.
An essential part of this upgrade process is to clone the old hard drive to the new one. To make the cloning process effortless, we recommend using EaseUS Partition Master for Mac. This tool simplifies your data migration to the new SSD with its dynamic interface and reliable performance. It offers additional features such as partition management and disk optimization to enhance your Mac's capabilities further.
With this high-powered tool, you can confidently undertake your SSD upgrade to ensure that your Mac operates at its best. Therefore, invest in this sturdy tool to enjoy a faster and more efficient computing experience.
FAQs About How to Upgrade Mac with SSD
As you embark on this journey, you might have a few questions about the process and its implications. To help you out, summarized below are some common queries and their answers regarding how to upgrade SSD for Mac.
Q1: Can I upgrade the SSD on a MacBook Pro?
That is correct and can be done relatively quicker and with ease if you arm yourself with the right tools and knowledge. The actual process of removing the old drive and installing the new SSD can differ depending on your MacBook Pro. However, the details regarding preparations and cloning of your system data are universal to utilize.
Q2: How do I get more storage space on a MacBook Pro?
To do that, you have many options that can be implemented with varying degrees of effect. You can upgrade the internal SSD if your MacBook Pro supports it or consider using external storage solutions, such as external hard drives. Additionally, you might explore cloud storage options to free up space on your local drive by storing files online.
Q3: Can I add an external SSD to my Mac?
You can find a convenient way to expand your storage without modifying internal components. External SSDs connect via USB-C cables and provide additional space for files, backups, and applications. This method is beneficial if you need more storage without opening up your Mac, as this process can void your warranty.
How Can We Help You
About the Author
Updated by Tracy King
Tracy became a member of the EaseUS content team in 2013. Being a technical writer for over 10 years, she is enthusiastic about sharing tips to assist readers in resolving complex issues in disk management, file transfer, PC & Mac performance optimization, etc., like an expert.
Cici is the junior editor of the writing team of EaseUS. She accepted the systematic training on computers at EaseUS for over one year. Now, she wrote a lot of professional articles to help people resolve the issues of hard drive corruption, computer boot errors, and disk partition problems.
Product Reviews
-
It won't hot image your drives or align them, but since it's coupled with a partition manager, it allows you do perform many tasks at once, instead of just cloning drives. You can move partitions around, resize them, defragment, and more, along with the other tools you'd expect from a cloning tool.
Read More -
I love that the changes you make with EaseUS Partition Master Free aren't immediately applied to the disks. It makes it way easier to play out what will happen after you've made all the changes. I also think the overall look and feel of EaseUS Partition Master Free makes whatever you're doing with your computer's partitions easy.
Read More -
Partition Master Free can Resize, Move, Merge, Migrate, and Copy disks or partitions; convert to local, change label, defragment, check and explore partition; and much more. A premium upgrade adds free tech support and the ability to resize dynamic volumes.
Read More -
It won't hot image your drives or align them, but since it's coupled with a partition manager, it allows you do perform many tasks at once, instead of just cloning drives. You can move partitions around, resize them, defragment, and more, along with the other tools you'd expect from a cloning tool.
Read More -
I love that the changes you make with EaseUS Partition Master Free aren't immediately applied to the disks. It makes it way easier to play out what will happen after you've made all the changes. I also think the overall look and feel of EaseUS Partition Master Free makes whatever you're doing with your computer's partitions easy.
Read More
Related Articles
-
How to Install Windows on BitLocker Encrypted Drive
![author icon]() Sherly/2025/04/28
Sherly/2025/04/28 -
How to Clone SSD [Step-by-Step Picture Guide]
![author icon]() Sherly/2025/04/28
Sherly/2025/04/28 -
Hard Drive Failure: How to Check & What to Do
![author icon]() Sherly/2025/04/28
Sherly/2025/04/28 -
How to Transfer OEM Windows 10 to A New PC [Easy & Quick]
![author icon]() Cici/2025/04/28
Cici/2025/04/28
Hot Topics


EaseUS Partition Master

Manage partitions and optimize disks efficiently