Page Table of Contents
Reviews and Awards
Instead of using cloud storage, it is always better to use the local network to share files between devices. Especially when it comes to sharing large files quickly, all other methods become unreliable as they take lots of time. While it is an efficient and quick way, you need some technical skills to set up file sharing between computers using a local network.
Therefore, it can take quite some hard work to find a file transfer method using a network connection that is easy to set up and also quick. To make it easier, this guide from EaseUS Software will discuss the best and most convenient methods to share files between computers over a network. Additionally, we'll discuss a bonus tool that will make file sharing a lot easier and quicker on computers.
How to Share Files Between Computers over a Network - 3 Ways
As said above, we'll discuss the three most reliable methods available for easy file transferring between PCs. To help you choose the ideal transferring option, here's a detailed table comparing each method's speed and other key features.
| Comparison | 1️⃣EaseUS Todo PCTrans | 2️⃣Network and Sharing Center | 3️⃣Nearby Sharing |
|---|---|---|---|
| Speed | Fast | Moderate | Moderate |
| Security | No data loss | Depending on the network | Depending on the network |
| Ease of Use | Easy for beginners | You may need technical guidance to set it up on both devices | It is accessible to users with minimal technical skills |
| Compatibility | All versions of Windows, even the older ones. | Recent and legacy Windows | Windows 11/10 only |
As evident from this comparison, EaseUS Todo PCTrans outsmarts the other methods by a mile. Its fast transfer speeds and secure connections make it the ideal alternative for data sharing between computers.
Way 1. EaseUS Todo PCTrans
While discussing the best ways to share files between computers over a network, we mentioned how the Windows tools have their drawbacks. In comparison, EaseUS Todo PCTrans emerges as a comprehensive data migration tool that bypasses compatibility issues and is accessible for all PCs. Similarly, you can migrate hundreds of GBs of files as it doesn't have any restrictions on how much data you can transfer.
As many other alternatives often cause data loss, EaseUSTodo PCTrans ensures everything remains intact when transferred to other computers. During file migration, you can also choose to transfer games and applications while maintaining your progress and stats in the games. It also makes sure your licenses and user accounts are not lost when transferring software to other devices.
Key Features
- Local Drive Transfer: In addition to moving files between PCs, it also allows the migration of data between drives of the same computer. As a result, you can upgrade your system drive without losing Windows files.
- Data Recovery: For those who've lost access to their files due to dead drives or computers, this tool is the ideal solution since it allows retrieving them without booting the disks. All you have to do is connect the drive to another computer and use this software to access its data.
- Transfer Licenses: When moving to a new PC, Todo PCTrans allows users to also take their licenses with them to activate their software. Similarly, it also recovers lost licenses from computers by extensively searching drives.
- Disk Cleaner: The tool also scans the disk for unnecessary and junk files that are taking away free space. After that, it lets users delete those files to clear disks and make them faster.
Step-by-Step Tutorial to Transfer Data Between Computers Using Todo PCTrans
Now that we know all the useful features of these tools, let's discuss how you can use Todo PCTrans to share files between computers over a network. By following the detailed steps given below, you can conveniently move your data across PCs:
Step 1. Install and open EaseUS Todo PCTrans on source and target PCs. Navigate to the "File Sharing" tab and click "Start" to begin. This feature can achieves high transfer rates by utilizing the maximum available network bandwidth.

Step 2. To build the connection between two PCs, you need to ensure both of them are under the same network. Then, choose the target PC icon or click "Add PC" and enter the other PC's connection code.

Step 3. Drag and drop the videos, pictures, audios, and documents that you want to transfer. Then, you check them in the Receive lists on your target PC.
As you can see, it is very easy to use this tool for file migration purposes on your computers. We highly recommend downloading EaseUS Todo PCTrans to make sure you’re always in control of your data on all your devices.
Way 2. Network and Sharing Center
Another option to send files using an internet connection is through the Network and Sharing Center, a feature included in Windows. Even though this inbuilt tool requires initial setup on both devices, it allows you to share files over a local network by enabling folder sharing.
However, you can lose your data if multiple people try to access the same file from the shared folder. To learn how to share files between computers over a network, follow the given steps in detail:
Guide 1. On the Source PC
Firstly, we need to set up the sharing folder on the computer from where we want to send the data. By following the given steps, you can easily create such a folder on your PC for easy data migration:
Step 1. On your computer, open the Control Panel using the "Search" bar and navigate to the "Network and Sharing Center."
Step 2. After it opens, locate and hit the "Change Advanced Sharing Settings" on your screen's left side.
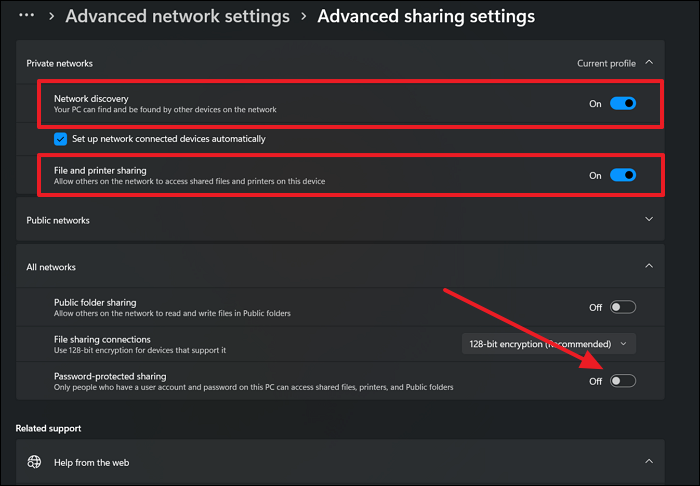
Step 3. Within the newly appeared menu, toggle on the "Network Discovery" and "File and Printer Sharing" options. Now, from the "All Settings" section, switch off the "Password Protected Sharing" toggle to make sure file transferring is accessible without any restriction.

Step 4. Now, create a new folder on your desktop and move the files that you want to share with others. Afterward, right-click on the folder and move your cursor to the "Give Access To" option from the pop-up menu. Another small pop-up will appear where you need to select the "Specific People" option.
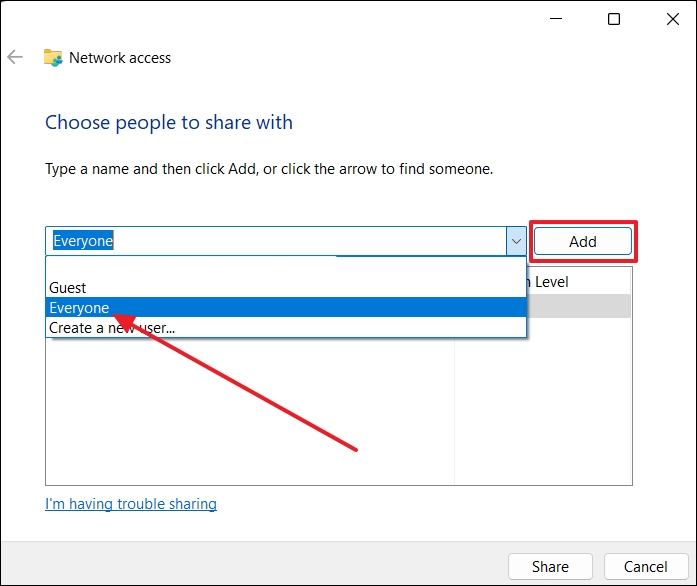
Step 5. Within a new screen, manage the access of the document with others. Here, click on the top dialogue box, select "Everyone" from the available options, and then tap on the "Add" button beside the box.
Step 6. To manage the level of permissions, click on the "Read" option beside "Everyone" and select "Read/Write" from the options that pop up. After that, finalize these selections by clicking the "Share" button at the bottom right side of your screen.

Step 7. Finally, after you click "Done," your files are ready to be accessed by others using the same network.
Do not forget to share this post and let more users in need know about how to set a Shared Folder.
Guide 2. On the Destination PC
After setting up the Network and Sharing Center on the source PC, you need to move on to make arrangements on the destination computer. By following the given steps, users can start receiving files on their computers:
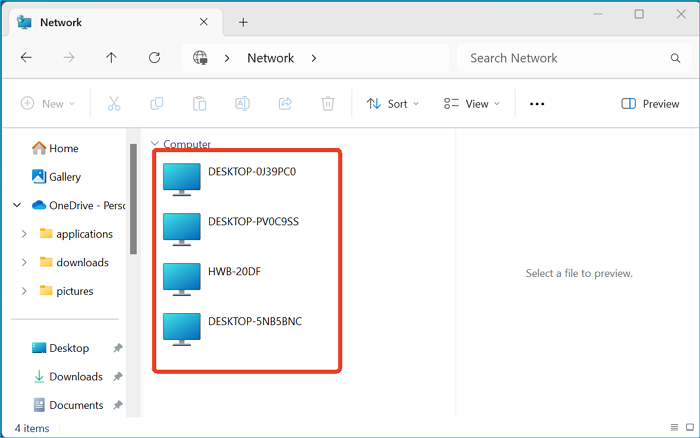
Step 1. To access a shared file on your new computer, go to your "File Explorer" and then find the "Network" option on the bottom side of the left menu. Once it opens, tap on the "Network Directory is Turned Off. Network Computers and Devices Are Not Visible. Click to Change" statement at the top of the window below the tools bar. From the two options that appear, click "Turn on Network Discovery and File Sharing."
Step 2. A small pop-up screen will appear to confirm your selections. Here, you need to select the "Yes, Turn on Network Discovery and File Sharing for All Public Networks" option to access all the available shared folders. Select the target device, and you will be able to access the target folder.

Way 3. Nearby Sharing
For users who are on the latest versions of Windows, Nearby Sharing is a quick way to share files between computers over a network. Even though it isn't an ideal solution for bigger file transfers, you can still use it to quickly share useful data. You can learn about how to use Nearby Sharing on your PC by following the steps below:
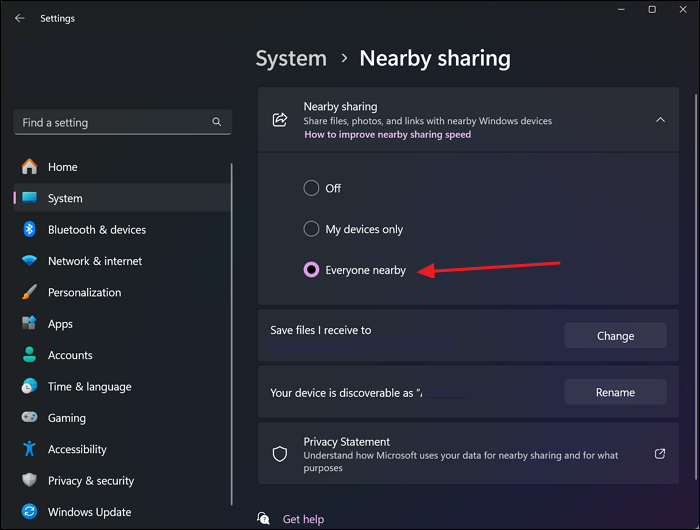
Step 1. In your PC's settings, go to the "System" tab and then scroll down to find the "Nearby Sharing" option.
Step 2. After opening it in the next window, set the settings to "Everyone Nearby" so that anyone with a stable network can access your shared files.

Step 3. Now, right-click on the file that you want to send to someone, and once the drop-down menu appears, select the "Share" option.
Step 4. Finally, select the computer to which you want to send the data under the "Nearby Share" section to complete the process.
During the process, if you encounter any issues, click this link to learn how to fix Neaby Sharing not working issue.
Conclusion
As we summarize, there are many ways to share files between computers over a network, having their own benefits. To help you ease out the process, Windows offers many built-in tools and supports file-sharing technology. However, they aren't reliable as they usually have problems like slow transfer speeds or compatibility issues.
In such cases, users have to look towards third-party tools that offer good transfer speeds with higher compatibility. Out of all the available external programs, EaseUS Todo PCTrans is the best alternative to migrate all of your data between computers.
FAQs About Sharing Files Between Computers on the Network
Through the previously explained methods, you get to share files between computers over a network easily. However, in the informative section, we are going to answer some commonly asked questions:
Q1. How do I share files between two computers using a LAN cable?
The following steps will make it easy to use LAN cables for data migration:
Step 1. Firstly, connect both PCs with a LAN cable and then go to the "Network and Sharing Center." Here, click these options in order: "Ethernet > Properties > Internet Protocol Version 4 (TCP/IPv4) > Properties".
Step 2. In the "Use the following IP address" section, add these values:
- IP Address: 192.168.1.2
- Subnet mask: 225.225.225.0
Step 3. On the receiving PC, follow the same steps and add these values:
- IP Address: 192.168.1.3
- Subnet mask: 225.225.225.0
Step 4. Now, navigate these options in order: "Control Panel > Network and Internet > Network and Sharing Center > Change advanced sharing settings."
Here, turn on these options:
- Network Discovery
- File and Printer sharing
- HomeGroup Connections
Step 5. Finally, right-click on the file that you want to share and follow these options in order: "Share with > Specific people > Everyone > Add > Share," and you will be able to find it on another computer.
Q2. How to transfer files between PCs via Wi-Fi?
You can send files to other computers via a wireless connection by using the Nearby Sharing feature of Windows by following these steps:
1. Access the "Nearby Sharing" option from the "System" tab in your PC's Settings and select "Everyone Nearby.
2. After that, right-click on the data that you want to send and select the "Share" option from the drop-down menu. Once a new window appears, select the desired computer from the "Nearby Share" section to send the file.
Q3. Is it safe to transfer files between PCs via the Internet?
It is generally a secure process to send data between computers using network connections. However, hackers can hack into the connections to steal or corrupt the data in the absence of strict security. In such cases, tools like EaseUS Todo PCTrans are secure options for sharing files between computers over a network.
About the Author
Sherly joined EaseUS in 2022 and she has always loved writing articles and enjoys the fun they bring. She receives professional training here, focusing on product performance and other relative knowledge. She has written over 200 articles to help people overcome computing issues.
Reviews and Awards
-
EaseUS Todo PCTrans Free is a useful and and reliable software solution created to serve in computer migration operations, be it from one machine to another or from an earlier version of your OS to a newer one.
Read More -
EaseUS Todo PCTrans is by the folks at EaseUS who make incredible tools that let you manage your backups and recover your dead hard disks. While it is not an official tool, EaseUS has a reputation for being very good with their software and code.
Read More
-
It offers the ability to move your entire user account from your old computer, meaning everything is quickly migrated. You still get to keep your Windows installation (and the relevant drivers for your new PC), but you also get all your apps, settings, preferences, images, documents and other important data.
Read More
Related Articles
-
How to Change Program Files Location in Windows 10
![author icon]() Sherly/2025/01/23
Sherly/2025/01/23 -
How to Transfer Data from Hard Drive of Dead Computer with 6 Steps
![author icon]() Jerry/2024/12/11
Jerry/2024/12/11 -
How to Increase File Transfer Speed Over WiFi
![author icon]() Tracy King/2025/01/23
Tracy King/2025/01/23 -
How to Transfer Data from Mac to External Hard Drive | 6 Ways
![author icon]() Sherly/2025/03/28
Sherly/2025/03/28