-
![]() Recover Deleted Files from Recycle Bin [All Devices Covered]
Recover Deleted Files from Recycle Bin [All Devices Covered] January 13,2026
 6 min read
 -
![]() Restore Deleted/Lost ASUS Data with ASUS Data Recovery Software
Restore Deleted/Lost ASUS Data with ASUS Data Recovery Software January 13,2026
 6 min read
 -
![]() How to Fix Corrupted HTML File Recovery Solutions (Online & Offline)
How to Fix Corrupted HTML File Recovery Solutions (Online & Offline) January 13,2026
 6 min read
 -
![]() Discord RTC Connecting Stuck? Troubleshoot This Error Now (7 Ways)
Discord RTC Connecting Stuck? Troubleshoot This Error Now (7 Ways) January 13,2026
 6 min read
 -
![]() How to Recover Deleted Files After Reinstalling Windows 11 | 3 Ways
How to Recover Deleted Files After Reinstalling Windows 11 | 3 Ways January 13,2026
 6 min read
 -
![]()
-
![]() [Error 5] Unable To Execute Files In The Temporary Directory | How to Fix
[Error 5] Unable To Execute Files In The Temporary Directory | How to Fix January 13,2026
 6 min read
 -
![]()
-
![]()
-
![]() How to Cancel a Format in Progress If Windows Won't Cancel Format
How to Cancel a Format in Progress If Windows Won't Cancel Format January 13,2026
 6 min read
PAGE CONTENT:
- Method 1. Uninstall Windows 11 Update in Windows Settings
- Method 2. Uninstall Windows 11 Update in Control Panel
- Method 3. How to Uninstall Windows 11 Updates in Windows RE
- Method 4. Use CMD to Uninstall Windows 11 Update
- Method 5. Roll Back Windows 11 Update with System Restore
- How to Recover Data After System Restore Windows 11 🏅
It's crucial to keep your system updated for the hassle-free functioning of your Windows PC. But sometimes, a buggy update may give rise to all types of issues with your system. As the Windows update procedure is automated, and the latest version gets upgraded without your concern, this is a severe issue! If you don't want to Windows 11 update automatically, you can stop Windows 11 update.
Have you recently been upgraded to Windows 11? Is it causing any problems in your system? You can quickly roll back the update and undo every change to your PC to download the previous Windows 10. There are two major types of updates in Windows 11: regular & builds updates. Regularly patch vulnerabilities and bugs, whereas a build update shows brand-new features and changes.
But you can eliminate these updates if they are incompatible with your laptop or PC. Do you want to uninstall Windows 11 update? Before presenting the solutions, there are a few reasons for uninstalling the latest update and rolling back to Windows 10:
| 😰A sluggish system | After installing Windows 11, you may face a slow system. The latest update of Windows 11 is KB5025239, which is a significant security patch causing errors for some users. |
| 💻Tough system requirements | Often users want to roll back to Windows 10 by uninstalling 11 because their PCs only fulfill some of the crucial system requirements. Its stringent system requirements have built an upgrade restriction for several incompatible PCs. |
| ❌Windows 11 doesn't have a proper timeline | Microsoft has eliminated Timeline, a noteworthy feature allowing users to access saved files with Microsoft apps from a chronological timeline. |
| 🆕Lack of new features in Windows 11 | Although Windows 11 boasts three eminent features, such as snap layouts, widgets, and Android app support, widgets could be more extraordinary since Windows 7 and Vista both have desktop gadgets. |
Wondering how to uninstall Windows 11 update? We have provided a video for help, whose timelines are the following:
- 00:40 Uninstall updates from settings
- 04:55 Command prompt uninstall updates
- 05:44 Uninstall updates from the safe mode
Now, let's proceed with the methods to uninstall Windows 11 update:
- Method 1. Uninstall Windows 11 Update in Windows Settings
- Method 2. Uninstall Windows 11 Update in Control Panel
- Method 3. How to Uninstall Windows 11 Updates in Windows RE
- Method 4. Use CMD to Uninstall Windows 11 Update
- Method 5. Roll Back Windows 11 Update with System Restore
- How to Recover Data After System Restore Windows 11 🏅
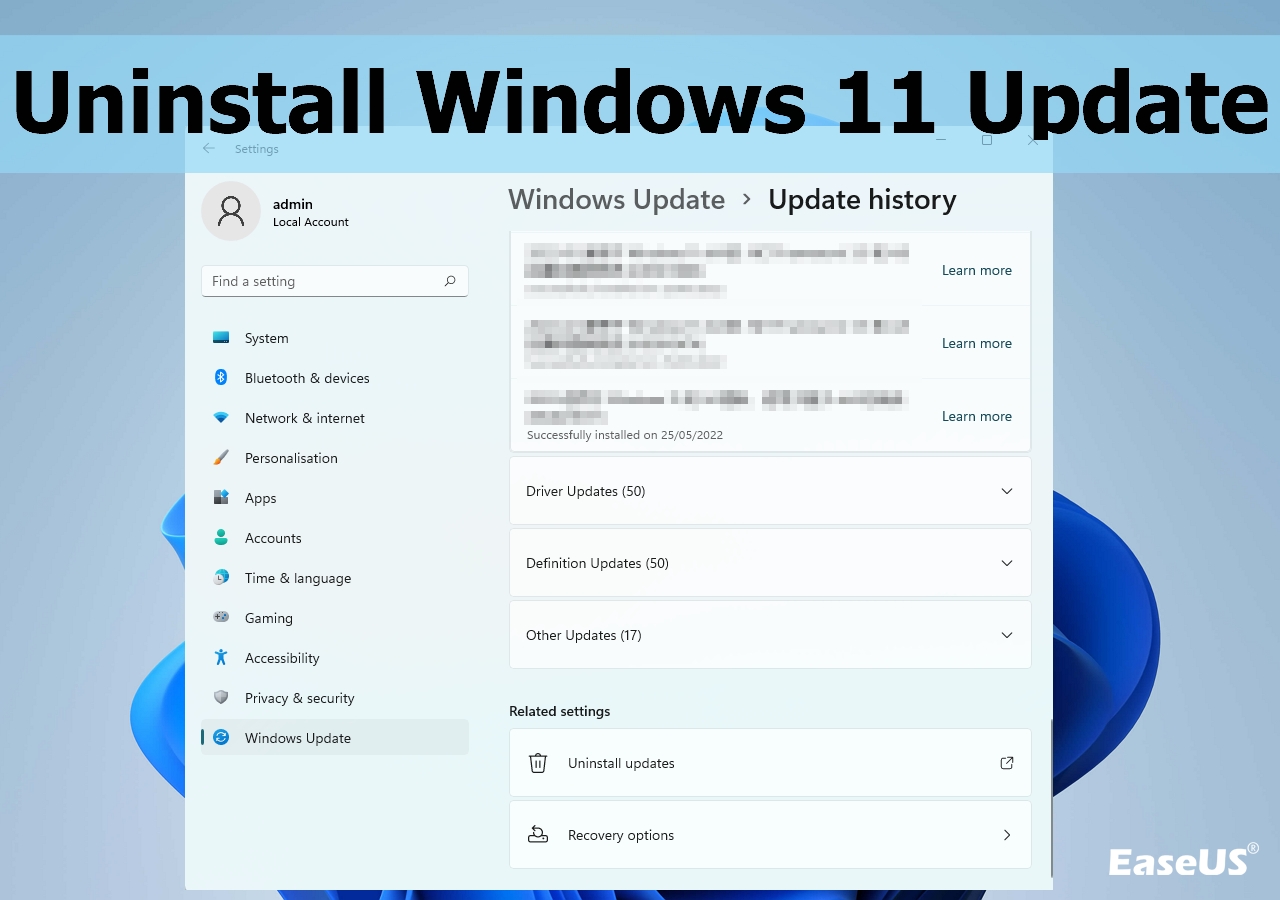
Method 1. Uninstall Windows 11 Update in Windows Settings
From the Windows updates settings menu, you can remove undesirable automatic updates installed. You must access the menu option if you want to delete any particular update from your list of downloaded updates. In Windows settings, take the following actions to delete the Windows 11 update:
Step 1. Hit the Windows + I keys to open settings.
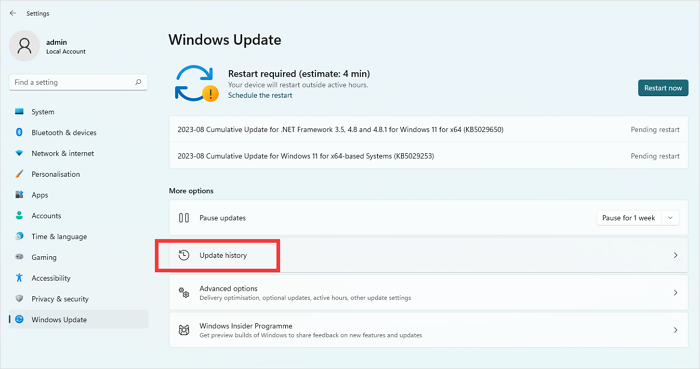
Step 2. Hit the Windows Update, which is located in the left panel.
Step 3. Opt for Update History, located on the right side, to see the update history of your Windows 11 PC.
Step 4. You can look at the list of your computer's latest Windows 11 updates. Features, excellence, driver, description, and other updates could be found. The updated version you want to remove from your system should be written down.
Step 5. You must scroll down to select uninstall updates, opt for the target update, and hit the uninstall to update from your Windows 11 PC.
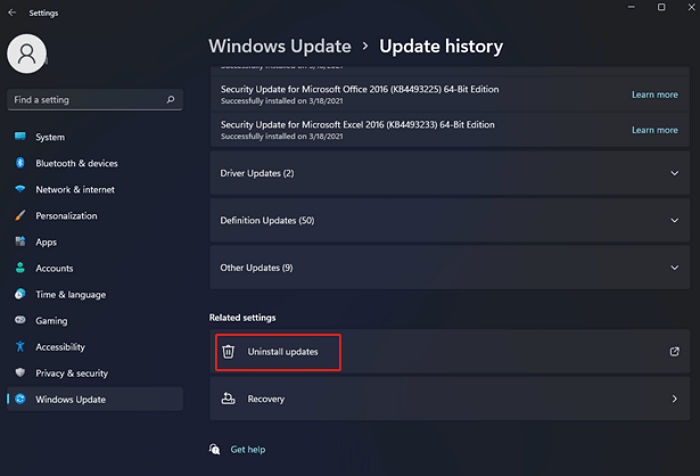
You must have understood how to uninstall Windows 11 updates. Send your friends a link to this page on social media if you find these instructions helpful.
Method 2. Uninstall Windows 11 Update in Control Panel
After downloading Windows 11 updates, you can uninstall them in the Control Panel. The steps to uninstall Windows 11 update in the Control Panel are the following:
Step 1. To access the Control Panel on Windows 11, type "control panel" in the search box and press Enter. If Windows 11 search bar is not working, you can open Control Panel in the "Run" program.

Step 2. Select "Uninstall a program," which is located under Programs.
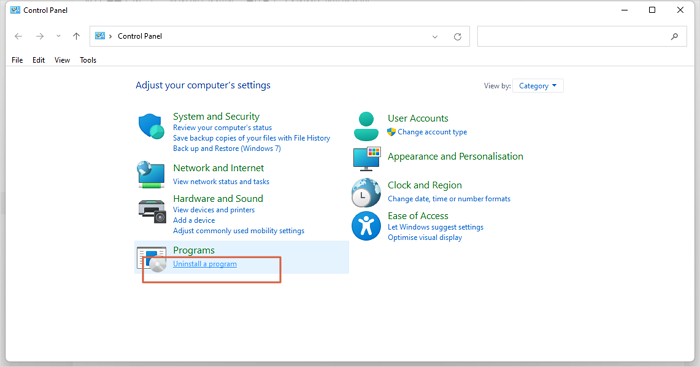
Step 3. Hit "View installed updates" in the left panel.
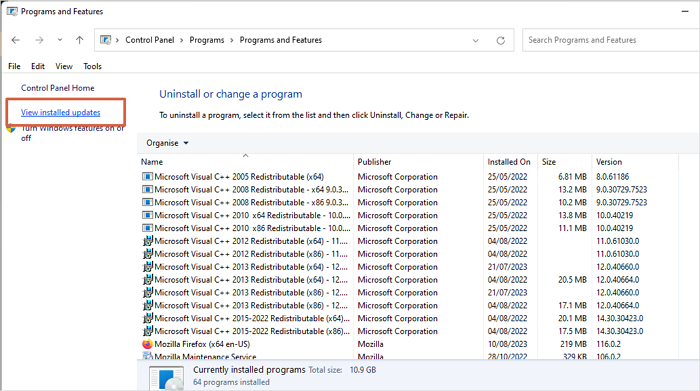
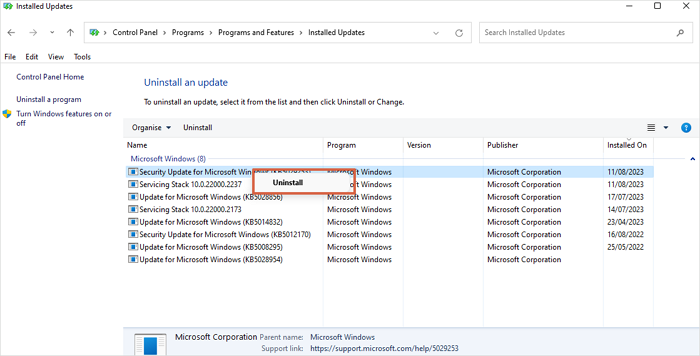
Step 4. You must look through your computer's current updates. You can delete a software update from the operating system by selecting Uninstall. To delete a specific update from your system, you can additionally use the Uninstall option found by right-clicking.
Method 3. How to Uninstall Windows 11 Updates in Windows RE
The steps to uninstall Windows 11 updates in Windows Recovery Environment are the following:
Step 1. Hit the Windows + I keys to open the Settings window.
Step 2. Click on Windows Update in the left panel.
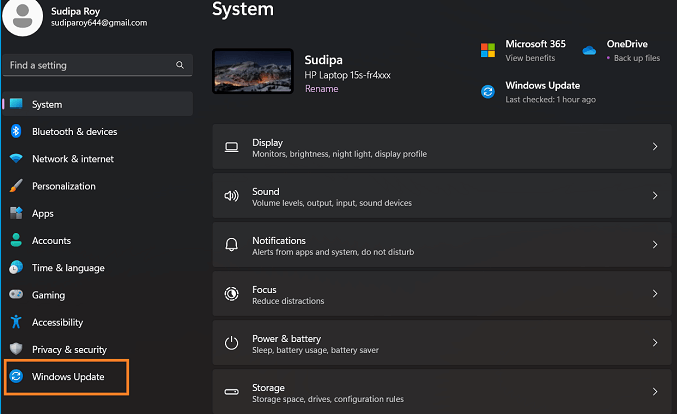
Step 3. Select Advanced options located in the right panel, and opt for Recovery.
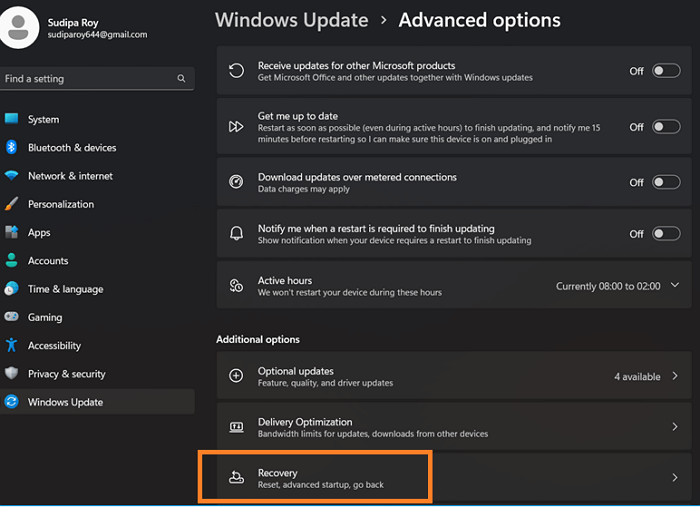
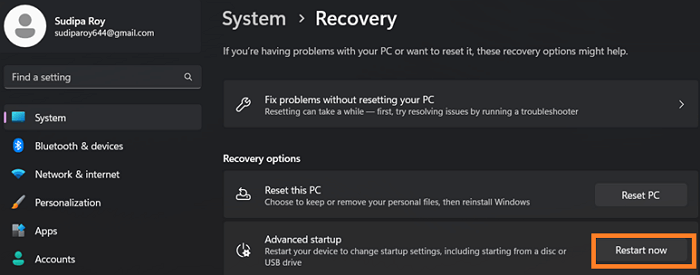
Step 4. Hit the "Restart Now" button, which is located adjacent to the Advanced Startup option. After that, your PC will reboot into the Windows Recovery Environment.
Step 5. Opt for Troubleshoot > Advanced Options, and then select uninstall updates.
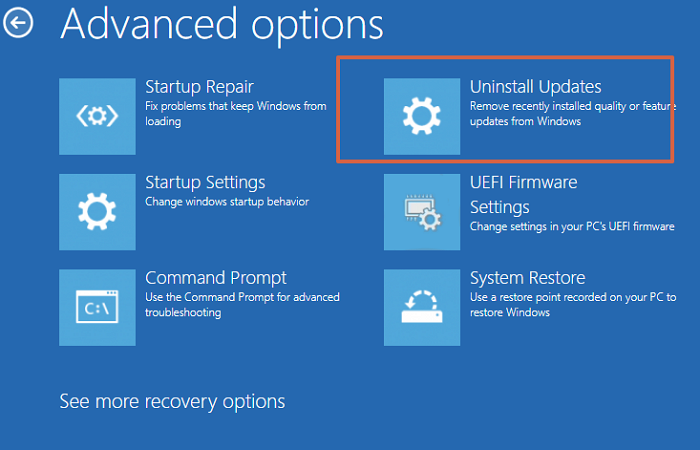
Step 6. Opt for the update type you intend to uninstall. You may opt for uninstalling the newest quality or feature update. The most recent Windows 11 update can be uninstalled in this manner.
If you like these steps mentioned here, please share this with your friends on social media.
Method 4. Use CMD to Uninstall Windows 11 Update
It's easy to uninstall Windows 11 updates with the help of a Command Prompt. So, the steps are the following:
Step 1. Go to the search bar, and type Command Prompt or CMD.
Step 2. Hit the Run as administrator to kick-start the command prompt with different administrative amenities.
Step 3. Type in wmic qfe list brief /format:table to see the update history, and hit the Enter button.

Step 4. Verify the Windows Update History of your Windows system, and find out the update by its InstalledOn and HotFixID information.
Step 5. Eliminate the most-wanted update from cmd by using this command: wusa /uninstall /kb:Number. To replace "number" with the update's KB number, you can type this: wusa /uninstall /kb:5005635.
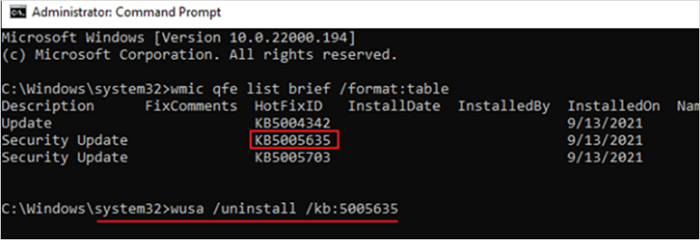
Step 6. Your screen will display a confirmation window asking you to approve the action. Choose Yes to move forward.
Step 7. Restart your PC once the uninstallation is over.
Command Prompt can do many things, including deleting files and folders on Windows 11. You can check the following passage to learn the command lines:

How to Use CMD Delete File/Folder
We will teach you how to use Windows cmd to delete files and folders with two command lines in this passage. Read more >>
Method 5. Roll Back Windows 11 Update with System Restore
If you've established any system restore points, you may perform a system restore to restore the computer to an earlier date. Follow the steps below:
Step 1. Hit the Windows + S keys to activate the search box.
Step 2. Type Create a restore point, and select Create a restore point.
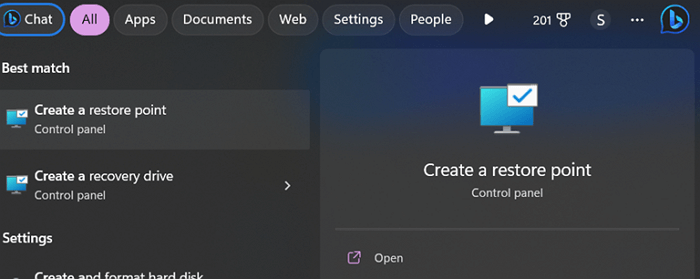
Step 3. You may hit the system restore button under the system protection tab to opt for a system restore point, and your Windows 11 computer can be restored to a prior state by following the on-screen directions.
How to Recover Data After System Restore Windows 11
Have you lost your precious data while uninstalling Windows 11 and returning to Windows 10? We will provide a simple method to recover deleted files from Windows 11 or from another storage device.
A reputable data restoration software for Windows is called EaseUS Data Recovery Wizard. This software makes it straightforward to get back data. This data recovery tool can swiftly recover shift deleted files from Windows 11 or damaged data from an SD or memory card, Windows-based laptop or computer, USB storage drive, external hard drive, SSD, etc., including images, movies, and other multimedia types.
Numerous data loss scenarios, such as system failures, malware/virus dissemination, hard drive failure, and other technological problems, can be managed with its assistance. Recover files after factory resetting Windows 11 is also possible. You can use this powerful tool to recover data after System Restoring Windows 11 or reinstalling Windows 11.
Download this professional data recovery tool today and recover lost data on Windows 11:
Note: To guarantee a high data recovery chance, install EaseUS data recovery software on another disk instead of the original disk where you lost files.
Step 1. Launch EaseUS Data Recovery Wizard on your Windows 11, Windows 10, Windows 8, or Windows 7 computer. Select the disk partition or storage location where you lost data and click "Search for Lost Data".

Step 2. This recovery software will start scanning the disk to find all lost and deleted files. When the scan process completes, click "Filter" > "Type" to specify lost file types. If you remember the file name, you can also search in the search box, which is the fastest way to find the target file.

Step 3. Preview and restore lost Windows files. You can double-click to preview the scanned files. Then, select the target data and click the "Recover" button to save them to another safe spot in the PC or Cloud drive.

If you found this software safe and easy to use, you can click the following buttons to share the page on Twitter or Facebook.
To Wrap Up
It can be seen that uninstalling updates on Windows 11 are relatively straightforward. If you experience any problems with updates, be prepared to give one of our remedies a shot. With these hassle-free methods, you can quickly uninstall Windows 11 and roll it back to Windows 10.
The ability to restore Windows 10 is accessible, but only for ten days. You must download the newest version if you cannot utilize a different version. A fresh installation is always possible, but ensure you have backed up all your data first. Download EaseUS Data Recovery Wizard to get back all the deleted data and back up other data.
Uninstall Windows 11 Update FAQs
Consider the below-mentioned FAQs to understand the topic a better way:
1. How to uninstall Windows 11 updates and downgrade to Windows 10?
Follow the steps below to downgrade Windows 11 to 10:
- Hit the start button on Windows 11.
- Look for Settings or hit Windows + I to open Settings.
- Hit the System.
- Select the Recovery page located on the right side of the screen.
- Select the "Go Back" button, which is located under the Recovery Options.
- Opt for the reason for uninstalling Windows 11.
2. Will uninstalling Windows 11 lose data?
Once you uninstall Windows 11, you may have to install some applications and lose some configured settings. Data loss is another common scenario while uninstalling Windows 11. If you want to regain the lost files, downloading EaseUS Data Recovery Wizard will be very helpful.
3. Can Windows 11 updates be rolled back?
Within 10 days of installing the latest build, Windows 11 automatically allows you to revert to an earlier release or version. You can nevertheless prolong the 10-day Windows 11 rewind period to a maximum of 30 or 60 days if you wish to test the most recent release for an extended period before making a final choice.
4. How to uninstall Windows 11 update 22h2?
Follow the steps below to uninstall Windows 11 update 22H2:
- Navigate to System > Recovery
- Hit the Go Back button, which is located under the Recovery Options section.
- Opt for the reason for uninstalling Windows 11 2022 Update, and hit the Next to proceed.
- Hit the No button when you're asked to search for the updates again.
Was this page helpful?
-
Dany is an editor of EaseUS who lives and works in Chengdu, China. She focuses on writing articles about data recovery on Mac devices and PCs. She is devoted to improving her writing skills and enriching her professional knowledge. Dany also enjoys reading detective novels in her spare time. …

20+
Years of experience

160+
Countries and regions

72 Million+
Downloads

4.9 +
Trustpilot Score


Free Data
Recovery Software
Recover data up to 2GB for free!


