Start Your Free Trial!
Sign up to our newsletter, stay updated on news and exclusive offers from EaseUS. Don't worry, if you change your mind, you can unsubscribe at any time, free of charge. We value your privacy (Privacy Policy).
Sherly updated on Mar 14, 2025 | Home >Computer Instruction
Digital security is more important than ever, and Microsoft recently made a bold move with Windows 11 24H2. BitLocker, its full-disk encryption feature, will be enabled by default in the upcoming Windows 11 24H2 update.
While this security enhancement offers benefits, it may also have unintended consequences. It has been documented that this feature decreases SSD performance and overall system speed.
Since Windows 11 24H2 enables BitLocker by default, deactivating it can be tricky for unfamiliar users. This guide from EaseUS will walk you through the steps to turn off this utility so you can retain complete control over your system.
While you may want to utilize this feature for security reasons, knowing the procedure to deactivate it is still essential. As Windows 11 24H2 enables BitLocker by default, it can become troublesome in many situations. Outlined below are the top 7 methods to turn off BitLocker on your computer to decrypt your data:
Before diving into the manual steps of disabling BitLocker, you will find a more convenient solution available. EaseUS Partition Master provides an excellent alternative to handle this task with ease, making the process simpler and faster. It is a powerful partition management tool designed to simplify tasks like resizing partitions and formatting drives. While Windows 11 24H2 enables BitLocker by default, it can be turned off with one click via this tool.
You will need your BitLocker recovery key or password for the quick process to disable it. However, this versatile tool can still disable this encryption feature even if you've forgotten the key or password. With its advanced capabilities, it offers an efficient solution for anyone looking to manage their disk partitions while disabling BitLocker encryption.
Employ the instructions described below to decrypt your hard drive when you have forgotten the BitLocker security key:
Step 1. Run EaseUS Partition Master, right-click the hard drive partition you intend to format and choose "Format".
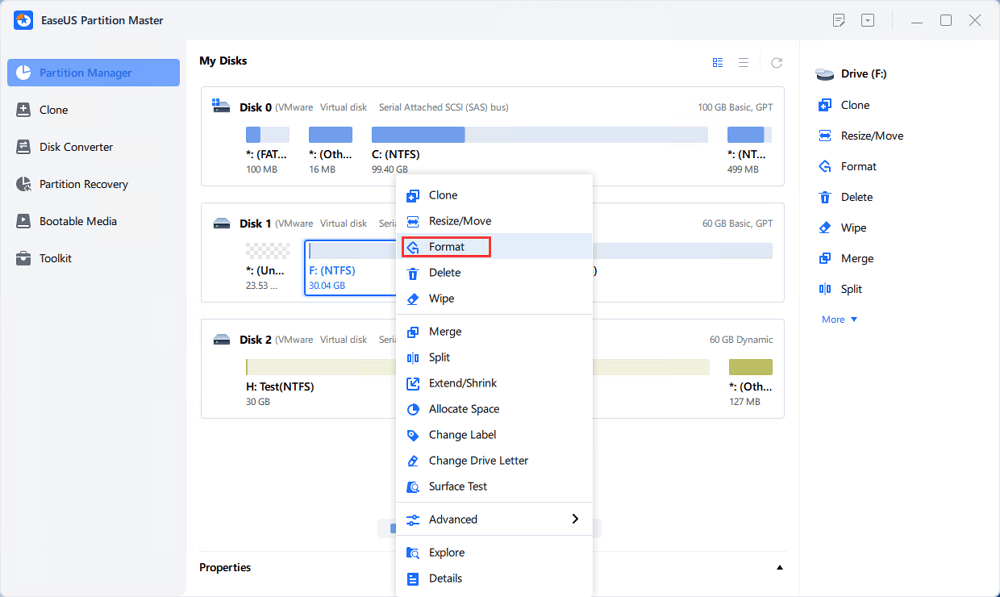
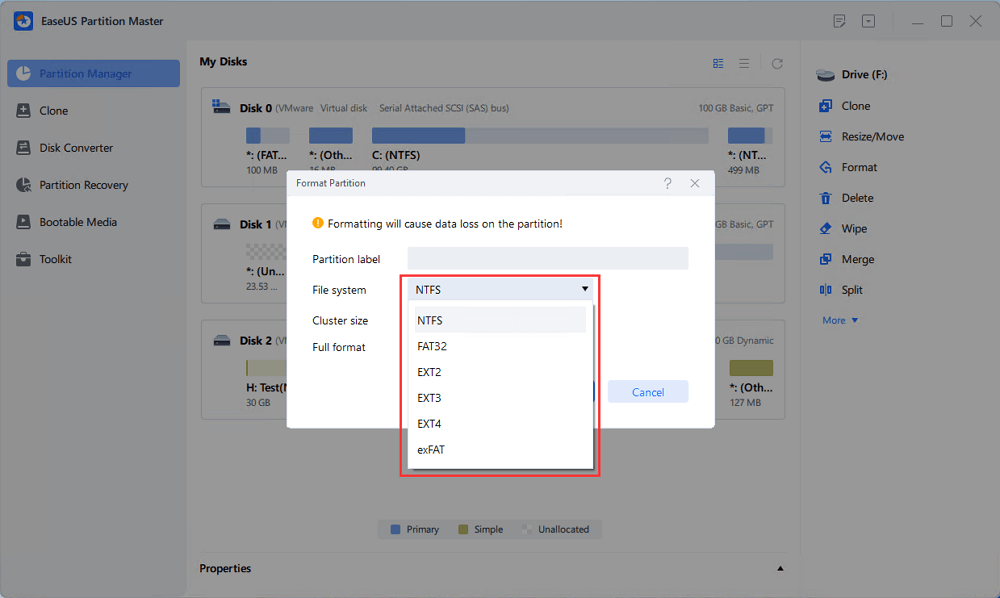
Step 2. In the new window, set the Partition label, File system (NTFS/FAT32/EXT2/EXT3/EXT4/exFAT), and Cluster size for the partition to be formatted, then click "OK".
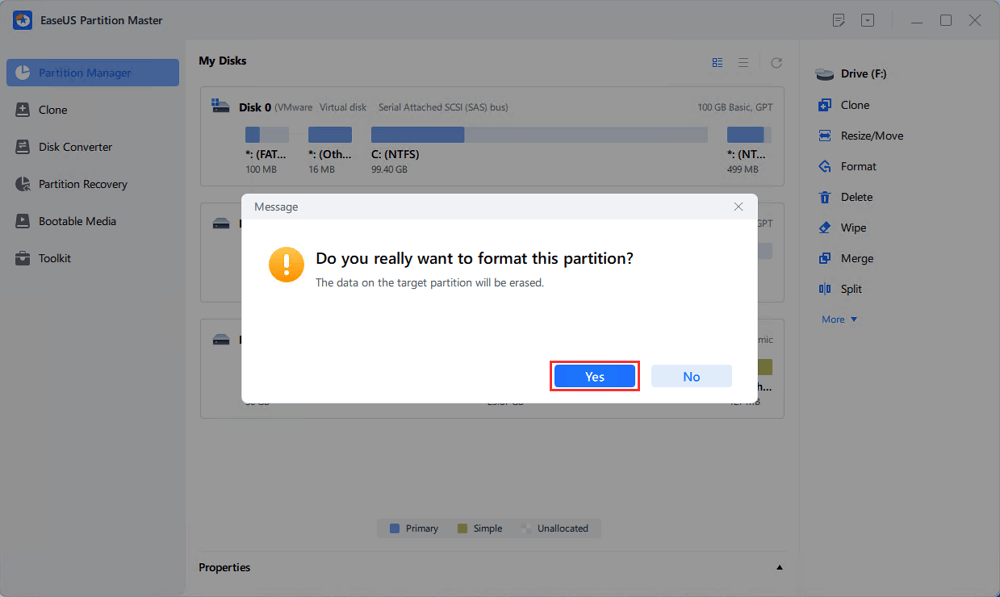
Step 3. Then you will see a warning window, click "Yes" in it to continue.
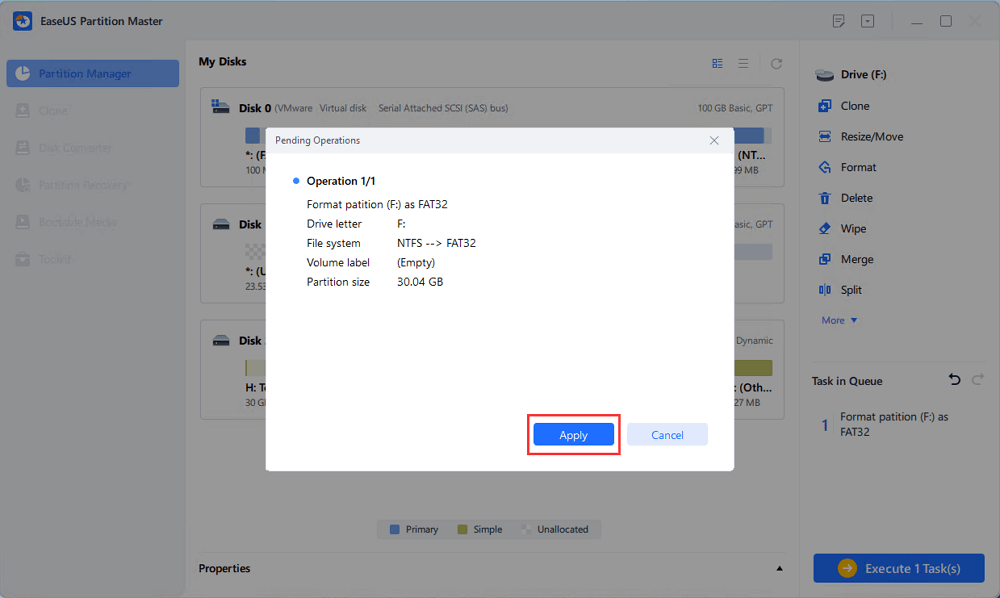
Step 4. Click the "Execute 1 Task(s)" button to review the changes, then click "Apply" to start formatting the partition on your hard drive.
Utilize the following guidelines to disable BitLocker when you have access to its security credentials:
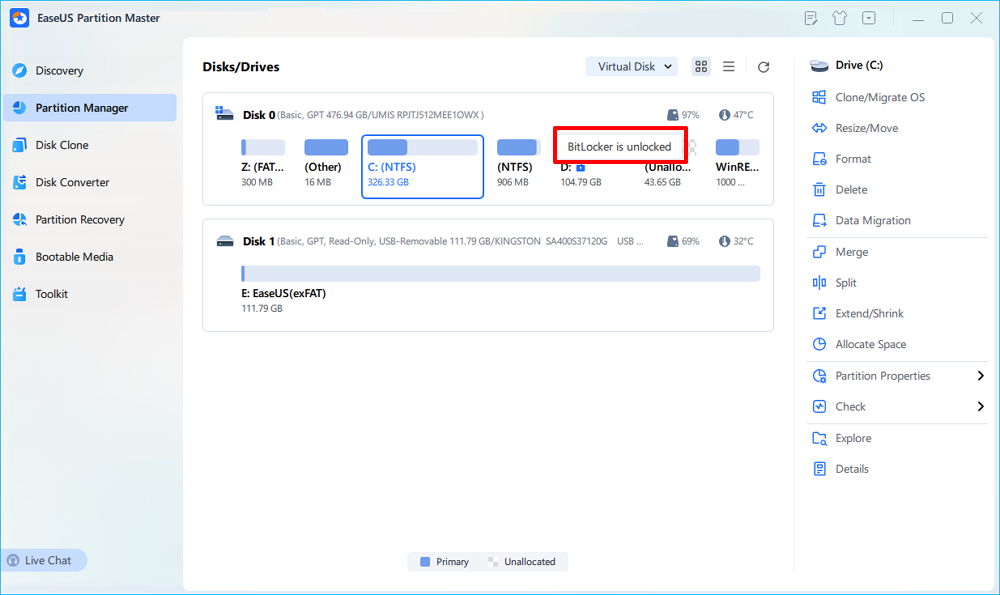
Step 1. Go to the partition manager section and select the BitLocker encrypted drive.
Step 2. Click the "Lock" icon on the top right corner of the window. Type the BitLocker recovery key, and you can unlock it.
It is clear that EaseUS Partition Master is the right choice for disabling BitLocker on Windows 11. Download this robust disk management software to eliminate all problems associated with your hard drives. It can format a BitLocker partition or clone a BitLocker partition.
Depending on your circumstances, many built-in Windows tools can also help you deactivate this feature. The first way we will discuss this is by using the Control Panel to access BitLocker management and turning it off. You can follow the straightforward steps given below to decrypt your locked data on your computer:
Step 1. Begin by utilizing the Windows search bar to look for "Manage BitLocker" and "Open" it once it appears in the results. Now, approach the drive whose encryption is the problem and tap "Turn off BitLocker" to proceed.
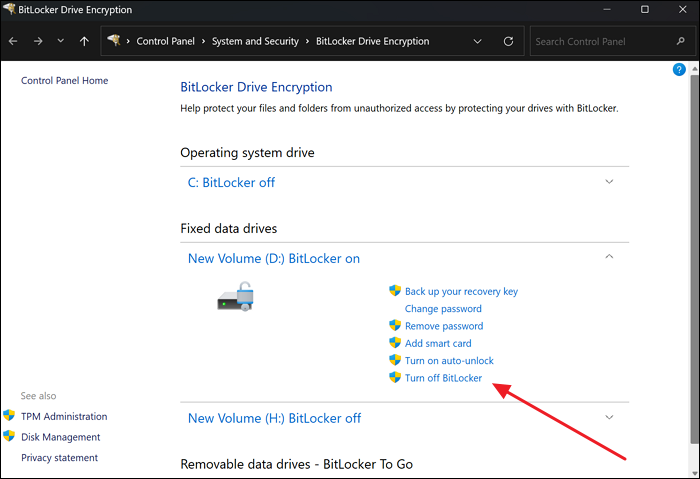
Step 2. You will now be required to provide the key, which can be accessed from the Microsoft site by matching the "Key ID." After pressing "Unlock" to unlock the drive, utilize the "Turn off BitLocker" option to have this utility deactivated.
Share this post and let more users know how to disable Bitlocker in Windows 11 24H2.
For those who prefer a more hands-on approach, the CMD offers an efficient way to disable BitLocker through commands. This method is particularly useful for advanced users or those who want complete control over the process. Windows 11 24H2 enables BitLocker by default, and you can turn it off using a few simple commands. Below are steps to quickly turn off Bitlocker in cmd:
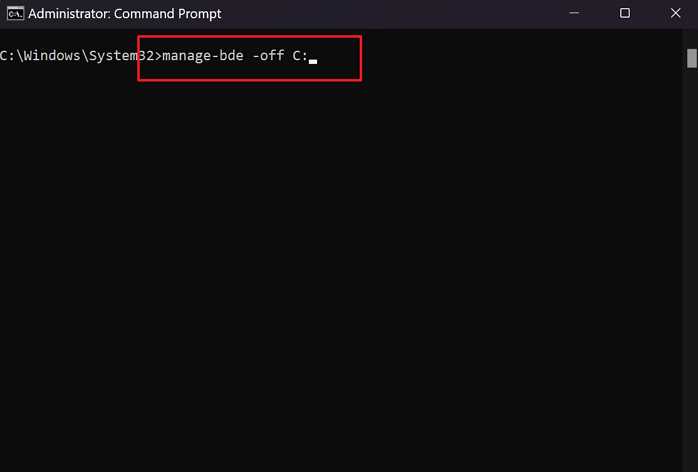
Step 1. You can initiate the process by searching for "CMD" in the search and launching it with admin powers via "Run as administrator." Now, check the status of hard drive encryption by executing the "manage-bde -status" command in Command Prompt.
Step 2. The result will show the encrypted drive as "Fully Encrypted" within "Conversion Status." To disable the BitLocker function from the drive, run the command "manage-bde -off C:" by replacing "C:" with the targeted disk letter.
For users familiar with scripting and automation, this utility provides another efficient method to disable BitLocker. PowerShell's versatility allows you to manage encryption through simple commands. That makes it an excellent option for those who prefer working with code. Utilize the following guide if you need to disable BitLocker in no time:
Step 1. To launch PowerShell on your Windows 11, right-click the Start menu and choose "Terminal (Admin)." Once it is open, run the command "Get-BitLockerVolume" to view which drive is encrypted under "Volume Status."
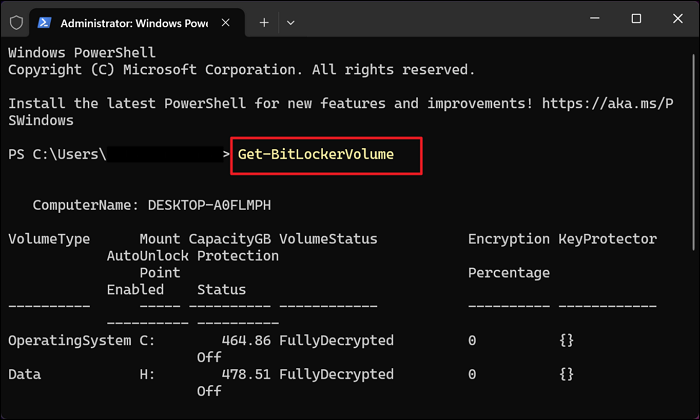
Step 2. After identifying the targeted drive, execute the instruction "Disable-BitLocker -MountPoint "E:" by substituting "E:" with the letter of the encrypted drive. This will deactivate BitLocker and allow you to access your drive data without issues.
Another method for disabling BitLocker involves using the Local Group Policy Editor, which allows you to manage system settings at a more advanced level. This method is ideal for users who want to disable BitLocker across an entire organization or for multiple devices, as Windows 11 24H2 enables BitLocker by default. You can modify the Group Policy via these steps to avoid manually decrypting data on each device:
Step 1. Kickstart the operation by typing "gpedit.msc" in the Windows Run function to launch this Windows utility. Now, approach "Computer Configuration" to get into "Administrative Templates" and opt for "Windows Components."
Step 2. Within this tap, open "BitLocker Drive Encryption" to access "Operating System Drives" and double-click "Require additional authentication at startup." Once the policy opens, select "Disabled" and click "OK" to stop BitLocker from starting at booting.
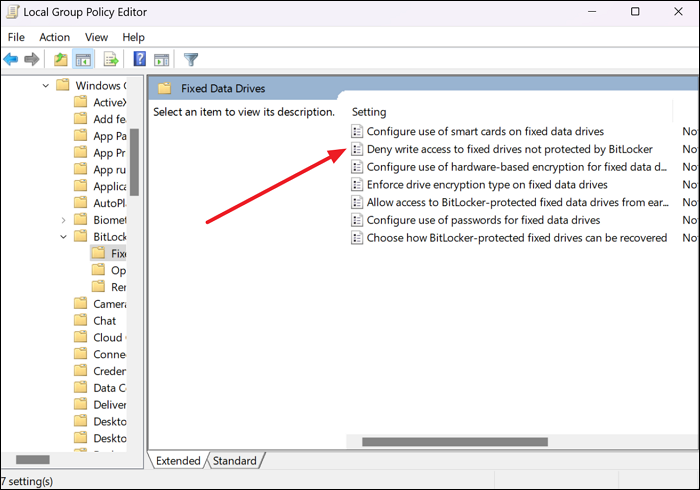
Step 3. Now, move back to the "BitLocker Drive Encryption" folder and open "Fixed Data Drives." Here, double-click the "Deny write access to fixed drives not protected by BitLocker" policy and set it to "Disabled." You will need to reboot the system to allow the changes in Local Group Policy Editor to take effect.
When looking for a way to disable BitLocker without navigating through various settings, managing it via Windows Services offers a more direct approach. By turning off the relevant services, you can prevent BitLocker from functioning and deactivate it across your system. This method is particularly useful for users who prefer to manage Windows components at the service level using the following instructions:
Step 1. As you launch the Run dialogue box on your Windows 11 via the "Win + R" keys, you type "services.msc" to open the Windows Services tab. Now, scroll through the list to find "BitLocker Drive Encryption Service" and right-click it.
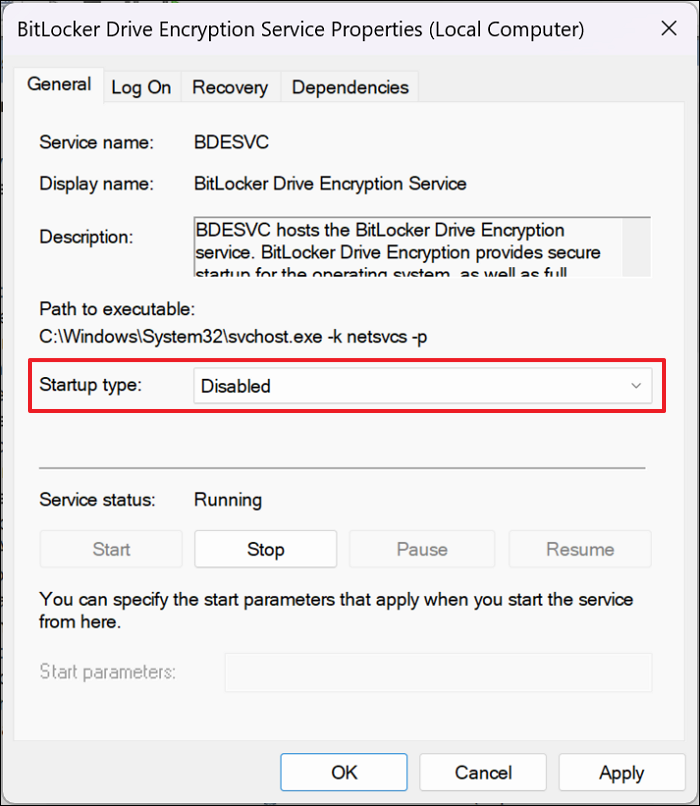
Step 2. From the pop-up context menu, choose "Properties" and access the "Startup type" option in the "General" tab. Here, choose "Disabled" from the available options and hit "OK" to permanently deactivate BitLocker on your computer.
You can also disable BitLocker through System Configuration, which allows you to control startup services and boot options. Using this method, you can prevent this feature from running on your system by adjusting its startup settings. Employ the following steps to turn off this security feature during system boot when Windows 11 24H2 enables BitLocker by default:
Step 1. On your computer, utilize the "Win + R" key combination to start the Run function and type "msconfig" to launch the System Configuration window. Here, navigate to the "Services" tab and uncheck the box next to the "BitLocker Drive Encryption Service" option.
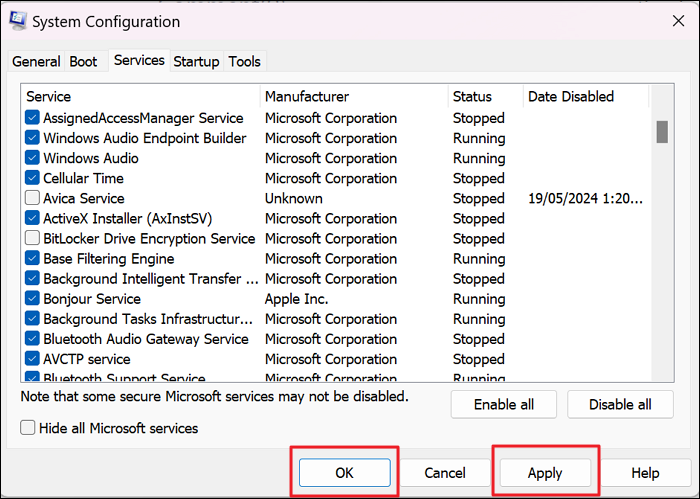
Step 2. Following this, click "Apply" to implement the change and tap "OK" to confirm it. Later, restart your system to stop BitLocker from activating again on your device.
In summary, Windows 11 24H2 enables BitLocker by default to enhance data security. However, it may not be necessary for every user because it considerably slows system performance. We've explored various methods to disable BitLocker, including using EaseUS Partition Master and many built-in Windows tools. Each method offers a different approach depending on your needs and comfort level with technology.
Among these options, EaseUS Partition Master stands out as a particularly convenient solution. It simplifies the process of disabling BitLocker and allows you to easily manage your encryption settings.
Having queries about the changes brought by the latest update on your system is a common occurrence. Expressed below are answers to the questions you have when Windows 11 24H2 enables BitLocker by default:
1. Is BitLocker encryption turned on by default on Windows 11 24H2?
This change does occur after the upgrade and is part of Microsoft's ongoing efforts to enhance security. It has been done to protect drive content from unauthorized access. The default activation of BitLocker ensures that your data is encrypted and secure on devices that might be prone to loss or theft.
2. Why is BitLocker automatically enabled?
The reason behind this is to provide an extra security layer by encrypting your drives. It helps protect sensitive information from being accessed if your device is lost. The automatic activation is designed to enhance overall system security and improve user data protection.
3. How do I disable Bitlocker on Windows 11 24H2?
These are the instructions you need to follow to decrypt your hard drive after the latest update:
1. You will need to launch Windows Settings via the "Win + I" keys and navigate to the "System" tab. Here, access the "Storage" tab to open up the "Disk & Volumes" options to proceed.
2. Within these options, find the target drive and double-click the "Properties" option right next to it. On the subsequent screen, opt for "Turn off BitLocker" under the "BitLocker" section to disable this utility.
Was This Page Helpful?
Roxanne is one of the main contributors to EaseUS and has created over 200 posts that help users solve multiple issues and failures on digital devices like PCs, Mobile phones, tablets, and Macs. She loves to share ideas with people of the same interests.
Sherly joined EaseUS in 2022 and she has always loved writing articles and enjoys the fun they bring. She receives professional training here, focusing on product performance and other relative knowledge. She has written over 200 articles to help people overcome computing issues.
Related Articles
Samsung 990 EVO vs 980 Pro: Which SSD to Buy?
![]() Jerry/2025-01-24
Jerry/2025-01-24
Detailed Guides to Fix FIFA 23 Career Mode Not Saving
![]() Rel/2025-01-24
Rel/2025-01-24
How to Reinstall macOS in 3 Methods [ Ventura/Monterey/Big Sur Available ]
![]() Jaden/2025-02-25
Jaden/2025-02-25
How to Upgrade to macOS 14 [macOS Sonoma]
![]() Jaden/2025-02-25
Jaden/2025-02-25
EaseUS Data Recovery Services
EaseUS data recovery experts have uneaqualed expertise to repair disks/systems and salvage data from all devices like RAID, HDD, SSD, USB, etc.
Copyright © 2004 - 2025 EaseUS. All rights reserved.
CHOOSE YOUR REGION
Start Your Free Trial!
Sign up to our newsletter, stay updated on news and exclusive offers from EaseUS. Don't worry, if you change your mind, you can unsubscribe at any time, free of charge. We value your privacy (Privacy Policy).
Start Your Free Trial!
Sign up to our newsletter, stay updated on news and exclusive offers from EaseUS. Don't worry, if you change your mind, you can unsubscribe at any time, free of charge. We value your privacy (Privacy Policy).