Page Table of Contents
Updated on Nov 25, 2024
The ASUS ROG Zephyrus G14 is a crisp performer. While it is already powerful, various upgrades can enhance its functionality. This article examines the ASUS ROG Zephyrus G14 SSD upgrade to expand its memory and general performance.
SSD upgrades are delicate, and you must know how to do them gently for the best outcome. We'll have a comprehensive look at the G14 SSD replacement and focus on effortlessly managing it in this EaseUS post.
Is the ASUS ROG Zephyrus G14 SSD Upgradable?
This is a common question in most forums, like Reddit, weighing on the upgradability of the Zephyrus G14 SSD.
Yes, you can improve the SSD to boost your laptop's capabilities. Many users may think the upgrade is impossible because of the laptop's slender chassis. On the contrary, the PC is highly customizable, courtesy of its highly adaptable architecture. You can upgrade your G14 SSD whenever you wish. The next sections will outline how to do that.
Preparations Before Upgrading the ASUS ROG Zephyrus G14 SSD
Before upgrading the laptop, you should ensure various elements are in order. The following are essential pre-upgrade measures to establish when working on the G14 SSD.
- 💾Get a suitable SSD: You should get an ideal SSD to replace the older one on your Zephyrus G14. The newer SSD should be compatible with the laptop and have adequate space, preferably more than the older SSD. Please ensure you get a stable drive for better performance.
- 🛠️Get the right tools for the job: Refurbing the G14's SSD requires access to its M.2 SSD slots. You need the correct tools, like a size 0 Phillips head screwdriver, an antistatic wrist wrap, and a plastic card or guitar pick.
- 📚Backup your files: You must safeguard crucial files before installing the new SSD via backups. It is an essential step in data cloning, ensuring all your files are intact. Cloud backups are the best, owing to their accessibility and safety.
- 🔍Device inspection: You should inspect your laptop to ensure everything is in order, specifically the SSD slots. All components should be in proper working condition. Otherwise, the upgrade will be useless.
- 🧩An ideal SSD cloning tool: Invest in an efficient tool to transfer data from the old SSD to the new one.
There are many cloning tools that you can try for the best experience. EaseUS Disk Copy is among the most effective, with many users lauding its lightning-fast operation. This cloning software is light, meaning it is economical on your device's space and won't affect its performance.
Its speed and stability make it perfect for cloning large files, such as entire operating systems. When cloning operating systems, like Windows 10 and 11, you don't have to reinstall them again on your device. The following are the standout elements of EaseUS Disk Copy:
- Lightning-fast cloning speeds.
- Compatible with various Windows versions and various types of HDDs and SSDs.
- It offers a safe cloning channel that prevents data loss.
- 24/7 efficient customer support.
- It can transfer large files like operating systems.
- Migrate all data from one SSD to another without any loss.
It's wise to get this cloning software for your SSD-to-SSD file transfers. Ensure you download it now, and follow the guide below to migrate all data from the old SSD to the new one.
Prior Notice:
- The "Sector by sector copy" asks the size of your destination disk to be at least equal to or larger than that of the source disk. Leave this feature unchecked if you wish to clone a larger hard disk to a smaller hard disk.
- All data on the destination disk will be completely erased, so take care.
Step 1. To start copying/cloning an entire disk to another, choose this disk as the source disk under "Disk Mode" and click "Next".
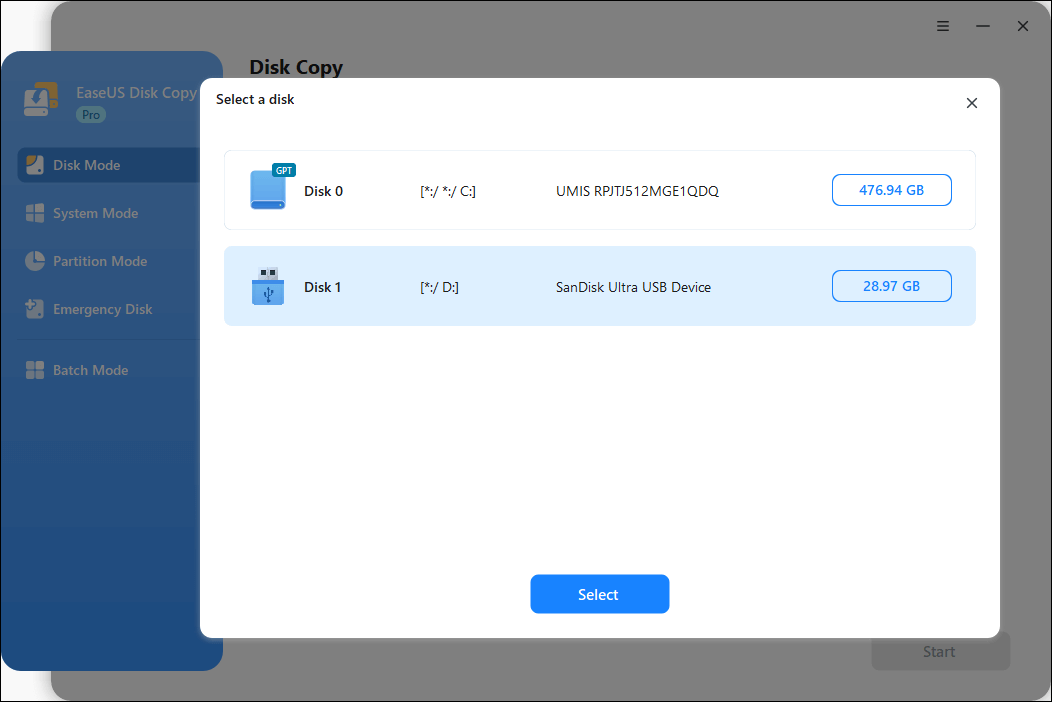
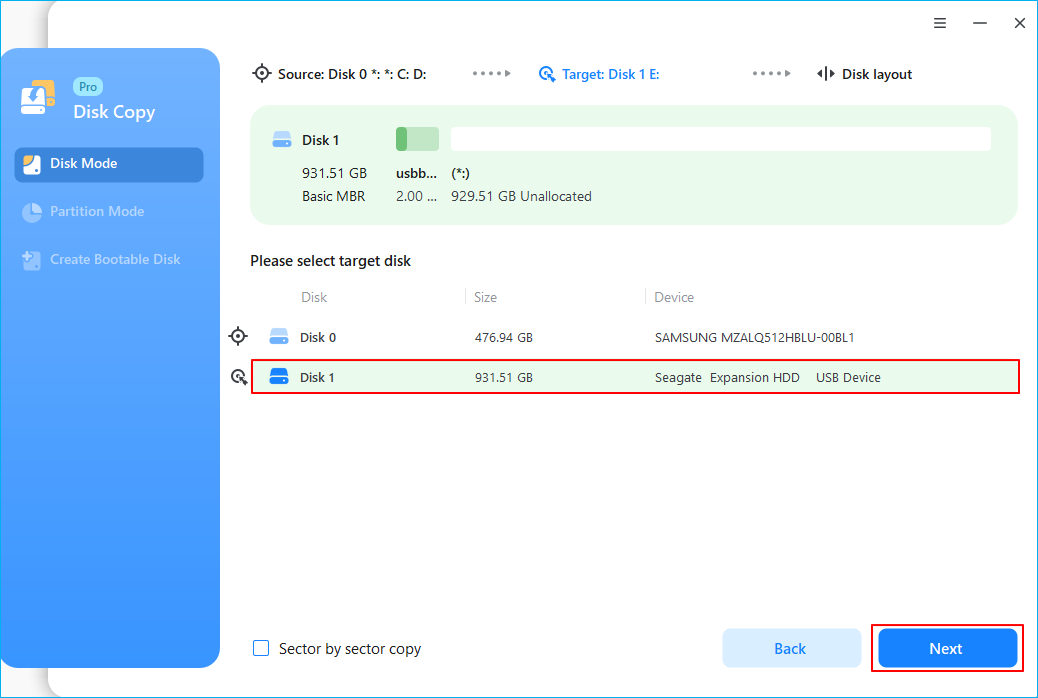
Step 2. Choose the other disk as the destination disk.
Step 3. Check the disk layout of the two disks. You can manage the disk layout of the destination disk by selecting "Autofit the disk", "Copy as the source" or "Edit disk layout".
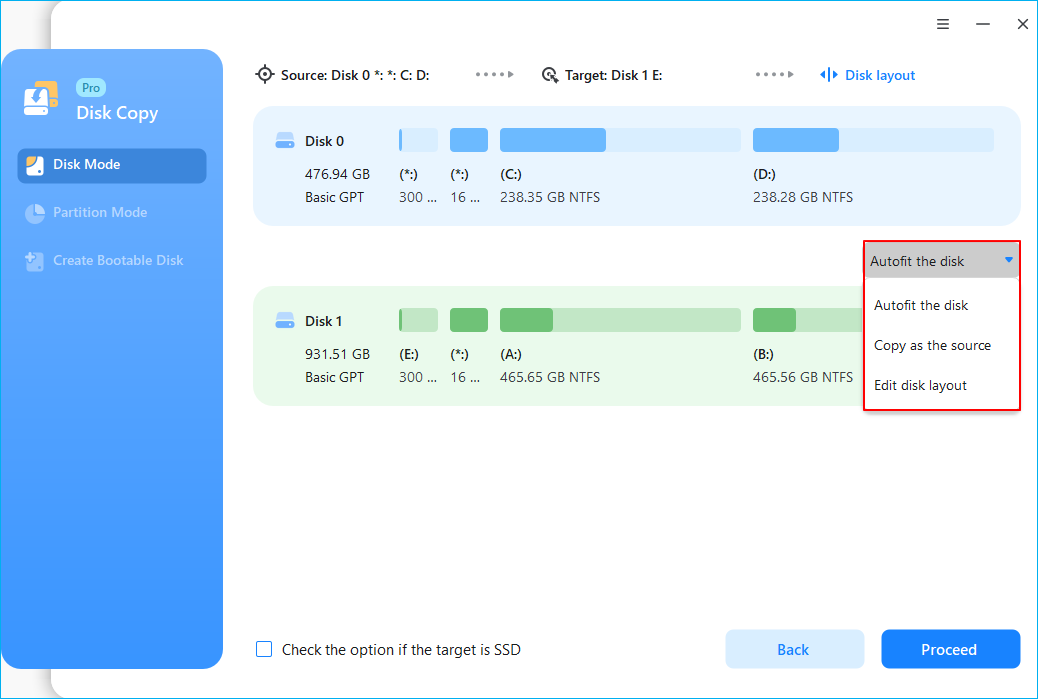
- "Autofit the disk" makes some changes by default on the destination disk layout so that it can work at its best status.
- "Copy as the source"does not change anything on destination disk and the layout is the same as source disk.
- "Edit disk layout" allows you to manually resize/move partition layout on this destination disk.
Tick the "Check the option if the target is SSD" option to put your SSD in its best performance.
A message now appears, warning you that data will be lost. Please confirm this message by clicking "OK" and then click "Next".
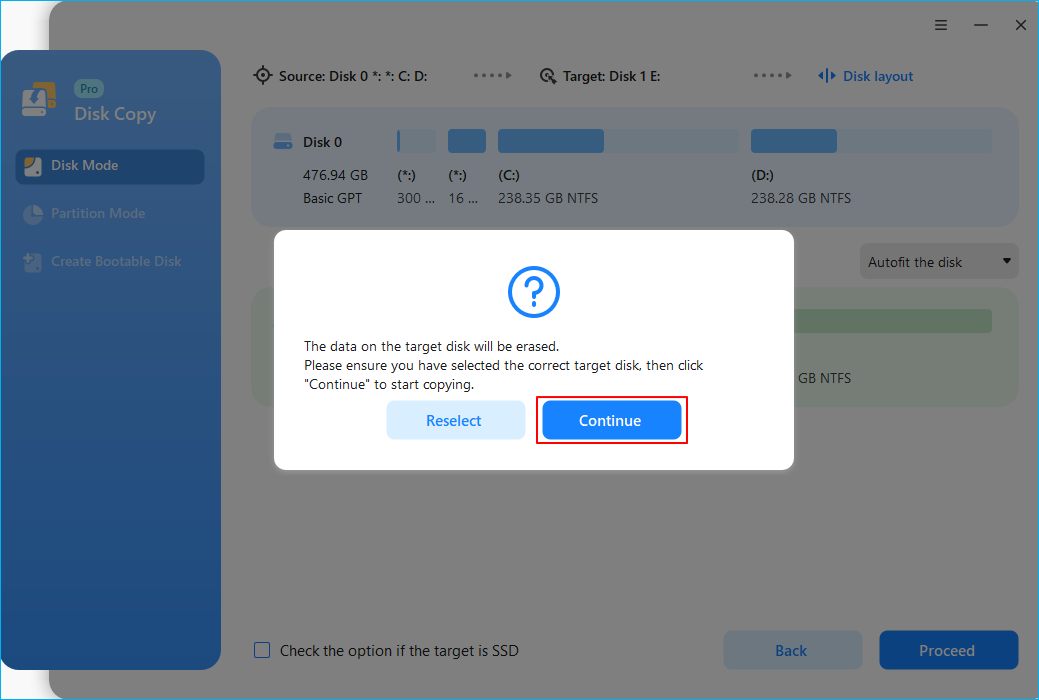
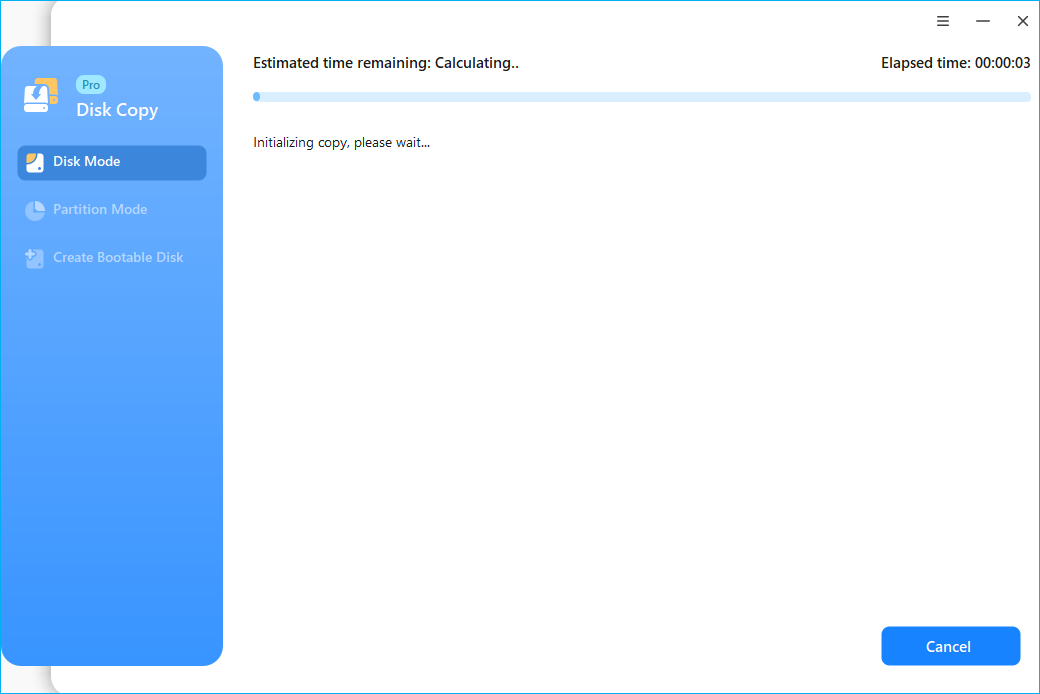
Step 4. Click "Proceed" to officially execute the task.
Share the blog on social media to help other ASUS ROG Zephyrus G14 users upgrade SSD smoothly.
How to Upgrade ROG Zephyrus SSD (No OS Reinstallation)
With all the preparation steps ticked you can delve into the ASUS ROG Zephyrus G14 SSD upgrade. Abide by the following steps for a successful hardware update.
Step 1. Turn off the laptop and remove its charger and other peripherals before working on it.
Step 2. Place the laptop on a stable and insulated surface to open its case. Use the screwdriver to unscrew the screws and place them in a safe spot. Pry the case open with a credit card or guitar pick. If possible, wear an antistatic wrist wrap for device safety while you work on it.
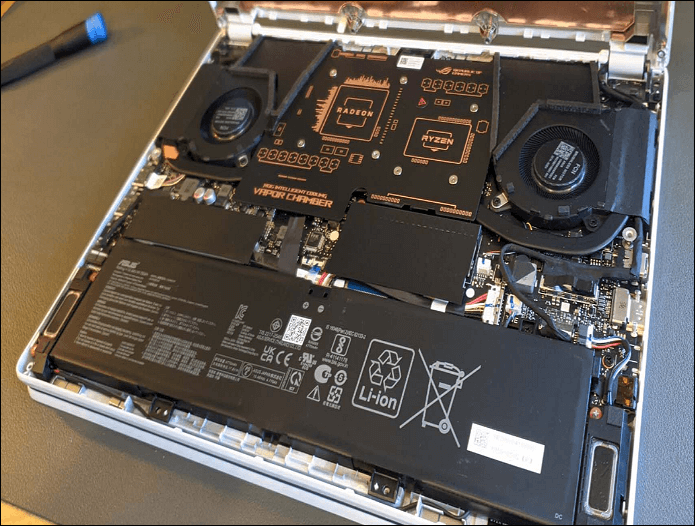
Step 3. Unplug the battery for safety. Locate its connector and gently remove it from its socket so that it is safe to access the laptop.
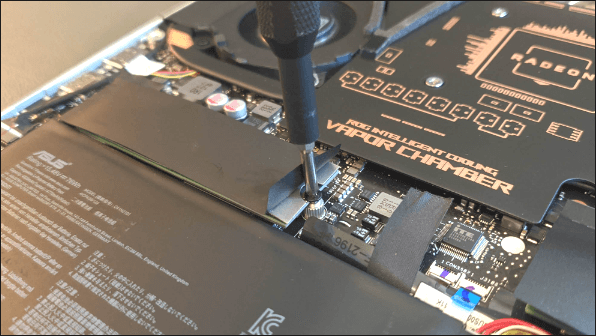
Step 4. Locate the M.2 SSD, which you will find under a long black strip. Unscrew the screws to remove the strip and gently unplug the SSD from its socket. Replace with the new SSD, and put back the screws and heat shield.
Step 5. Screw back the housing and turn on the laptop to determine whether the upgrade was successful.
How to Boot Computer from a Newly Cloned SSD
After installing a new SSD, you must boot your device to see if it works. Here are the steps to start your computer with a freshly cloned SSD.
Step 1. Turn on the laptop, and as it boots, click the recommended key to direct you to BIOS or UEFI. For ASUS, press ESC, F2 for Dell or Acer, F10 for HP, and DEL for custom PCs. You can refer to your user manual for the keys to press.
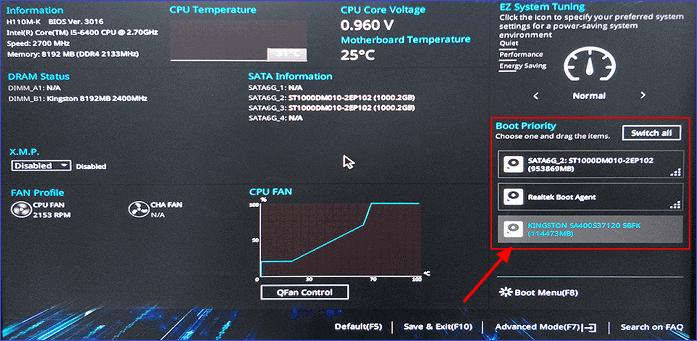
Step 2. Go to "Boot Order" settings in BIOS. Set the new SSD as the primary boot option and save the setting by clicking "Save."
Step 3. Exit and reboot your device. Your PC will now boot from the cloned SSD.
Share the blog on social media to help other ASUS ROG Zephyrus G14 users upgrade SSD smoothly.
The Bottom Line
As we finalize the discussion on the ASUS ROG Zephyrus G14 SSD upgrade, there are a few critical takeaways. First, the G14 is upgradable, contrary to what some tech pundits may think, possibly due to its slender design. The SSD upgrade is more accessible if handled with cloning software, which ensures the lossless transfer of crucial files.
EaseUS Disk Copy is an ideal cloning software that stands out due to its fast transfer speeds. It is also highly adaptable, which translates to user convenience. Download the software from its website and start with the free trial version.
FAQs About Upgrading ASUS ROG Zephyrus G14 SSD
1. Does Zephyrus G14 Have 2 SSD Slots?
The Zephyrus G14 has a single M.2 PCle x4 slot. Open the laptop's casing and unscrew the heat shield to access this slot.
2. Can I Add SSD to my ASUS ROG Laptop?
While most ASUS laptops have two SSD slots that allow you to add extra SSDs, the ROG has one slot. You can only replace the SSD with a larger one to improve your device's performance.
3. How to Install SSD Zephyrus G14?
Installing an SSD on your Zephyrus G14 is a critical step towards enhancing its functionality. The following are the steps for this hardware upgrade.
- Step 1. Gather necessary tools, primarily a size 0 Phillips head screwdriver, an antistatic wrist wrap, a container for screws, and a plastic card to pry the casing open.
- Step 2. Unscrew all the screws save for the one that holds everything together. Use the card to open the housing. Make sure you disconnect the charger and other accessories like USB cables. Furthermore, work on an insulated surface to prevent static electricity damage.
- Step 3. Locate the SSD slot, remove the old SSD, and fix the new one. Screw back the M.2 slot screw and put the housing back.
- Step 4. Turn on your laptop and go to the BIOS setup to set the new SSD as the boot device.
Was this page helpful? Your support is truly important to us!

EaseUS Disk Copy
EaseUS Disk Copy is a well designed and very easy-to-use HDD/SSD cloning and migration tool, a tool which should be ideal for anyone wanting to quickly and easily migrate an existing system disk to a new disk (or newly installed SSD drive) with the minimal of configuration required.
-
Updated by
![]()
Larissa
Larissa has rich experience in writing technical articles and is now a professional editor at EaseUS. She is good at writing articles about data recovery, disk cloning, disk partitioning, data backup, and other related knowledge. Her detailed and ultimate guides help users find effective solutions to their problems. She is fond of traveling, reading, and riding in her spare time.…Read full bio
Related Articles
![]() Clone SATA to NVMe Won't Boot - Causes and Fixes👩🔧
Clone SATA to NVMe Won't Boot - Causes and Fixes👩🔧![]() How to Transfer Data/Files from One SSD to Another Without Losing Data
How to Transfer Data/Files from One SSD to Another Without Losing Data![]() Can Clonezilla Clone to Larger Drive? See How to Do!
Can Clonezilla Clone to Larger Drive? See How to Do!![]() How to Clone NVMe SSD with Only One Slot on Windows 11/10/8/7
How to Clone NVMe SSD with Only One Slot on Windows 11/10/8/7![]() (2024 Tips) Replace Hard Drive with SSD Without Reinstalling Windows
(2024 Tips) Replace Hard Drive with SSD Without Reinstalling Windows![]() How to Clone Windows 10 to SSD Without Software
How to Clone Windows 10 to SSD Without Software


EaseUS Disk Copy

Dedicated cloning tool to meet all your system, disk, and partition clone needs.
Popular Posts


Interesting Topics