Page Table of Contents
- ✋Post Quoted from Lenovo Forums :
- "Hello, everyone. My storage is running low, so I plan to install another SSD since my laptop only supports two slots of PCIe NVMe, one is 2242, and the other is 2280. So I want to ask if it's okay to use an m2.2242 with SATA 3. I read somewhere that this model doesn't support SATA SSD, so I'm kind of lost here."
When storage is running low, one may want to install a second SSD. But the laptop only has two M.2 slots: 2280 and 2242. Now, the Lenovo IdeaPad is one of the best devices for productivity or general use.
That's why some people may want to upgrade Lenovo SSDs and wish to understand the process of Lenovo IdeaPad Gaming 3 SSD upgrade. Now, it's important to note that it supports one of each 2280 and 2242 M.2 drives.
Is It Possible to Upgrade SSD for Lenovo IdeaPad Gaming 3
The answer is YES. You can upgrade the SSD of Lenovo IdeaPad Gaming 3 for a better performance. There are two things you can upgrade about Lenovo IdeaPad 3: RAM and SSD. It has two RAM slots and two M.2 slots, and the user can upgrade to newer or better RAMs or SSDs if they wish.
The 2280 M.2 SSD is what most refer to as an NVME SSD storage nowadays, as it only has an M key connector. In contrast, the 2242 SSD looks the same but is quite smaller in size. If you want to upgrade your SSD for a larger storage capacity or better performance, keep reading and find your answer in the following content!
| 🎯Key Takeaways: How to Upgrade Lenovo IdeaPad 3 Gaming SSD |
|
For detailed instructions, you can refer to the following text.
What to Prepare Before Upgrading Lenovo IdeaPad Gaming 3 SSD
Since we know that the user will have to replace an existing M.2 then they would have to take care of a few things, so let's talk about a checklist and to-do things before upgrading the Lenovo IdeaPad Gaming 3 SSD:
- Watch videos regarding opening the laptop housing
- Find the right SSD model for supported M.2 2280 and 2242 slots
- Focus on creating Windows backups and use viable software to do so
- Find or buy an opening pick (preferably made out of rubber or plastic)
- Find methods to migrate Windows to SSD - if you don't wish to reinstall Windows and other utilities
- Prepare a cleaning cloth, brush, and a screwdriver set to open the laptop properly
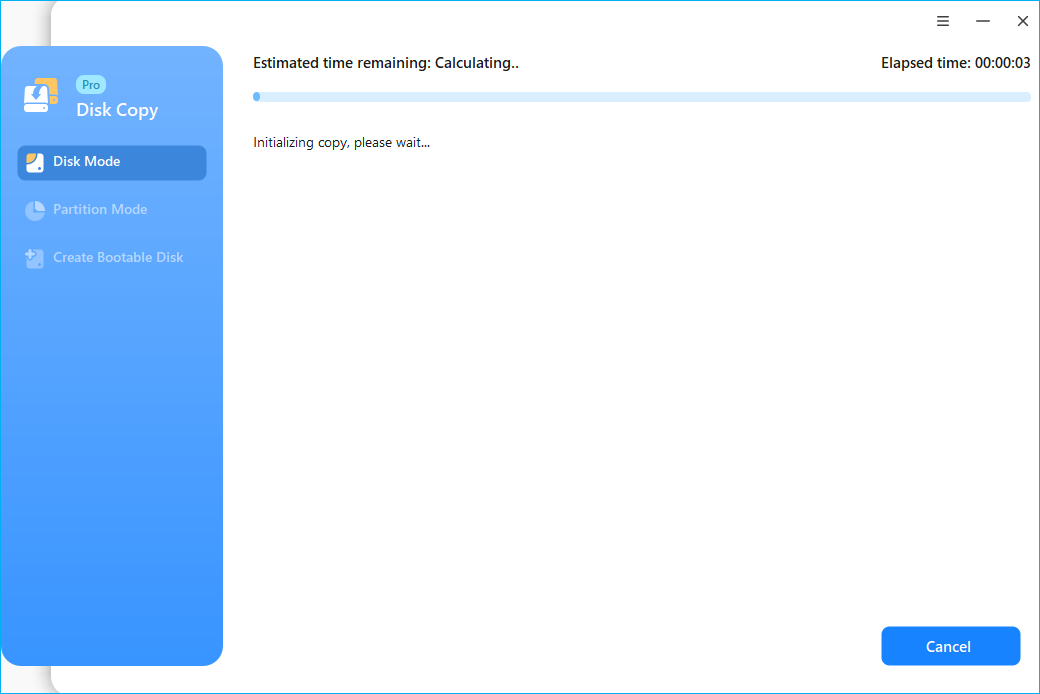
Download it on your Lenovo IdeaPad 3 and perform an SSD cloning with the following steps before the SSD upgrade.
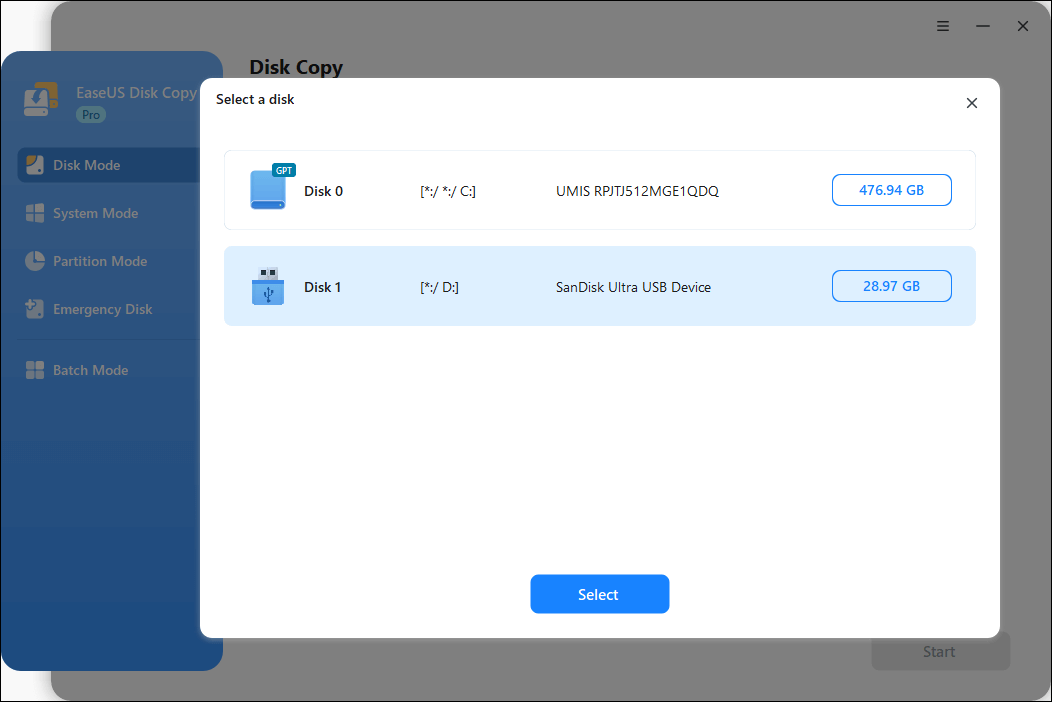
Here is what you should do to clone HDD to SSD:
Step 1: In "Disk Mode", select the HDD that you want to clone.
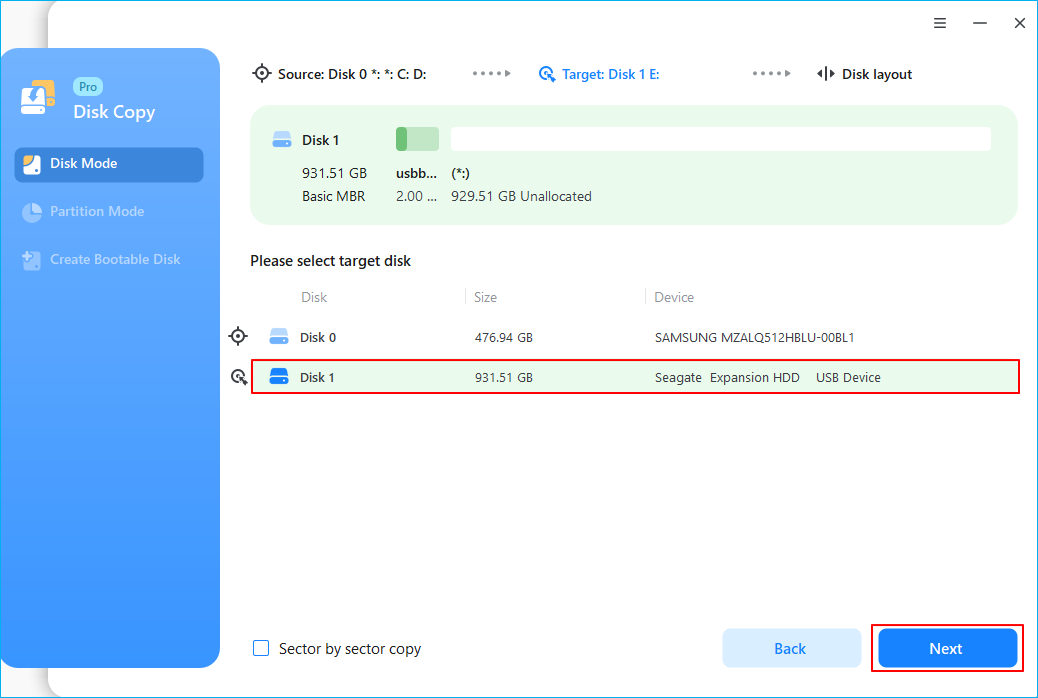
Step 2: Select the SSD as your destination.
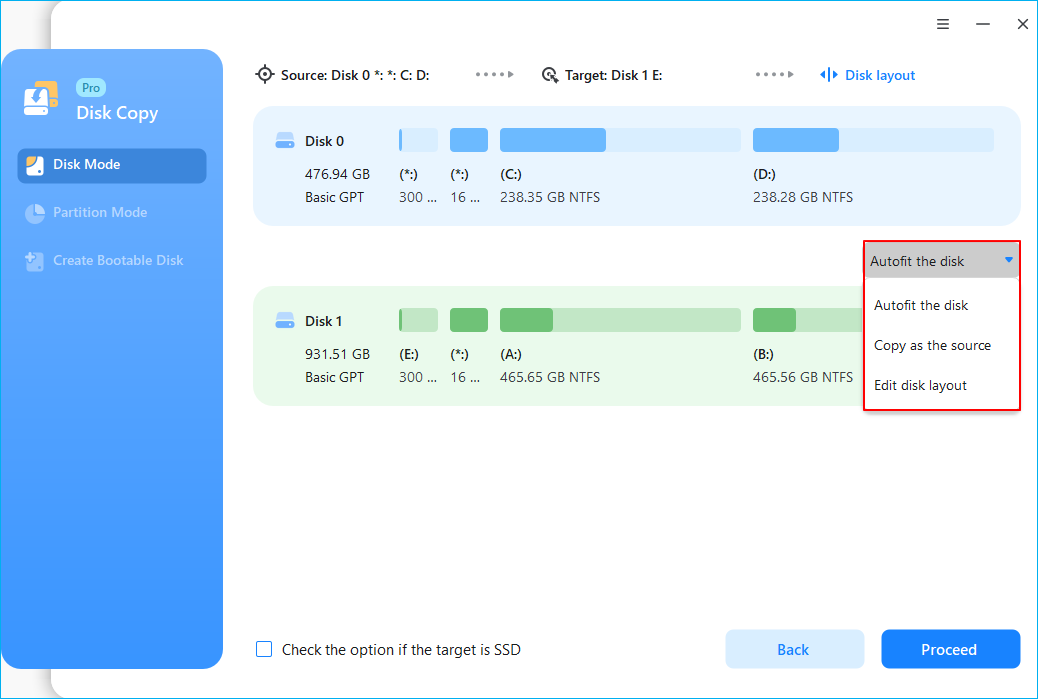
Step 3: Edit the disk layout and then click "Proceed" to continue.
As the destination is an SSD, you are suggested to tick "Check the option if the target is SSD".
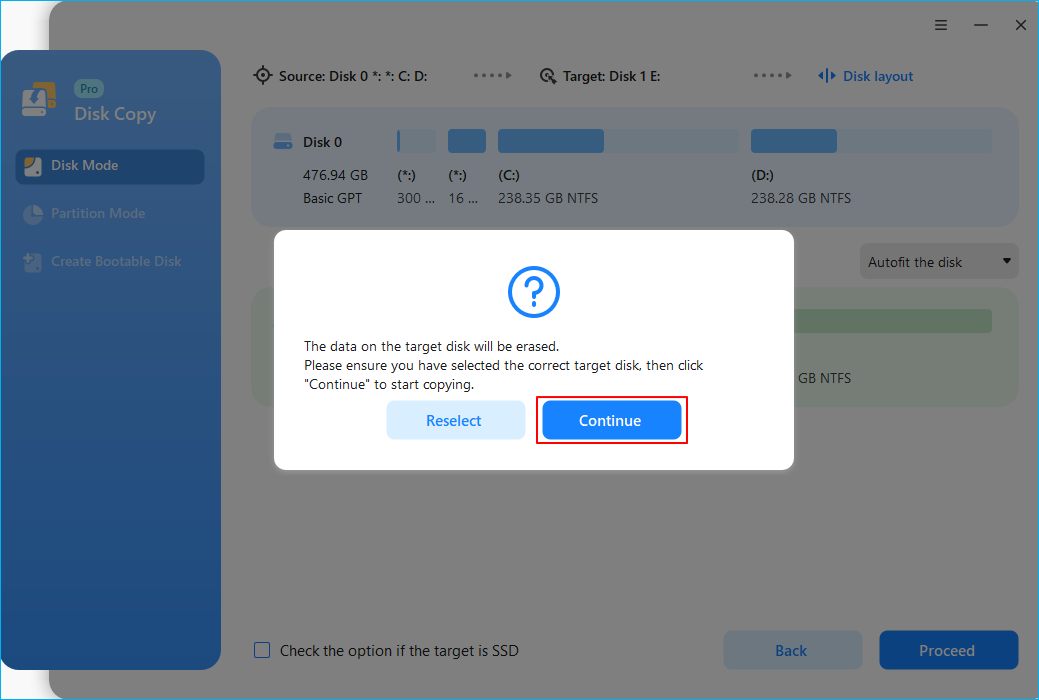
A warning message tells you that the data on the SSD will be erased. Click "OK" to continue if you do not have important data on the destination disk.
Step 4: Wait for the process to complete.
Video Tutorial: How to Clone A Hard Drive (Set clone HDD to SSD as an example)
A detailed video may be better than the words you view. You can watch it to see how to upgrade the hard disk via EaseUS Disk Copy.
Is the post helpful? Remember to share it with your followers on Twitter and other social platforms to solve the Lenovo IdeaPad Gaming 3 SSD upgrade problem.
Replace New SSD on Lenovo IdeaPad Gaming 3
So, using all the things that we prepared earlier, here's how to open and replace the new SSD on the Lenovo IdeaPad Gaming 3 device:
- Tip
- Replacing the new SSD on Lenovo IdeaPad is quite a straightforward process, but one does need to be careful when removing the laptop housing. While it's secured by screws, the user will still have to be careful when prying it open with an opening pick.
Step 1: Undo all ten screws on the back housing of the laptop

Step 2: Now pry the casing open with the opening pick on both sides

Step 3: Remove the casing slowly.
Step 4: Now find the battery plug.
Step 5: Unplug it gently using a pick or screwdriver by slowly prying it out on both sides.

Step 6: Now locate the M.2 2280 and remove the 3.3 mm screw.
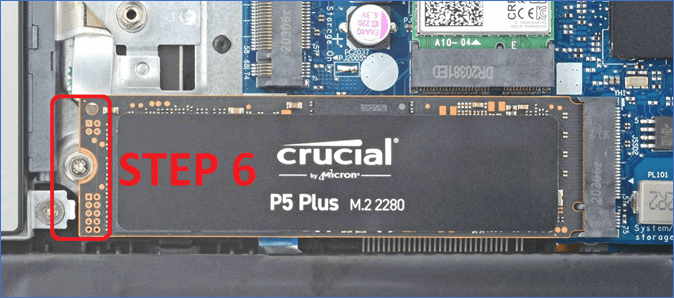
Step 7: Now remove the SSD.

Step 8: Plug the new SSD back in.

Step 9: Secure the SSD by screwing it back in.
Step 10: Put the laptop housing back and screw down all ten screws.
This is how you simply pull out the old SSD and put in the new one in Lenovo IdeaPad Gaming 3 SSD. It's vital to guarantee that the user has a 3rd or 4th Gen SSD to replace the older one. This will allow them to fully use the speed offered by the 3rd and 4th Gen SSDs.
And the user should also be careful when plugging out the old SSD and plugging in the new one, as these M.2 connectors and slots happen to be quite delicate. So users need to ensure to try and be as gentle as possible when plugging out the SSD and plugging the new one in.
How to Clone Lenovo HDD to SSD Without Reinstalling OS and Applications?
To upgrade an HDD to an SSD on a Lenovo computer, you can clone Lenovo HDD to SSD directly. EaseUS Disk Copy is good at cloning Lenovo laptop drive from HDD to SSD with secure boot.

Pro Tips: What to Do After Upgrading SSD
Now, you should follow some pro tips after upgrading the SSD. The user must configure the SSD by going into their BIOS so the system boots from it. Then, the user also needs to ensure that they format it in the right partition table, such as GPT or MBR.
Many users today would suggest GPT as it's the latest and most well-supported type of partition table. Therefore, here are a few tips to remember and things to do after upgrading the SSD:
- Set it as a boot device for Windows installation;
- Use it as GPT to ensure optimal use of its speed;
- Restore the data created from the earlier SSD;
- Set it as the primary drive in BIOS to boot from it;
- And monitor the temperature using HWMonitor or propriety software.
This will ensure that the SSD is being utilized fully and works as a boot drive rather than a common drive on the laptop.
Sum Up
These are the key things to know about upgrading SSD on Lenovo IdeaPad Gaming 3. It's important to ensure that a user buys the M.2 2280 SSD before upgrading it so that it matches the keys on the M.2 slot on the Lenovo IdeaPad.
And it's also essential that they back up and restore all of their important data and configurations using EaseUS Disk Copy. It'll also help them create a clone of their Windows if the user doesn't wish to reinstall everything from scratch.
Is the post helpful? Don't forget to share it with your followers on Twitter and other social platforms to solve the Lenovo IdeaPad Gaming 3 SSD upgrade.
FAQs about Lenovo IdeaPad Gaming 3 SSD Upgrade
Here are some additional queries that people ask and they might assist users further:
1. Can I add SSD to Lenovo IdeaPad Gaming 3?
Lenovo IdeaPad Gaming 3 only has two M.2 slots, and they support one of 2280 and 2242 drives each. And if these are occupied, then there's no way to add a third SSD, as the laptop doesn't support SATA III drives either.
2. Does Lenovo IdeaPad 3 have M2 SSD slot?
Yes, Lenovo IdeaPad 3 has one of 2280 and 2242 M.2 slots each, and it only houses two storage devices on each slot. And it also doesn't have any SATA III, so there's no way a user can add 2.5 SATA SSD or HDD into it.
3. Is the Lenovo IdeaPad 3 gaming upgradeable?
The only two things upgradeable about Lenovo IdeaPad 3 are its RAM and SSD. It has two RAM slots and two M.2 slots, and the user can upgrade to newer or better RAMs or SSDs if they wish.
4. What type of SSD is in Lenovo IdeaPad Gaming 3?
Lenovo IdeaPad Gaming 3 has two M.2 SSD slots. The first SSD slot houses a 2280 "M" Key SSD, and it's usually the larger one. The other SSD slot is 2242, which uses a B+M Key and is usually the shorter one.
Was this page helpful? Your support is truly important to us!

EaseUS Disk Copy
EaseUS Disk Copy is a well designed and very easy-to-use HDD/SSD cloning and migration tool, a tool which should be ideal for anyone wanting to quickly and easily migrate an existing system disk to a new disk (or newly installed SSD drive) with the minimal of configuration required.
-
Updated by
Larissa has rich experience in writing technical articles and is now a professional editor at EaseUS. She is good at writing articles about data recovery, disk cloning, disk partitioning, data backup, and other related knowledge. Her detailed and ultimate guides help users find effective solutions to their problems. She is fond of traveling, reading, and riding in her spare time.…Read full bio
EaseUS Disk Copy

Dedicated cloning tool to meet all your system, disk, and partition clone needs.
Popular Posts
Interesting Topics
