Page Table of Contents
PAGE CONTENT:
Upgrading Microsoft Surface Laptop 5 SSD is the quickest way to get more storage capacity to boost your laptop's performance. You can replace the larger-capacity solid-state drive (SSD) on your Surface Laptop 5. However, how do you make Microsoft Surface Laptop 5 SSD upgrade yourself? This upgrading process needs to be treated carefully. You can read this EaseUS step-by-step guide below as a reference.
Preparations for Upgrading Surface Laptop 5 SSD
It is worth noting that it is essential to make sufficient preparations before replacing and upgrading the SSD with another. The following are the specific preparations that need to be done:
- M.2 2230 SSD: A larger-capacity SSD is a good choice. You need to make sure the SSD is compatible with your Surface Laptop 5.
- T5 Torx Screwdriver, Spudger, and Tweezer: Use these tools to remove laptop's rubber feet and screws.
- Anti-Static Wrist Strap: Keep the work area clean and dust-free, and use an anti-static wrist strap to avoid static.
- Data Backup: Before upgrading the SSD, ensure that all critical data is backed up to an external storage device or cloud service. You can use using Windows' built-in Backup and Restore EaseUS Todo Backup to complete it.
- A USB-to-SATA Adapter: You can connect the new SSD to your laptop with a USB-to-SATA Adapter.
- Data Transfer Tool: If you need to preserve the operating system, applications, and other settings and ensure the upgrading process is safe, consider using SSD cloning software for data migration. EaseUS Disk Copy can safely and efficiently transfer all data from one SSD to another.
If you found this post helpful, share it on your social media platforms.
How to Upgrade Microsoft Surface Laptop 5 SSD
In this part, you will learn in detail how to upgrade Microsoft Surface Laptop 5 SSD. Here are the specific steps and precautions for cloning the old SSD to another and replacing the old SSD with the new one, let's dive in!
⚒️Stage 1. Clone Your Old SSD to the New SSD
Before upgrading your Microsoft Surface Laptop 5 SSD, securing your data or transferring SSD to New SSD to preserve existing settings and files is necessary. This will not only protect your privacy but also avoid unnecessary trouble during the upgrade process.
In this case, you can make a recovery drive to reinstall Windows, which requires multiple steps, such as a USB drive, recovery files, and a USB-C to USB-A connector. However, the process is cumbersome and can be confusing to users. Therefore, it is a better option to use a powerful disk cloning tool like EaseUS Disk Copy for a seamless transition.
Windows 11/10/8/7
Using the disk cloning software, you can create an exact copy of the old SSD to the new SSD, including the OS, applications, and all personal files. With this method, your data integrity is guaranteed, and you don't need to worry about losing or damaging any data when upgrading your SSD. The data on the new SSD will be the same as the old SSD, so you can safely replace the SSD in Surface Laptop 5 while retaining the original usage environment.
Moreover, the EaseUS disk clone software transfers SSD to another very quickly and can complete the entire cloning process relatively quickly, greatly improving the upgrade efficiency. Its interface is simple and intuitive, allowing non-technical users to complete SSD cloning operations easily.
You can successfully replace the Surface Laptop 5 SSD with just a few simple steps.
Before cloning:
- If your computer has only one slot, connect the target disk to your machine via a USB-to-SATA/NVMe adapter.
- If your computer has an extra slot, install the target disk into the empty slot properly, and make sure it is compatible.
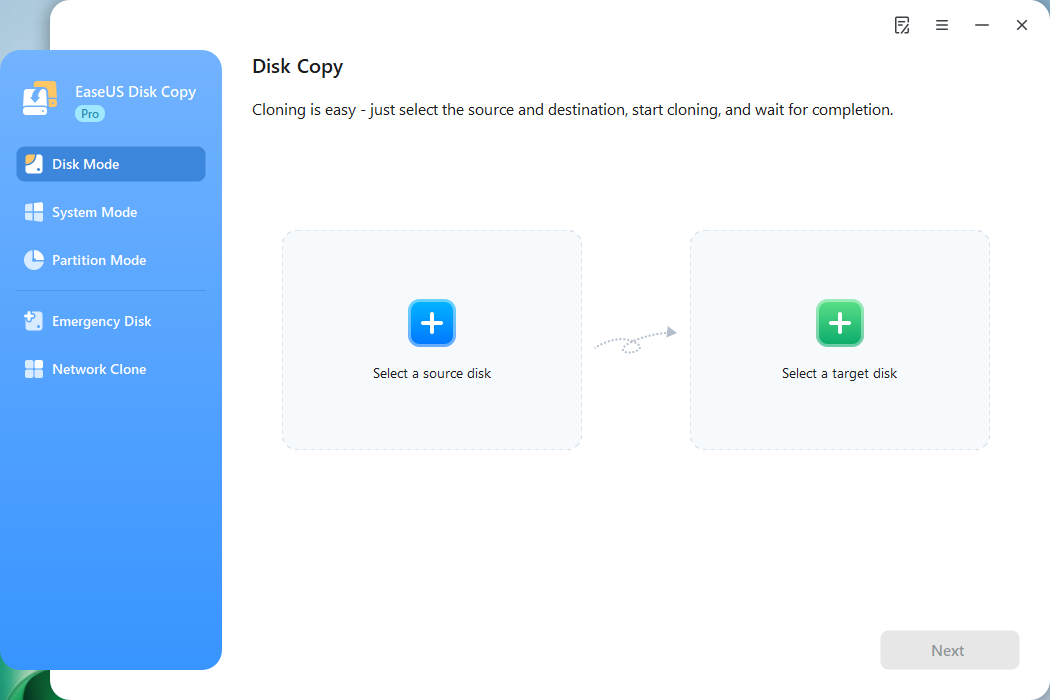
Step 1. Launch EaseUS Disk Copy and choose Disk Mode.
Install EaseUS Disk Copy cloning software on your Windows computer, then launch it and select Disk Mode from the left panel.
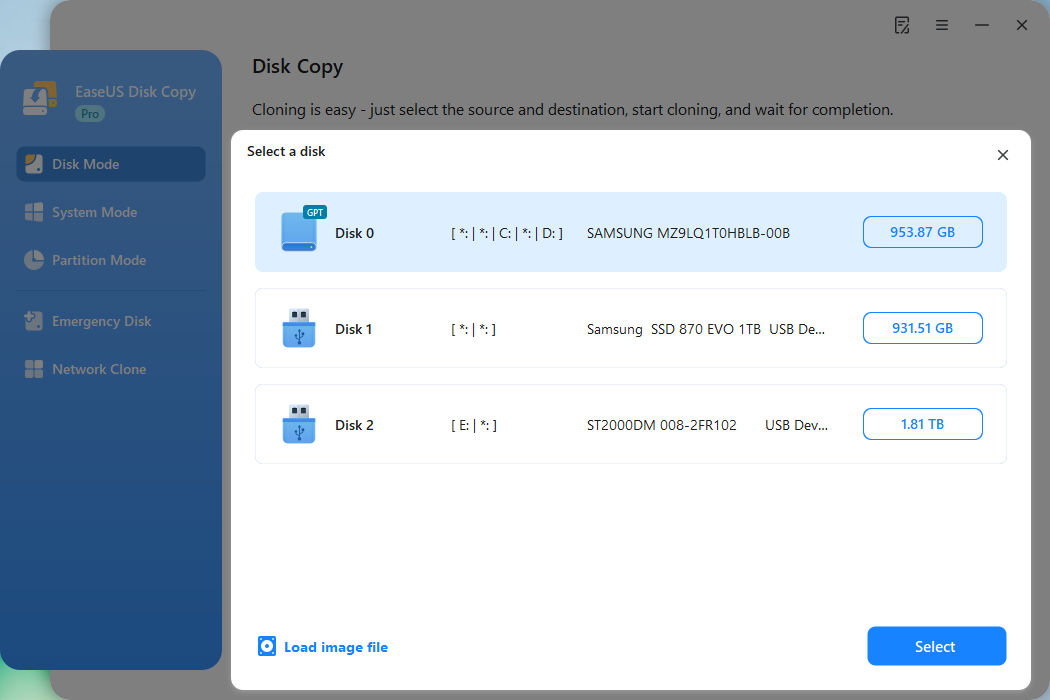
Step 2. Select the source drive.
Select the drive you want to copy, then click Select.
Step 3. Choose the target disk.
Choose the disk that you want to clone data to, and click Select. Note that the used space of the source disk should be less than the target disk capacity.
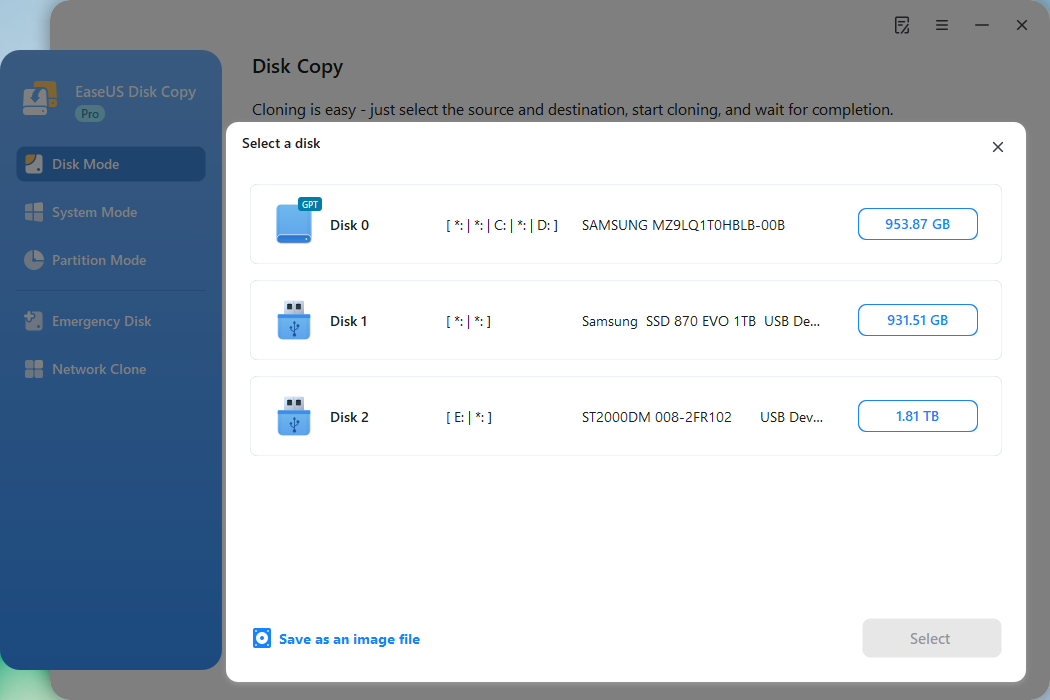
*At this step, you can also click the option "Save as an image file" to store your disk as a compressed image file, which can be restored without any data loss.
Step 4. Adjust disk layout.
Specify the target disk layout as your preference. You can choose among:
- Autofit the disk: makes some changes by default on the destination disk layout so that it can work at its best.
- Copy as the source: create a 1-to-1 copy of your source disk; the layout is the same as the source disk.
- Edit disk layout: allows you to manually resize/move the partition layout on this destination disk.
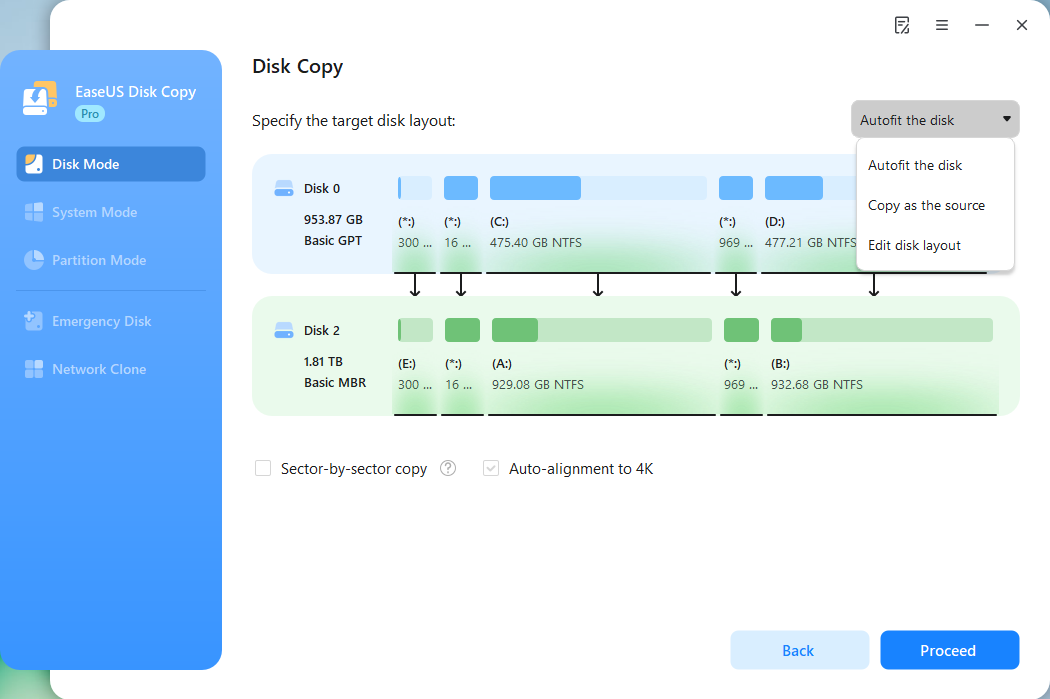
*If the target disk is an SSD, the option "Auto-alignment to 4K" will be checked automatically to optimize the performance of your SSD.
Step 5. Start cloning.
Click Proceed, and a message will appear, warning you that data will be lost. Confirm the message by clicking Continue.

Now, it will start executing the cloning task.
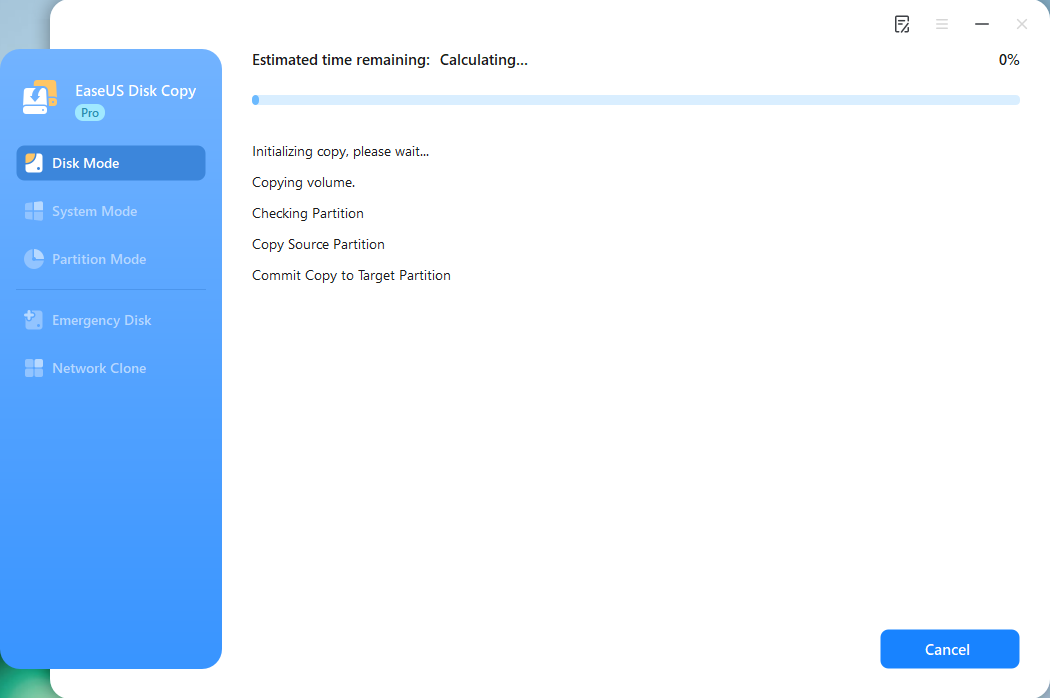
*The time it takes to clone a hard drive depends on how much data is on the source disk, and it will also be affected by the disk types, USB connection, etc.
You can successfully upgrade the SSD in Surface Laptop 5 by using SSD upgrade software to clone old SSD to new SSD. Now, you can download this tool to start the upgrade process.
Windows 11/10/8/7
⚒️Stage 2. Replace the Old SSD and Boot from the New SSD
When you have all the necessary tools and all the data you need cloned onto your SSD, you can replace the old SSD with the new SSD on your Microsoft Surface Laptop 5 by following these steps:
➡️Part 1. Manually Replace the SSD
Step 1. Unplug the laptop and turn it off, and it is best to reduce the battery level to below 25%;
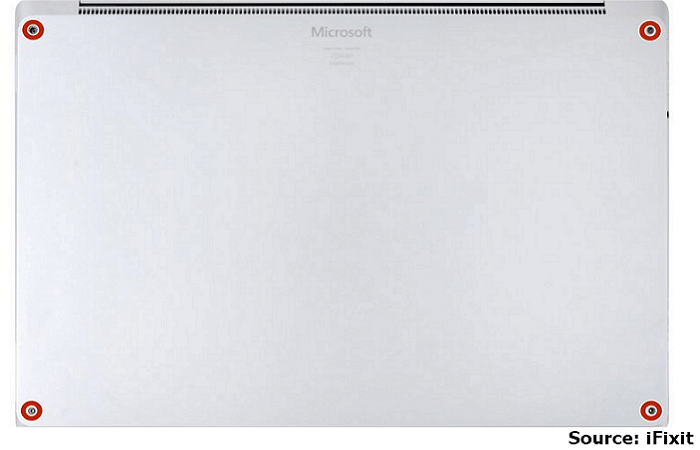
Step 2. Use tweezers to remove the 4 rubber feet on the laptop back cover;
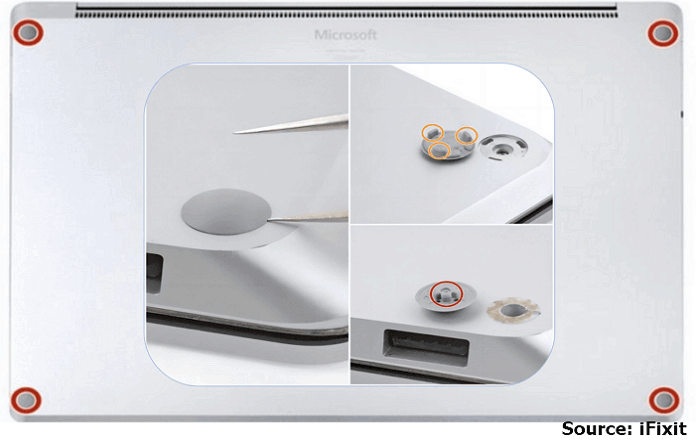
Step 3. Remove the four 3mm screws using a T5 Torx screwdriver to that are in place;
Step 4. Turn your Surface Laptop 5 over and open it as usual. And lift the upper case. You need to be especially careful not to remove it completely, as it is still connected to the laptop by a cable;

Step 5. Please put on your anti-static wrist strap and attach it to the side of the laptop chassis to ground it.
Step 6. Use the tip of a spudger to insert under one edge of the magnet connector and pry up to disconnect the keyboard and touchpad cable;
Step 7. Remove the upper case and place it on a clean table;
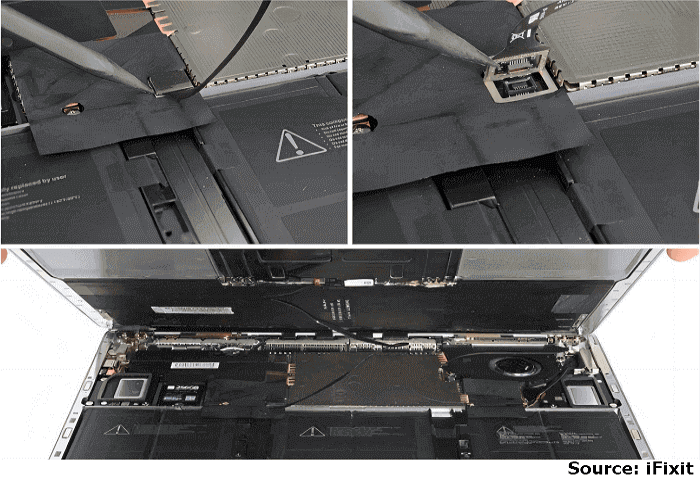
Step 8. Use the T5 Torx screwdriver to remove the 2.7mm screws holding the SSD in place;
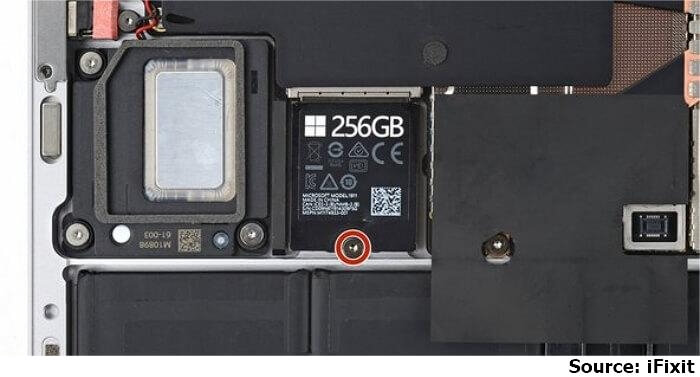
Step 9. Pull the SSD out of the slot and remove it gently, then replace it with the new SSD.

Step 10. Restore everything according to the above disassembly steps.
If you found this post helpful, share it on your social media platforms.
➡️Part 2. Boot from the New SSD
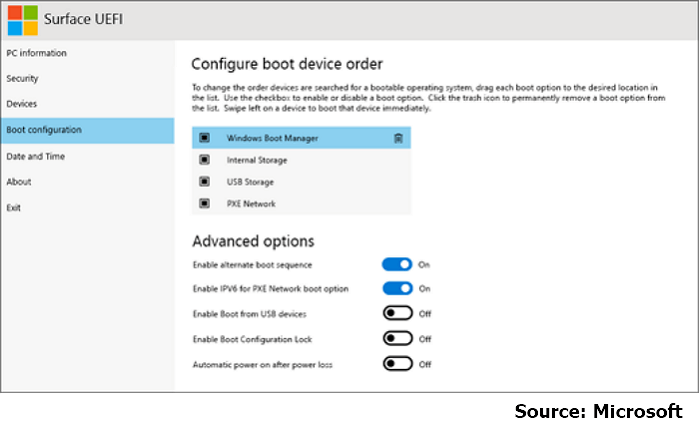
After finishing the replacement process, you can boot from the new SSD to check if it was successful. Here are the steps to enter the BIOS/UEFI setting and boot from the cloned SSD.
- Step 1. Press and hold the Volume Up button while pressing and releasing the Power button.
- Step 2. The Microsoft or Surface logo appears on your screen. Continue holding the Volume Up button. Release the buttons when the UEFI screen displays.
- Step 3. In the UEFI menu, click on Boot Configuration, and then select your SSD boot drive. Press Enter to confirm your selection and start.
If you also want to learn how to upgrade the Surface Laptop Studio SSD, you can click the link below.
![]()
How to Upgrade Surface Laptop Studio SSD
If your Surface Laptop Studio is experiencing lag, slow performance, or insufficient storage space, you can upgrade its SSD to improve its performance.

Reasons for Microsoft Surface Laptop 5 SSD Upgrade
Microsoft Surface Laptop 5 SSD Upgrade is necessary to expand storage capacity to accommodate growing data demands or improve system performance for faster read and write speeds.
In addition, upgrading the SSD can improve the overall response speed and application loading time of Surface Laptop 5, extending its service life. More importantly, upgrading the SSD can meet the performance requirements of some professional specific software. With the development of SSD technology, upgrading SSD by yourself has become a cost-effective way to improve laptop's performance.
To Wrap Things Up
In summary, a Microsoft Surface Laptop 5 SSD upgrade can be achieved using the correct method. In this situation, using a professional SSD upgrade software like EaseUS Disk Copy is essential to make sure data safety and complete SSD replacement efficiently. Follow the detailed guide above to start your journey of upgrading your SSD.
Windows 11/10/8/7
FAQs about Microsoft Surface Laptop 5 SSD Replacement
1. Can you add SSD to Surface Laptop 5?
Yes, you can add SSD to Surface Laptop 5. Please note that you should purchase an M. 2 2230, not an M. 2 2280 SSD, which will be too large.
2. Is Surface Laptop 5 RAM upgradable?
Sorry, it is impossible to upgrade the RAM on the Surface Laptop 5. The RAM is soldered onto the motherboard and does not have an additional RAM slot for expansion. If you want to get more storage, you can upgrade your SSD.
3. How to replace the SSD on Microsoft Surface Laptop 5?
To remove or replace the SSD on your Surface Laptop 5:
- Step 1. Remove the laptop feet and screws.
- Step 2. Separate the keyboard from the base.
- Step 3. Find out the SSD and M.2 slot just below the keyboard. You can use a Torx screwdriver to remove the screws and remove the SSD.
-
Updated by
![]()
Jerry
>"I hope my articles can help solve your technical problems. If you are interested in other articles, you can check the articles at the bottom of this page, and you can also check my Facebook to get additional help."…Read full bio


