Table of Contents
- NAS File Recovery When the Time Machine Is in Error
- Ways to Fix the Time Machine Backup Error 19 With NAS
- Why the Backup Disk Image Could Not Be Accessed
- Final Words
- Time Machine Backup Error 19 FAQs
![]() About the Author
About the Author
![]() Reviews and Awards
Reviews and Awards
- Video Recovery
- SD Card Recovery
- Recycle Bin Recovery
- Recover Data from USB
- Recover Deleted Emails
- Hard Drive Not Showing Up in Windows
- Recover Unsaved Word Documents
- Recover Deleted Files in Windows 10
- Recover Files from Virus Infected Hard Drive
- Best Free Photo Recovery Software
- Recover Files from Formatted Hard Drive
The time machine can notice the backup disk and the NAS mounted and accessible via the finder. MacBook users reported that their Time Machine has been perfectly working for automatically backing up their Macs over Wi-Fi. But recently, they needed some assistance to get started manually - taking huge time "preparing backup" but finally succeeding.
Time Machine is the most vital utility on macOS; once established, it automatically backs up your files frequently. But it's not always smooth; for example, "Time Machine error 19" may loom at any moment! This pesky error shows a problem with the permissions for a particular file, which further deters Time Machine from reading and backing it up successfully. The issue may loom on network and local external drives, often after a macOS update.
NAS File Recovery When the Time Machine Is in Error
If the backup drive is corrupted or damaged beyond repair, it's recommended that you use credible data restoration software for Mac to retrieve your lost data. EaseUS Data Recovery for Mac is a leading tool for restoring lost files, including videos, photos, files, audio files, and emails. This Time Machine error 19 often leads to critical data loss.
EaseUS Data Recovery software is compatible with every Mac powered by T2, M1, M2, and M3 chips, functioning with macOS Sierra 10.12 and up to the newest macOS, Sonoma 14. The leading features of EaseUS are the following:
- Recovers data from high storage capacity storage devices of >18 TB.
- Provides leading features like cloning, driving health assessment, and optimizing devices.
- Restores data from fusion drives, SSDs, Thunderbolt 3 drives, Time Machine backups, and other USB storage media.
- Retrieves data from formatted HFS+/APFS/ExFAT/NTFS volume.
Step 1. Select the location to scan
Launch EaseUS Data Recovery Wizard for Mac and choose the hard drive, SSD, SD card, USB flash drive, or TF card where you lost data. Click "Search for lost files" to start scanning.

Step 2. Filter lost Mac data
The software will automatically scan for lost data on MacBook/iMac. When the scan completes, filter wanted data through the "Type" and "Path" buttons.

Step 3. Recover lost data or files
Double-click a file to preview it. Then, click the "Recover" button to restore the lost data to another place.

If you find this information helpful, please share it with others on social media to help them overcome this common challenge. Install EaseUS Data Recovery Wizard for Mac now!
Ways to Fix the Time Machine Backup Error 19 With NAS
This article will show numerous workable strategies to efficiently resolve the Time Machine error 19. Below are the 4 methods to fix the Time Machine backup error 19 with NAS:
- Method 1. Update the OS and Firmware
- Method 2. Alter the Network Folder or Drive Settings
- Method 3. Eliminate the Backup Disk from Time Machine
- Method 4. Uninstall Anti-Virus Software on Mac
Method 1. Update the OS and Firmware
Network-associated storage devices are designed with specialized firmware and OS to fulfill the demands of storage, sharing, and other networking-oriented tasks. If you're having issues with Time Machine accessing the sparse bundle on your NAS drive for backups, upgrading the NAS device's OS and firmware might be time.
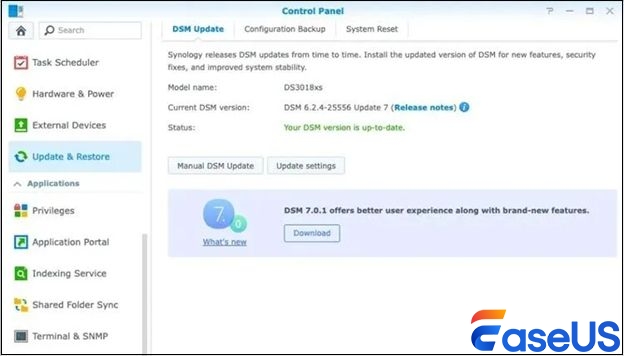
This is crucial if you recently upgraded your macOS, as the latest version might cause compatibility problems. Go through the steps below to update the firmware and OS if you're using a Synology NAS:
Step 1. Navigate to "DSM" > "Control Panel" > "Update & Restore."
Step 2. Hit "Download" if an update is available.
These are the steps below to update firmware:
Step 1. Head to "DSM" > "Storage Manager."
Step 2. Opt for "HDD/SSD" > "Action" > "Firmware Update" to ensure your NAS drive is updated.

Method 2. Alter the Network Folder or Drive Settings
Follow the steps below to make such adjustment to your drive settings or network folder:
Step 1. Turn off AFP and turn on the "Time Machine broadcast" over SMB.
Step 2. Reboot your NAS device & Mac before starting Time Machine after ensuring SMB2 or SMB3 is turned on.
Step 3. For Synology users, go to "Control Panel" > "File Services" > "Advanced" > "Bonjour" and turn on "Enable Bonjour discovery by SMB."
Step 4. Navigate to the AFP to disable AFP. While establishing the Time Machine again, opt for the SMB route disk.
Step 5. Disable the "Recycle Bin" feature.
Method 3. Eliminate the Backup Disk from Time Machine
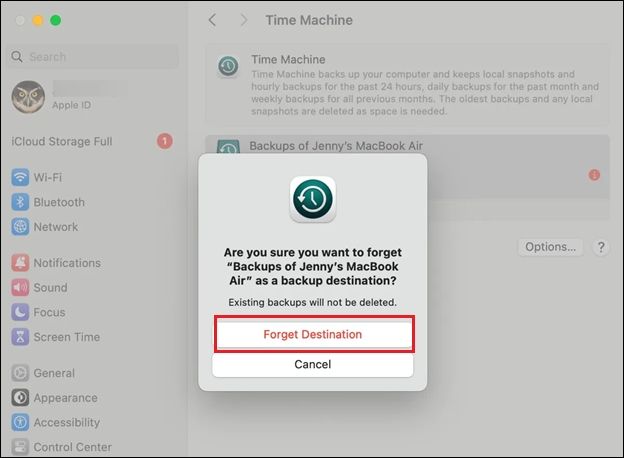
One of the most effective ways to resolve Time Machine error 19 is to eliminate the backup disk from Time Machine and reconfigure it. Below are the steps to follow:
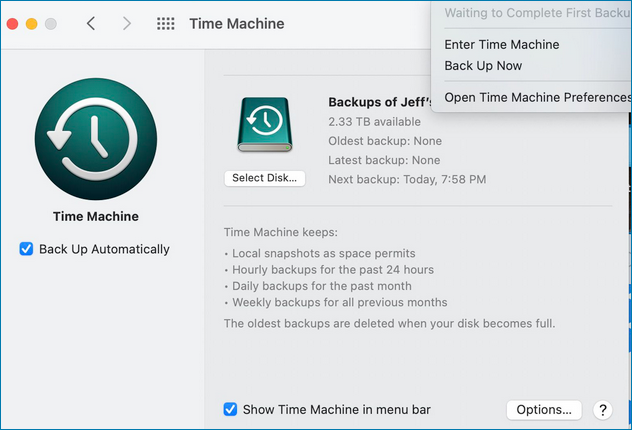
Step 1. Launch the "Apple" menu > "System Settings."
Step 2. Opt for "General" > "Time Machine."
Step 3. Select "Time Machine backup disk/folder," which does not have a backup disk image.
Step 4. Hit the "-" button to eliminate it.
Step 5. Hit "Forget Destination."

Method 4. Uninstall Anti-Virus Software on Mac
Several users have fixed Time Machine error 19 by uninstalling the third-party anti-virus software on their MacBooks. These programs frequently disrupt Time Machine's operation by recognizing innocuous items as dangers or even corrupting your backup files to get rid of malware that has been discovered. Suppose your Mac is conducting any anti-malware program, security application, or VPN. In that case, it's recommended to uninstall them before trying a Time Machine backup and count on the built-in safety attributes of macOS.
2024 Fixed: Time Machine Won't Complete First Backup
Is your Time Machine will not complete the first Backup? If yes, then you are not alone. Because of this issue, many Mac users cannot complete their Time Machine backup.

Why the Backup Disk Image Could Not Be Accessed
On a broader perspective, error 19 implies Time Machine can't read your backups, which might ensue for a few reasons, which are listed below:
- 🔑NAS Access Issue - If you utilize a network-attached storage or NAS service, you might temporarily lose access to the device. The NAS might be dealing with a schedule update or need you to log in again.
- 📃Damaged Backup File - You might have encountered a power outage or the backup disk disengaged for any reason during the backup procedure. In such a case, the backup file might have been damaged, and the Time Machine couldn't finish the process or read the file.
- 💾Failing Disk Drive - This is the worst thing! No HDD/SSD/disk is resistant to physical failures, and the probability of a drive breaking gradually increases.
- 🔒The Disk is Password Protected - If you're backing up to a network disk with a password, you might need to re-type it.
Final Words
Time Machine backups preserve our most precious data, and losing access to them because of any error is always an issue. Here, we have illustrated the top 4 methods that can assist you in fixing this Time Machine error 19 on your MacBook. If you have lost data while trying the fixes, installing EaseUS Data Recovery Wizard for Mac is recommended.
Time Machine Backup Error 19 FAQs
Consider the below-mentioned FAQs to comprehend the topic better:
1. How to fix error 19 Time Machine?
To fix Time Machine error 19, you may delete the backup disk from Time Machine or change the Network Folder or Drive Settings.
2. Why does my Time Machine backup keep failing?
Time Machine backup keeps failing due to disk issues. If it fails because of a read-only disk, there might be a problem with the disk or its file system. Therefore, verify the backup disk with First Aid from Disk Utility.
3. Why will Time Machine not back up?
The Time Machine may not working due to connection issues. The backup disk might not be plugged in or safely linked to the Mac. If the MacBook and the disk are connected over a network, they might not be related to a similar network.
4. Why can't I restore from Time Machine?
One reason you can't restore from Time Machine is the backup disk issue. Other reasons are connection problems, third-party safety software, and backup disk firmware.
Was This Page Helpful?
Jaden is one of the editors of EaseUS, who focuses on topics concerning PCs and Mac data recovery. Jaden is committed to enhancing professional IT knowledge and writing abilities. She is always keen on new and intelligent products.
-
EaseUS Data Recovery Wizard Pro has a reputation as one of the best data recovery software programs on the market. It comes with a selection of advanced features, including partition recovery, formatted drive restoration, and corrupted file repair.
Read More -
EaseUS Data Recovery Wizard is a powerful system recovery software, designed to enable you to recover files you’ve deleted accidentally, potentially lost to malware or an entire hard drive partition.
Read More -
EaseUS Data Recovery Wizard is the best we have seen. It's far from perfect, partly because today's advanced disk technology makes data-recovery more difficult than it was with the simpler technology of the past.
Read More -
EaseUS Data Recovery Wizard Pro has a reputation as one of the best data recovery software programs on the market. It comes with a selection of advanced features, including partition recovery, formatted drive restoration, and corrupted file repair.
Read More -
EaseUS Data Recovery Wizard is a powerful system recovery software, designed to enable you to recover files you’ve deleted accidentally, potentially lost to malware or an entire hard drive partition.
Read More
Related Articles
-
How to Dual Boot Mac | Step-by-Step Guide
![author icon]() Dany/Feb 14, 2025
Dany/Feb 14, 2025 -
How to Check SSD Health on Mac | 3 Free Ways
![author icon]() Sherly/Feb 05, 2025
Sherly/Feb 05, 2025 -
How to Recover Deleted iPhone Backup on Mac [Restore Tip]
![author icon]() Jaden/Nov 30, 2024
Jaden/Nov 30, 2024 -
How to Verify Time Machine Backup [Network and Local Disks]
![author icon]() Dany/Jan 18, 2025
Dany/Jan 18, 2025