


Start Your Free Trial!
Sign up to our newsletter, stay updated on news and exclusive offers from EaseUS. Don't worry, if you change your mind, you can unsubscribe at any time, free of charge. We value your privacy (Privacy Policy).
EaseUS Partition Master
Do you want to upgrade the internal SSD of the Xbox Series S? Read this guide to learn the entire process of how to perform the Xbox Series S internal SSD upgrade.

Content
Page Table of Contents
How to Perform Xbox Series S Internal SSD Upgrade?HOT
Bonus Tip: How to Upgrade Xbox Series S Internal Storage?HOT
Can I Perform Xbox Series S Internal SSD Upgrade?HOT
ConclusionHOT
FAQs About Xbox Series S Internal SSD UpgradeHOT
About the Author
Hot Topics
Key Takeaways:
Sometimes, we need to upgrade the internal SSD of the Xbox Series S for various reasons. The most common cause could be limited storage. For whatever reason, you want to upgrade your SSD, in this article, EaseUS will show the entire process of how to perform an Xbox Series S internal SSD upgrade so that you can easily upgrade your SSD on your own to enjoy the best gaming experience and optimize your console's performance through this comprehensive guide.
Various stages are involved in upgrading the SSD of the Xbox Series S. Follow this section step-by-step; we split it into three stages.
Guide 1. Choose a suitable new SSD for the Xbox Series S.
You first need to get a better SSD for the Xbox Series S and ensure the Xbox Series recognizes it. Think about your goal for upgrading the Xbox Series S SSD - 1️⃣a better gaming experience; 2️⃣or, to get a bigger gaming storage.
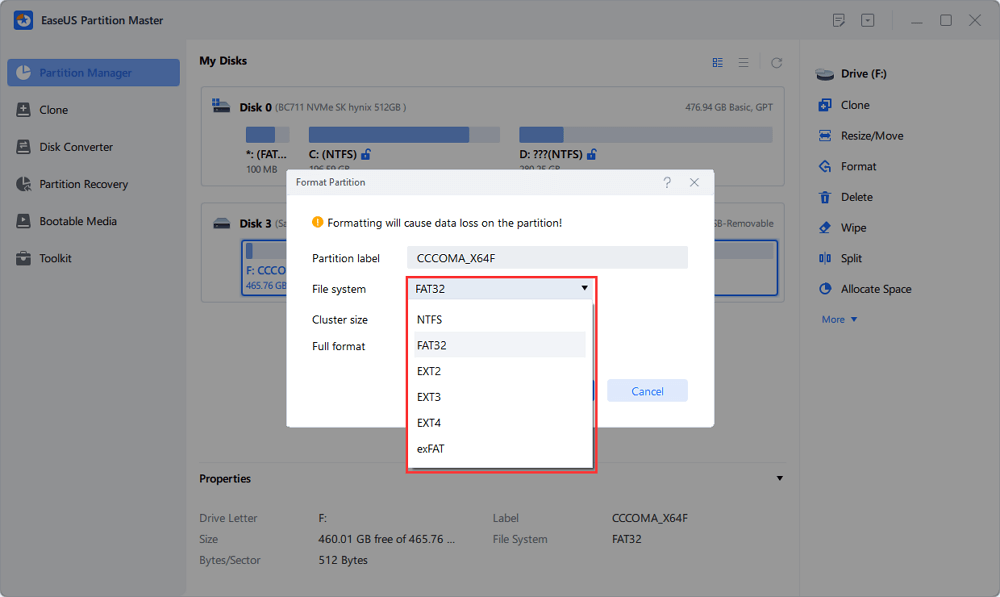
🚩🚩Guide 2. Format New SSD to exFAT format.
To ensure compatibility between the SSD and the Xbox Series, you will need to format the Xbox SSD to a suitable format first:
Here is how to format the new SSD:
Step 1. Download EaseUS Partition Master using the button above. Navigate to the Partition Manager section.
Step 2. Right-click the SSD, select "Format," select the exFAT, and follow the onscreen instructions to finish the format.
Guide 3. Remove the old SSD from your Xbox Series S.
Step 1. Turn off your Xbox and disconnect all cables. Then, use tweezers to remove the screw covers and unscrew the back panel.
Step 2. Remove the plastic case and detach the power button, Wi-Fi, and Bluetooth boards.
Step 3. And continue disconnecting and removing the power supply, fan, motherboard screws, and the motherboard with the SSD card.

Step 4. Unplug the old Xbox Series SSD with your game data from the Xbox console and insert the SSD into an SSD enclosure.
Note: When you get the new SSD with your Xbox data, as shown in Stage 2, follow these steps in reverse order to reassemble it.
After getting both old and new SSD disk drives connected to your computer, you can start the cloning process to save the Xbox Series S's entire data, your programs, and games to avoid data loss.
EaseUS Partition Master is a handy tool for cloning the original SSD and assisting you in upgrading your SSD without data loss. It simplifies the complex process of cloning by providing an intuitive interface. You don't need to be a tech expert to use it effectively.
Follow the steps to clone the original SSD to upgrade the hard disk without losing game data: (select "Clone Data Disk" mode)
Step 1. Select the source disk.
Step 2. Select the target disk.
Step 3. View the disk layout and edit the target disk partition size.
Then click "Continue" when the program warns it will wipe out all data on the target disk. (If you have valuable data on the target disk, back up it in advance.)
You can select "Autofit the disk", "Clone as the source" or "Edit disk layout" to customize your disk layout. (Select the last one if you want to leave more space for C drive.)
Step 4. Click "Start" to start the disk cloning process.
Once you complete the process of cloning your old internal SSD to the new SSD through EaseUS Partition Master, you need to install the new SSD in your Xbox Series S. To install a new SSD in your Xbox Series S. You can follow steps in the reverse order from stage 1 to insert the new one in the same place and follow the entire steps in reverse order from the above stage 1 to reassemble your Xbox Series S.
For more detailed steps, you can check the video from YouTube:
Upgrading your Xbox Series S storage is easier than you might think, and you don't necessarily have to replace the internal SSD. For a comprehensive and detailed guide, click this link:
How to Upgrade Xbox Series X/S Storage [Ultimate Guideline]
Learn and follow how to upgrade the storage device of the Xbox series X/S with two effective methods.

Two main ways to enhance your storage capacity are to expand it with an official Xbox Series S Expansion Card or add external storage. Let's briefly go over these options.
Guide 1: Expand Storage with Xbox Series S Expansion
Guide 2: Add External Storage to Xbox Series S
You May Also Like:
Yes, but not necessarily. It is possible to upgrade the Xbox Series S SSD, but there's typically no need since it utilizes a custom NVMe M.2 2230 SSD.
However, upgrading to a larger SSD can be beneficial if your storage capacity is insufficient for larger game installations, game data saves, and media storage. If you decide to upgrade the internal SSD, you must transfer the old data to the new SSD to preserve your data, settings, programs, and games. You must transfer the old data to the new computer if you don't have the proprietary SSD inside the Xbox Series S. Below, we outline the steps to perform the upgrade seamlessly.
If you found this article helpful in upgrading your Xbox Series X's SSD, you can click the social buttons to share it with others in need.
For various reasons, the significance of upgrading the internal SSD of your Xbox Series S arises. Whether you're facing storage limitations or simply looking to optimize your gaming experience, it's possible to upgrade the SSD but not always necessary because you can expand the storage limit without replacing the internal SSD with Xbox Series S Expansion Card and adding External Storage to Xbox Series S. For a smooth and seamless SSD upgrade, give EaseUS Partition Master a try.
If you have any queries or want to learn more about upgrading your Xbox Series S's internal SSD, follow the FAQs below.
1. Is any SSD compatible with the Xbox Series S?
Not all SSDs are compatible with the Xbox Series S. It uses a custom NVMe M.2 2230 SSD. You should choose a compatible SSD for the upgrade.
2. How fast is the Xbox Series S internal SSD?
The Xbox Series S internal SSD is fast and offers high-speed performance to reduce loading times and improve the gaming experience. According to some sources, the ability for the console to access 2.4 GB/s of data per second - or 4.8GB/s uncompressed.
3. How to upgrade the internal SSD on Xbox Series X?
To upgrade the internal SSD on the Xbox Series X, you can follow a procedure like upgrading the Xbox Series S SSD, discussed in detail in this guide. However, remember that the Xbox Series X uses a different form factor for its internal SSD. So first, you should choose the suitable internal SSD for your Xbox Series X.
How Can We Help You
Sherly joined EaseUS in 2022 and she has always loved writing articles and enjoys the fun they bring. She receives professional training here, focusing on product performance and other relative knowledge. She has written over 200 articles to help people overcome computing issues.
Cici is the junior editor of the writing team of EaseUS. She accepted the systematic training on computers at EaseUS for over one year. Now, she wrote a lot of professional articles to help people resolve the issues of hard drive corruption, computer boot errors, and disk partition problems.
It won't hot image your drives or align them, but since it's coupled with a partition manager, it allows you do perform many tasks at once, instead of just cloning drives. You can move partitions around, resize them, defragment, and more, along with the other tools you'd expect from a cloning tool.
Read MoreI love that the changes you make with EaseUS Partition Master Free aren't immediately applied to the disks. It makes it way easier to play out what will happen after you've made all the changes. I also think the overall look and feel of EaseUS Partition Master Free makes whatever you're doing with your computer's partitions easy.
Read MorePartition Master Free can Resize, Move, Merge, Migrate, and Copy disks or partitions; convert to local, change label, defragment, check and explore partition; and much more. A premium upgrade adds free tech support and the ability to resize dynamic volumes.
Read MoreIt won't hot image your drives or align them, but since it's coupled with a partition manager, it allows you do perform many tasks at once, instead of just cloning drives. You can move partitions around, resize them, defragment, and more, along with the other tools you'd expect from a cloning tool.
Read MoreI love that the changes you make with EaseUS Partition Master Free aren't immediately applied to the disks. It makes it way easier to play out what will happen after you've made all the changes. I also think the overall look and feel of EaseUS Partition Master Free makes whatever you're doing with your computer's partitions easy.
Read MoreRelated Articles
How to Create New Partition in Windows Server 2022/2019/2016 - EaseUS
![]() Tracy King/2025/07/06
Tracy King/2025/07/06
Password Reset Disk Windows 7: How to Create and Use
![]() Sherly/2025/07/06
Sherly/2025/07/06
Can I Burn ISO to USB Windows 11? Sure! [Complete Guide]
![]() Tracy King/2025/07/07
Tracy King/2025/07/07
How to Merge C and E Drive Without Losing Data
![]() Oliver/2025/07/06
Oliver/2025/07/06
EaseUS Partition Master

Manage partitions and optimize disks efficiently
Your best companion for disk partitioning, MBR to GPT/GPT to MBR conversion,even OS migration
Copyright © 2004 - 2025 EaseUS. All rights reserved.
CHOOSE YOUR REGION
Start Your Free Trial!
Sign up to our newsletter, stay updated on news and exclusive offers from EaseUS. Don't worry, if you change your mind, you can unsubscribe at any time, free of charge. We value your privacy (Privacy Policy).
Start Your Free Trial!
Sign up to our newsletter, stay updated on news and exclusive offers from EaseUS. Don't worry, if you change your mind, you can unsubscribe at any time, free of charge. We value your privacy (Privacy Policy).
