Start Your Free Trial!
Sign up to our newsletter, stay updated on news and exclusive offers from EaseUS. Don't worry, if you change your mind, you can unsubscribe at any time, free of charge. We value your privacy (Privacy Policy).
Page Table of Contents
Overview of Bitlocker Encryption Key Cannot Be ObtainedHOT
How to Fix Bitlocker Encryption Key Cannot Be Obtained - 6 SolutionsHOT
ConclusionHOT
FAQs About Bitlocker Encryption Key Cannot Be Obtained.HOT
About the Author
Hot Topics
Updated on Apr 28, 2025
BitLocker safeguards sensitive data and vital files. However, facing issues such as the "BitLocker encryption key cannot be obtained" or "BitLocker could not be enabled. C was not encrypted" error can be frustrating. But what does this error mean, what causes it, and how can it be fixed?
In this article provided by EaseUS, you'll understand why this issue occurs and learn actionable steps to resolve it. Follow along to discover the common causes behind the problem and effective troubleshooting methods.
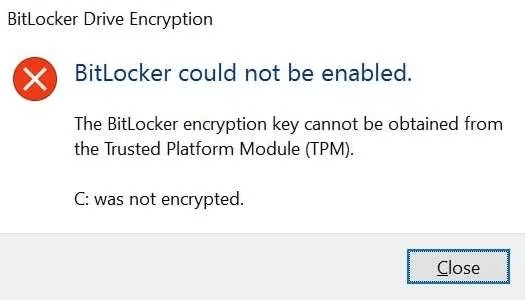
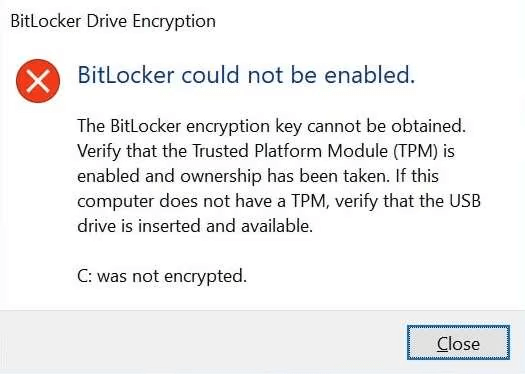
Some users experience the "BitLocker Could Not Be Enabled" error when attempting to activate BitLocker. When this issue arises, an error message window is typically displayed. The specific message can vary depending on the trigger causing the problem on different PCs. Below are two common symptoms of such error messages:
Error 1: This error indicates that while the TPM (Trusted Platform Module) is detected, there is a communication issue between BitLocker and the TPM chip.
Error 2: This error advises users to check if TPM is enabled in their BIOS, which commonly happens when BitLocker is activated with TPM.
Boot Manager Verification: Boot Manager (Bootmgr) checks that the key material needed to unlock the disk is available before booting and starting the encryption process.
Pre-Boot Hardware Test: If the key material is not available during the pre-boot hardware test, BitLocker will not proceed with encryption to avoid leaving the disk in an unusable state.
Startup Key Not Found: This issue can arise when Bootmgr cannot locate the Startup Key. This may happen if:
In this section, we'll discuss and learn how to fix the BitLocker encryption key that cannot be obtained error by applying four effective methods.
EaseUS Partition Master Free is an excellent disk management tool that provides an easy and efficient way to manage partitions and recover lost data. It also helps users find and manage BitLocker encryption keys, making it an excellent option for troubleshooting various issues. Unlike manual processes, EaseUS Partition Master streamlines the process, saving time and reducing the risk of errors.
Option 1. Enable or Disable Bitlocker With One-click
Step 1. Launch EaseUS Partition Master on your computer and open the Partition Manager tab.
Step 2. If the partition is BitLocker encrypted, it will be marked with a lock icon.
![]()
Step 3. Click the lock icon, and the prompt will show. You will be required to enter your BitLocker password.
Step 4. Enter the password or try the recovery key option to unlock the encrypted drive.

We highly recommend trying EaseUS Partition Master to recover your BitLocker encryption key.
Option 2. Format the Bitlocker Encrypted Partition
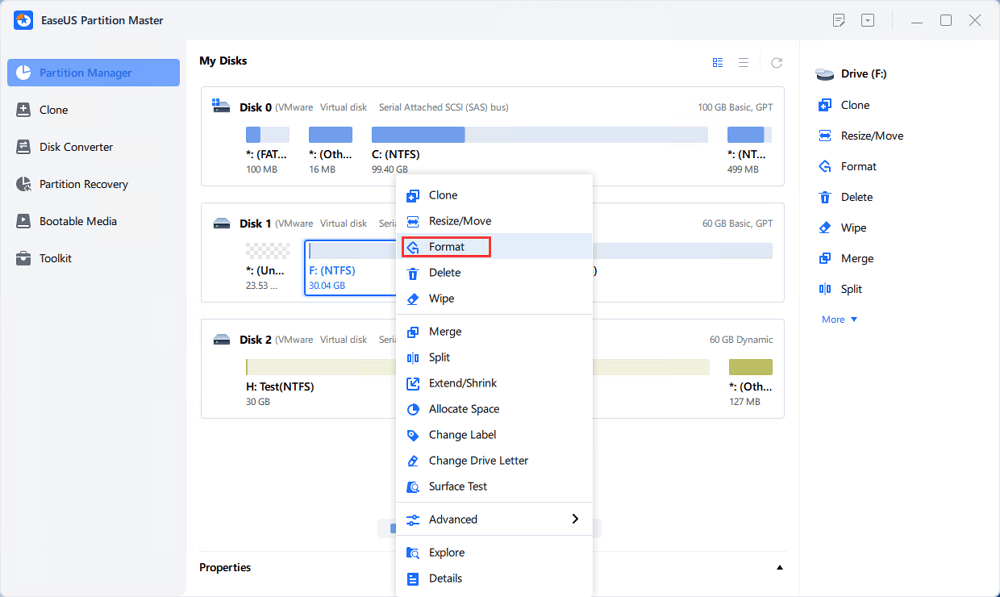
Step 1. Run EaseUS Partition Master, right-click the hard drive partition you intend to format and choose "Format".
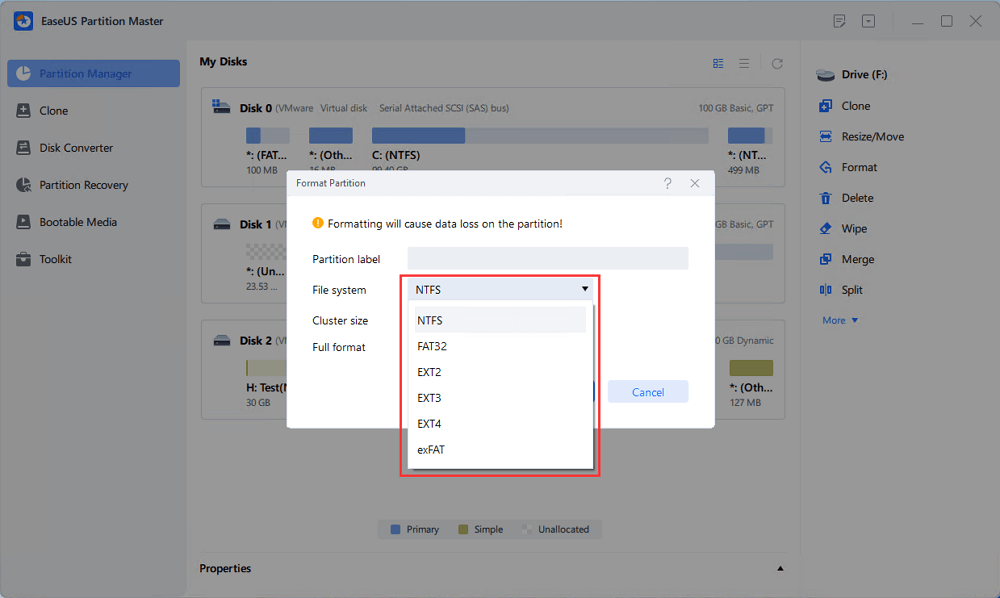
Step 2. In the new window, set the Partition label, File system (NTFS/FAT32/EXT2/EXT3/EXT4/exFAT), and Cluster size for the partition to be formatted, then click "OK".
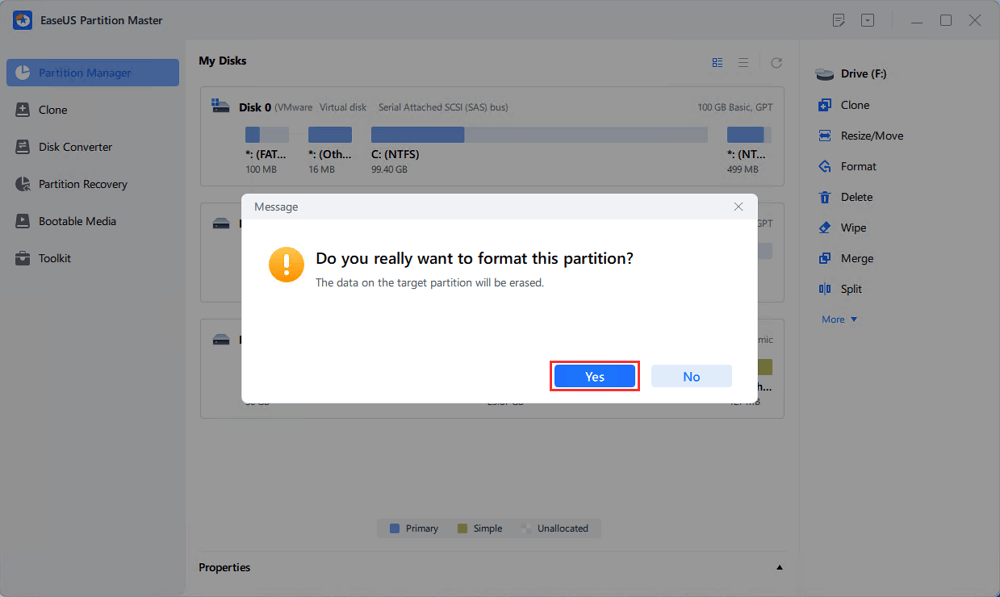
Step 3. Then you will see a warning window, click "Yes" in it to continue.
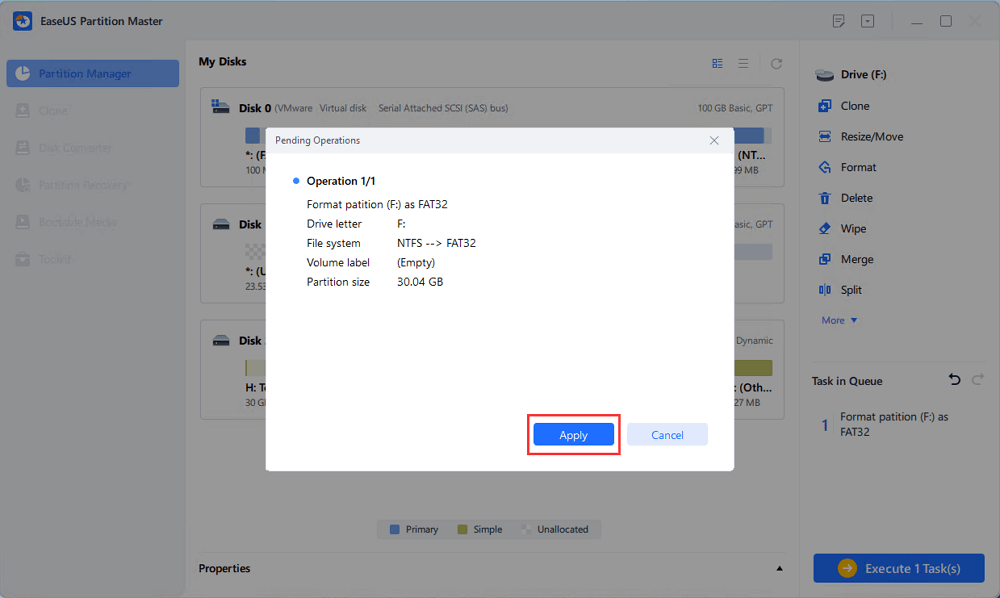
Step 4. Click the "Execute 1 Task(s)" button to review the changes, then click "Apply" to start formatting the partition on your hard drive.
Check the following posts to learn more about EaseUS Partition Master's Bitlocker solutions:
If your BIOS fails to recognize the USB port with the USB drive inserted properly, you might encounter the "BitLocker Could Not Be Enabled" error. To resolve this issue, try the following solutions:
Disabling BitLocker and then re-enabling it can fix the "BitLocker Could Not Be Enabled" error. This method can sometimes work effectively. There are various ways to disable and re-enable Bitlocker service. We'll do it through the Services Manager:
Here's how to disable the Bitlocker service:
Step 1. Press the Windows key + R to open the Run dialog box.
Step 2. Type services.msc in the box and click OK to proceed.

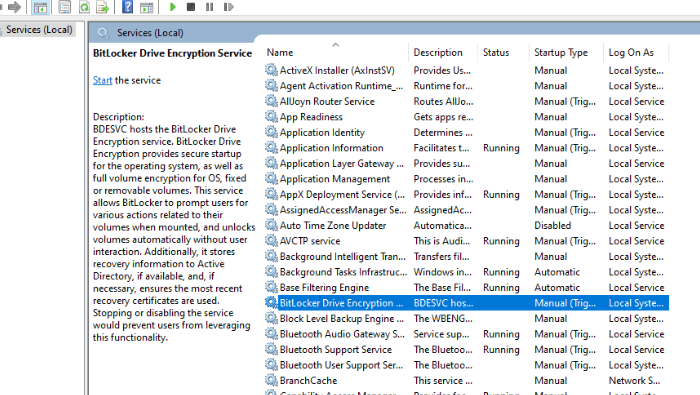
Step 3. In the Services window, locate BitLocker Drive Encryption Service and double-click on it.
Step 4. Set the Startup type to Disabled.
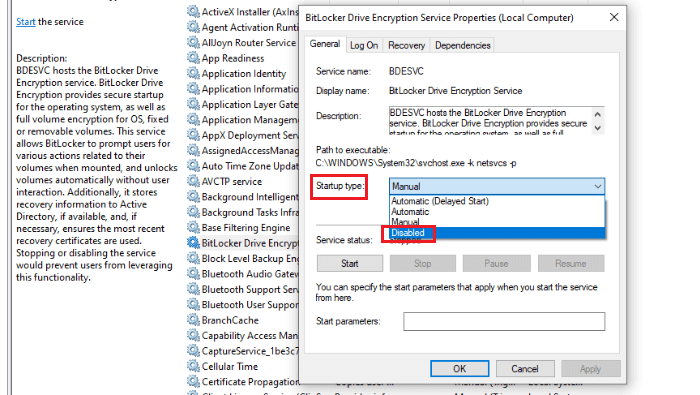
Step 5. Click Apply and then OK to save the changes.
Here's how to re-enable the Bitlocker service:
Step 1. Press the Windows key + R to open the Run dialog box.
Step 2. Type services.msc in the box and click OK to proceed.
Step 3. In the Services window, locate BitLocker Drive Encryption Service and double-click on it.
Step 4. Set the Startup type to Automatic and click Start.
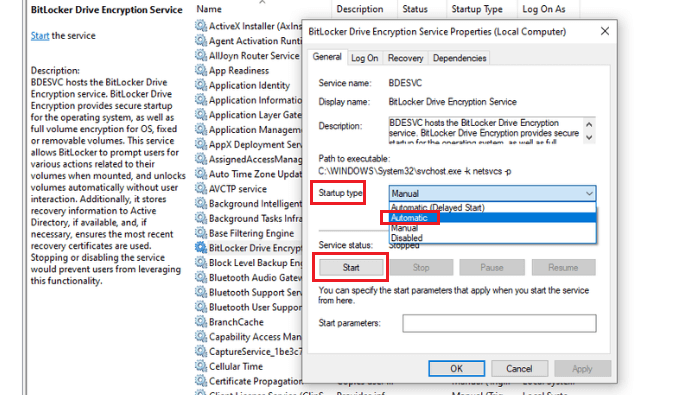
Step 5. Click Apply and then OK to save the changes.
If your BIOS has not been updated for a long time, it might not be compatible with newer versions of BitLocker, potentially causing the "BitLocker Could Not Be Enabled" error. To resolve this issue, consider updating your BIOS.
Keep in mind that a failed BIOS update can result in data loss, so it is recommended to back up your disk before proceeding. To learn more about BIOS, the underlying principles, and detailed backup methods, refer to this comprehensive EaseUS guide: 2 Available Ways | How to Update BIOS Without USB?
Clearing or reinstalling the TPM potentially fixes the issue. However, be sure to back up your data to prevent data loss before clearing the TPM. Let's first reinstall the TPM:
Step 1. Press Windows + X and choose Device Manager from the menu.
Step 2. Expand the Security Devices section, right-click the driver, and select Uninstall device.
Step 3. Click Uninstall in the confirmation dialog.
Step 4. Restart your computer and check if the issue has been resolved.
On some Dell devices, TPM is cleared through TPM.MSC can fix the issue. You can try this solution after ensuring all necessary BitLocker settings are enabled. Here's a brief guide:
Step 1: Verify BitLocker Requirements
Step 2: Clear TPM
Don't forget to share this comprehensive tutorial with your friends or other users:
Although rare, BitLocker issues can occur with an MBR (Master Boot Record) partition. Converting it to GPT (GUID Partition Table) may fix the error, but remember that this will erase all data, which is similar to formatting. Therefore, always create a backup.
Follow the steps:
Step 1. Press Win + X and select Disk Management.
Step 2. Locate the disk you want to convert, right-click on its partitions, and select Delete Volume to remove all partitions.
Step 3. Once the drive shows as Unallocated, right-click it and select Convert to GPT Disk.
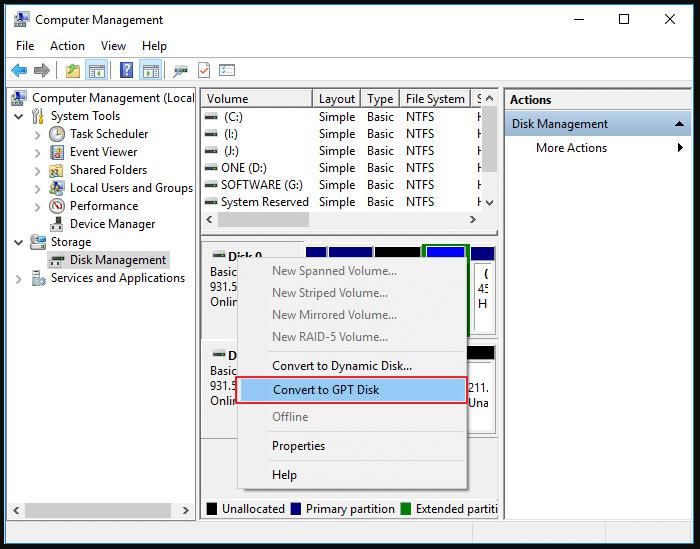
Step 4. If the disk is already GPT, the option will be Convert to MBR Disk, and no action is needed.
To resolve the "BitLocker encryption key cannot be obtained" error, try the methods provided in this guide, including addressing TPM issues, updating BIOS, and adjusting partition settings. We recommend starting with EaseUS Partition Master for an efficient solution. You should be able to resolve the 'BitLocker encryption key cannot be obtained' issue by identifying the cause and applying the provided methods step by step.
Do you have more queries? Check out the FAQs below!
1. Why can't I find my Bitlocker recovery key?
If you can't find your BitLocker recovery key, it may not have been saved securely or could be misplaced. Typically, it's stored in your Microsoft account, on a USB drive, or printed on paper.
2. How do I find the BitLocker recovery key when I forget it?
Here's a general guide on how to find your BitLocker recovery key:
3. Can I turn off BitLocker?
Yes, BitLocker can be turned off. Here's how to disable it:
How Can We Help You
"I hope my articles can help solve your technical problems. If you are interested in other articles, you can check the articles at the bottom of this page. Similarly, you can also check my Twitter to get additional help."
Cici is the junior editor of the writing team of EaseUS. She accepted the systematic training on computers at EaseUS for over one year. Now, she wrote a lot of professional articles to help people resolve the issues of hard drive corruption, computer boot errors, and disk partition problems.
It won't hot image your drives or align them, but since it's coupled with a partition manager, it allows you do perform many tasks at once, instead of just cloning drives. You can move partitions around, resize them, defragment, and more, along with the other tools you'd expect from a cloning tool.
Read MoreI love that the changes you make with EaseUS Partition Master Free aren't immediately applied to the disks. It makes it way easier to play out what will happen after you've made all the changes. I also think the overall look and feel of EaseUS Partition Master Free makes whatever you're doing with your computer's partitions easy.
Read MorePartition Master Free can Resize, Move, Merge, Migrate, and Copy disks or partitions; convert to local, change label, defragment, check and explore partition; and much more. A premium upgrade adds free tech support and the ability to resize dynamic volumes.
Read MoreIt won't hot image your drives or align them, but since it's coupled with a partition manager, it allows you do perform many tasks at once, instead of just cloning drives. You can move partitions around, resize them, defragment, and more, along with the other tools you'd expect from a cloning tool.
Read MoreI love that the changes you make with EaseUS Partition Master Free aren't immediately applied to the disks. It makes it way easier to play out what will happen after you've made all the changes. I also think the overall look and feel of EaseUS Partition Master Free makes whatever you're doing with your computer's partitions easy.
Read MoreRelated Articles
3DS SD Card Format | How to format 3Ds SD Card🔥
![]() Daisy/2025/04/28
Daisy/2025/04/28
How to Extend C Drive in Windows 10? [3 Efficient Ways]
![]() Tracy King/2025/04/28
Tracy King/2025/04/28
DiskPart Format: How to Format Hard Drive Using DiskPart [Free]
![]() Jean/2025/04/28
Jean/2025/04/28
MSI Stuck on MSI Screen Windows 10/11? How to Fix?
![]() Sherly/2025/04/28
Sherly/2025/04/28
EaseUS Partition Master

Manage partitions and optimize disks efficiently
Your best companion for disk partitioning, MBR to GPT/GPT to MBR conversion,even OS migration
CHOOSE YOUR REGION
Start Your Free Trial!
Sign up to our newsletter, stay updated on news and exclusive offers from EaseUS. Don't worry, if you change your mind, you can unsubscribe at any time, free of charge. We value your privacy (Privacy Policy).
Start Your Free Trial!
Sign up to our newsletter, stay updated on news and exclusive offers from EaseUS. Don't worry, if you change your mind, you can unsubscribe at any time, free of charge. We value your privacy (Privacy Policy).