Page Table of Contents
Check Your Storage on MacHOT
How Do I Get More Disk Space on Mac - 5 Effective WaysHOT
Way 1. Move Files to External Storage via EaseUS Partition Master for MacHOT
Way 2. Clean Up Your Mac HOT
Way 3. Using Cloud Storage ServicesHOT
Way 4. Upgrade the Internal Hard DriveHOT
Way 5. Compress Your FilesHOT
ConclusionHOT
FAQs About How Do I Get More Disk Space on MacHOT
About the Author
Hot Topics
Updated on Apr 28, 2025
Running low on disk space on your Mac? As applications and files grow in size, users often run out of storage space. Whether you're using a MacBook Air or Pro, macOS Sonoma, or Ventura, running out of space can be annoying because it can severely impact your computer's performance and make it less enjoyable for everyone.
Understanding how to get more disk space is crucial for all Mac users, whether you're new to the platform or a seasoned user. In this article, EaseUS will explore 5 effective ways for Mac disk cleanup. By following these methods, you can boost your Mac's performance and keep it running smoothly.
Check Your Storage on Mac
Before you start cleaning up the disk, it's crucial to understand how your storage is allocated. You can check your storage details by following these steps:
Step 1. Open the System Settings app.
Step 2. Click the General in the sidebar.

Step 3. Select the Storage category.
This will display various categories, such as Documents, Apps, System Data, and macOS Storage Usage. The junk files we want to get rid of may be hidden in these categories.
If the currently available storage space is relatively small compared to the amount of storage space you need, then Way 2, as discussed below, can solve your problem. However, if you need more storage space, then Way 1 is our most recommended method. Because it is less technically difficult and can save you time and energy, of course, there are other ways to increase your storage space, so if you're curious, keep reading.
How Do I Get More Disk Space on Mac - 5 Effective Ways
Now you've assessed your storage needs on your Mac. If your hard drive hits about 80% capacity, you may notice a slowdown, as tests show that nearly full drives can perform up to 17% slower. For a better experience using a Mac, here are five effective methods to help you do so.
Way 1. Move Files to External Storage via EaseUS Partition Master for Mac
One of the easiest ways to free up space is by moving files to an external drive. EaseUS Partition Master for Mac is a versatile tool designed to help users manage their disk partitions efficiently, including those who want to clone files seamlessly to an external hard drive. This software not only simplifies the process but also ensures that your data remains intact during transfer.
You only need to download the tool and follow the steps below to save time and energy:
Step 1. Connect your removable device to Mac and run EaseUS Partition Master.
Click "Clone" at the left pane under the Abilities section, click the "+" icon to select a source external device you want to clone.
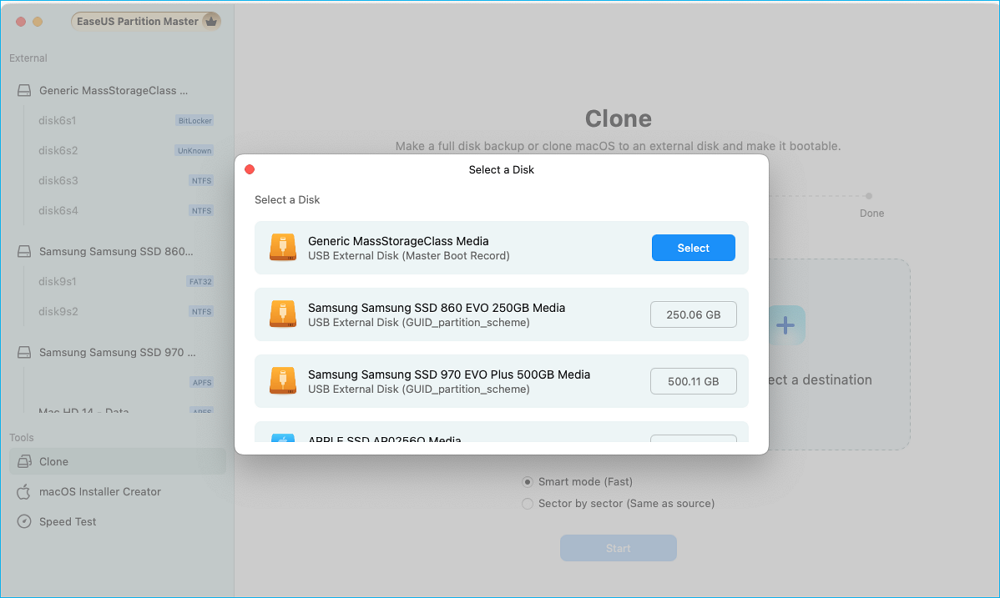
Step 2. Select a new target disk as destination to clone the selected removable disk - external HDD/SSD, USB, or SD card.
When both source and target external storage devices are selected, click "Start" to begin.
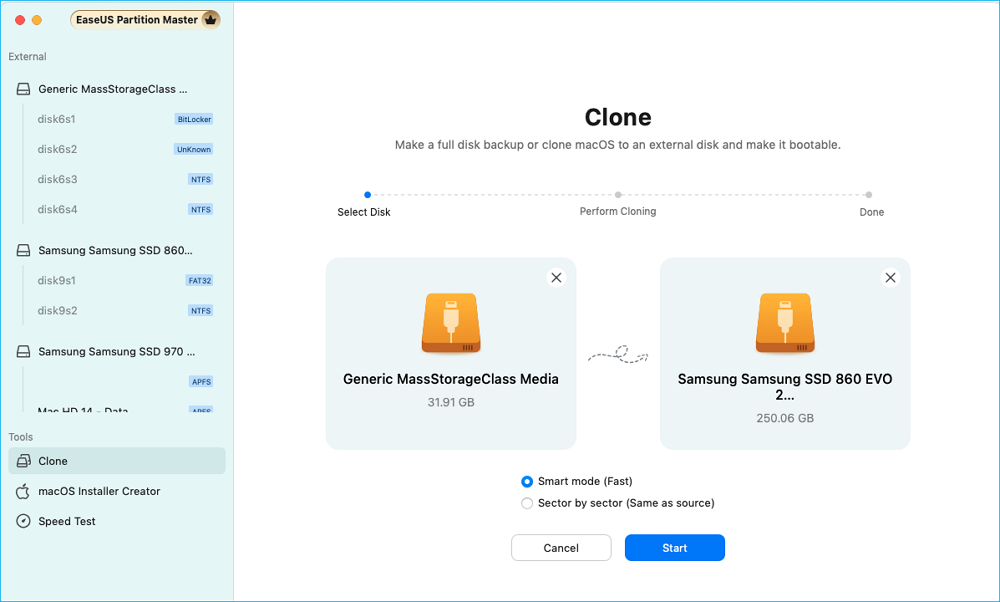
Step 3. Click "Yes" when EaseUS Partition Master for Mac request you to confirm the operation.
Step 4. Wait patiently to let EaseUS Partition Master for Mac to complete the cloning process.
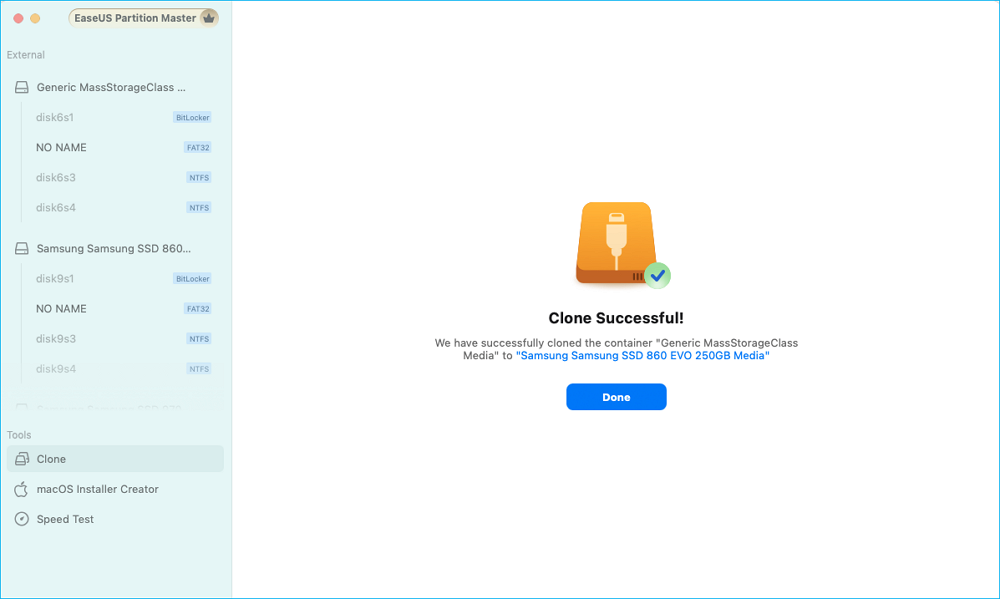
In addition to its clone function, this disk management tool offers several valuable features, including the following:
- Create a bootable installer for macOS.
- Convert FAT to exFAT on Mac
- Unlock BitLocker drives on Mac.
- Run a speed test for a disk.
Based on the powerful functions of this disk management tool, we highly recommend you use EaseUS Partition Master for Mac to manage your disk space more easily.
Way 2. Clean Up Your Mac
To free up space on your Mac, follow these steps to remove system junk, including cache files, unused installers, desktop clutter, and browser cache data:
Option 1. Remove System Junk
#1. Clear Cache Files: Cache files are temporary data created by applications to speed up processes. Over time, these files can accumulate and take up a lot of space. To remove them, you can follow these steps:
Step 1. Open Finder.
Step 2. Select Go from the menu, then choose Go to Folder.
Step 3. Type ~/Library/Caches and move the contents of this folder to Bin.

#2. Remove Unused Installers: Check your Downloads folder for any installers you no longer need and delete them. Here are the steps:
Step 1. Open Finder: Click on the Finder icon in your Dock.
Step 2. Go to Applications Folder: In the left sidebar, select Applications.
Step 3. Identify Unused Installers: Look for installer files, which are often named with "Install" followed by the macOS version (e.g., "Install macOS Mojave"). They may also be in your Downloads folder.
Step 4. Move Installers to Trash: Select the unused installer files by clicking on them. Hold down the Command key to select multiple files. And then right-click and choose Move to Trash, or drag them to the Trash icon in your Dock.
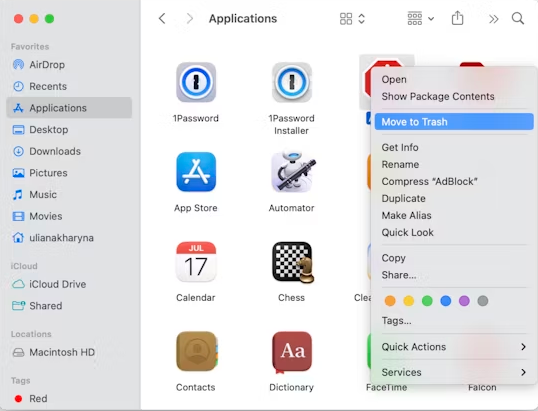
#3. Declutter Your Desktop: Organize your desktop by moving files into folders or deleting items you don't use anymore.
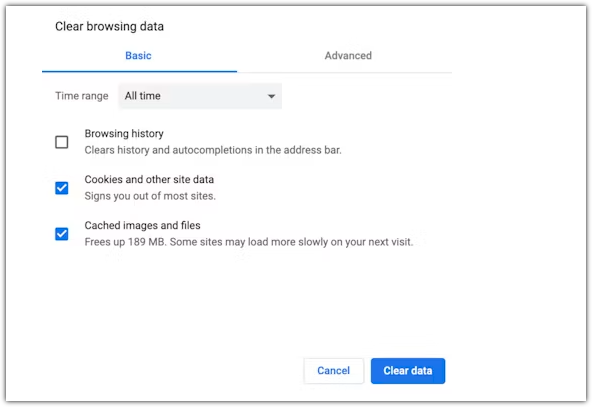
#4. Clear Browser Cache: Go to your browser settings and find the option to clear browsing data or cache. Here is an example of cleaning Google Chrome:
Step 1. Open Chrome: Launch the Google Chrome browser.
Step 2. Access Settings: Click the three dots in the upper right corner, then select More Tools > Clear Browsing Data.
Step 3. Select Data to Clear: Choose a time range (e.g., Last hour, All time) and check the boxes for Cookies and other site data, Cached images and files, and any other data you want to remove.
Step 4. Clear Data: Click on Clear Data.
Option 2. Delete useless files
As time goes on, your Mac collects a significant amount of data, much of which might have become outdated. Here are the steps to identify and clear out those old files:
Step 1. Open Finder. Click on the Finder icon in your Dock to launch it.
Step 2. In the Finder sidebar, select Downloads. This folder often contains installers and files that you may have forgotten about.
Step 3. Review your Documents, Pictures, Videos, and Music folders and delete any files you no longer need by selecting them and pressing Command + Delete or right-clicking and choosing Move to Trash.
Option 3. Get Rid of Unused Apps
Check your Applications for any apps you no longer need and delete them. Here are the steps:
Step 1. Open Finder: Click on the Finder icon in your Dock.
Step 2. Go to Applications: In the left sidebar, select Applications.
Step 3. Delete Apps: Look for any applications that you no longer need and move them to Trash.

Option 4. Empty Your Trash
Keep in mind that when you delete files, they go to the Trash and don't free up space until the Trash is emptied. Here's the process:
Step 1. Right-click the Trash icon in the Dock.
![]()
Step 2. Choose Empty Trash. If asked, confirm the action.
Step 3. Make it a routine to empty your Trash regularly.
Keeping up with this little habit can significantly free up disk space on your Mac.
If you found these tips helpful for cleaning up your Mac, share them on social media to help others optimize their devices too.
Way 3. Using Cloud Storage Services
Using cloud storage services can help free up local disk space while keeping your important files accessible. Services like iCloud, Google Drive, and Dropbox allow you to store documents, photos, and media online, providing a flexible solution for managing your data.
To enable iCloud storage on your Mac, follow these steps:
Step 1. Open the System Settings App: Click on the Apple menu in the upper left corner of your screen and select System Settings.
Step 2. Access Your Profile: Click on your profile name at the top of the left pane to access your Apple ID settings.
Step 3. Select iCloud: In the settings menu, find and click on the iCloud category to manage your iCloud settings.
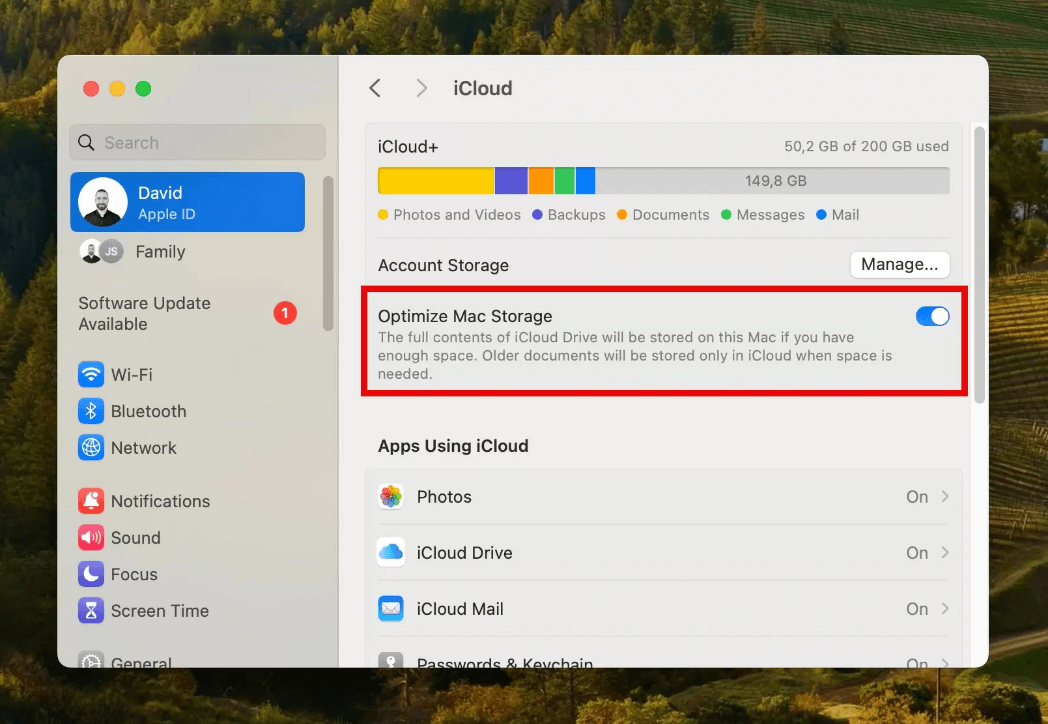
Step 4. Enable Optimize Mac Storage: Turn on the Optimize Mac Storage feature to automatically store your documents and desktop files in iCloud, which will help free up physical space on your Mac.
- Notice:
-
iCloud provides a free tier of 5 GB, suitable for light users. For those needing more space, Apple offers several paid plans:
- 50 GB for $0.99/month
- 200 GB for $2.99/month
- 2 TB for $9.99/month
Choose a plan that fits your storage needs to keep your important files secure and accessible.
Way 4. Upgrade the Internal Hard Drive
If you're still running low on space after cleaning up, consider upgrading your internal hard drive, particularly with a solid-state drive (SSD). This can greatly enhance performance and provide additional storage capacity. Here's how to do it:
Step 1. Check Compatibility: Determine if your Mac model supports SSD upgrades by clicking the Apple menu and selecting About This Mac.
Step 2. Purchase a Compatible SSD: If your Mac can be upgraded, buy a compatible SSD from a reputable supplier.
Step 3. Backup Your Data: Use Time Machine or another backup method to ensure your data is safe before making any changes.
Step 4. Replace the SSD: Remove the old internal hard drive. Slide the new SSD into place, making sure to place each module in the correct slot.
Step 5. Reinstall macOS: After installing the new SSD, boot into Recovery Mode to reinstall macOS and restore your data from the backup.
However, this method is a highly technical process that may not be suitable for beginners. So follow a guide or consult a professional for installation.
Way 5. Compress Your Files
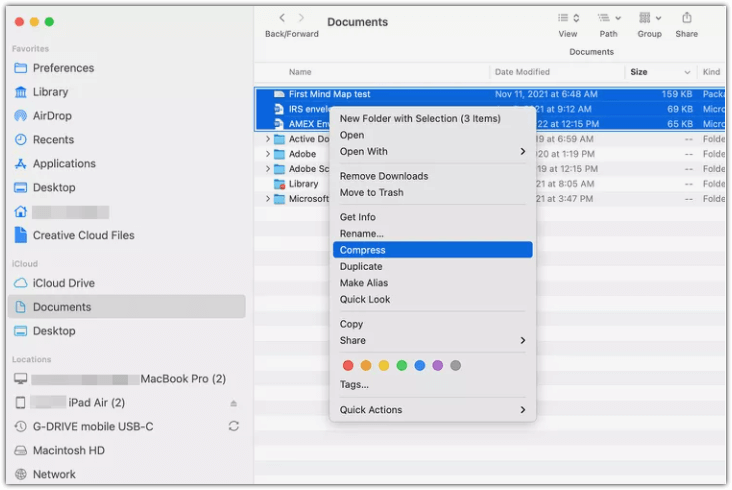
Compressing files is an effective way to save significant disk space without deleting them. By reducing the size of files, you can store more data on your Mac while using minimal storage space. Additionally, file compression makes it easier to share large numbers of files via email, allowing you to send multiple items in a single compressed folder instead of sending them one or two at a time. Here are the steps:
Step 1. Open Finder and go to your documents.
Step 2. Command + click on a folder (or multiple folders).
Step 3. Choose Compress.
Don't hesitate to share this information with others. Click the buttons below to share it on your social media.
Conclusion
Managing disk space on your Mac is essential to maintaining optimal performance and usability. You can do this by deleting system junk files, upgrading your Mac's internal hard drive, or using the highly recommended EaseUS Partition Master for Mac. This tool simplifies the process of cleaning up files, making it easier for you to organize your data and increase your Mac's efficiency.
When moving files to external drives, EaseUS Partition Master is highly recommended. This tool simplifies the process of cleaning up files, making it easier for you to organize your data and increase the efficiency of your Mac.
FAQs About How Do I Get More Disk Space on Mac
The process of getting more disk space on your Mac is relatively complex and requires careful operation and patience. There may be some questions here. Check out the FAQs.
1. Why is my Mac disk space full?
Your Mac disk space may be full due to the accumulation of unnecessary files, large media, applications, and cache data that take up significant storage.
2. What happens when your Mac runs out of disk space?
When your Mac runs low on disk space, several issues may arise:
- Slow Performance: The system can become sluggish as macOS relies on free space for virtual memory.
- App Crashes: Applications may freeze or fail to launch due to insufficient space for temporary files.
- Inability to Save Files: You may receive error messages when trying to save new files or download content.
- Update Failures: System and software updates may fail if there isn't enough space available.
- Backup Issues: Time Machine and other backup services may not function properly.
- Data Corruption: A full disk can lead to data loss or file corruption.
3. Can I copy the macOS to an external hard drive?
Yes, you can copy macOS to an external hard drive. You can do this using Disk Utility by erasing and formatting the external drive and then restoring your internal drive to the external one. Alternatively, you can use third-party cloning software like EaseUS Partition Master for Mac to clone macOS to an external hard drive. After cloning, you can boot from the external drive by holding down the Option key during startup and selecting it as the boot disk.
How Can We Help You
About the Author
Cici is the junior editor of the writing team of EaseUS. She accepted the systematic training on computers at EaseUS for over one year. Now, she wrote a lot of professional articles to help people resolve the issues of hard drive corruption, computer boot errors, and disk partition problems.
Product Reviews
-
It won't hot image your drives or align them, but since it's coupled with a partition manager, it allows you do perform many tasks at once, instead of just cloning drives. You can move partitions around, resize them, defragment, and more, along with the other tools you'd expect from a cloning tool.
Read More -
I love that the changes you make with EaseUS Partition Master Free aren't immediately applied to the disks. It makes it way easier to play out what will happen after you've made all the changes. I also think the overall look and feel of EaseUS Partition Master Free makes whatever you're doing with your computer's partitions easy.
Read More -
Partition Master Free can Resize, Move, Merge, Migrate, and Copy disks or partitions; convert to local, change label, defragment, check and explore partition; and much more. A premium upgrade adds free tech support and the ability to resize dynamic volumes.
Read More -
It won't hot image your drives or align them, but since it's coupled with a partition manager, it allows you do perform many tasks at once, instead of just cloning drives. You can move partitions around, resize them, defragment, and more, along with the other tools you'd expect from a cloning tool.
Read More -
I love that the changes you make with EaseUS Partition Master Free aren't immediately applied to the disks. It makes it way easier to play out what will happen after you've made all the changes. I also think the overall look and feel of EaseUS Partition Master Free makes whatever you're doing with your computer's partitions easy.
Read More
Related Articles
-
How to Unlock BitLocker Drive on Another PC | 2 Safe Guides
![author icon]() Sherly/2025/04/28
Sherly/2025/04/28 -
How to Clone Mac Hard Drive to USB Flash Drive – Full Guide
![author icon]() Cici/2025/04/28
Cici/2025/04/28 -
Samsung Magician Data Migration Stuck at 0% While Cloning [100% Working]
![author icon]() Larissa/2025/04/18
Larissa/2025/04/18 -
Disk Utility Not Loading? Effective Solutions to Fix Disk Utility Not Loading Issue
![author icon]() Brithny/2024/12/30
Brithny/2024/12/30
Hot Topics
EaseUS Partition Master

Manage partitions and optimize disks efficiently


