Page Table of Contents
About the Author
Hot Topics
Updated on Apr 28, 2025
Solid State Drives (SSDs) have emerged as game-changers in computing. These have revolutionized the way users store and access data. Their lightning-fast performance and enhanced reliability make them a preferred choice. Just like any storage device, there might be occasions when you need to revive your SSD by erasing its data and beginning anew. There could be many reasons which can make you format your SSDs.
These include reinstalling your operating system, erasing sensitive data, or troubleshooting issues. That's why learning to format your SSD from BIOS is essential. EaseUS will take you through each step of the process to format your SSD directly from the BIOS in this detailed guide. You'll find the instructions simple to follow and execute, even if it is your first time.
How to Format SSD From BIOS - 3 Methods
Below, we compare both methods to help you make an informed decision:
| 🆚Comparison | 🥇EaseUS Partition Master | 🥈Secure Erase | 🥉Command Prompt |
|---|---|---|---|
| ⏰Duration | 5 Minutes | 7 Minutes | 10 Minutes |
| 🔒Difficulty Level | Easiest | Easy | Hard |
| 🚀Effectiveness | High | Moderate | Moderate |
| 👩💻Suitable Users | All Users | All Users | Seasoned Users |
Way 1. Best Option - EaseUS Partition Master
Regarding formatting an SSD from the BIOS, a more user-friendly and feature-rich method is available: EaseUS Partition Master Pro. This powerful partition management software offers a seamless solution for creating bootable media and formatting SSDs in the BIOS.
Advantages of EaseUS Partition Master:
- User-Friendly Interface: EaseUS Partition Master's intuitive interface suits users of all skill levels. No advanced technical knowledge is required to utilize its various features effectively.
- Enhanced Data Protection: The software incorporates advanced algorithms to ensure data integrity during partition operations, significantly reducing the risk of data loss compared to BIOS formatting.
- Faster Operation: It completes tasks swiftly, saving valuable time and reducing the waiting period.
Follow these simplified steps to create a bootable disk on a healthy computer:
Step 1. To create a bootable disk of EaseUS Partition Master, you should prepare a storage media, like a USB drive, flash drive or a CD/DVD disc. Then, correctly connect the drive to your computer.
Step 2. Launch EaseUS Partition Master, and find the "Bootable Media" feature on the left. Click on it.
Step 3. You can choose the USB or CD/DVD when the drive is available. However, if you do not have a storage device at hand, you can also save the ISO file to a local drive, and later burn it to a storage media. Once made the option, click the "Create" button to begin.
- Check the Warning message and click "Yes".
Step 4. When the process finishes, you'll see a pop up window, asking if you want to restart computer from the bootable USB.
- Reboot Now: it means you want to restart the current PC and enter EaseUS Bootable Media to manage your disk partitions without OS.
- Done: it means you don't want to restart the current PC but to use the bootable USB on a new PC.
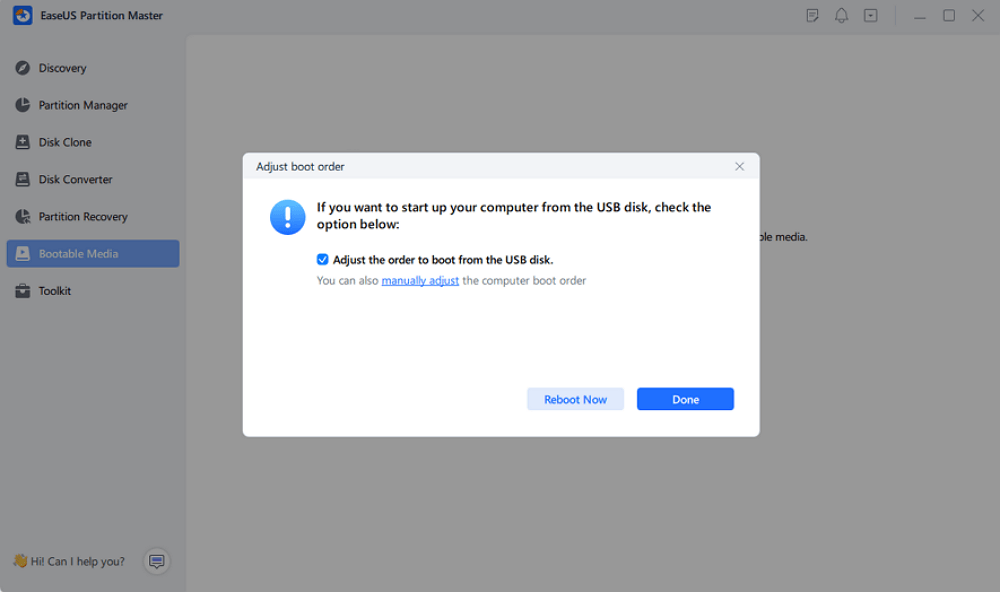
Note: To use the bootable disk on a new PC, you need to resart the target computer and press F2/F8/Del key to enter BIOS, and set the USB bootable disk as the first boot disk.
Wait patitiently and your computer will automatically boot up from the USB bootable media and enter EaseUS WinPE desktop.
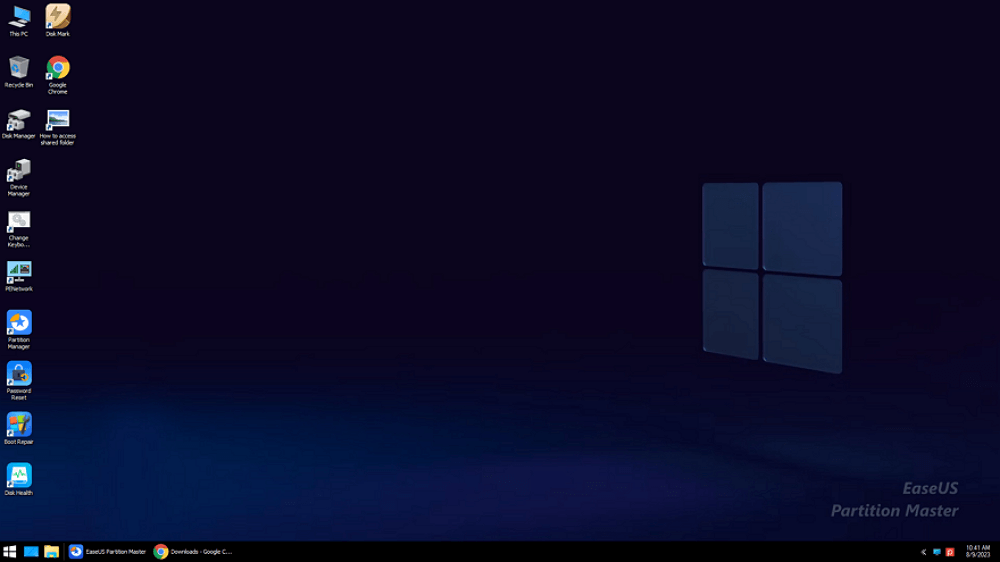
Use the bootable USB to boot your computer and format your SSD in the WinPE environment:
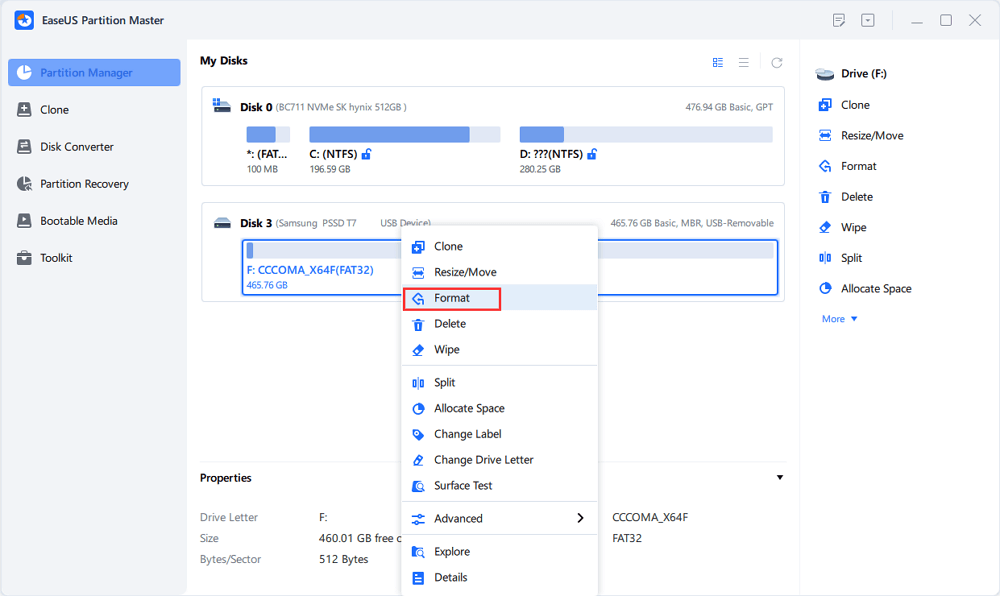
Step 1. Launch EaseUS Partition Master, right-click the partition on your external hard drive/USB/SD card which you want to format and choose the "Format" option.
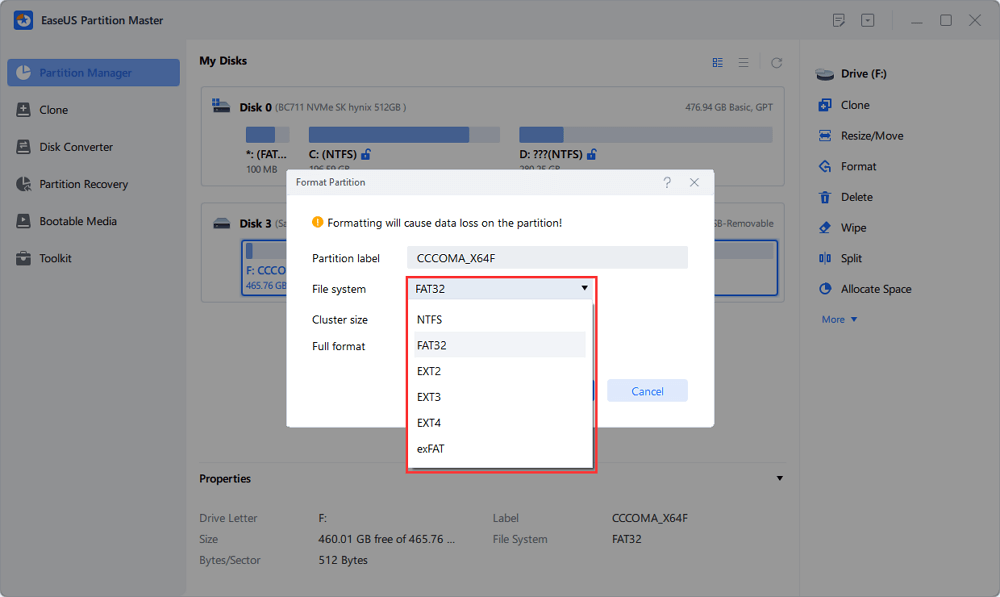
Step 2. Assign a new partition label, file system (NTFS/FAT32/EXT2/EXT3/EXT4/exFAT), and cluster size to the selected partition, then click "OK".
Step 3. In the Warning window, click "Yes" to continue.
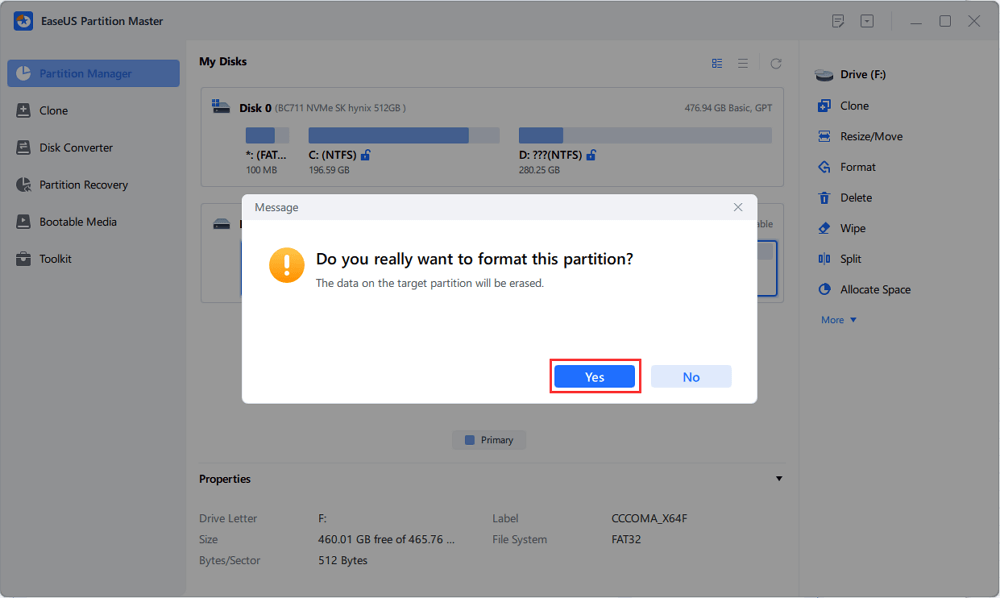
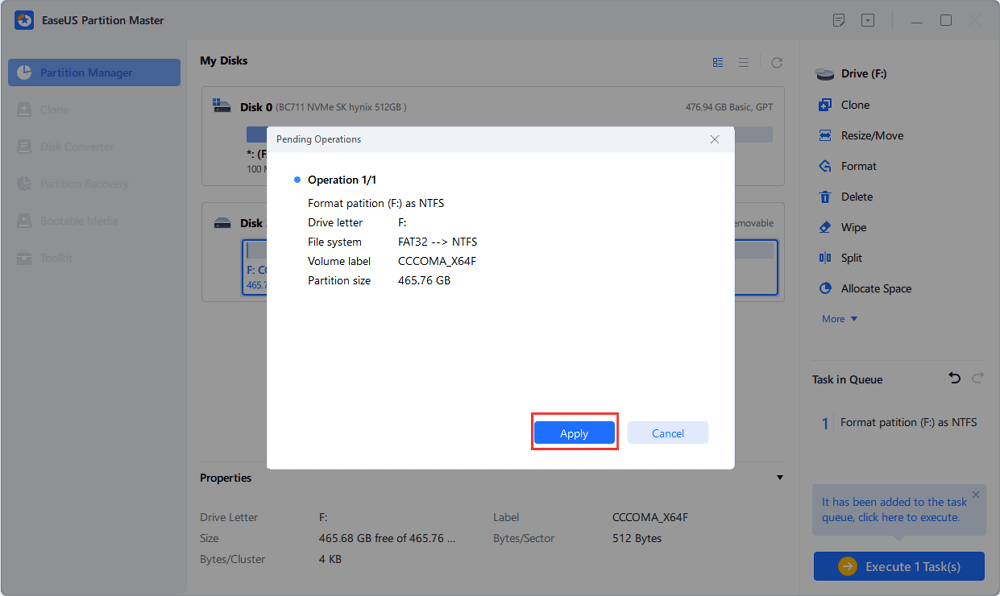
Step 4. Click the "Execute 1 Task(s)" button in the top-left corner to review the changes, then click "Apply" to start formatting your external hard drive/USB/SD card.
Notable Features of EaseUS Partition Master:
- Wipe hard drive from BIOS: You can wipe a hard drive from the bootable USB in the BIOS.
- Migrate OS to SSD/HDD: Seamlessly transfer your operating system and data to a new SSD or HDD without reinstalling Windows.
- Disk Cloning: Clone your entire disk or individual partitions to safeguard against data loss or upgrade to a larger storage drive.
- With EaseUS Partition Master, you can learn how to format M.2 SSD in Windows 10.
- Convert Disk and Partition Type: Convert between MBR and GPT disks or primary and logical partitions without data loss.
- Format SSD with no harm to it: It formats an SSD safely and efficiently and won't damage the SSD at all.
For a hassle-free and versatile solution to format your SSD and manage partitions effectively, we highly recommend using EaseUS Partition Master.
If you want to share this helpful passage with others who are in the same need, use the below social media platforms:
Way 2. Secure Erase
Formatting an SSD from the BIOS is a straightforward and effective solution to refresh your storage drive. This guide will lead you through a step-by-step process of formatting your SSD directly from the BIOS interface. Before proceeding, ensure you have backed up any essential data, as formatting will erase all existing content. With this solution, you can also format a hard drive from BIOS Windows 10.
Another essential thing to remember is that this feature is only available in some motherboards. Here is how to format SSD from BIOS:
Step 1: Press the BIOS key after rebooting your computer when the system reboots. The BIOS can differ depending on your computer model and can be F1, F2, F10, F12, Delete, or Esc. In the BIOS settings, navigate to "Security."
Step 2: Tap "Hard Drive Utilities" or "Hard Drive Tools," depending on your computer model. Now, choose "Secure Erase" and select the SSD to erase the disk.

Way 3. Command Prompt
If your computer doesn't boot or is stuck at the start screen, you can use the Command Prompt to format SSD. Here is a comprehensive guide on how to do that:
Step 1. Refer to way 1 to create a bootable disk using EaseUS Partition Master. Boot your computer via the bootable disk.

Step 2. In the "Use a Device" screen, choose the bootable device, and you will enter the "Windows Setup."

Step 3. Press the "Shift + F10" keys, and the Command Prompt will expand. Write the following commands and end with hitting "Enter" for each:
- diskpart
- list volume
- exit
- dir #:
- format #: /fs: NTFS
- Y
(Replace # with the target SSD's name. You can change NTFS with other formats.)
Step 4. Enter exit to quit after the format process is completed.
Conclusion
This article explored two methods for formatting an SSD - from the BIOS and using EaseUS Partition Master. How to format SSD from BIOS involves accessing the system's firmware settings and using secure erase to wipe the SSD. While effective, it may be time-consuming and carries a higher risk of data loss, especially for less experienced users.
In contrast, EaseUS Partition Master emerged as the best alternative for formatting SSDs. This powerful partition management software offers a user-friendly interface, enhanced data protection, and faster operation. It ensures a seamless and efficient process. Additionally, it provides a range of partition management features, making it a comprehensive disk management tool.
Here are some related articles about how to format SSD from BIOS. Read and explore more interesting information through the links below:
FAQs of How to Format SSD From BIOS
As you venture into how to format SSD from BIOS or consider the alternative of using EaseUS Partition Master, you may encounter some questions along the way. Below, we have compiled frequently asked questions to address any doubts you might have and provide clear answers for a successful SSD formatting process:
1. Can I format an SSD using BIOS?
Yes, you can format your SSD drive from the BIOS settings. This feature is available on only a few motherboards and is not universal. Even the system where this function is available performs a secure erase rather than formatting the SSD. Moreover, you should be careful when changing setting in BIOS as it negatively impacts your system.
2. How can I format my SSD entirely?
To format your SSD completely, you can follow these steps:
Step 1: Start by pressing "Win + X" and choosing "Disk Management" from the menu. In the Disk Management window, locate your SSD from the list of available drives.
Step 2: Right-click on the SSD you want to format, and from the context menu, choose "Format." In the Format window, choose the desired file system for your SSD.
Step 3: Now, set the Allocation unit size based on your preference and provide a name or label for your SSD partition in the "Volume label" field. After reviewing your settings, click "OK" to confirm and begin formatting.
3. How to reformat a badly corrupted SSD?
Here is how you can reformat a badly corrupted SSD:
Step 1: Run the Windows search bar to look for Command Prompt and run it as administrator. In Command Prompt, run the command diskpart and follow it by running the list disk command.
Step 2: This command will display a list of all available disks on your computer, including your SSD. To select your SSD for formatting, type the select disk X command and press Enter (replace "X" with the disk number of your SSD).
Step 3: Use the clean command to remove all partitions and data from the SSD. Then, input and execute the create partition primary command to create a primary partition.
Step 4: Run the select partition 1 command to select the new partition for formatting. Type the format fs=ntfs quick command and press Enter to format the partition. Lastly, use the assign letter=X to assign a letter to the new partition.
How Can We Help You
About the Author
Updated by Tracy King
Tracy became a member of the EaseUS content team in 2013. Being a technical writer for over 10 years, she is enthusiastic about sharing tips to assist readers in resolving complex issues in disk management, file transfer, PC & Mac performance optimization, etc., like an expert.
Cici is the junior editor of the writing team of EaseUS. She accepted the systematic training on computers at EaseUS for over one year. Now, she wrote a lot of professional articles to help people resolve the issues of hard drive corruption, computer boot errors, and disk partition problems.
Product Reviews
-
I love that the changes you make with EaseUS Partition Master Free aren't immediately applied to the disks. It makes it way easier to play out what will happen after you've made all the changes. I also think the overall look and feel of EaseUS Partition Master Free makes whatever you're doing with your computer's partitions easy.
Read More -
Partition Master Free can Resize, Move, Merge, Migrate, and Copy disks or partitions; convert to local, change label, defragment, check and explore partition; and much more. A premium upgrade adds free tech support and the ability to resize dynamic volumes.
Read More -
It won't hot image your drives or align them, but since it's coupled with a partition manager, it allows you do perform many tasks at once, instead of just cloning drives. You can move partitions around, resize them, defragment, and more, along with the other tools you'd expect from a cloning tool.
Read More
Related Articles
-
Clear/Reformat/Erase/Wipe SD Card & USB Flash Drive
![author icon]() Jean/2025/04/28
Jean/2025/04/28 -
Failed to Format the Device? How to Fix HP USB Format Tool Write Protected
![author icon]() Daisy/2025/04/28
Daisy/2025/04/28 -
How to Extend Partition in Windows 7 without Data Loss🚀
![author icon]() Jean/2025/04/28
Jean/2025/04/28 -
Can't Format SD Card to FAT32? Here Is Why and How to Fix This Issue
![author icon]() Tracy King/2025/04/28
Tracy King/2025/04/28
Hot Topics
EaseUS Partition Master

Manage partitions and optimize disks efficiently


