


Start Your Free Trial!
Sign up to our newsletter, stay updated on news and exclusive offers from EaseUS. Don't worry, if you change your mind, you can unsubscribe at any time, free of charge. We value your privacy (Privacy Policy).
EaseUS Partition Master
Initialization is required before using a brand-new disk. But do you know how to initialize SSD in Windows 11? Check this page for a detailed tutorial on SSD initialization.

Content
Page Table of Contents
Why Do You Need to Initialize SSDHOT
Which Partition Style Should I Choose - MBR or GPTHOT
How to Initialize SSD Windows 11 - 4 MethodsHOT
ConclusionHOT
How to Initialize SSD Windows 11 FAQsHOT
About the Author
Hot Topics

What's the first thing you should do when you get a brand-new SSD? How do I get Windows 11 to recognize my new SSD? The answer is simple. You should initialize the SSD first to ensure its partition style and file system are compatible with your operating system.
So, how do I initialize SSD in Windows 11? Check this article from EaseUS, and you'll find the answer.
When preparing a new SSD for your device, initializing it before using it is crucial because this will allow Windows 11 to recognize and get control of the disk. So that you can read and write data from it.
For more specific reasons why you need to initialize an SSD:
When initializing an SSD, you have two partition style options: MBR (Master Boot Record) or GPT (GUID Partition Table). Here are the key factors for you to consider which one to use:
|
Feature |
MBR (Master Boot Record) |
GPT (GUID Partition Table) |
|
Maximum Disk Size |
2 TB |
9.4 ZB (approximately 9.4 billion TB) |
|
Maximum Partitions |
4 primary partitions or 3 primary + 1 extended (up to 26 total) |
Up to 128 partitions |
|
Firmware Interface Support |
Legacy BIOS |
UEFI (Unified Extensible Firmware Interface) |
|
Data Integrity |
No backup of partition table |
Includes backup partition table for redundancy |
|
Operating System Support |
Windows 7 and older systems like Windows 95/98, Windows XP 32-bit, Windows 2000, Windows 2003 32-bit |
Later systems like Windows 11, Windows 10 64-bit, Windows 8/8.1 64-bit |
GPT is recommended for most modern systems and SSDs due to its compatibility, support for larger capacities, and more partitions. However, MBR may still be a viable option if you have an older system or specific compatibility requirements.
Now, share this article with your friends and family, and then move to the next section for the Windows 11 SSD initialization tutorial.
In this section, we'll introduce 4 practical methods to assist you in initializing the SSD in Windows 11.
The most common way to initialize an SSD is using one of the Windows built-in utilities, Disk Management.
Step 1. Right-click on the Start menu icon and select "Disk Management" to open it.
Step 2. In the Disk Management window, you will see the new SSD labeled as "Not Initialized" and show unallocated space.
Step 3. Right-click on the SSD and select "Initialize Disk."

Step 4. In the new box, select either "GPT" or "MBR" as the partition style.

Step 5. Click "OK" to proceed.
Step 6. After that, you can right-click on the unallocated space of the initialized SSD and select "New Simple Volume."
Step 7. Follow the New Simple Volume Wizard to set the partition size, assign a drive letter, and choose a file system (usually NTFS).
Step 8. Click "Finish" to complete the process.
🚩You May Also Like: Solved: SSD Not Showing Up in Disk Management on Windows 10/11/8/7
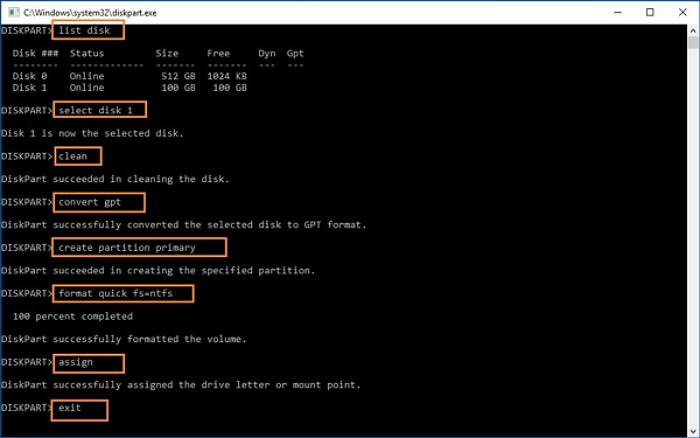
Command Prompt also offers the ability to manage your disks, including initializing and formatting an SSD. However, you should be careful with every command line since incorrect ones might lead to system errors.
Step 1. In the Taskbar search box, enter CMD and run it as administrator.
Step 2. Type in the following command lines and hit "Enter" after inputting each:
diskpart
list disk
select disk X (Replace "X" with the SSD's number)
clean
convert gpt
create partition primary
format quick fs=ntfs
assign
exit
Similar to CMD, PowerShell also requires commands to execute tasks like initializing your SSD. You should also be cautious with the command lines for data safety.
Step 1. Right-click on the Windows Start menu icon and open "Windows PowerShell (Admin)."
Step 2. Type in get-disk and hit "Enter." This command will display all disks connected to your system. Look for the disk that is marked as "RAW" or "Not Initialized" to identify your new SSD.
Step 3. Note the disk number of your SSD and type in initialize-disk X (Replace "X" with the correct number).
Step 4. By default, the command initializes your disk as GPT. If you want to specify MBR instead, type in initialize-disk X -PartitionStyle MBR
Step 5. After initialization, you need to create a partition. Type in: New-Partition -DiskNumber X -UseMaximumSize -AssignDriveLetter
Step 6. Finally, format the new partition with NTFS using this command: Format-Volume -DriveLetter N -FileSystem NTFS (Replace "N" with the newly assigned drive letter of that partition.)
If you somehow are unable to initialize the SSD using the methods above, a professional disk manager like EaseUS Partition Master Free will be needed. This tool can detect all disks connected to your PC and allow you to perform operations such as initialization, formatting, resizing disks, erasing disks, etc.
Now, let's see how to initialize your SSD through this powerful tool.
Step 1. Open EaseUS Partition Master and got to Partition Manager.
Step 2. Right-click the target disk - HDD or SSD and select "Initialize to MBR" or "Initialize to GPT". Click "Execute Task" and "Apply" to save the changes.
0:00-0:18 Initialize to MBR; 0:19-0:44 Initialize to GPT;
If you mistakenly initialize the SSD with an incompatible partition style, this tool can also help you convert GPT to MBR without data loss.
As you can see, EaseUS Partition Master is very user-friendly for novice users. In the face of being unable to initialize a disk, it can become your savior.
If you think this page is helpful to you, don't forget to share it on social media to benefit more beginners.
This article offers 4 methods to guide you to initialize an SSD in Windows 11. Among all the tools, EaseUS Partition Master stands out for its clear interface and simple steps. The SSD initialization can be much easier with its help, even for Windows 11 beginners.
Below are some common issues that a user may encounter when installing a new SSD.
See also:
1. How do I create an SSD drive in Windows 11?
To create an SSD drive in Windows 11, open Disk Management, right-click on the SSD's unallocated space, select "New Simple Volume," and follow the prompts to format and assign a drive letter.
2. Should I initialize my SSD as MBR or GPT?
You should initialize your SSD as GPT for modern systems, such as those running Windows 11 or using UEFI firmware, while MBR may be appropriate for older systems like Windows 7 or legacy BIOS setups.
3. Is GPT or MBR better for Windows 11?
For Windows 11, GPT is generally better than MBR because it is designed for modern UEFI systems, supports larger drives over 2TB, and allows for more partitions.
How Can We Help You
Oliver is an EaseUS professional writer who dares explore new areas. With a passion for solving tech issues with straightforward guides for common users, Oliver keeps honing his writing craft by developing in-depth solutions for disk and partition management, computer boot-up issues, file transfer, etc.
It won't hot image your drives or align them, but since it's coupled with a partition manager, it allows you do perform many tasks at once, instead of just cloning drives. You can move partitions around, resize them, defragment, and more, along with the other tools you'd expect from a cloning tool.
Read MoreI love that the changes you make with EaseUS Partition Master Free aren't immediately applied to the disks. It makes it way easier to play out what will happen after you've made all the changes. I also think the overall look and feel of EaseUS Partition Master Free makes whatever you're doing with your computer's partitions easy.
Read MorePartition Master Free can Resize, Move, Merge, Migrate, and Copy disks or partitions; convert to local, change label, defragment, check and explore partition; and much more. A premium upgrade adds free tech support and the ability to resize dynamic volumes.
Read MoreIt won't hot image your drives or align them, but since it's coupled with a partition manager, it allows you do perform many tasks at once, instead of just cloning drives. You can move partitions around, resize them, defragment, and more, along with the other tools you'd expect from a cloning tool.
Read MoreI love that the changes you make with EaseUS Partition Master Free aren't immediately applied to the disks. It makes it way easier to play out what will happen after you've made all the changes. I also think the overall look and feel of EaseUS Partition Master Free makes whatever you're doing with your computer's partitions easy.
Read MoreRelated Articles
How to Hide System Reserved Partition in Windows 11/10/8/7 [Step-by-Step Guide]
![]() Sherly/2025/04/28
Sherly/2025/04/28
How to Format PS3 USB? Top 3 Best PS3 FAT32 Format Tool Free Download
![]() Jean/2025/04/28
Jean/2025/04/28
Download Corrupted Memory SD Card Format Software [SD Card Formatter Online]
![]() Jean/2025/04/28
Jean/2025/04/28
How to Install Windows 11/10 on GPT Partition in 2025
![]() Tracy King/2025/04/28
Tracy King/2025/04/28
EaseUS Partition Master

Manage partitions and optimize disks efficiently
Your best companion for disk partitioning, MBR to GPT/GPT to MBR conversion,even OS migration
Copyright © 2004 - 2025 EaseUS. All rights reserved.
CHOOSE YOUR REGION
Start Your Free Trial!
Sign up to our newsletter, stay updated on news and exclusive offers from EaseUS. Don't worry, if you change your mind, you can unsubscribe at any time, free of charge. We value your privacy (Privacy Policy).
Start Your Free Trial!
Sign up to our newsletter, stay updated on news and exclusive offers from EaseUS. Don't worry, if you change your mind, you can unsubscribe at any time, free of charge. We value your privacy (Privacy Policy).