Page Table of Contents
Reviews and Awards
In today's highly interconnected world, sharing files has become a necessity. Whether you need to share files for work purposes or personal reasons, effortless file transferring can reduce half of your stress. Let's explore some seamless and easy methods that would assist you in sharing files between computers in Windows 7, a broadly used operating system and highly known for its user-friendly interface, versatility, and convenience in file sharing.
How to Share Files Between Computers in Windows 7 - 7 Ways
Whether you are a regular Windows user or just a beginner, EaseUS will assist you step by step until your files are transferred without any data loss or other expected malfunctions in this detailed guide. By following the lower-mentioned methods, you can share files between computers with Windows 7 without any problem.
So, keep reading to discover the most safe and easy solutions for file sharing in Windows 7 computers:
| 🧰Workable Method | 👨🔧Difficulty Level | ⏰Duration | 🚁Effectiveness |
|---|---|---|---|
| Easiest | 6 Minutes | Highest | |
| Easy | 8 Minutes | Moderate | |
| Moderate | 10 Minutes | High | |
| Easy | 15 Minutes | Moderate | |
| Easy | 20 Minutes | High | |
| Moderate | 20 Minutes | High | |
| Moderate | 15 Minutes | Moderate |
Also, don't forget to share this guide online to help more Windows 7 owners master and move their files to new computers with ease:
Way1. Using EaseUS Todo PCTrans to Share Files
EaseUS Todo PCTrans is a superb tool. It assists you and helps you in the file-sharing process between computers in Windows 7, Windows 8, and even newer systems. Its versatility makes it a product of choice, as it can work in a unified manner to solve multiple problems.
You do not have to install multiple software for each task. You can share files, applications, and accounts using this one tool.
Step-by-step Guide to Share files using EaseUS Todo PCTrans:
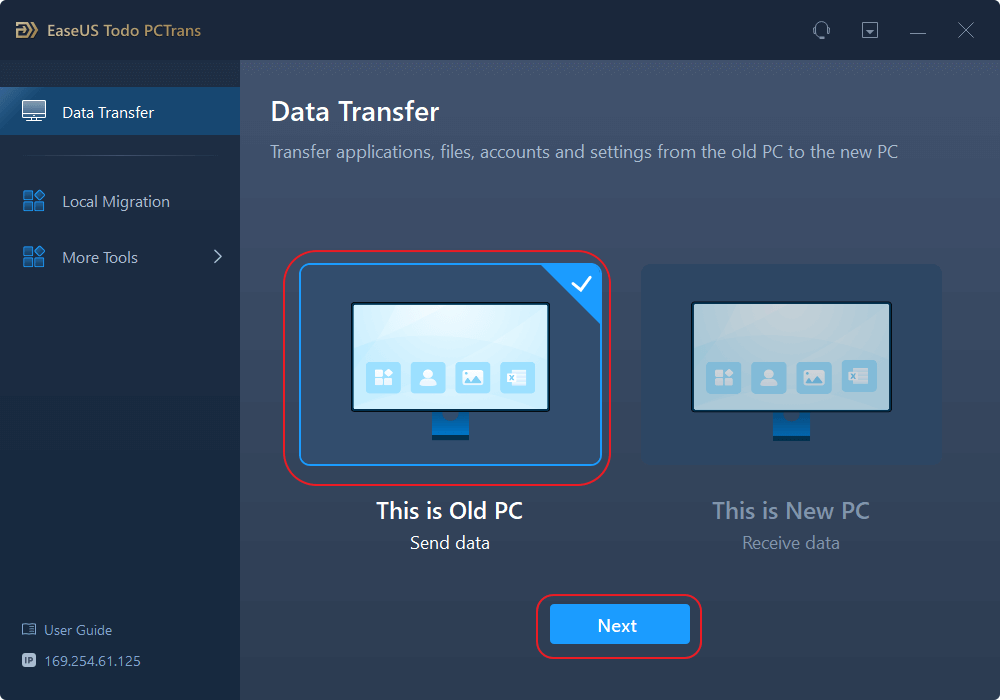
Step 1. Set Up the Old PC
- First, install and launch EaseUS Todo PCTrans and select Data Transfer on the left panel of the main interface.

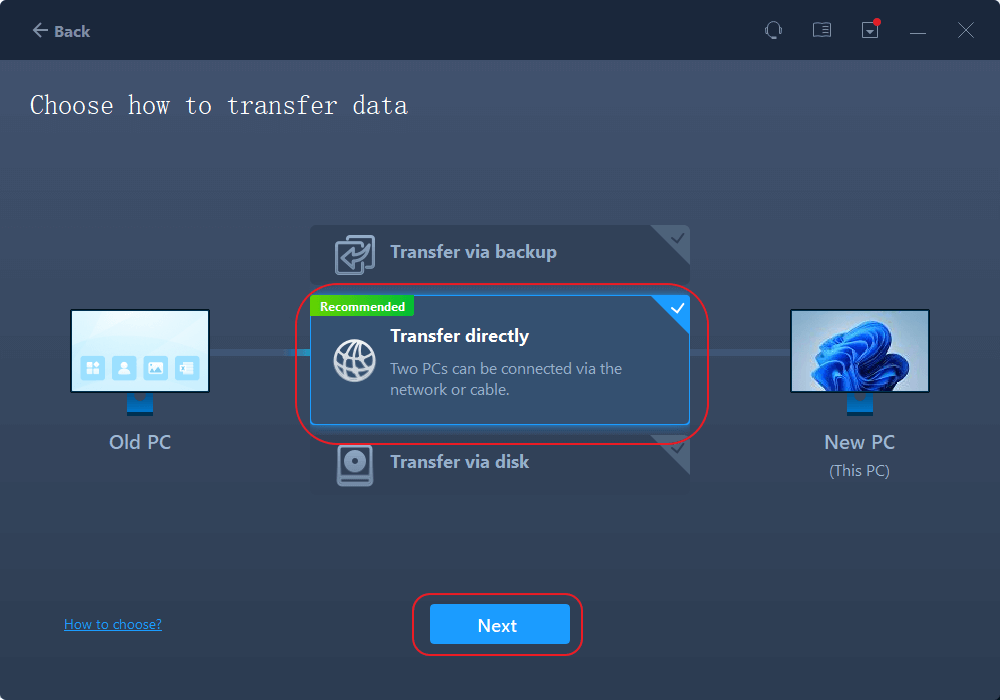
- Select "Transfer Directly" and click "Next" to continue.

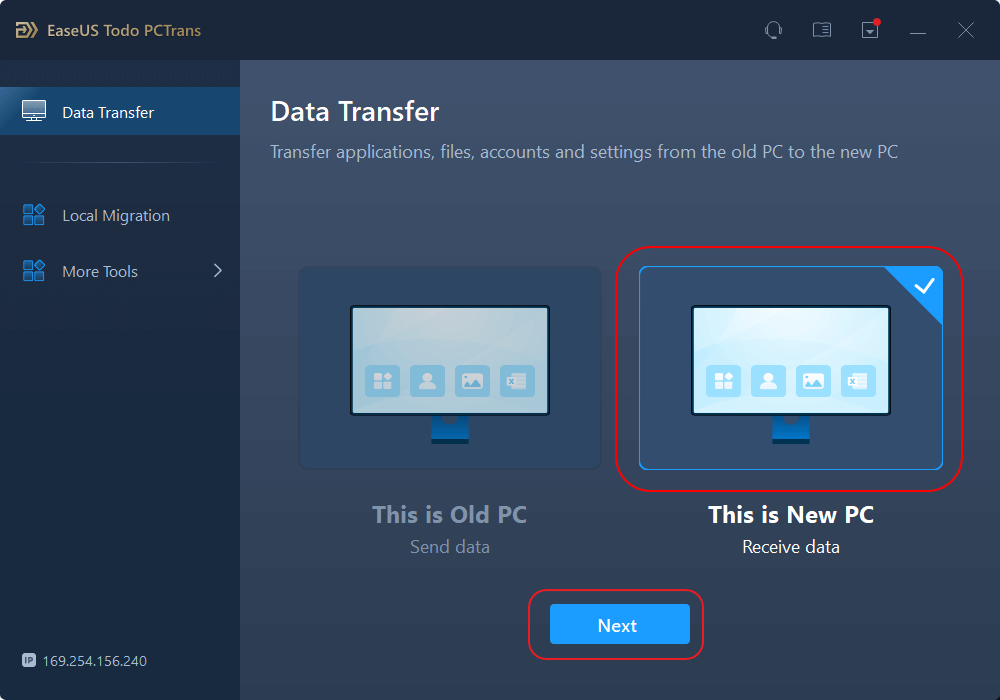
Step 2. Set Up the New PC
- Download and launch EaseUS Todo PCTrans on the new computer; select "This is New PC" and click "Next".

- Select "Transfer directly" and click "Next" to continue.
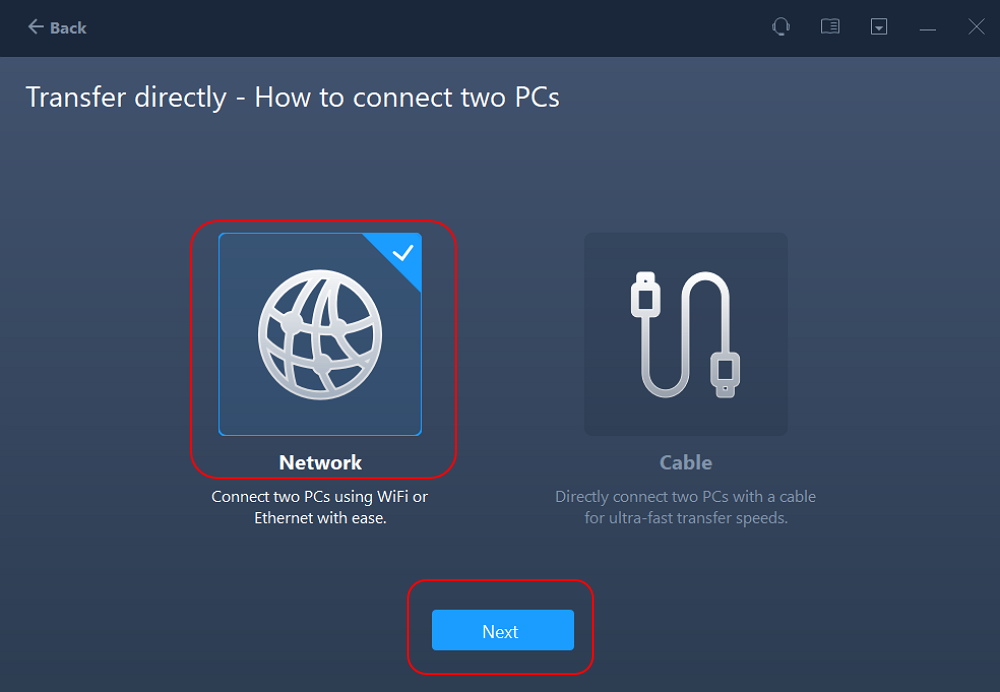
- Select "Network" and click Next to continue. This will automatically scan the old PC. (Make sure the two PCs are connected to the same LAN.)

- Select the target PC and click Connect. Then, it will take some time to scan and analyze the data in old PC.

Step 3. Select the Files to Transfer
- Finally, on the new PC, select the Files tab, select the files you need to transfer. Then, click "Transfer" to start.

After following the steps above, you can easily share your files between computers with Windows 7 without any fear of data breach or loss.
🔥Hot Reading: How to Send Files Over 20 GB For Free
Way 2. Transfer Files with Nearby Sharing
If you need to transfer the files with nearby sharing, remember that the processing time would depend on the size and the device's capability.
Step 1. Make sure to keep the Bluetooth and Wi-Fi running on both devices simultaneously for a seamless file-sharing process.
Step 2. Now you have to right-click the file you want to share, select Share and choose Nearby sharing from the available options.
Step 3. Accept the file by clicking the accept file transfer notification. The notification will be received after the transfer is done.

Way 3. Move Files Between PCs via the Shared Folder
Follow the below-mentioned steps for easy file sharing via a shared folder:
Step 1. Ensure that both computers are connected via the same local area network (LAN) through Ethernet cables or a Wi-Fi network.
Step 2. Create a shared folder on the PC with the files. Right-click the folder, go to "Properties," and enable sharing.
Step 3. The network path of the shared folder: PC_Name\Shared_Folder_Name.
Step 4. On the receiving PC, open File Explorer, enter the network path, and copy/paste files between the shared folder and your PC.

Way 4. Try to use E-mail
E-mail file transfer is one of the easiest ways to share files seamlessly. By using the following steps, you can share files instantly via e-mail:
Step 1. Launch your preferred e-mail program or service on your Windows 7 computer.
Step 2. By clicking the "Compose" button, generate a new e-mail.
Step 3. Attach the files that need to be shared.
Step 4. Attach the files that need to be shared using the "Attach Files" button, and send the e-mail once the files are attached
Step 5. Enter the recipient's e-mail; add a subject and message in the respective fields to ensure your e-mail gets noticed in the junk. Now send the e-mail.
The recipient will receive the files in the e-mail inbox, where you can download them.

Way 5. Share Files Between Computers in Windows 7 through Cloud
Cloud sharing is a very well-known method, and it is very secure and easy. To share files using the Cloud, follow these steps:
Step 1. Download and install the cloud storage application, or use Google Drive or Dropbox.
Step 2. On your PC, open the Cloud. Select all the files you need to share with the second device. Now upload them on the Cloud. This would sync the files with the Cloud.
Step 3. Login to your cloud storage on the other device to share the data. You can download the sent files via the Cloud and access the shared data.

Want to share this helpful article with other users that in the same need on social media platforms:
Way 6. Moving data by External Hard Drive
To share files via an external hard drive, correctly connect the external hard drive to your computer with Windows 7. After making sure the drive is connected correctly, follow the below-mentioned steps:
Step 1. By right-clicking the file that needs to be shared, select it. Now go to the "Properties," open the "Sharing Tab," and select "Advanced settings" from there.
Step 2. Select the "Share This Folder Option." Finally, grant it sharing access permission, and once done, press "OK."
Step 3. Now that you have successfully shared the file on the external hard drive, the users with the same network access it by typing \[your_computer_name][share_name] in the File Explorer address bar.

Way 7. Connect Two PCs with USB Cable
To share files between computers using a USB cable, connect both computers by plugging the USB cable into their respective USB ports. Make sure they are connected appropriately. Now start following the below-given steps:
Step 1. Go to the Control Panel on the first computer and select "Network and Sharing Center." Now from the sidebar, choose "Advanced Settings" from the available options.
Step 2. Now enable the option for "Turn on file and printer sharing." Make sure to save the changes before exiting the Control Panel.
Step 3. Use the File Explorer on the second PC to find the shared files to transfer files. Copy the files from computer one and paste them onto the second computer. It's recommended to wait until the process is done to prevent data loss.

Are you looking for further information about sharing files between computers in Windows 7? Click the links below to find what you need:
Why Need to Share Files Between Computers in Windows 7
Why do we need to share files between computers in Windows 7? Multiple reasons could require file sharing, and we have rounded up some vital ones as follows:
- Back up and archive valuable data: It can be done when you need to archive, share, or back up essential data.
- Migrate OS between PCs: Moreover, it can also be used if your PC runs out of storage space and the computer runs slow, so you can shift your data from one Pc to another in order to make enough space.
- Share large files: Lastly, sharing large files becomes convenient through network sharing, enabling users to share documents, multimedia files, or any other sizable data effortlessly.
Overall, file sharing in Windows 7 enhances productivity, data management, and collaboration among multiple computers.
Conclusion
In conclusion, sharing files between computers in Windows 7 is crucial for efficient data management and collaboration in various scenarios. Whether backing up valuable data, migrating OS to SSD, or sharing large files, Windows 7 provides user-friendly methods to facilitate seamless file transfer.
Individuals can effortlessly transfer files while safeguarding data integrity using helpful tools such as EaseUS Todo PCTrans. The capability to share files between computers boosts productivity and streamlines data backup, and facilitates seamless collaboration, making it a vital proficiency in our interconnected society. Download EaseUS Todo PCTrans and give it a try today!
FAQs About Share Files Between Computers in Windows 7
If you have further questions about how to share files between computers in Windows 7, have a look at the questions and answers shared below:
1. How do I transfer files from PC to PC using nearby Share?
To transfer files from one PC to another, both PCs must activate Nearby Share and be close to sharing files. Follow the steps given below:
Step 1. Select the file to transfer, click Share, and then choose a nearby PC.
Step 2. Nearby Share is available in the settings menu. Once enabled, pick the file to move and select the PC you want your files to transfer and share them.
2. Can we directly connect two computers to transfer files?
You can transfer files directly across two different PCs. Use ethernet cables to connect two PCs directly. Connect each computer's Ethernet port to the Ethernet wire. Open the Control Panel on Windows, scroll to the Network and Sharing Center, and select "Set up a new connection or network." Choose "Peer-to-Peer connection" or "Ad-hoc network" and follow the instructions to connect. Drag-and-drop files between machines after connecting.
3. How do I find my Network on Windows 7?
Follow these steps to find your Windows 7 network:
Step 1. Click the system tray's network icon in the lower-right corner. It should list networks.
Step 2. If your network is not displayed, check your Wi-Fi and range. Check the Ethernet cord if you're wired. Examine your network adapter or contact your administrator if your network does not show.
About the Author
Roxanne is one of the main contributors to EaseUS and has created over 200 posts that help users solve multiple issues and failures on digital devices like PCs, Mobile phones, tablets, and Macs. She loves to share ideas with people of the same interests.
Cici is the junior editor of the writing team of EaseUS. She accepted the systematic training on computers at EaseUS for over one year. Now, she wrote a lot of professional articles to help people resolve the issues of hard drive corruption, computer boot errors, and disk partition problems.
Reviews and Awards
-
EaseUS Todo PCTrans Free is a useful and and reliable software solution created to serve in computer migration operations, be it from one machine to another or from an earlier version of your OS to a newer one.
Read More -
EaseUS Todo PCTrans is by the folks at EaseUS who make incredible tools that let you manage your backups and recover your dead hard disks. While it is not an official tool, EaseUS has a reputation for being very good with their software and code.
Read More
-
It offers the ability to move your entire user account from your old computer, meaning everything is quickly migrated. You still get to keep your Windows installation (and the relevant drivers for your new PC), but you also get all your apps, settings, preferences, images, documents and other important data.
Read More
Related Articles
-
How to Move Downloads Folder to Another Drive on Windows 10/11
![author icon]() Cedric/2025/01/23
Cedric/2025/01/23 -
How to Move Game to M.2 SSD without Reinstalling
![author icon]() Sherly/2025/01/23
Sherly/2025/01/23 -
How to Move Adobe from C Drive to D Drive? [Workable Solution]
![author icon]() Cici/2025/04/01
Cici/2025/04/01 -
Best Cloud Transfer App: cloudHQ, CloudFuze, Cloudsfer, Odrive
![author icon]() Tracy King/2025/03/27
Tracy King/2025/03/27